AWS Compute Blog
Building a GPU workstation for visual effects with Amazon EC2: Part 4 – Optimizations
For many years, Amazon Web Services (AWS) has been guiding customers in deploying powerful workstations backed by NVIDIA graphics processing units (GPUs) for graphics-intensive workloads. With the recent expansion of our G-series Amazon Elastic Compute Cloud (Amazon EC2) graphics-based instances, we’re excited to introduce new instance families that deliver enhanced performance and capabilities. We’re also refreshing our comprehensive guidance on choosing and configuring these powerful virtual workstations.
This is the fourth post in a five-part series, exploring optimizations to support the ready deployment of visual effects (VFX) workstations, using Amazon DCV as a performant desktop display protocol. The screen capture that follows shows one such workstation running a live visual-effects workload.
“First there were rocks… Humanity made wheels. Those wheels ground flour and we made progress to sliced bread. Amazon DCV is the best thing since sliced bread.”
— Chris Coupe, CG Supervisor, Outpost VFX
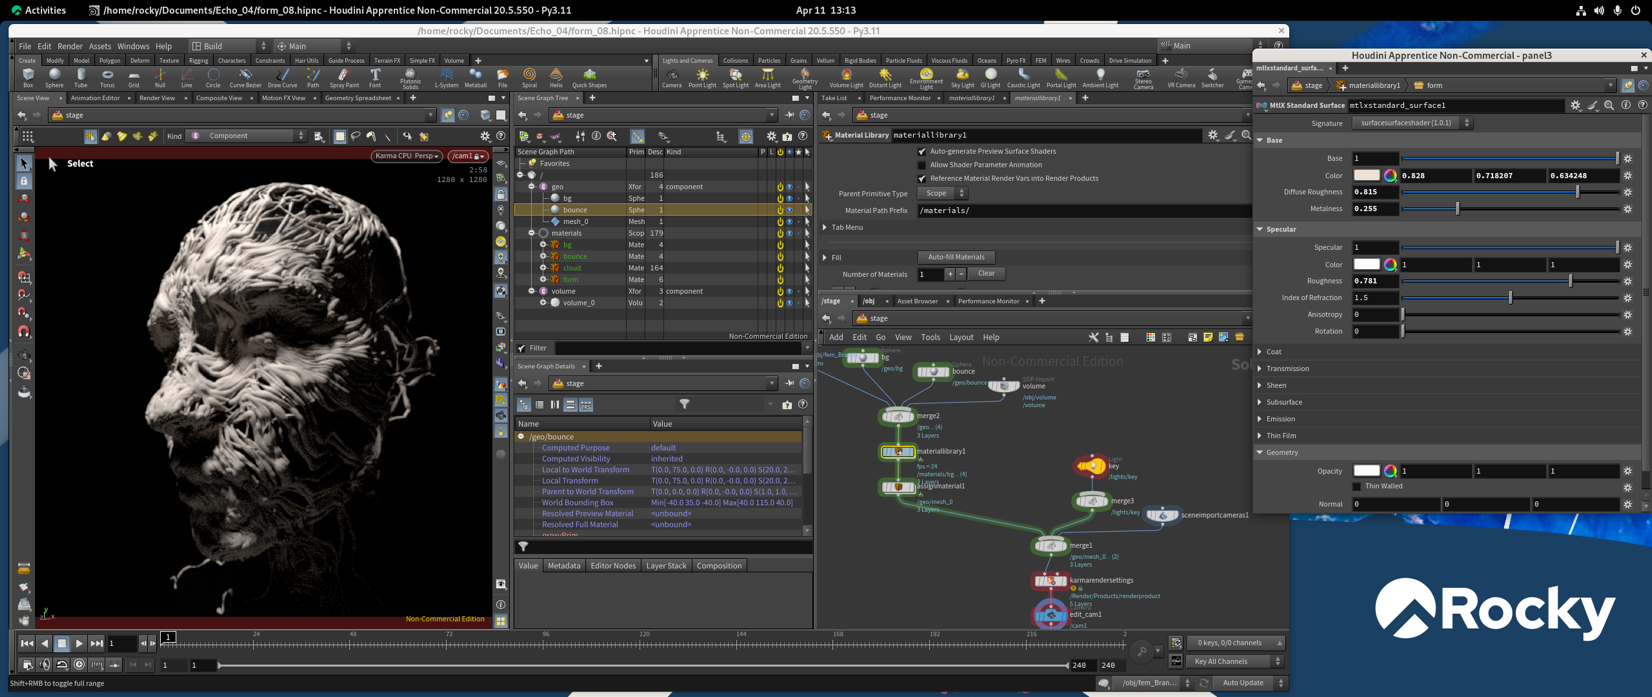
Figure 1: A screen capture of a Rocky Linux-based workstation
This post focuses on several key aspects:
- The consolidation and standardization of VFX workstation instance configurations, to allow simpler launching mechanisms, also facilitating deployments at larger scale (for example, a team of people).
- Optimizations to improve performance beyond out-of-the-box setups, with emphasis on GPU acceleration.
- Analysis and discussion of security considerations when implementing a VFX workstation on AWS.
Prerequisites
This post assumes that you have deployed a Linux or Windows EC2 instance, for the purposes of creating a GPU workstation.
If you want to understand more about GPU-accelerated Amazon EC2 G graphics instances, go to Part 1 in this series: Build a GPU workstation for visual effects on Amazon EC2: Part 1 – Setup.
For deployment instructions for creating a Rocky Linux graphics workstation, go to Part 2 in this series: Building a GPU workstation for visual effects on Amazon EC2: Part 2 – Linux.
Finally, for deployment instructions for creating a Windows Server 2025 graphics workstation, go to Part 3 in this series: Building a GPU workstation for visual effects with Amazon EC2: Part 3 – Windows.
Amazon Machine Images and launch templates
You have used existing base Amazon Machine Images (AMIs) as a source for your OS and software, customizing them to your needs. The next step is to produce your own AMIs from these customizations so that you can quickly launch one or more instances from this state in the future. Furthermore, you want to avoid replicating the work that you have just done, while also maintaining a standard environment across the teams that use these instances.
Moreover, when you initiated the workstation instances, you also stipulated the networking, security, permissions, and instance type that define the complete instance alongside the AMI. You can wrap all of this information into an Amazon EC2 launch template to standardize the whole instance, so you can launch it without issues.
Note the current size of the Amazon Elastic Block Store (Amazon EBS) volume that you are using for your OS and applications on your workstation. When you create an AMI you stipulate the size of the volume to associate with it. Keeping the storage size of the AMI efficient makes sure that your (relatively small) storage costs are optimized and any movement and startup using that AMI are as quick as possible.
On Windows, review the size of the C: drive in Windows Explorer by looking at the drive properties, and in a shell in Linux you can use df -h to review filesystem disk space usage.
Preparing a Linux AMI
To prepare Linux, first stop the instance, if it is running:
- In the Amazon EC2 console, choose Amazon EC2 Dashboard in the top left.
- Choose Instances (running).
- Choose the
my_linux_workstationinstance in the top pane. - Open the context menu for the instance, and choose Stop instance.
- Wait for the Instance state to move from Running to Stopped.
Preparing a Windows AMI
Windows Server 2025 uses the agent EC2Launchv2 on bootup to perform system tasks. You must configure the agent before shutting down the instance, prior to making an AMI, through the Amazon EC2LaunchSettings application. The following screen capture shows the EC2Launch Settings application, where you set the boot-time behavior of the agent. In this example, the General tab is open. This tab controls launch-time options for the instance, such as setting the instance name and configuring the administrator username and password.
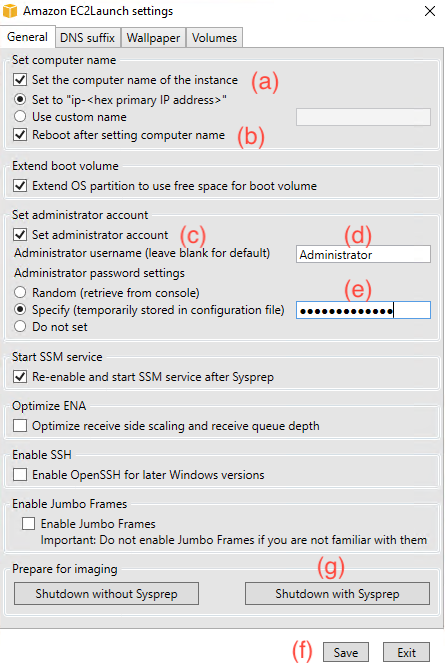
Figure 2: A screen capture of the Amazon EC2Launch Settings application, used to configure the EC2Launch agent on bootup
On your Windows instance, open the Amazon EC2Launch settings application.
This application controls which tasks the agent performs on boot. Pertinent options to enable are as follows:
Host name:
- Turn on “Set the compute name of the instance”, and set it to
ip-<hex primary IP address>. - Turn on “Reboot after setting Computer Name”.
This makes sure that the compute host name is unique upon booting for future considerations toward Active Directory, render farms, and so on.
Password
- Turn on Set the administrator account.
- Set the Administrator username (for example, Administrator).
- Specify the Administrator password.
This can be the same as what you previously set before, or you can change it.
Wallpaper (on the third tab)
You can specify the custom Windows wallpaper and stat burn-in of various instance parameters.
- When you have made your changes, choose Save at the bottom of the screen to save your configuration changes.
You have two choices to shut down based on Sysprep.
Shut down without Sysprep
This option is useful if you have embedded information on the image that you want to retain (for example, local users for processes) that would otherwise be removed by Sysprep.
Shut down with Sysprep
For removing PC-specific information for future AMI consideration:
- Shut down with Sysprep on this occasion. The machine automatically shuts down.
Wait for the Instance state to move from Running to Stopped.
You can find more information about Amazon EC2 Launch in the Amazon EC2 User Guide.
Creating the AMI
When your instances are in the Stopped state, you can proceed with making your AMI.
- In the Amazon EC2 console, choose Instances in the top left.
- Choose your workstation instance by selecting the checkbox next to its name.
- Choose Actions from the top right of the pane, and choose Image and templates, Create image.
In the Create image page, specify the options for your AMI:
- Give your AMI an Image name. You might want to consider versions in the AMI name.
- For example,
VFX_Workstation_Linux_v001.
- For example,
- Give your AMI a relevant Image description.
- For example,
base build, with GPU, WACOM, CLI.
- For example,
- The Size of your storage can be specified. As mentioned previously, consider reducing this down to something that is more aligned with your actual usage, such as usage + 20 percent.
- Consider adding a new tag to give your AMI a discernible name.
- For example, add a Name tag key, and paste the Image name as the value.
- Choose Create image to make the AMI. This can take several minutes to complete.
Amazon EC2 AMIs can be shared across accounts and Regions, which lets teams standardize workstation configurations and deploy them quickly. Because a VFX workstation AMI often bakes in licensed digital content creation (DCC) tools, render plugins, studio tooling, and credentials, treat it as a controlled asset rather than something to share broadly.
Share each AMI only with the specific accounts that need it and prefer sharing with named AWS account IDs over making an AMI public. Before you share, confirm the image contains no embedded secrets such as application API keys, license tokens, or SSH keys baked in during the build. Audit your sharing configuration periodically so access does not outlive its purpose and revoke it when a team or project no longer needs the image.
Creating a launch template
When you launched the EC2 instance, as well as the AMI to use, you also stipulated other options that were important to define how the machine launched, such as the network, security groups, and roles. Rather than do this each time that you want to start an instance, you can combine all this information, and more, into an Amazon EC2 launch template. You can then quickly launch machines in the future, or combine them with other brokering and scaling mechanisms to control larger usage of the machines. This is useful for studios with multiple artists, or render farms with multiple machines, all using standardized environments.
You can build a launch template through the Amazon EC2 console:
- In the Amazon EC2 console, choose Launch Templates under the Instances section on the left.
- Choose Create launch template on the right side of the pane.
- Provide a Launch template name and description in the relevant boxes.
Launch templates are versioned, so there is no need to add a version number to its name.
- For the AMI, choose My AMIs and choose the relevant AMI that you made in the previous steps.
- Under Instance type choose g6.4xlarge. This is the default size for your template (but this and all values can be overridden at launch time if you wish).
- Provide your
ec2_test_keypairin the Key pair (login). - Edit the Network settings to adjust security and network placement:
- Leave the Subnet to Don’t include in launch template.
- Under the Firewall (security groups) section of the Network Settings, choose Select existing security group, and choose the “ec2_test_sg” that you made earlier to set up the firewall for the machine.
- In Resource tags, add a Name key tag, with a value of
my_workstationor another suitable name. - Under Advanced details, specify the
basic_workstation_rolethat you made previously through the IAM instance profile list, to allow your workstation to access more services.
There are many other options that you can explore in launch templates. A useful feature is found at the bottom of the Advanced details: the User data. With user data, you can enter Windows PowerShell or Linux shell commands to run on boot, adding configurations or modifications on top of the AMI. This circumvents the need to publish new AMIs for certain kinds of change. An example of this can be found in the following GPU performance optimization section, but for now you can finish making the launch template.
- Choose Create launch template.
When you return to the Launch templates dashboard, your newly created template appears in the list. Select the template, then choose Launch instance from template from the Actions menu to open a dialog for launching a new instance from it. The dialog shows the template’s values and lets you adjust any setting before launch. You can also modify a template to create new versions and set a default version. This way, you can keep multiple versions for comparison while clearly marking which one to use by default. The following screen capture shows the dialog, where you confirm the source template and version and optionally override its settings before launching.
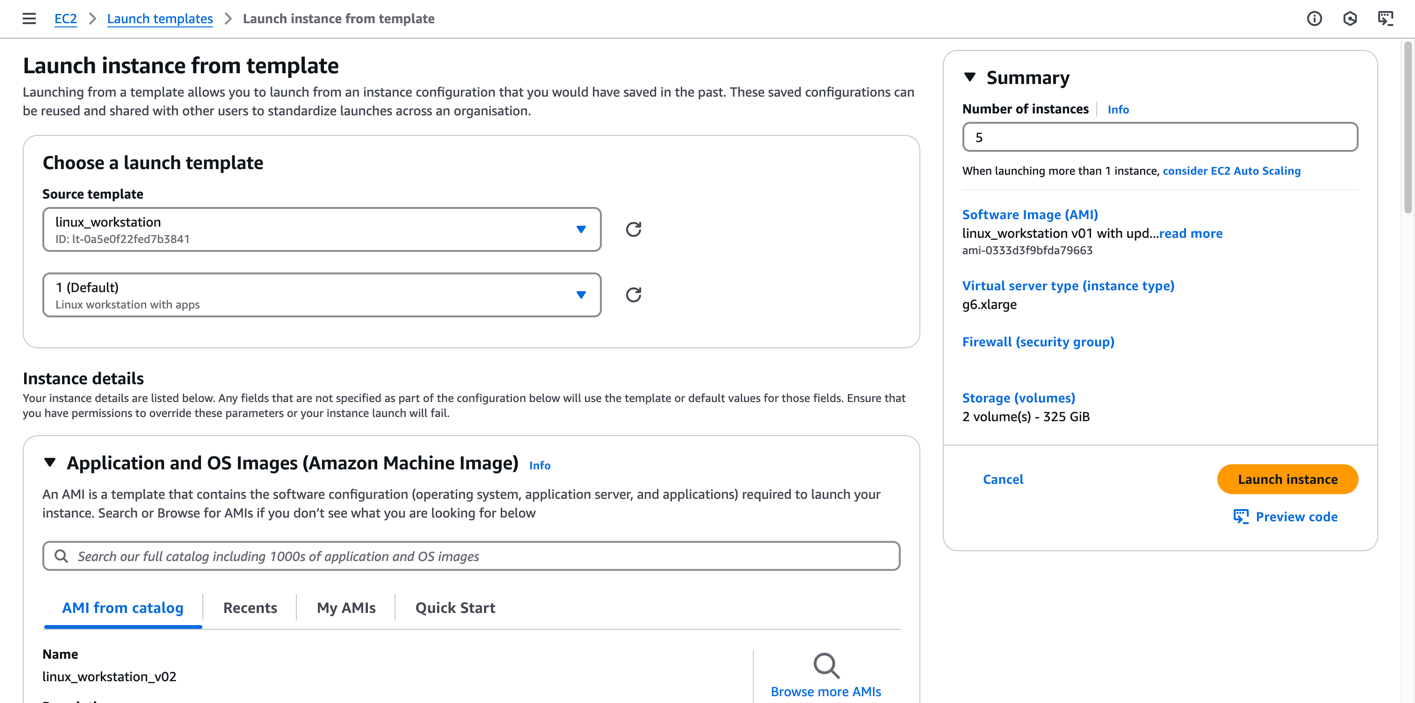
Figure 3: The Amazon EC2 launch template UI can be used to quickly start an instance, with options to override existing parameters
Launch templates can be used in other services to streamline and control instance starting mechanisms at scale, such as Amazon EC2 Auto Scaling groups, as well as third-party services listed in the Further reading section.
This post demonstrates how to build an AMI in manual steps. There are alternate services to create an AMI that can cater to larger scaling mechanisms to support productions. For example, Amazon EC2 Image Builder allows you to define recipes and schedules for automating the creation of AMIs.
GPU performance optimization
There’s dedicated AWS documentation in the Amazon EC2 User Guide regarding GPU optimizations. This includes initializing the persistent driver kernel on Linux, to keep GPU states initialized regardless of client connections:
It also includes documenting how to turn off GPU autoboost, for slightly more efficient GPU usage. This option should be considered and evaluated on a per-application basis to ascertain positive or negative impact on performance. Go to the preceding documentation for more information.
Outside of the official documentation on AWS, for VFX-specific workloads a further optimization can be made regarding NVIDIA Error Correction Code (ECC). Amazon EC2 G instance family types use NVIDIA data center cards, designed for high performance computing. These differ from the consumer-style cards typically found in individual workstations in offices. On data center cards, ECC is provisioned and enabled as a method to introspectively look for potential pixel errors because of bit flipping through phenomena such as cosmic ray interaction, and fix any errors found.
You should consider deactivating this feature to reduce the overhead of memory checking on the GPU, to gain performance. ECC isn’t typically available on consumer GPU cards, so many customers’ workloads haven’t relied on this error-correction feature in the first place. If debugging requires it, the feature can be quickly re-enabled.
ECC is activated on every fresh start of an EC2 instance, and disabling necessitates a reboot. You can automate turning it off with a traditional startup script, or with the previously mentioned User data script as part of the launch template.
For a Windows instance, you can add the User data script by inserting it between leading and trailing powershell elements to define a PowerShell script, with the persist element added so the script runs again on each reboot cycle, and not only on the first boot.
For a Linux instance, you can enter a shell script:
User data is a mechanism to make changes to EC2 instances, without reverting to changing the underlying AMI. However, you should avoid hardcoding and storing sensitive data in it, that might pose a visible compliance or security risk. AWS Secrets Manager can be used to obfuscate sensitive data, as it stores and manages the lifecycle of secrets, and provides robust mechanisms to pass that data programmatically into process within a user data context.
Cleaning up
Remember to turn off your instances when not in use. You can turn them off either through the AWS Management Console, or through other programmatic methods such as the AWS Command Line Interface (AWS CLI). You incur costs associated with a running machine, so deactivating machines when not in use reduces your expenditure.
There are two different options for deactivating an EC2 instance: stopping and terminating.
Stopping
When you stop an instance, its Amazon EBS volumes remain attached and their data is retained, so your work on the EBS volume persists while the instance is deactivated. Data held in memory (RAM) is not preserved, and neither is any data on the instance store (NVMe) volumes (that data is lost when the instance stops).
You perform this operation by choosing the instance from the Amazon EC2 console, and under the Instance state options you can elect to Stop instance. The instance remains in your console, with a “Stopped” state, but the persistent volumes enable you to restart the instance and resume your session when you want, retaining any changes that you made to the main volume. You can restart an instance by using the Start instance operation under the Instance state options.
When an instance is “Stopped”, you don’t pay for the instance itself but incur a smaller charge for the storage of the volume.
Terminating
This operation deactivates the instance and does not retain any information locally stored. You can’t restart a terminated instance.
To terminate an instance, choose Terminate instance from the Instance state options on the Amazon EC2 console. The instance shuts down and reports a “Terminated” state on the console, and automatically disappears after a short time.
For more information about Amazon EC2 lifecycles, options, and billing, go to the Amazon EC2 User Guide.
Conclusion
This post has demonstrated how existing base AMIs can be used as a source for creating a custom VFX workstation, with further GPU optimizations applied to increase performance. These customizations can be published as new AMIs themselves for quick redeployment of that machine setup. Then, you integrated this AMI into a launch template to specify the complete array of startup requirements needed for a workstation, for quick and standardized deployment of machines.
We recommend that you continue to the final Part 5 of our series, Building a GPU workstation for visual effects with Amazon EC2: Part 5 – Security, to explore security practices related to the deployment of visual effects (VFX) workstations. This post examines how to secure these workstations by controlling who can reach the desktop, protecting the session in transit, and safeguarding the credentials, images, and storage behind it.
For more information, contact us at aws-visual-compute-interest@amazon.com.
Further reading
If you want to augment a VFX workstation environment with a dedicated render farm, then consider the managed service AWS Deadline Cloud.
EC2 instance metrics, such as CPU and memory usage, are readily sent to Amazon CloudWatch logs, allowing you to access this data through the console and AWS CLI. This information can be pertinent to discern if an EC2 instance is being over-provisioned or under-provisioned for the work at hand. For example, it has excessive CPU, memory, and networking resources for the current tasks and could be optimized for price, or the alternative where it has not been allocated enough resources to cope. For more information, visit the Amazon EC2 User Guide.
Windows instances can be lengthy to boot. Amazon EC2 Fast Launch for Windows is an AWS facility for quicker launching of Windows machines through smart snapshots of the AMI.
The following post shows how to programmatically configure a Windows EC2 instance as part of a domain. This is particularly useful when the instances are used ephemerally, for example as part of a fleet of instances that spool up and down for the purposes of rendering, and you need methods to bind and remove instances quickly.
Commercial options also exist to perform artist/instance brokering, using Amazon DCV and Amazon EC2 launch templates. An example of this offering is Leostream.