AWS Database Blog
Automating Amazon RDS backup and maintenance windows for Daylight Saving Time shifts
Twice a year, some database administrators face the same tedious task: manually adjusting Amazon Relational Database Service (Amazon RDS) backup and maintenance schedules across multiple instances when Daylight Saving Time (DST) begins or ends. Because RDS operates on Coordinated Universal Time (UTC) while backup and maintenance schedules often reflect local time zones, each spring and fall, DST shifts create misalignment between intended schedules and actual execution times, which shifts maintenance windows by an hour and potentially disrupting planned activities during critical business hours. When you add the complexity of cron jobs operating on local system time while RDS maintains UTC, you face risks of missed backups, maintenance occurring during business hours, and compliance violations. By automating RDS backup and maintenance windows to adjust to time shifts, it eliminates manual DST adjustments and you’ll have consistent database operations across DST transitions while reducing operational overhead and scheduling errors.
In this post, you’ll learn how to deploy a serverless solution using AWS CloudFormation that automatically adjusts RDS maintenance and backup windows for DST transitions. You’ll configure Amazon EventBridge rules to trigger AWS Lambda functions on DST changes, set up cross-account AWS Identity and Access Management (AWS IAM) roles for managing RDS resources across multiple accounts, and implement tag-based filtering to selectively update specific instances. We’ll also cover testing the solution and monitoring execution through Amazon CloudWatch logs and Amazon Simple Notification Service (Amazon SNS) notifications.
Solution overview
An EventBridge rule triggers a Lambda function twice a year, coinciding with the switch to and from DST. The function, deployed in a designated AWS account, assumes an IAM role in the target AWS account to update RDS maintenance and backup windows. CloudFormation templates simplify deployment and management by defining the necessary resources as infrastructure as code.
The following image shows the architecture and process:
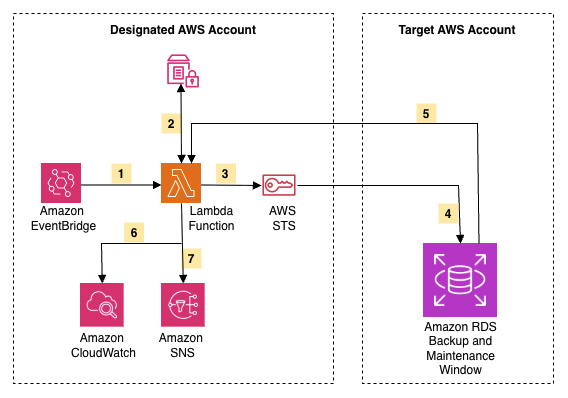
- EventBridge triggers the Lambda function on DST transitions
- Lambda retrieves IAM role ARNs from SSM Parameter Store
- Lambda assumes cross-account role via AWS STS for target account access
- Lambda updates RDS windows by adjusting maintenance and backup times
- Lambda receives RDS confirmation that updates completed successfully
- Lambda logs all operations to CloudWatch for monitoring and troubleshooting
- Lambda sends status notification to SNS
Prerequisites
Before deploying this solution, you need:
- An AWS account to deploy CloudFormation stacks and Lambda functions
- IAM permissions to create CloudFormation stacks, Lambda functions, IAM roles, EventBridge rules, and SNS topics
- An Amazon RDS cluster or instance that will have their maintenance and backup windows adjusted
- AWS Command Line Interface (AWS CLI) installed and configured to execute deployment commands and interact with AWS services from your local environment
- An Amazon Simple Storage Service (Amazon S3) bucket to store the Lambda deployment package before CloudFormation can reference it
With these prerequisites in place, you’re ready to deploy the solution. The deployment follows a three-phase approach that establishes secure cross-account access and automation.
Deploy the solution
The deployment process consists of three main phases that work together to create a secure, cross-account automation solution. Each phase builds upon the previous one to establish the complete infrastructure.
Overview of deployment phases
Phase 1: Deploy core functionality in the designated AWS account
Create the automation engine that manages your RDS resources by deploying:
- EventBridge rules – Automatically trigger the Lambda function twice a year when DST starts and ends
- Lambda function – Contains the logic to calculate new time windows and update RDS resources
- IAM role for Lambda – Grants permissions to assume roles in target accounts and modify RDS settings
- AWS Systems Manager parameter – Stores the list of target account IAM role Amazon Resource Names (ARNs) that Lambda can assume
- SNS topic – Sends notifications about successful or failed updates
Your “control plane” orchestrates DST adjustments across your organization.
Phase 2: Deploy IAM permissions in the target AWS account
Establish the trust relationship that allows the Lambda function to access RDS resources in other accounts by creating:
- IAM role in target account – Grants specific permissions to describe and modify RDS instances and clusters
- Trust policy – Allows the Lambda execution role from Phase 1 to assume this role
A secure, least-privilege access pattern enables cross-account operations. If your RDS resources are in the same account as the Lambda function, you can deploy both stacks in the same account.
Phase 3: Update the IAM role in the designated AWS account
The final phase connects everything together by updating the Lambda function’s configuration with the actual IAM role ARNs from Phase 2. This replaces the wildcard placeholder (*) with specific role ARNs, following the principle of least privilege.
Now let’s walk through each deployment phase with detailed CLI commands.
Step 1: Clone the GitHub repository
Obtain the CloudFormation templates and Lambda function code from the GitHub repository:
You’ll now have access to:
templates/DSTMaster.yaml– CloudFormation template for Phase 1.templates/DSTAccount.yaml– CloudFormation template for Phase 2.src/rds.py– Lambda function code that performs the time adjustments.
Step 2: Deploy core functionality in the designated AWS account
Deploy the automation engine that manages your RDS resources across multiple accounts.
Create Lambda Package
Package the Lambda function code and upload it to S3:
Deploy Master Stack
Deploy the CloudFormation stack that creates the core resources:
Replace the following parameters:
- <S3-BUCKET> – S3 bucket containing your Lambda deployment package
- <EMAIL> – Email address that will receive SNS notifications about DST updates
- Adjust Regions with comma-separated AWS regions where you have RDS resources
- Update Tags with comma-separated tags in key=value format to filter resources, or use “none” to update every resource (Ex.
env=prod\\,dept=finance) - Customize DSTStartScheduleExpression and DSTEndScheduleExpression for your region (see DST Schedules)
Note: Set DSTAccountRoleArns to “*” initially. We will update this with actual role ARNs in Step 4.
Wait for stack creation and retrieve outputs
Save the Lambda IAM Role ARN for the next step to establish the trust relationship.
Step 3: Deploy IAM permissions in the target AWS account
Create the IAM role that allows the Lambda function to access and modify RDS resources in the target account.
Deploy Account Stack
Deploy the account stack with the Lambda IAM Role ARN from Step 2:
Replace <LAMBDA_ROLE_ARN> with the Lambda IAM Role ARN from Step 2.
Wait for the stack to complete and retrieve the account IAM Role ARN:
Note: For multiple target accounts, repeat this step in each AWS account that hosts RDS resources you want to manage. Save all the Account IAM Role ARNs for the next step.
Step 4: Update the IAM role in the designated AWS account
Connect the Lambda function to the target account roles, completing the cross-account access configuration.
Update Master Stack with Account Role ARNs
Update the master stack with the Account IAM Role ARN from Step 3:
Replace <ACCOUNT_ROLE_ARN> with the Account IAM Role ARN from Step 3.
For multiple accounts, provide all role ARNs as a comma-separated list:
Important: When adding new role ARNs later, you must include the existing ARNs plus the new ones. CloudFormation replaces the entire parameter value rather than appending to it.
Wait for stack update to complete
Wait for the update to finish:
The solution is now fully deployed and ready to automatically adjust RDS maintenance and backup windows during DST transitions.
Test the solution
Now that you’ve deployed the solution, verify that it works correctly before relying on it for production workloads. Testing in a non-production environment allows you to confirm that the Lambda function can successfully access your RDS resources, verify that maintenance and backup windows are adjusted correctly, understand the notification flow and log output, validate cross-account access if you’re using multiple AWS accounts, and confirm that tag-based filtering works as expected.
While the EventBridge rules will automatically trigger the Lambda function during actual DST transitions, you can manually invoke the function to test the behavior at any time.
Test DST Start (Spring Forward)
Invoke the Lambda function to simulate DST start, which shifts maintenance and backup windows 1 hour earlier:
Expected response:
Test DST End (Fall Back)
Invoke the Lambda function to simulate DST end, which shifts maintenance and backup windows 1 hour later:
Expected response:
Verify the changes
After invoking the Lambda function, verify that the RDS maintenance and backup windows have been updated:
Check RDS instance windows:
Check RDS cluster windows:
Verify DST tag
The DST tag value should match your test (“true” for DST start or “false” for DST end).
View Lambda execution logs:
Or view the most recent log stream:
Expected results
The following examples show how maintenance and backup windows are adjusted. Your actual windows will vary based on your RDS configuration.
When DST starts (spring forward), maintenance and backup windows shift 1 hour earlier:
- Original:
sun:02:00-sun:03:00→ Updated:sun:01:00-sun:02:00 - Original:
03:00-04:00→ Updated:02:00-03:00
When DST ends (fall back), maintenance and backup windows shift 1 hour later:
- Original:
sun:02:00-sun:03:00→ Updated:sun:03:00-sun:04:00 - Original:
03:00-04:00→ Updated:04:00-05:00
Clean up
After testing the solution or if you decide this automation no longer meets your needs, you can remove the deployed resources to avoid ongoing charges.
To delete the other resources that were launched as part of the CloudFormation stacks, complete the following steps in both the designated account and the target account.
Delete the stacks
In the designated account:
In the target account(s):
Note: Repeat the account stack deletion for each target account where you deployed the RDSDSTAccountStack.
Conclusion
In this post, we presented an automated solution that helps you maintain consistent RDS backup and maintenance windows throughout the year, regardless of DST changes. The approach removes the manual effort of adjusting these windows twice a year, reduces the risk of human error, and keeps your database operations running as expected.
The solution is particularly useful if your organization operates across multiple time zones, have strict maintenance window requirements, need to maintain consistent scheduling relative to business hours, or want to reduce operational overhead and eliminate manual processes.
To learn more about the implementation of this automated solution, you can visit this aws-samples github page.