AWS Database Blog
Getting started with Oracle Database@AWS: A complete onboarding guide
Oracle Database@AWS (ODB@AWS) delivers Oracle Exadata Database Service and Oracle Autonomous Database natively inside AWS data centers. Your Oracle workloads run on purpose-built Exadata infrastructure with low-latency access to AWS services, including Amazon Bedrock, Amazon Redshift, AWS Key Management Service (AWS KMS), Amazon CloudWatch, and AWS CloudTrail. At the same time, you keep the Oracle database engine, Exadata performance characteristics, and DBA tooling that your teams rely on today.
This post covers the complete onboarding journey for Oracle Database@AWS, from choosing the right service through a provisioning-ready environment. Depending on which service you need, you can follow a streamlined public offer path or a full five-step private offer path. The post covers both.
For Autonomous Database Serverless (ADB-S) and Exadata Database Service on Exascale Infrastructure (ExaDB-XS), a public offer is available on AWS Marketplace with no advance procurement required. You can subscribe and begin provisioning in minutes. The service selection table in Step 1 directs you to the right starting point.
The onboarding journey at a glance
The path from service selection to a provisioning-ready environment breaks into two phases:
- Procurement (Steps 1–2): Select your service, secure your offer (public or private), and accept it through AWS Marketplace.
- Onboarding (Steps 3–5): Validate account prerequisites, link your OCI tenancy, and configure identity and access on both clouds.
After these steps are complete, you’re provisioning ready. The what’s next section covers creating ODB networks, Exadata infrastructure, and VM clusters.
The five steps that map to these phases are as follows:
- Select your service and secure your offer.
- Accept the offer.
- Validate prerequisites.
- Link your OCI tenancy.
- Configure AWS Identity and Access Management (IAM) (groups and roles).
The following diagram shows the five steps grouped into these two phases.
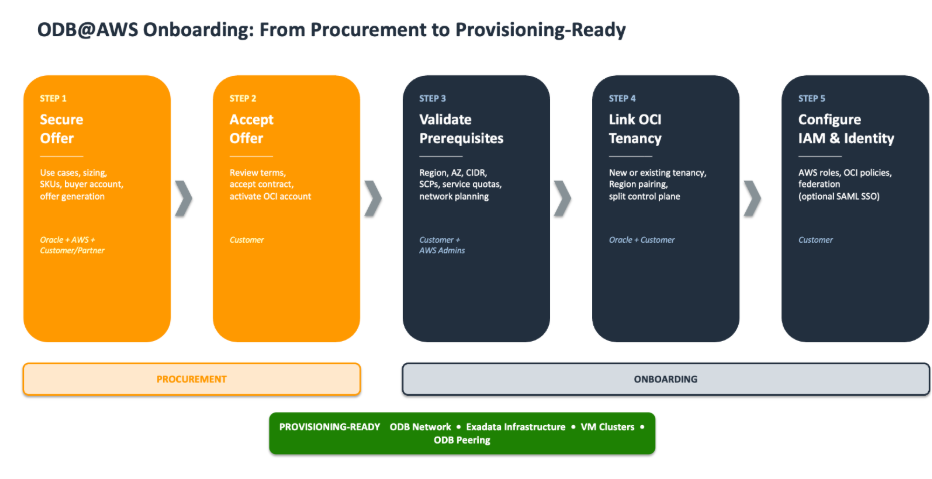
Figure 1: The five onboarding steps grouped into the procurement and onboarding phases
Step 1: Select your service and secure your offer
Start by identifying which Oracle Database@AWS service fits your workload. Your service selection determines both the capabilities available to you and the procurement path that you follow.
Choose your service and procurement path
| Service | Offer type | Choose this when |
| Exadata Database Service on Dedicated Infrastructure (ExaDB-D) |
Private offer (Steps 1–5) | You need dedicated Exadata racks with full single-tenant isolation, Oracle RAC with complete control over node count, ECPU, and memory, extreme scalability for large consolidated estates, or certified MAA architectures for Oracle COTS applications (PeopleSoft, E-Business Suite, JD Edwards, Siebel, CC&B). |
| Exadata Database Service on Exascale Infrastructure (ExaDB-XS) |
Public offer (skip to Step 3) or private offer | You want full Exadata performance without dedicated infrastructure. Suited for production databases of varying size, DR standbys with cross-service Data Guard, dev/test environments, and workloads that start small and grow. No minimum infrastructure commitment. |
| Autonomous Database Serverless (ADB-S) | Public offer (skip to Step 3) or private offer | You want a fully managed Oracle database with zero infrastructure decisions. Oracle handles patching, tuning, scaling, and availability. Suited for OLTP, analytics, mixed workloads, and auto-pause during idle periods. |
| Autonomous Database on Dedicated Exadata Infrastructure (ADB-D) | Private offer (Steps 1–5) | You need autonomous operations on fully dedicated infrastructure, with Oracle managing patching and tuning while you retain control of maintenance windows and single-tenant isolation. |
If your workload fits ExaDB-XS or ADB-S and a public offer meets your needs, no infrastructure sizing or advance Oracle engagement is required. Subscribe from the Oracle Database@AWS Marketplace page and skip to Step 3. For current regional availability of public offer services, see Regional Availability for Oracle AI Database@AWS.
If you’re deploying ExaDB-D or ADB-D, or need negotiated pricing and committed terms for a service, continue with the private offer process in the following sections.
Request the private offer
A private offer is a negotiated agreement between your organization and Oracle, tailored to your workload requirements. To begin:
- Go to the Oracle Database@AWS product page on the AWS Management Console and choose Request private offer. This redirects to OCI to capture your AWS Region, workload requirements, and contact details.
- Alternatively, engage your Oracle account team or an AWS channel partner directly to initiate the request.
- Provide your AWS account ID at the start. Oracle needs it to generate the offer for the correct account.
Tip: Run AWR Miner or Oracle-provided sizing utilities (Cloud Premigration Advisor Tool (CPAT), ORAchk) on your source databases early. The output feeds directly into the sizing exercise and helps you scope the offer accurately from the start.
Choose your buyer account
When procuring ODB@AWS, the entitlement is anchored to a single AWS account called the buyer account. In multi-account environments, this doesn’t need to be your organization’s management account. AWS best practice recommends a dedicated buyer account that owns the commercial relationship. This account shares the entitlement across workload accounts within the same AWS Organization by using AWS Resource Access Manager (AWS RAM). This separates procurement governance from infrastructure deployment and maintains a clean audit trail. For single-workload deployments, the buyer account and workload account can be the same.
| Concept | Description | Role in ODB@AWS |
| Buyer account | The AWS account that accepts the private offer and holds the AWS Marketplace subscription | Receives the ODB@AWS entitlement, is billed for OCI SKUs, and is linked to the OCI tenancy. All provisioning originates from or is shared from this account. |
| Management account | The root account of your AWS Organization that manages consolidated billing and SCPs | Might or might not be the buyer account. If your organization uses a dedicated procurement account, that account becomes the buyer, not the management account. |
Important: The buyer account is permanently linked to the OCI tenancy after onboarding. This cannot be changed later without re-onboarding.
Plan your account choice before you request the offer, even at the proof of concept (POC) stage. Starting your proof of concept in the same buyer account you intend to use in production, you can transition to production by replenishing the private offer in place. The OCI tenancy linkage, network configuration, and existing infrastructure persist through this transition. Changing the buyer account after onboarding forces a full re-onboarding cycle including new OCI tenancy mapping, rebuilt networking, and potential data migration.
For multi-account organizations, you can use AWS License Manager to share the ODB@AWS subscription from the buyer account to workload accounts within the same AWS Organization. For resource sharing across accounts, use AWS Resource Access Manager (AWS RAM). Decide your buyer account strategy before you request the offer:
- Simple: Buyer account equals the workload account. Fits single-workload or proof-of-concept deployments.
- Enterprise: A dedicated buyer or procurement account with entitlement sharing through License Manager. Fits landing zone patterns with multiple workload accounts.
For detailed steps, see Request Offer for Oracle AI Database@AWS. For multi-account sharing, see Subscription Sharing for Oracle AI Database@AWS.
Define the target architecture and sizing (ExaDB-D and ADB-D)
For dedicated infrastructure services, sizing determines SKU quantities and feeds directly into your offer. Sizing is a collaborative effort between Oracle, AWS, and any channel partner, if involved. Provide AWR Miner output from your source databases to Oracle. From that data, Oracle helps translate workload characteristics into an Exadata configuration: shape, ECPU allocation, storage capacity, and environment count.
For the database tier, plan the following:
- Exadata Infrastructure placement (Availability Zone selection).
- VM cluster layout, typically a production cluster, a DR cluster for Multi-AZ Data Guard, and one or more non-production clusters.
- CDB/PDB consolidation strategy using Oracle multi-tenant architecture.
- Backup strategy using Autonomous Recovery Service (ARS), Amazon Simple Storage Service (Amazon S3), or both. See Navigating backup and recovery options for Oracle Database@AWS.
- ODB network design, including client and backup subnet CIDRs.
For the application tier, plan the following:
- EC2 instances in the ODB@AWS placement group for sub-200-microsecond
app-to-DBlatency. See high performance networking placement groups. - Virtual private cloud (VPC) design, subnets, security groups, and ODB peering connectivity.
- Load balancing (Application Load Balancer or Network Load Balancer) and auto scaling groups.
- Amazon Elastic Kubernetes Service (Amazon EKS) or Amazon Elastic Container Service (Amazon ECS) for containerized application components.
- Shared storage using Amazon Elastic File System (Amazon EFS), monitoring using Amazon CloudWatch, and infrastructure as code using Terraform or AWS CloudFormation.
Select the offer type
Oracle private offers come in two types, depending on your procurement channel:
| Offer type | How it works | Choose this when |
| Marketplace Private Offer (MPPO) | Oracle generates the offer directly in AWS Marketplace for your buyer account. | You have an existing direct Oracle relationship and want to negotiate terms directly with Oracle. |
| Channel Partner Private Offer (CPPO) | A channel partner extends an Oracle-sourced offer from AWS Marketplace to your account. | You procure through a channel partner or want consolidated billing through that partner. |
- Choose MPPO if you have an existing direct Oracle relationship.
- CPPO works best when you procure through a channel partner or want consolidated billing through that partner.
- Confirm the billing model upfront: direct to your AWS account (MPPO) or through the partner (CPPO).
Gather offer prerequisites: Account ID, SKUs, and terms
Before Oracle or your channel partner can generate the offer, gather the following:
- AWS buyer account ID: The 12-digit AWS account ID that accepts the offer.
- SKUs under consideration:
- Exadata Cloud Infrastructure X11M and X11MV, including database and storage servers (fixed infrastructure cost).
- Exadata Database ECPU, License Included or BYOL (variable compute cost).
- Autonomous AI Database ECPU, if using Autonomous Database (LI or BYOL).
- ExaDB-XS or ADB-S, if using public offer services (consumption-based, no minimum commitment).
- Autonomous Recovery Service or Zero Data Loss Recovery, for backup requirements.
- OCI Object Storage, if you need additional OCI-side storage.
- Contract duration: Typically 1-year, 3-year, or a custom term.
- Licensing model per SKU: License Included (LI) or Bring Your Own License (BYOL).
Map each environment (production, DR, non-production) to specific SKU quantities and usage hours. Determine non-production operating hours to optimize ECPU costs. A common baseline is 264 hours per month for non-production.
Oracle generates the offer
After all prerequisites are confirmed, typical turnaround is 2–5 business days from final inputs to offer availability. The process:
- Oracle Sales creates the private offer in AWS Marketplace targeting your specified buyer account.
- The offer includes the agreed SKUs, quantities, pricing, and contract duration.
- For CPPO, Oracle generates the offer using inputs provided by the channel partner.
- The offer appears in your AWS Management Console under Oracle Database@AWS. Choose View private offer to review and accept.
For detailed steps, see Purchase Oracle AI Database@AWS.
Step 2: Accept the offer
After Oracle makes the private offer available, accept it through the AWS Management Console to activate your Oracle Database@AWS subscription.
To accept the offer, complete the following steps:
- On the AWS Management Console, go to Oracle Database@AWS and choose View private offer.
- Review the offer terms, pricing, and EULA.
- Choose Create contract and respond to the prompts to accept.
- After acceptance, activate your OCI account using the activation link on the console or the link sent to your email.
- Choose whether to create a new Oracle Cloud account or link an existing one.
- Complete the activation. The dashboard becomes available after activation is confirmed.
For multi-account organizations:
- Share the ODB@AWS subscription across accounts within your AWS Organization using AWS License Manager.
- Centralize procurement in a single payer account while allowing provisioning in workload accounts.
Note: The Oracle Database@AWS dashboard isn’t available until you have accepted a private offer (or subscribed through a public offer). Provisioning API calls fail until onboarding is complete.
After onboarding, your AWS account is linked to your OCI tenancy and replicated to supported Regions. Activate your preferred Regions through the OCI console and access Oracle Database@AWS in supported AWS Regions without repeating the subscription process.
Step 3: Validate prerequisites
Before proceeding with OCI tenancy linking and AWS Identity and Access Management (IAM) configuration, verify that your AWS account environment is ready. The following checklist covers the key items.
| Category | What to check | Why it matters |
| Service Quotas | VPC, subnet, and ENI limits in the target Region. | Verify sufficient capacity for the ODB network and peering connections. |
| Network planning | CIDR ranges for client and backup subnets. | Must not overlap with existing VPC CIDRs. Both must be /24 or larger. |
| IAM | Administrative user or role with required permissions. | See Step 5 for the detailed policy setup. |
| DNS | Amazon Route 53 outbound resolver endpoint and forwarding rules. | Required for application VPCs to resolve Oracle database hostnames (SCAN listeners) in the ODB network. |
Network planning details
- Client subnet CIDR: Used for application connectivity to the database through ODB peering.
- Backup subnet CIDR: Used for backup traffic to OCI Autonomous Recovery Service or Amazon S3.
- Both CIDRs must be /24 or larger and must not conflict with your existing VPC address space.
- Plan for ODB peering connections between your application VPC and the ODB network.
Service Control Policy (SCP) considerations
Organizations that enforce region-restricting SCPs face specific considerations during ODB@AWS onboarding. Two Regions must be allowed regardless of your primary deployment target:
- US East (N. Virginia) us-east-1: Required for AWS License Manager entitlement grants, AWS Marketplace subscription acceptance, and global services (IAM, AWS Organizations, STS). If your SCP restricts this Region and your workload deploys elsewhere, entitlement sharing fails.
- Your target ODB@AWS Region: Where Exadata infrastructure, ODB networks, and VM clusters are provisioned.
Important: AWS Service Control Policies (SCPs) and permission boundaries at the organization level can override user permissions and cause onboarding failures. Verify with your AWS Organization administrators before proceeding.
Step 4: Link your OCI tenancy
Oracle Database@AWS operates with a split control plane. Infrastructure resources such as networking and Exadata are managed through AWS. Database administration such as DB Homes, PDBs, and patching is managed through OCI. This design means your teams use familiar AWS tooling for infrastructure while Oracle manages the database lifecycle layer. Linking an OCI tenancy establishes the cross-cloud connection that makes this possible.
| Option | When to use | Process |
| Create a new OCI tenancy | You have no existing Oracle Cloud relationship | Created automatically during activation. The user performing onboarding becomes the tenancy administrator. |
| Link an existing OCI tenancy | You already have an OCI account with Oracle support contracts | Connect during activation. Your tenancy must be subscribed to the OCI Region paired with your target AWS Region. |
Your OCI tenancy must be subscribed to the OCI Region paired with your target AWS Region. For example, US East (N. Virginia) pairs with OCI US East (Ashburn), and Asia Pacific (Sydney) pairs with OCI Australia East (Sydney). For the full list of current pairings, see Supported Regions for Oracle Database@AWS.
The linked tenancy supports day-to-day database operations:
- Database control plane: Create and manage DB Homes, CDBs, and PDBs through the OCI console or APIs.
- Data Guard: Configure standby databases for high availability and DR.
- Backup management: Automated backups to OCI Object Storage or Amazon S3.
- Patching: Apply database, Grid Infrastructure, and OS patches on your schedule.
- Monitoring: OCI-side performance metrics and diagnostics.
Note: If you create a new tenancy during onboarding, the user performing the onboarding automatically becomes the OCI tenancy administrator.
Step 5: Configure groups and roles
ODB@AWS requires IAM permissions on both the AWS side and the OCI side. This dual-cloud governance model needs careful planning to maintain least-privilege access and separation of duties.
AWS IAM permissions
ODB@AWS provides the AmazonODBFullAccess AWS managed policy as the starting point for granting provisioning permissions. Attach it to the IAM roles or permission sets your infrastructure teams use. This policy covers core odb:* actions and the EC2 peering operations required to create ODB networks and VM clusters.
The following example covers the most common additions for networking, placement groups, and DNS:
Important: The odb:* action in this example grants access to all Oracle Database@AWS API actions and is intended as a starting point for initial setup and proof-of-concept deployments. For production environments, replace odb:* with only the actions your workload requires (for example, odb:CreateOdbNetwork, odb:CreateCloudExadataInfrastructure, odb:CreateCloudVmCluster) and scope the Resource element to specific ARNs. See Actions, resources, and condition keys for Oracle Database@AWS for the full list of actions, and AWS managed policies for Oracle Database@AWS for least-privilege guidance.
The managed policy intentionally omits permissions that depend on your architecture choices. Add these through customer-managed policies:
| Capability | Actions to add | When needed |
| Amazon VPC Lattice and VPC endpoints | vpc-lattice:*, ec2:CreateVpcEndpoint, ec2:DeleteVpcEndpoints | Always – required for ODB network creation (S3 backup integration is provisioned by default) |
| Placement group management | ec2:CreatePlacementGroup, ec2:AttachResourcesToPlacementGroup, ec2:DeletePlacementGroup | Always – required in AZs that support managed cluster placement groups |
| EC2 networking for ODB peering and DNS | ec2:CreateRoute, ec2:DeleteRoute, route53resolver:* | Always – required for VPC route table updates and DNS forwarding |
| Resource sharing (cross-account) | ram:CreateResourceShare, ram:AssociateResourceShare | Only if sharing infrastructure or ODB networks across accounts |
| Customer-managed encryption | kms:CreateKey, kms:CreateGrant, kms:GenerateDataKey* | Only if using customer-managed KMS keys for Autonomous Database |
For the complete policy JSON with all required actions, see AWS managed policies for Oracle Database@AWS.
DNS planning note: After provisioning, your application VPCs need to resolve Oracle database hostnames (SCAN listeners) in the ODB network. This requires an Amazon Route 53 outbound endpoint and a forwarding rule targeting the ODB network DNS listener. Plan the IAM permissions (route53resolver:) and subnet placement now. You configure them after creating the ODB network. For details, see Configuring DNS for Oracle Database@AWS.*
OCI IAM permissions
Users who aren’t OCI tenancy administrators must belong to a group with the following policy statements in the target compartment:
Separation of duties
Map personas to permissions on each cloud so access stays scoped to what each role needs:
| Persona | AWS permissions | OCI permissions |
| Cloud Admin | odb:* (scope to specific actions in production) plus networking | manage all-resources in tenancy |
| Network Admin | ec2:* for VPC, subnet, and peering | manage virtual-network-family |
| DBA | odb:Get, odb:List | manage database-family in compartment |
| Read-only / Auditor | odb:Get, odb:List | read all-resources in compartment |
Note: If you encounter “Missing permissions: P[DB_HOME_CREATE], P[DATABASE_CREATE]” errors, the OCI IAM policies in the mapped compartment are missing “manage db-homes” and “manage databases”. This is an OCI-side permission issue, not an AWS-side one.
Identity federation between AWS and OCI
The operational boundary in ODB@AWS is straightforward: AWS owns the infrastructure and networking layer up to and including the VM cluster, while OCI owns the database lifecycle layer inside it. Your identity flows across both without separate credentials, and you don’t need to create new users, roles, or groups in OCI.
During onboarding, OCI automatically provisions the necessary identity constructs: a tenancy link, a compartment mapped one-to-one to your AWS account, and a set of IAM policies and user groups that authorize the multicloud service to act on your behalf. Your teams continue to authenticate through IAM or your corporate identity provider through IAM Identity Center. The cross-cloud trust handles authorization in OCI transparently.
For day-to-day infrastructure work, you do not leave the AWS console. For database lifecycle operations such as creating CDB/PDBs, configuring Data Guard, and applying patches, you use the OCI console accessible through the Manage in OCI button in the AWS console. When SAML federation is configured, the user lands in the OCI console already authenticated without a separate login.
| Operation | Where | Interface |
| Create/manage ODB networks | AWS | Console, CLI, API, CloudFormation |
| Provision Exadata infrastructure | AWS | Console, CLI, API, CloudFormation |
| Create VM clusters | AWS | Console, CLI, API, CloudFormation |
| Configure TGW, DNS, VPC peering | AWS | Console, CLI, API |
| Enable VPC Lattice integrations and Zero-ETL | AWS | Console, CLI, API |
| Monitor through CloudWatch | AWS | Console, CLI, API |
| Share resources through AWS RAM | AWS | Console, CLI, API |
| Create Autonomous Database Serverless | AWS | Console, CLI, API |
| Create Exadata databases (CDB/PDB) | OCI | Console, OCI CLI, OCI API, Terraform (OCI provider) |
| Create Autonomous DB on Dedicated Infrastructure | OCI | Console, OCI CLI, OCI API, Terraform (OCI provider) |
| Configure Data Guard | OCI | Console, OCI CLI, OCI API |
| Database patching and updates | OCI | Console, OCI CLI, OCI API |
| Scale database ECPU/OCPU | OCI | Console, OCI CLI, OCI API |
| Manage PDBs, clone, restore | OCI | Console, OCI CLI, OCI API |
| Configure OCI Network Security Groups | OCI | Console, OCI CLI, OCI API, Terraform (OCI provider) |
Note: “Console” on the AWS side refers to the AWS Management Console. “Console” on the OCI side refers to the Oracle Cloud Console, accessed through the Manage in OCI button. No separate OCI login is required when SAML federation is configured.
Optional: Setting up SAML federation
For teams that need to access the OCI console for database operations, configuring SAML federation provides single sign-on through your existing corporate identity provider. This is an optional post-onboarding step and does not block AWS-side or OCI-side operations. It avoids the need to create and manage separate OCI user credentials. The process involves registering your identity provider (IAM Identity Center, Okta, Azure AD, or a SAML 2.0-compatible IdP) with OCI Identity Domains and mapping groups to the auto-provisioned OCI groups from onboarding. For step-by-step guidance, see Federation for Oracle AI Database@AWS and Federating with SAML 2.0 Identity Providers.
To summarize the identity posture: no new OCI users to create, no OCI groups to manage, no OCI roles to assign, no OCI passwords to rotate. The auto-provisioned policies and federation handle everything. Your security team maintains one identity plane, your operational teams interact primarily with the AWS console, and the OCI-side database operations are accessible through SSO without identity overhead.
What’s next
With these five steps complete, your environment is fully onboarded and ready for provisioning. You can now:
- Create an ODB network with automatic placement group provisioning.
- Deploy Oracle Exadata Infrastructure (Quarter, Half, or Full Rack) for ExaDB-D.
- Create Exadata VM clusters with RAC for high availability.
- Establish ODB peering between your application VPC and the ODB network.
- Launch EC2 instances in the placement group for sub-200-microsecond
app-to-DBlatency.
For the provisioning walkthrough, see Getting started with Oracle Database@AWS in the AWS documentation.
Conclusion
In this post, we walked through the complete Oracle Database@AWS onboarding journey. For public offer services (ADB-S and ExaDB-XS), getting started requires only an AWS Marketplace subscription and account prerequisites. For dedicated infrastructure services (ExaDB-D and ADB-D), the five steps cover offer procurement, tenancy linking, and dual-cloud IAM configuration. The planning you do up front on service selection, sizing, buyer account strategy, and IAM is what keeps the provisioning phase on track.
With onboarding complete, your next step is to create an ODB network, provision Exadata infrastructure, and deploy your first VM cluster. These resources will help:
- Oracle Database@AWS documentation for provisioning guides and API reference.
- Best practices for cross-account sharing in Oracle Database@AWS for multi-account patterns.
- Oracle Database@AWS product page for pricing, regions, and feature overview.
To get started, visit Oracle Database@AWS on AWS Marketplace. For ADB-S and ExaDB-XS, subscribe directly with a public offer. For dedicated infrastructure services, request a private offer from the AWS Management Console.