AWS Database Blog
Integrate natural language processing and generative AI with relational databases
Organizations are increasingly grappling with the challenge of immediate access to data. The majority of this data is stored in relational database management system (RDBMS) applications requiring specialized SQL knowledge. This requirement creates a bottleneck, forcing companies to rely on developer resources. A transformative solution is to use the power of AI and harness the natural language processing (NLP) capabilities of Amazon Bedrock to allow users to interact with existing RDBMS databases. This innovative approach enables conversational interactions with databases, allowing end-users to access data using natural language rather than complex SQL queries. The implications of this technology are far-reaching:
- Democratizes data access
- Alleviates the need for SQL expertise among general users
- Significantly reduces the burden on developer resources
In this post, we present an approach to using NLP to query an Amazon Aurora PostgreSQL-Compatible Edition database.
Solution overview
The solution presented in this post assumes that an organization has an Aurora PostgreSQL database. We create a web application framework using Flask for the user to interact with the database. JavaScript and Python code act as the interface between the web framework, Amazon Bedrock, and the database.
Amazon Bedrock is a fully managed service that offers a choice of high-performing foundation models (FMs) from leading AI companies like AI21 Labs, Anthropic, Cohere, Luma, Meta, Mistral AI, Stability AI, and Amazon through a single API, along with a broad set of capabilities needed to build generative AI applications with security, privacy, and responsible AI. For this solution we chose Anthropic’s Claude 3 Sonnet model, based on its capabilities to convert NLP to code. The Sonnet model possesses high levels of intelligence, and it strikes the ideal balance between intelligence and speed—qualities especially critical for a real time interface.
The following diagram illustrates the solution architecture:

The solution involves the following steps:
- A Flask web application framework allows the user to enter a natural language query to the database in plain text.
- JavaScript handles the user interaction through a Generate Report
- JavaScript captures the report generation action and passes the user’s input to Python.
- Python code parses the user’s input as a check against possible SQL injection attempts.
- Amazon Bedrock processes the user’s natural language input and converts it into SQL using Anthropic’s Claude 3 Sonnet model.
- The SQL generated by Amazon Bedrock is parsed to help prevent restricted actions.
- AWS Secrets Manager is accessed to obtain database connection information and credentials.
- The SQL is executed against the Aurora PostgreSQL database.
- Results from the database are presented to the user on the webpage.
Prerequisites
This solution requires the following AWS services and resources:
- An Amazon Elastic Compute Cloud (Amazon EC2) instance running Amazon Linux 2023 with the following software installed:
- Flask web application framework (Flask is used for demonstration purposes)
- Python3
- Boto3
- An EC2 instance running Windows with a web browser to act as a bastion host
- Anthropic’s Claude 3 Sonnet model on Amazon Bedrock (access has to be requested to each model as described at Add or remove access to Amazon Bedrock foundation models)
- Secrets Manager credentials
- An Aurora PostgreSQL database. In the event that there isn’t an existing Aurora PostgreSQL database, follow the instructions in Creating a DB cluster that uses Aurora Serverless v2.
Create the tables
Complete the following steps to create the tables:
- Connect to your bastion host.
- Connect to the database.
- Create the customers table with the following DDL:
- Create the items table with the following DDL:
- Create the orders table with the following DDL:
- Populate the customers table with the following SQL:
- Populate the items table with the following SQL:
- Populate the orders table with the following SQL:
- On the Amazon Bedrock console, choose Model access in the navigation pane.
- Select Anthropic – Claude Sonnet.
- Choose Request model access.
- In the pop-up window, review the terms and conditions for using the model, and select the check box to agree to the terms.
- Choose Submit request to finalize your access request.
- On the Amazon RDS console, locate the Aurora PostgreSQL cluster you created earlier.
- Choose the cluster name to open the cluster details page.
- In the Connectivity & security section, find the security group associated with your database cluster.
- Choose the security group name to open the security group details page.
- On the security group details page, choose the Inbound rules
- Choose Edit inbound rules.
- Choose Add rule.
- Provide the following information:
- For Type, choose PostgreSQL.
- For Port range, enter 5432.
- For Source, enter the IP address or the security group of your web server. If you’re using the web server’s IP address, enter it in CIDR notation (for example, 168.1.0/24).
- If you’re using the web server’s security group, choose Security group on the dropdown menu and choose the appropriate group.
- Choose Save changes to apply the new inbound rule.
- Verify that the new inbound rule has been added to the security group.
- On the IAM console, locate the IAM role associated with your web server.
- Choose the role name to open the role details page.
- On the Permissions tab, choose Add permissions.
- On the Add permissions dropdown menu, choose Create inline policy.
- On the Create inline policy page, choose the JSON
- Enter the following policy document in the JSON editor:
- Choose Next.
- On the Review policy page, give the policy a name (for example, Web_AI_Access) and a description (optional).
- Choose Create policy to save the inline policy.
- On the Amazon EC2 console, choose Security groups in the navigation pane under Network & security.
- Locate the security group associated with your web server. You can find this by looking at the Description column or by checking the tags.
- Choose the web server’s security group.
- On the Inbound rules tab, choose Edit inbound rules.
- On the Edit inbound rules page, choose Add rule.
- Configure the new rule as follows:
- For Type, choose Custom TCP.
- For Port range, enter 5000.
- For Source, choose Custom and enter the security group ID of your bastion host. You can find this by looking up the bastion host’s security group in the same security groups list. The format will be similar to sg-xxxxxxxxxxxxxxxxx.
- Add an optional description for the rule, such as Allow Flask access from bastion host.
- Choose Save rules to apply the changes.
- Verify that the new inbound rule has been added to the security group.
- Make sure that your Flask application is configured to run on port 5000. If it’s set to a different port, adjust the rule accordingly.
- This setup assumes that you’re using a bastion host for secure access to your web server. If you’re not using a bastion host, you might need to adjust the source to your specific needs (such as your IP address or a different security group).
- Always follow the principle of least privilege. Only open the ports that are necessary for your application to function.
- Regularly review and audit your security group rules to make sure they align with your security requirements.
- Connect to the web server.
- Create a directory (folder) for the code.
- Enter the sample code into a file named py.
- Start the web server with the command Python3 ./AuroraAI.py.
The output should be similar to the following screenshot.
- Note the second IP displayed to use in a later step.
- Sign on to the Windows bastion server.
- Launch a web browser.
- Navigate to the second IP collected from the previous step.
- Connect to the bastion host
- Connect to the database
- If an Aurora database was created, it can be deleted by following the instructions at Deleting Aurora DB clusters and DB instances
- Delete the Secrets Manager secret:
- On the Secrets Manager console, choose Secrets in the navigation pane.
- Select the secret you created for storing the database information, and on the Actions menu, choose Delete secret.
- Remove access to the Amazon Bedrock foundational models as described at Add or remove access to Amazon Bedrock foundation models)
- Terminate the web server EC2.
- Remove the entry in the security group of the database created to allow connections on port 5432 from the web server
- Delete the IAM role:
- On the IAM console, choose Roles in the navigation pane.
- Select the role created for the Lambda function and choose Delete.
- Confirm the deletion when prompted.
Store the database information in AWS Secrets Manager
Store the database connection information and credentials in AWS Secrets Manager as shown in the following screenshots. The sample code provided is expecting these specific values.


Request access to the foundation model
New users must request access to Anthropic’s Claude Sonnet model before using the model for the first time. Complete the following steps:
The approval process typically takes 1–2 business days.
Launch and configure the web server
The web server runs on an EC2 instance running Amazon Linux 2023. The following software must be installed:
Configure the database security group to allow access from the web server
Edit the security group of the database to allow connections on port 5432 from the web server:
Connections to the Aurora PostgreSQL database on port 5432 will now be allowed from the specified web server source, enabling the web application to communicate with the database.
Remember to follow AWS security best practices, such as regularly reviewing and updating your security group rules, to maintain the ongoing security of your database and web application.
Create an IAM role to allow the web server to access Amazon Bedrock
The web server requires AWS Identity and Access Management (IAM) permissions to access Amazon Bedrock. Complete the following steps:
The policy should now be attached to the web server’s IAM role.
Remember to follow AWS security best practices, such as regularly reviewing and updating your IAM policies, to maintain the ongoing security of your application and data.
Configure the web server’s security group to allow access from the bastion host
The bastion host running the web browser needs to be able to connect to the web server. Complete the following steps:
This configuration allows the bastion host to access the Flask application running on port 5000 of your web server.
Note the following considerations:
Execute the sample code
The sample code to display the webpage and interface with Anthropic’s Claude 3 Sonnet model is available in the following GitHub repo. Execute the sample code on the web server. The steps to accomplish this are as follows:
Test the solution
Access the webpage as follows:
The webpage should be similar to the following screenshot.

You can test the solution with a sample prompt such as:
List all the customers in Chicago that have placed orders in the last month. The report should include the customers first name, last name, item name, item price and order date sorted by customer last name, first name, order date
This would be the equivalent of coding the following SQL:
The following webpage should be displayed.

Another test to demonstrate grouping could be with a prompt such as:
Generate a report of the sales grouped by year, month and city. Only show the top 10.
This would be the equivalent of coding the following SQL:
The following webpage should be displayed:
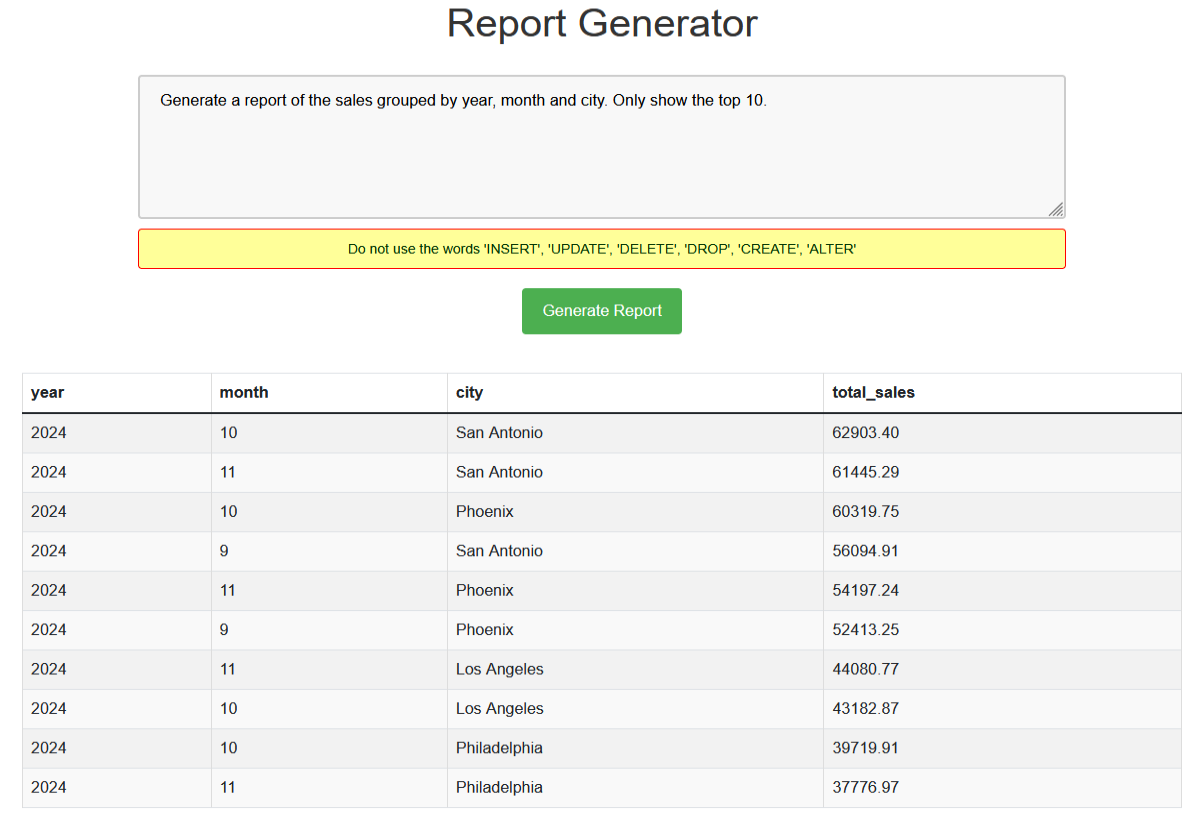
The exact data will vary depending on when the sample data was created in your database.
If a user attempts to change the data with a prompt such as:
Update the items table to set the price of “Coffee Mug” to $99
The following webpage should be displayed:

Cleaning up
To avoid incurring unnecessary charges and to clean up the resources used in this solution, follow these steps:
Conclusion
The integration of AI-driven NLP with RDBMS applications represents a significant leap forward in data accessibility and management. By taking advantage of the generative AI and NLP capabilities of Amazon Bedrock, we have demonstrated a powerful solution that bridges the gap between complex database structures and user-friendly interactions.
The ability to interact with databases through natural language queries opens up new possibilities for data exploration, decision-making, and operational efficiency. As we move forward, it’s clear that the fusion of AI, NLP, and traditional database systems will continue to reshape how organizations interact with and derive value from their data, paving the way for more inclusive and agile data-driven cultures.
If you have any questions or comments, post your thoughts in the comments section.
About the Authors
 Dean Capps is a Database Consultant at AWS and has experience providing database support on legacy, open systems, and cloud platforms. Dean is currently a member of the AWS Worldwide Public Sector team, providing homogeneous and heterogeneous database migration support to customers in the US Federal space.
 Wajid Ali Mir is a Database Consultant at AWS and works as a database migration specialist, enabling customers to build highly available, cost-effective database solutions and migrate their database workloads to the AWS Cloud. Wajid works with AWS customers and partners to provide guidance and technical assistance on database projects, helping them improve the value of their solutions when using AWS.
 Feng Cai is a Senior Database Consultant at AWS. He has a wide background in providing database services to different clients. Feng is currently a member of the AWS Worldwide Public Sector team, providing homogeneous and heterogeneous database migration support to customers.