AWS Database Blog
Integrate your Spring Boot application with Amazon ElastiCache using Spring Data Valkey
In this post, we walk you through integrating a Spring Boot application with Amazon ElastiCache using Spring Data Valkey for caching.
Spring Boot provides a quick way to build production-grade applications based on Spring Framework. To accomplish this, Spring Boot comes prepackaged with auto-configuration modules for most libraries typically used with Spring Framework, following convention over configuration.
Spring Data Valkey is a dedicated integration module for the Valkey data store. It provides first-class support for Valkey and uses Valkey GLIDE, the open source multi-language client library. Spring Data Valkey offers API compatibility with Spring Data Redis. You can migrate from Spring Data Redis to Spring Data Valkey with minimal friction while benefiting from improved performance and long-term support for Valkey.
Solution overview
Spring Framework supports transparently implementing caching in an application by providing an abstraction layer. The following code demonstrates adding caching to a method by including the @Cacheable annotation. Before invoking the getCacheableValue method, Spring Framework looks for an entry in the myTestCache cache that matches the myKey argument. If an entry is found, Spring returns the cached content immediately without invoking the method. Otherwise, the method is invoked, and the cache is updated before returning the value.
To implement caching using Valkey, first add the following dependencies to the project’s Maven POM file:
The spring-boot-starter-data-valkey dependency adds integration libraries between Spring and Valkey.
The valkey-glide dependency provides the Valkey GLIDE client driver. Valkey GLIDE requires platform-specific native libraries. The os-maven-plugin build extension resolves ${os.detected.classifier} automatically. Add the following to your Maven POM build section:
Next, add a configuration class to declare that all caches will exist in Valkey.
For configurable values, update the Spring Framework application.properties file. In the following example, the endpoint address of a Serverless ElastiCache cache is provided, with all cached entries configured to have a Time-to-Live (TTL) of 10 minutes:
spring.data.valkey.host=cache1-XXXXX.serverless.euw2.cache.amazonaws.com
spring.cache.valkey.time-to-live=10m
Amazon ElastiCache Serverless caches have in-transit encryption enabled by default. To configure in-transit encryption, we also add:
spring.data.valkey.ssl.enabled=trueThe demo code provided in this post implements this in an AWS Command Line Interface (AWS CLI) application. We demonstrate how to build and run this application in the next sections.
Prerequisites
You build and run the demo application on an Amazon Elastic Compute Cloud (Amazon EC2) Linux instance, running Linux from AWS. To create an EC2 instance and connect to it using Session Manager, refer to Connect to an Amazon EC2 instance by using Session Manager. After you create the instance, note the following information:
- The IDs of the subnets for the virtual private cloud (VPC) your EC2 instance lives in.
- The ID of the security group assigned to the instance.
- The ID of the EC2 instance.
To build the application, you must have the following prerequisites:
- Java 25 – To install the Java Development Kit (JDK) 25, run
sudo dnf install -y java-25-amazon-corretto-develon your EC2 instance. - Maven – To install Apache Maven, run
sudo dnf install maven -yon your EC2 instance.
Create Amazon ElastiCache Serverless cache
We use the Amazon ElastiCache Serverless option because you can create a cache in under a minute, and it instantly scales capacity based on application traffic patterns. We use the Valkey engine, which is an open source in-memory key-value data store.
To create a serverless cache using the AWS CLI, run the following command in AWS CloudShell, replacing <your VPC subnet IDs> with a comma-separated list of the subnet IDs for the VPC containing your EC2 instance:
Obtain and note the endpoint address for the cache:
The cache has a security group. Obtain and note this security group ID:
Your EC2 instance and ElastiCache cache exist in the same VPC. To enable access to the cache from the EC2 instance, you must permit this in the associated ElastiCache security group. Add a rule permitting access to port 6379 from the EC2 instance security group:
Download and run the demo application
On your EC2 instance, run the following commands:
Using your preferred editor on the Linux instance, update the src/main/resources/application.properties file to include the endpoint address for the spring-boot-demo cache. For example:
spring.data.valkey.host=spring-boot-demo-XXXXX.serverless.euw2.cache.amazonaws.comNow run the demo application with the following command:
The demo application builds and runs. You see output on the console. An example is shown in the following screenshot.
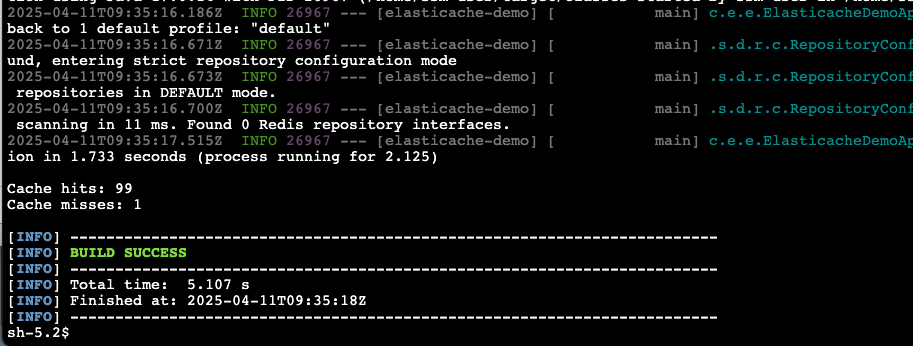
Figure 1: Spring Boot demo application console output showing one cache miss followed by cache hits
The output shows that for 100 attempts to invoke the getCacheableValue method, the first was a cache miss, causing the method to be invoked. The following 99 attempts were cache hits, returning the value from the cache without invoking the method. You can run the demo application again and see that there are now 100 cache hits and 0 misses (the cache is still populated from the previous run).
Why Spring Data Valkey
While spring-boot-starter-data-redis works with Valkey (Valkey is wire-protocol compatible with Redis OSS), Spring Data Valkey offers several advantages. These include native support for AWS Identity and Access Management (AWS IAM) authentication, OpenTelemetry, and Availability Zone (AZ) affinity. We cover each of these next.
AWS IAM authentication
The Spring Data Valkey GLIDE driver includes native support for AWS IAM authentication when connecting to ElastiCache or Amazon MemoryDB. This means your application can use standard IAM roles and policies to control cache access, instead of storing credentials in configuration files or a secrets manager.
To use IAM authentication, first enable IAM authentication on your ElastiCache cache, then configure your application.properties file, replacing the placeholder values with your cache details:
spring.data.valkey.client-type=valkeyglide
spring.data.valkey.valkeyglide.iam-authentication.service=ELASTICACHE
spring.data.valkey.username=<your Valkey IAM user name>
spring.data.valkey.valkeyglide.iam-authentication.cluster-name=<your Valkey cache name>
spring.data.valkey.valkeyglide.iam-authentication.region=<your Valkey cache region>
With this configuration, Spring Data Valkey automatically:
- Generates IAM authentication credentials using the AWS SDK credential chain.
- Authenticates to ElastiCache using the generated credentials.
- Refreshes the credentials before expiration.
Availability Zone (AZ) affinity
When running a multi-AZ ElastiCache node-based cache with replicas, read requests can be routed to any replica, including those in a different Availability Zone to your application. This cross-AZ traffic incurs standard data transfer charges and adds network latency.
You can’t set up AZ affinity for the serverless cache in our examples because it exposes a single endpoint with no replicas. Instead an Elastic Network Interface (ENI) is available in your chosen AZs to process that AZ’s traffic.
By implementing AZ-aware routing with Amazon ElastiCache, HotelTrader cut inter-AZ data transfer costs by 95% and reduced average latency by 49%.
The Valkey GLIDE AZ affinity feature can route read requests to replicas in the same AZ as your application. Turn on this feature in your Spring Data Valkey application.properties file:
Spring.data.valkey.valkeyglide.read-from=AZ_AFFINITY
spring.data.valkey.valkeyglide.client-az=eu-west-2a
The spring.data.valkey.valkeyglide.read-from parameter supports four read strategies. Choose the strategy best suited to your application’s needs.
You must set the spring.data.valkey.valkeyglide.client-az parameter to the AZ hosting the application. In many cases, we recommend determining this at runtime to support dynamic application deployment. One approach is to set an environment variable before you run the application. The parameter can then consume this environment variable. For example:
spring.data.valkey.valkeyglide.client-az=${currentAZ}OpenTelemetry observability
Valkey GLIDE has built-in OpenTelemetry support. The system exports telemetry data through the OpenTelemetry Protocol (OTLP) to an OpenTelemetry collector, which then forwards the data to Amazon CloudWatch or any other supported backend. You can turn on OpenTelemetry in the application.properties file:
spring.data.valkey.valkeyglide.open-telemetry.enabled=true
spring.data.valkey.valkeyglide.open-telemetry.traces-endpoint=<Your traces endpoint>
spring.data.valkey.valkeyglide.open-telemetry.metrics-endpoint=<Your metrics endpoint>
Migrating from Spring Data Redis
If you have an existing application using Spring Data Redis, migrating to Spring Data Valkey requires minimal changes. The Migration Guide provides detailed instructions. The key changes are:
- Update dependencies – Replace
spring-boot-starter-data-rediswithspring-boot-starter-data-valkeyand add thevalkey-glidedependency. - Update configuration properties – Change
spring.data.redis.*tospring.data.valkey.*. - Update imports – Change
org.springframework.data.redis.*toio.valkey.springframework.data.valkey.*.
Cleaning up
To avoid incurring future costs, you can delete the chargeable resources created as part of this post.
Delete the Amazon ElastiCache Serverless cache:
Delete the EC2 instance:
Conclusion
In this post, we showed you how to integrate a Spring Boot application with ElastiCache using Spring Data Valkey to enable caching. By using Spring Data Valkey instead of Spring Data Redis, you get purpose-built Valkey support, the Valkey GLIDE driver, native AWS IAM authentication, AZ-affinity routing for cost optimization, and built-in OpenTelemetry observability. You get all of these benefits while maintaining API compatibility with Spring Data Redis.
Adding caching to your application with ElastiCache can speed up application performance, scaling to millions of operations per second with microsecond response time.
To get started with ElastiCache, see the Amazon ElastiCache User Guide. To learn more about Spring Data Valkey, visit the project on GitHub.