AWS Database Blog
Migrate relational-style data from NoSQL to Amazon Aurora DSQL
Organizations using NoSQL databases have long benefited from their flexibility and scalability. Many of these organizations store relational data in denormalized structures, using substring queries and indexes to maintain and query relationships. For companies managing such data, Amazon Aurora DSQL presents a compelling opportunity to transition to a purpose-built relational database that is a fast, serverless distributed SQL database.
Aurora DSQL combines the familiarity of SQL—a cornerstone of database technology since the 1970s—with modern capabilities like ACID compliance and active/active multi-Region operations. Your organization can benefit from your teams’ SQL expertise and the maturity of relational systems while maintaining the flexibility and scalability of NoSQL databases. Because it’s serverless and optimized for transactional workloads, it’s ideal for microservice, serverless, and event-driven architectures.
In this post, we demonstrate how to efficiently migrate relational-style data from NoSQL to Aurora DSQL, using Kiro CLI as our generative AI tool to optimize schema design and streamline the migration process.
Solution overview
We demonstrate migrating data from a MongoDB NoSQL database, where related entities are stored in a single collection, to a normalized relational schema in Aurora DSQL.
We use the movie_collection dataset from a MongoDB collection, where multiple related entities are stored in a denormalized format, to normalized relational tables in Aurora DSQL. The extract, transform, and load (ETL) process will be performed using Apache Spark running as a step on an Amazon EMR cluster.
The following diagram shows the architecture used for the demonstration.

The solution consists of the following components:
- The source MongoDB database contains a movie collection with documents associated with movies. These documents represent different entities, such as movie, actor, director, movie actor, and movie director.
- Amazon EMR with Spark performs ETL processing by reading MongoDB data using the MongoDB Spark Connector with credentials from AWS Secrets Manager, transforming document structures to a relational model using Spark DataFrames, and writing the transformed data to Aurora DSQL using the Spark PostgreSQL JDBC connector.
- AWS Secrets Manager stores the MongoDB credentials.
- Amazon Simple Storage Service (Amazon S3) serves as storage layer for the data and JDBC driver.
- The target Aurora DSQL relational database stores transformed data in structured tables, supports SQL querying capabilities, and maintains referential integrity between tables.
- The target data structure consists of five main tables (Movies, Actors, Directors, Movie_Actors, Movie_Directors), each storing specific entity data and relationship mappings in a normalized relational format.
For this post, we use the following steps to perform a smooth migration:
- Identify entities and relationships in your NoSQL documents.
- Build normalized tables with proper keys and constraints.
- Write a Spark script to extract, transform, and load data.
- Run the ETL process to transfer data.
- Verify data integrity and completeness.
Prerequisites
Follow the instructions in this section to deploy the prerequisite resources in your AWS account.
Deploy infrastructure
Complete the following steps to deploy the infrastructure using an AWS CloudFormation template:
- Open AWS CloudShell.
- Run the following command to clone the GitHub repo:
- Enter the
mongodb-dsql-migration-stackdirectory and makedeploy.shexecutable: - Run the deploy script to deploy the infrastructure:
The CloudFormation stack takes approximately 10–15 minutes to complete. It creates the following resources:
- Amazon Virtual Private Cloud (Amazon VPC) resources, including VPC with public subnet and internet gateway
- Amazon Elastic Compute Cloud (Amazon EC2) instance with MongoDB database preconfigured
- EMR cluster for running Spark ETL jobs
- Aurora DSQL single-Region cluster
- Secrets Manager secret for MongoDB credentials
- AWS Identity and Access Management (IAM) roles and security groups with appropriate permissions
- Sample data loaded into MongoDB
The cost will be approximately $1 per hour for the infrastructure deployed.
- Run the following command to find the
dataset.jsonfile containing the exported data from MongoDB: - Download
dataset.jsonto your local folder.
Install Kiro CLI
We use Kiro CLI in this post to demonstrate the code generation process. Refer to the Kiro CLI installation steps to install it on your local machine.
Identify entities and relationships
When migrating from a NoSQL database to a SQL database, the first step is entity identification. This involves analyzing the existing dataset to create the corresponding DDL statements that will define the tables in Aurora DSQL. The process requires extracting the schema and parsing document structures to identify embedded objects, arrays, and potential entity candidates. An important aspect is properly normalizing the many-to-many relationships commonly found in NoSQL collections by creating appropriate junction tables. Although this can be time-consuming when done manually, modern generative AI tools like Kiro CLI can significantly streamline the analysis and DDL creation process.
To generate SQL DDL statements efficiently, it’s important to provide Kiro CLI with a representative data sample. Extract a comprehensive subset of your database, encompassing all entity types and relationships, either through a full dump or targeted queries. You can find the sample prompt that we used in the code in the GitHub repository, under the folder prompts_and_outputs. The file name is mongodb_dsql_migration_prompt.md.
Create relational tables
When developing with DSQL, it’s important to be mindful that it doesn’t support some PostgreSQL features, such as:
- No foreign keys – Enforce referential integrity in your application code
- No triggers – Implement business logic and data validation in your application layer
- No stored procedures or functions – Move all procedural logic to your application
- No sequences – Use UUIDs or other generated identifiers instead of auto-incrementing IDs
- Constraints on primary keys – Limited to eight columns with 1 KiB combined size
- Batch sizes – Transactions capped at 3,000 row modifications and 10 MiB total size
Data analysis process
We will be analyzing the dataset.json file using Kiro CLI. You can review the sample prompt used to extract the entities and the constraints under which we are working.
We first ask Kiro CLI to review the file and identify all entities. Then we ask Kiro CLI to create the SQL DDL for creating all the tables.
This prompt provides comprehensive instructions for analyzing a MongoDB dataset and generating Amazon DSQL compatible DDL that preserves adjacency list relationships through composite primary key and secondary key patterns while respecting DSQL’s specific constraints (no foreign keys, triggers, or sequences, UUID primary keys, asynchronous indexes, and so on).
The prompt is structured in four main sections:
- Migration Requirements – Establishes technical constraints
- What I Need You To Do – Breaks down the 4-step analysis and generation process
- My MongoDB Data Source – References the input file
- Expected Output Format – Specifies deliverables including migration overview, DDL scripts, relationship mapping, and migration strategy
To analyze dataset.json using Kiro CLI, complete the following steps:
- Open your terminal application.
- Navigate to the directory containing dataset.json.
- Start a Kiro CLI session:
- Copy the prompt from the provided GitHub repository and enter it in the terminal prompt.
Kiro CLI will generate a ddl.sql file in your working directory.
The following code block shows part of the output generated by Kiro CLI with the DDL you can run in Aurora DSQL to create the tables:
Deploy tables in Aurora DSQL
You can use the generated ddl.sql file to create tables in Aurora DSQL. Complete the following steps:
- On the Aurora DSQL console, choose Clusters in the navigation pane.
- Select your Aurora DSQL cluster.
- Under Connect with Query Editor, choose Connect with AWS CloudShell.
- Choose Connect as admin, then choose Launch CloudShell.
- After connecting to CloudShell, choose Actions to upload the ddl.sql file.
- Execute the DDL statements by running the following command at the postgres prompt:
Create ETL script
For our migration implementation, we create an ETL script to efficiently process and migrate the data into Aurora DSQL. For this step, we recommend using AWS Glue or Amazon EMR. AWS Glue is a fully managed ETL service that simplifies data preparation and loading tasks. Amazon EMR manages Hadoop clusters for big data processing and analytics workloads.
To streamline the development process, we again use Kiro CLI as our AI-powered coding assistant. It helps accelerate code generation for both the extraction and loading components of your ETL pipeline. By providing Kiro CLI DDL statements from the ddl.sql file, you can obtain AI-generated code snippets tailored to extract each entity and its associated relationships.
You can review a sample prompt called pyspark_migration_prompt.md found in the prompts_and_outputs folder. When you write your prompt for your migration, you can modify the sample prompt to match your use case and data. Kiro CLI will follow the instructions in this file and create the PySpark script you will execute. The generated file is named mongodb_to_dsql_migration.py and a sample generated file can be found in the code repo in the prompts_and_outputs folder.
Although Kiro CLI can automate much of the repetitive coding tasks, human oversight remains crucial, especially when dealing with complex data structures or mission-critical systems. As a best practice, thoroughly review and validate the generated code to ensure accuracy in capturing all data relationships and adherence to your specific business logic and data transformation requirements.
Execute ETL script
Complete the following steps to run the ETL script:
- Locate your S3 bucket name where you’re storing the EMR script. The bucket name follows the format
emr-scripts-dsql-XXXXXXXXXXXX. - Upload the ETL script (
mongodb_to_dsql_migration.py) to your S3 bucket. - Add a Spark job as a step to your EMR cluster:
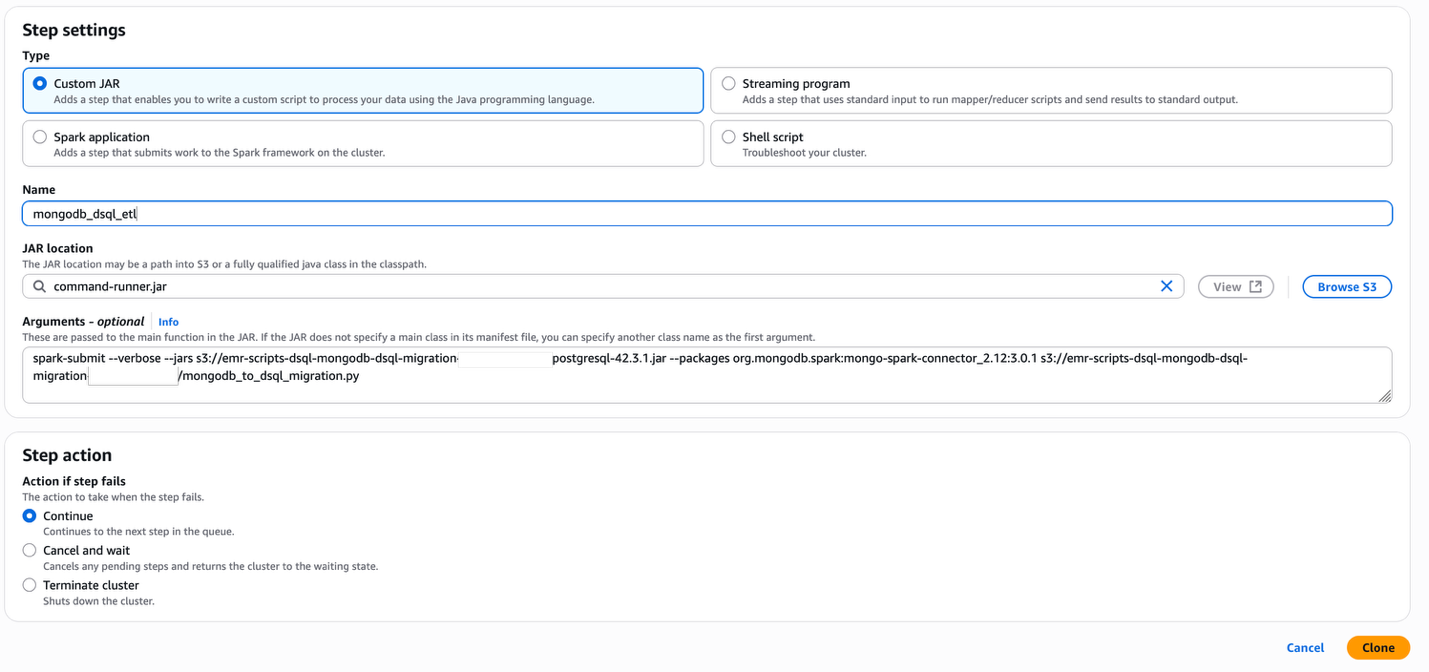
- Choose Add Step.
- For Type, select Custom JAR.
- For Name, enter a descriptive name (for example, MongoDB Migration).
- For JAR location, enter
command-runner.jar. - For Arguments, enter the following code, updating the name of your EMR script’s S3 folder:
- For Action if step fails, select Continue.
- Choose Add.
- To verify successful completion, check the stdout logs. If the step fails, review the stderr logs for error messages.
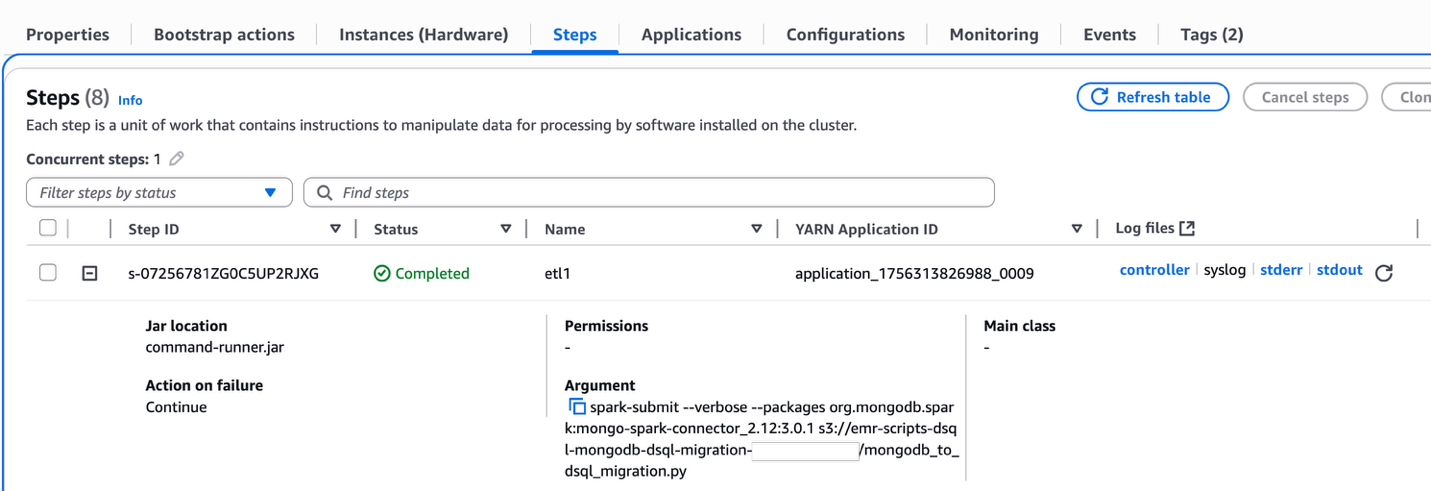
This extracts all entities from MongoDB and inserts them in Aurora DSQL.
Validate migration
The final phase of the migration process involves validating the integrity and accuracy of the transferred data. Consider the following checks:
- Basic entity count validation – Begin with simple count queries for each entity, comparing results between the source database and Aurora DSQL. This provides a quick, high-level check of data completeness.
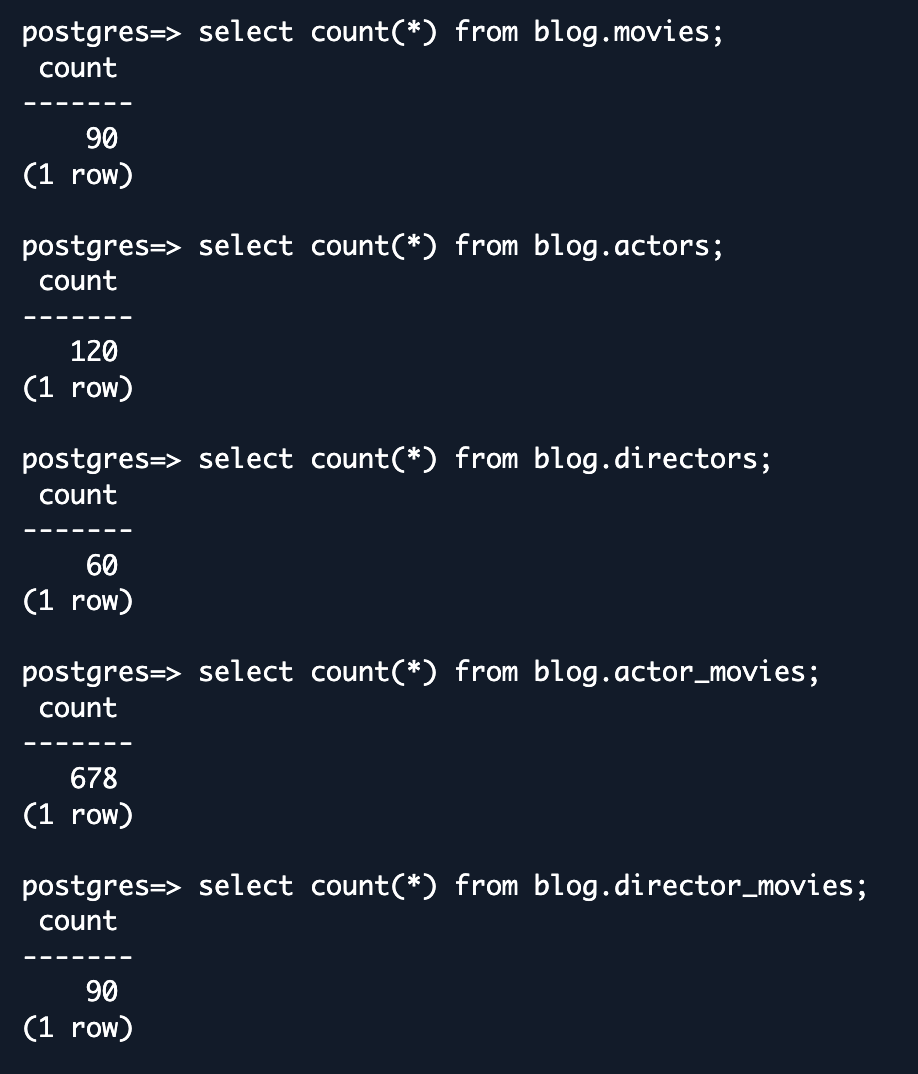
- Row validation – Review a few sample rows between MongoDB and DSQL. You will need to identify sample rows with the same primary key for which you can compare all the column values between MongoDB and Aurora DSQL.
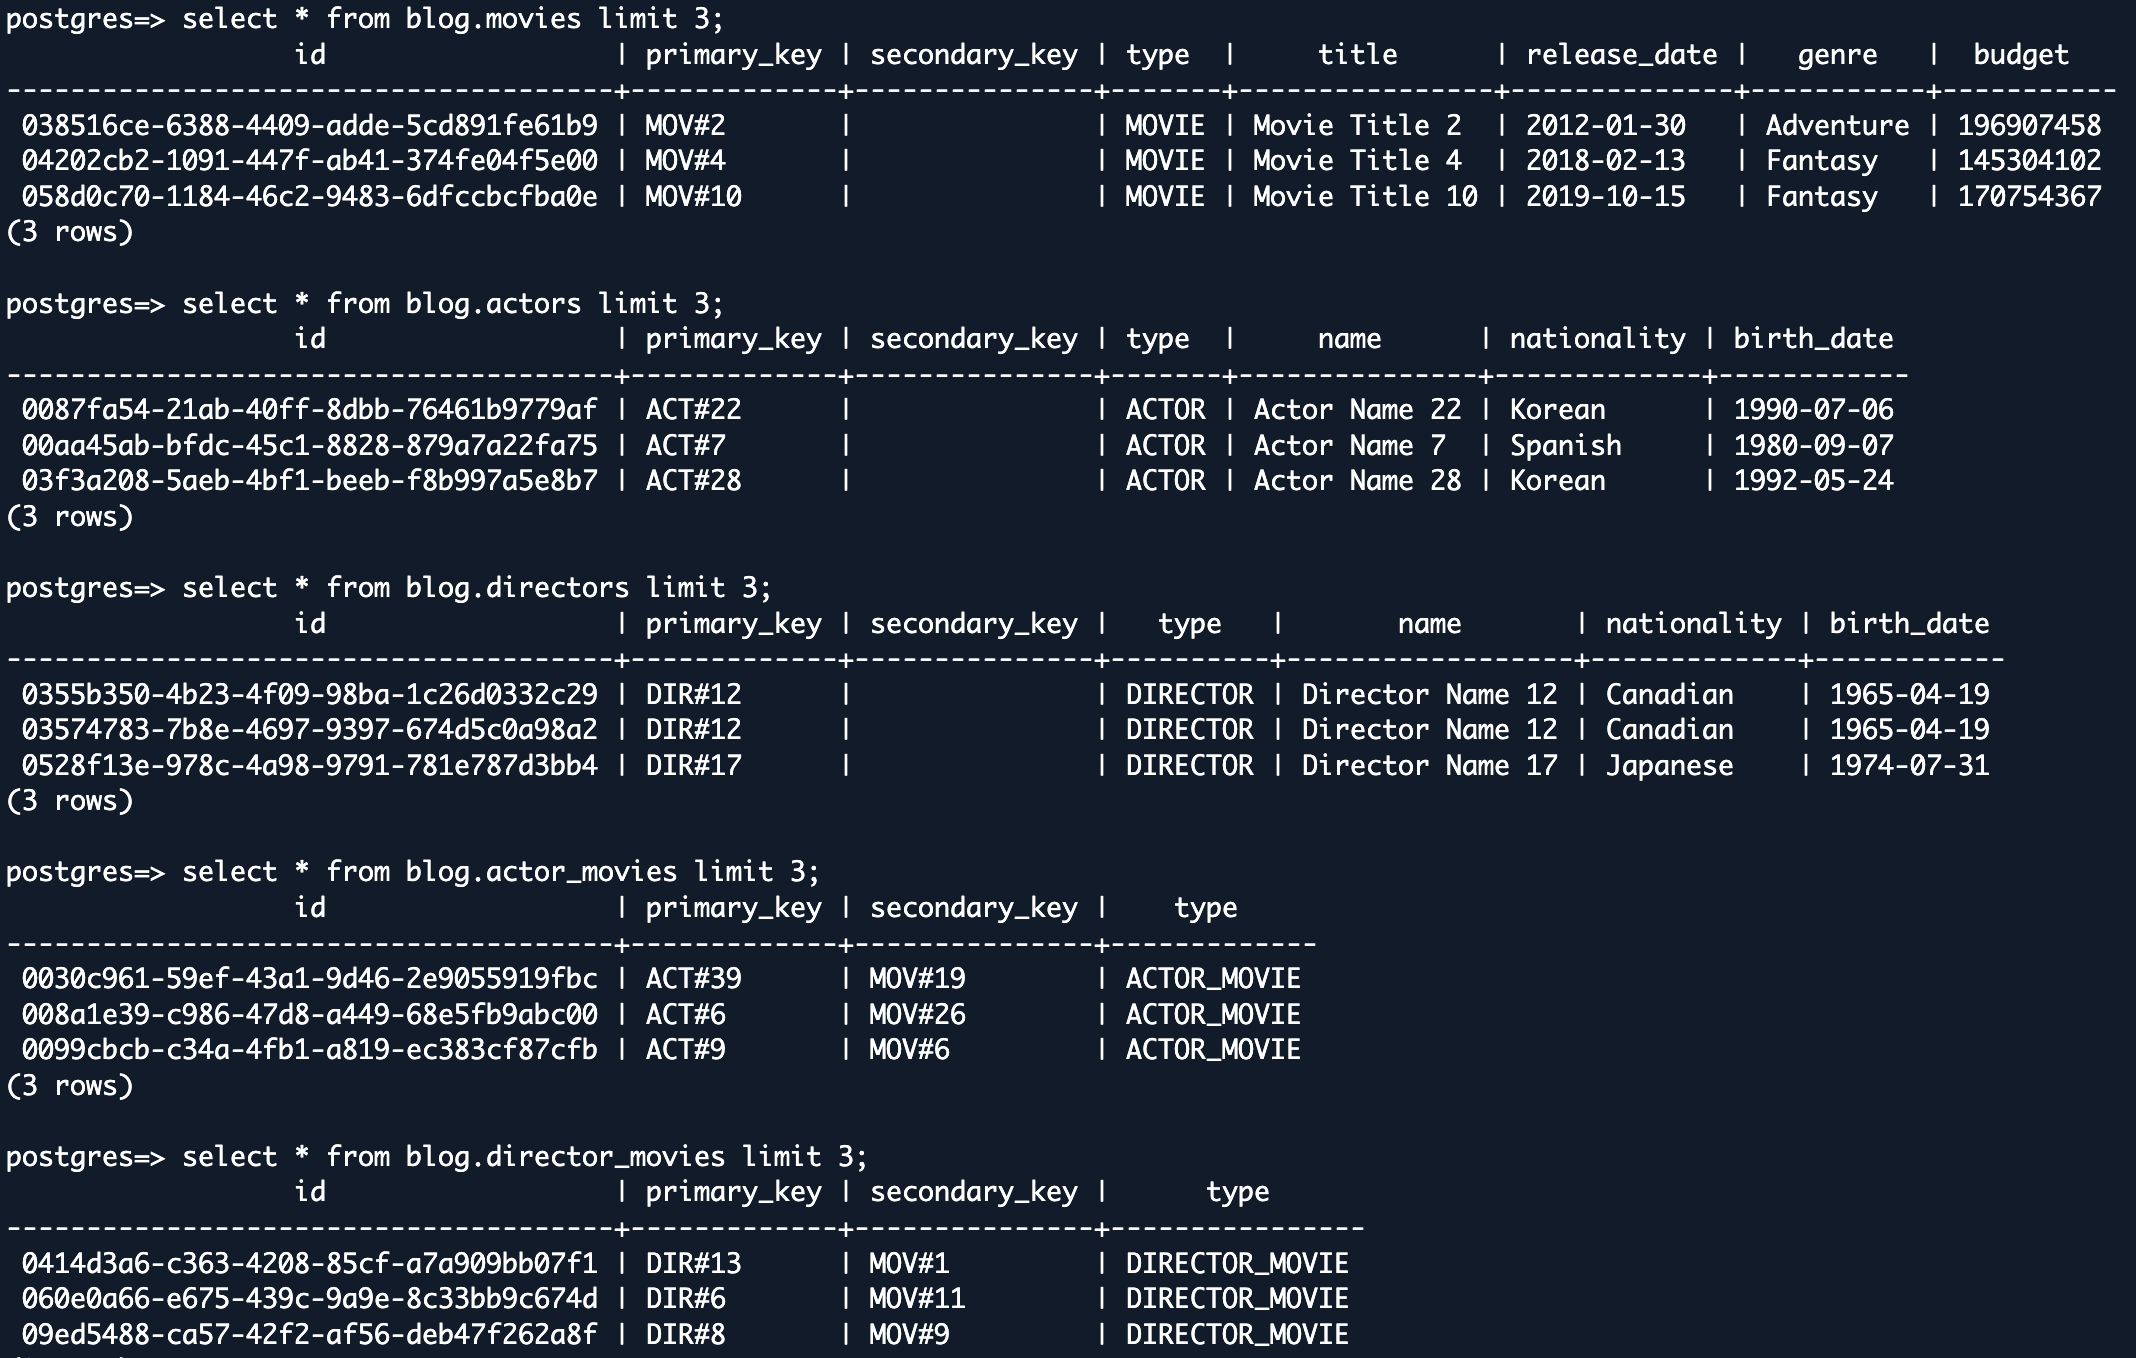
You can also implement more rigorous data validation methodologies as desired.By implementing a comprehensive validation strategy, you can be confident in the success of your data migration project and maintain the integrity of your business operations post-migration.
Clean up
To help prevent unwanted charges to your AWS account, delete the AWS resources that you used for this walkthrough:
- On the Amazon S3 console, empty and delete the following buckets:
- On the CloudFormation console, delete the stack mongodb-dsql-migration.
This will automatically delete the resources created by the template, including:
- Aurora DSQL cluster
- EMR cluster
- EC2 MongoDB instance
- S3 buckets
- VPC and networking components
- IAM roles and security groups
- Secrets Manager secret
Conclusion
In this post, we demonstrated migrating from a NoSQL relational-style design to Aurora DSQL’s relational model, demonstrating how organizations can get the best of both worlds—the scalability and flexibility that initially drew them to NoSQL, combined with the robust ACID compliance, SQL querying capabilities, and relational integrity of a traditional database system. Through our migration of a movie collection database from MongoDB to Aurora DSQL, we illustrated the complete end-to-end process, from entity identification and schema design to ETL execution and validation.
By transitioning to Aurora DSQL, organizations gain access to PostgreSQL-compatible SQL querying. This flexibility becomes increasingly valuable as applications evolve and new query requirements emerge. Additionally, Aurora DSQL’s serverless architecture, with its SLA of 99.99% single-Region and 99.999% multi-Region availability, provides the reliability and scale that enterprise applications demand without the operational overhead of managing database infrastructure. The integration of generative AI tools like Kiro CLI throughout the migration process—from DDL generation to ETL script creation and validation query development—demonstrates how generative AI assistance can significantly reduce the time and complexity traditionally associated with database migrations.
Aurora DSQL combines distributed SQL capabilities with NoSQL scalability, making it ideal for modern applications. This approach provides a practical template for organizations seeking to maximize their relational data capabilities while maintaining the operational efficiency that modern applications require.Try out the solution for your own use case, and share your feedback in the comments.