AWS Database Blog
Replicate data from Amazon Aurora to Amazon S3 with AWS Database Migration Service
In this blog post, I’ll cover how to use an AWS CloudFormation template to automate the configuration that allows you to replicate data between a relational database like Amazon Aurora to Amazon Simple Storage Service (Amazon S3). I’ll walk you through a sample CloudFormation template so that you can customize for your needs.
The AWS Database Migration Service (AWS DMS) enables you to migrate data from one data source to another. For example, Oracle to Aurora, NoSQL to SQL, or on-premises to cloud. In addition to using DMS for a one-time data migration, customers often leverage DMS for on-going heterogenous data replication as part of their ETL process, which is the focus of this blog post.
Solution overview
Here’s a diagram of our architecture.
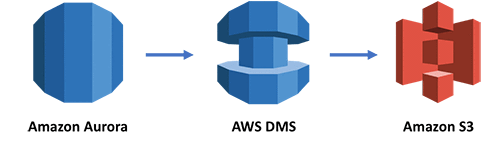
The sample CloudFormation template describes and provisions all of the required resources for this example. You can find the code on GitHub and deploy the template as a stack with the Launch Stack button. Note: This template uses a RDS DB cluster snapshot in the us-east-1 region. If you’d like to deploy this stack to another region, copy the snapshot to the desired region and replace the SnapshotIdentifier value in the CloudFormation template.
![]()
When you start this, it takes about 50 minutes for the stack to be created. The template handles the following for you:
- Creating an Aurora MySQL database from a snapshot of the AWS DMS Sample Database.
- Configuring DMS-required settings on the Aurora MySQL database. See Using a MySQL-Compatible Database as a Source for AWS DMS for details.
- Creating a S3 bucket.
- Creating a DMS replication instance.
- Configuring required IAM permissions and role if they do not already exist. See IAM Permissions Needed to Use AWS DMS for more information.
- Configuring the Aurora database as a DMS source endpoint.
- Configuring the S3 bucket as a DMS target endpoint.
- Creating a DMS migration task to load existing data and replicate ongoing changes from the source endpoint to the target endpoint.
After your stack is created, you can test replication from Aurora to S3. I’ll highlight some information about working with a MySQL database and DMS below.
Using a MySQL-compatible database as a source for DMS
This CloudFormation template creates an Aurora MySQL database to act as an example source endpoint for DMS. You could also configure the template to replicate data from any other MySQL-compatible database (MySQL, MariaDB). Regardless of which MySQL-compatible engine you choose, you first configure certain prerequisites to use the database as a source for DMS. For more details, see Using a MySQL-Compatible Database as a Source for AWS DMS.
DMS supports multiple migration methods. You can migrate existing data only, migrate existing data and replicate ongoing changes, or only replicate data changes from the source to the target database. In this example, I replicate all of the existing and on-going data from Aurora to S3 by selecting the migrate existing data and replicate ongoing changes (change data capture/CDC) method. If you would like to replicate ongoing changes, you must also enable binary logging on the MySQL database. The template handles this for you. For more details, see How do I enable binary logging for my Amazon RDS instance running Amazon Aurora MySQL?.
There are performance and crash recovery considerations when enabling on-going replication for Aurora MySQL. See DMS Best Practices and the Crash Recovery section of Amazon Aurora Reliability for more information.
Configuring IAM Permissions for AWS DMS
There are several IAM permissions and roles required to use AWS DMS. If the permissions and roles are not already created, the template configures an IAM role called dms-vpc-role that allows DMS to create the EC2 instance and configure the network for the replication instance. It also creates a role called dms-cloudwatch-logs-role to allow you to view replication instance metrics and logs. For more details, see IAM Permissions Needed to Use AWS DMS.
Using Amazon S3 as a DMS target also requires additional IAM permissions, and the template creates a role called dms-s3-target-role that allows certain permissions on the target S3 bucket. For details, see Prerequisites for Using Amazon S3 as a Target.
Testing the example
After your stack is created, note your S3 bucket name and Aurora endpoint information from the Outputs tab in the CloudFormation console. You can see this in the example console below. This information is used later.

Next, start the DMS task by following these steps in the DMS console:
- In the left navigation pane, choose Tasks.
- Choose the created task.
- Choose Start/Resume.
After you start the task, DMS starts loading data from the source endpoint to the target. Choose your S3 bucket name in the S3 console.
There is a folder called dms_sample in the bucket that contains multiple folders – each folder corresponding to a table on the source database. Inside each folder is a CSV of the sample data. It might take up to 10 minutes for the initial data load to complete. You can see this in the example console below.

You can also monitor the task progress in the DMS console. An example console is below. After the task status shows Load complete, you can test the change data capture by running queries against the source database.

You can use any MySQL client to connect to your Aurora database. This demo shows commands using a Linux mysql client.
Connect to your database from terminal/shell:
Enter password when prompted for a password. After you’re connected, use the dms_sample database:
The sample database includes procedures designed to generate transactions. To generate transactions, run the following SQL statement:
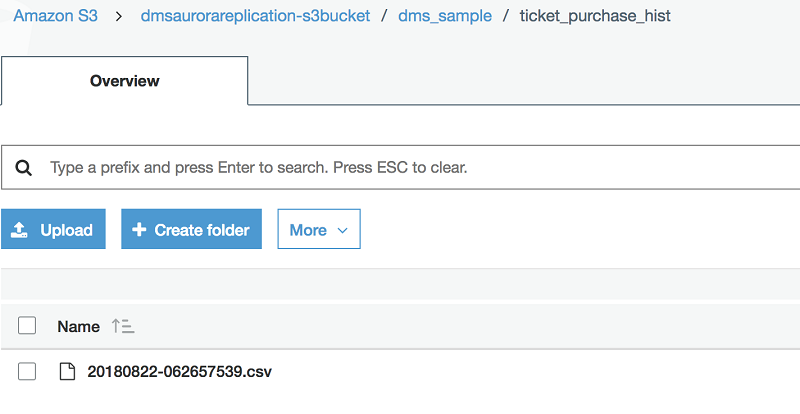
The statement “sells” 50 tickets in successive purchases each delayed by 0.01 seconds. Tickets are sold in random groups of 1-6 to random people for a random price. A record of each transaction is recorded in the ticket_purchase_hist table. You may need to wait a minute for the data to migrate from your Aurora database to your S3 bucket. After the replication begins, you can see a new ticket_purchase_hist folder created in the dms_sample folder. You can find a CSV file with your changes inside. This can be seen in the screenshot here.
For more procedures that you can test with, see the SampleDB GitHub page.
Final notes
I hope you find the CloudFormation template for on-going replication with DMS helpful and encourage you to modify it to support your business’ needs.
Now that your data is in Amazon S3, you might use other AWS services that are integrated with S3 to power new workloads. For example, you can run big data analytics on your data in S3 without moving the data into a separate analytics system. Amazon has a suite of tools available to you, such as:
- Amazon Athena – a serverless, interactive query service that gives anyone who knows SQL on-demand query access to vast amounts of unstructured data. To see Athena in action, follow Amazon Athena – Interactive SQL Queries for Data in Amazon S3.
- Amazon Redshift Spectrum – a feature included in Amazon Redshift, Spectrum allows you to run SQL queries spanning both your data warehouse and S3. To see Redshift Spectrum in action, follow Amazon Redshift Spectrum – Exabyte-Scale In-Place Queries of S3 Data.
- Amazon EMR – a service that provides a managed Hadoop framework, making it easy, fast, and money-saving to process vast amounts of data. To learn more about EMR, follow Getting Started: Analyzing Big Data with Amazon EMR.
If you have comments or questions about this blog post, submit them in the comments section below.
About the Author
 Chris Chang is a Solutions Architect with Amazon Web Services. He works with startups and small businesses in the US and helps them adopt cloud technology to build scalable and secure solutions using AWS. He enjoys surfing, biking, and trying to not overcook dinner.