AWS DevOps & Developer Productivity Blog
Run Maestro tests on real Android devices using AWS Device Farm
ManoMano is a European online marketplace for home improvement and gardening products. Their mobile engineering team builds a React Native application that serves millions of customers across Europe. To verify app quality across a wide range of Android devices, ManoMano adopted Maestro for end-to-end (E2E) testing and needed a way to run these tests at scale on real hardware. This post shares how they solved that challenge using AWS Device Farm.
In this post, you learn how to run Maestro mobile UI tests on real Android devices using AWS Device Farm. Maestro is a mobile UI testing framework that uses a declarative YAML syntax to describe test flows. By using the custom test environment in AWS Device Farm, you can install and run Maestro flows on real physical devices in the cloud.
This post is for mobile developers and Quality Assurance (QA) engineers who use Maestro for E2E testing and want to scale their test suites across real Android devices with different brands, screen sizes, and OS versions.
Many teams that adopt React Native prefer Maestro for its YAML-based simplicity and reliable mobile testing capabilities. With the custom test environment feature in AWS Device Farm, you can run any framework that operates over Android Debug Bridge (ADB), including Maestro. This post shows you how to set it up end to end.
Solution overview
AWS Device Farm is a fully managed app testing service that you can use to test your Android and iOS apps on physical devices in the AWS Cloud. It provides officially supported frameworks (Appium, Espresso, and XCTest) with all dependencies and setup pre-configured. It also offers custom test environments that give you full control over the test host. This means you can install and run any framework that operates over ADB, including Maestro. The custom environment provides the following capabilities:
- An Amazon Linux 2023 host machine with ADB pre-installed, fully cleaned up and not reused between runs.
- ADB connectivity to the physical device under test.
- The ability to install additional tooling through shell commands in the test spec from your test package, downloaded from the internet or accessed through private sources within your virtual private cloud (VPC).
- Live log and video streaming during test execution.
- Full artifact collection (logs, screenshots, and other test output) from specified directories.
With these capabilities, you can install the Maestro CLI and, if needed, its primary dependency (for example, Java 21) on the test host. You then run your YAML-based test flows against the connected device, the same way you run them locally.
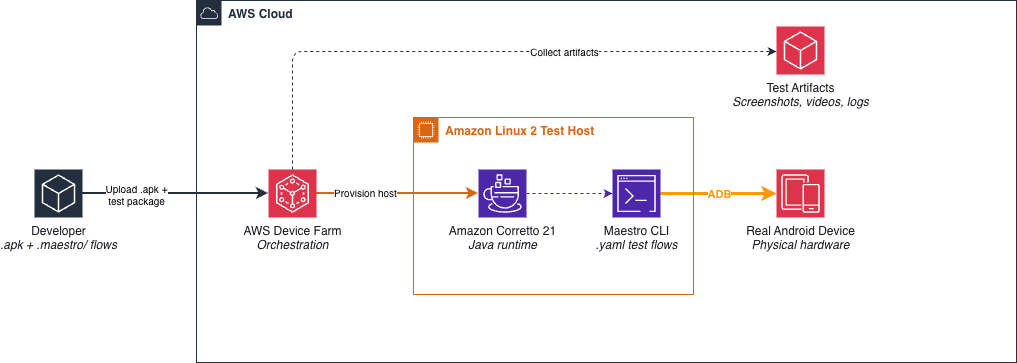
Figure 1: Solution architecture
How it works
The solution uses the following workflow:
- AWS Device Farm provisions a real Android device and an Amazon Linux 2023 test host with ADB access to the device.
- During the install phase, the test spec downloads and installs Amazon Corretto 21 (Java) and the Maestro CLI on the test host.
- During the test phase, Maestro connects to the device through ADB and runs your
.yamltest flows. - Maestro writes screenshots, video recordings, and test results to the
$DEVICEFARM_LOG_DIRdirectory. - AWS Device Farm collects all artifacts and makes them available for download after the run completes.
Note: This approach currently supports Android devices only. As of 2026, Maestro iOS support is optimized for simulators and does not work with the real physical iOS devices that AWS Device Farm provides (as indicated in the Maestro documentation).
Prerequisites
To complete this walkthrough, you must have the following:
- An AWS account with access to AWS Device Farm
- An Android .apk file built for testing (a release build with animations disabled is recommended for stability)
- Maestro test flows written in YAML (for more information, see Getting started in the Maestro documentation)
- Familiarity with the AWS Device Farm Console
- The Maestro driver APKs (
dev.mobile.maestro) for uploading as Extra Apps in AWS Device Farm. After running Maestro locally at least once on a connected device, you can extract the installed APKs usingadb shell pm path dev.mobile.maestro.
Walkthrough
Complete the following steps to configure and run Maestro tests on AWS Device Farm.
Step 1: Prepare your Android application package
Build your React Native (or native Android) application as an .apk file. Use a release build or a dedicated test build with animations disabled to reduce test flakiness.
Step 2: Package your Maestro test flows
AWS Device Farm expects a test package in .zip format. Use this zip file as a carrier for your Maestro .yaml flows. The following example shows a typical test directory structure:
Run the following command to package the directory into a zip file:
Upload this zip file to AWS Device Farm as your test package. AWS Device Farm extracts it to $DEVICEFARM_TEST_PACKAGE_PATH, which makes your flows accessible during test execution.
Step 3: Configure the test run
In the AWS Device Farm Console, create a test run with the following configuration:
- For Choose your application, upload your .apk file.
- For Test framework, select Appium Node.js. This selection determines the expected format of the test package you upload. Appium Node.js accepts a generic zip file containing your test scripts and binaries, which makes it suitable for packaging Maestro flows and the Maestro CLI. Other framework options (such as Instrumentation) require framework-specific package formats like compiled jar files.
- For Test package, select the zip file that contains your .maestro directory.
- For Test spec, replace the default
testspec.ymlwith the custom configuration in Step 4. - For Devices, select a curated device pool or specific Android devices.
- For Extra Apps (located under Additional configuration and then Install other apps), upload the Maestro driver APKs (
dev.mobile.maestro). AWS Device Farm installs these on the device before the test begins to help you maintain compatibility with restrictive Android skins. - Review your configuration and choose Confirm and start.
Step 4: Configure the test specification
The following test spec instructs AWS Device Farm to download Amazon Corretto 21, install the Maestro CLI, and run your test flows.
In the following code, replace {YOUR_APP_ID} with your application package ID (for example, com.example.myapp). You can find this in your application’s AndroidManifest.xml or by running adb shell pm list packages | grep <your-app-keyword>.
For more information, see Custom test environments in AWS Device Farm.
Key environment variables
The test spec uses the following AWS Device Farm environment variables:
$DEVICEFARM_TEST_PACKAGE_PATH: The path where AWS Device Farm extracts your uploaded test package (zip file).$DEVICEFARM_LOG_DIR: The default directory for storing artifacts. AWS Device Farm collects files from this directory after the run.$DEVICEFARM_APP_PATH: The path to your uploaded .apk file on the test host.$DEVICEFARM_DEVICE_NAME: The unique device identifier (UDID) of the device under test.$DEVICEFARM_DEVICE_OS_VERSION: The Android OS version running on the device.
Reviewing test results
After the test run completes, AWS Device Farm displays results organized into three suites:
- Setup suite: Contains the output from the install and
pre_testphases, including Amazon Corretto and Maestro installation. - Tests suite: Contains the output from the
maestro testcommand, with pass/fail status for each flow. - Teardown suite: Contains the
post_testphase output and device cleanup.
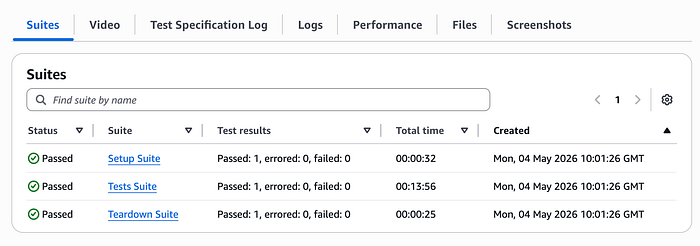
Figure 2: AWS Device Farm test run results showing the Setup, Tests, and Teardown suites
In the Test Specification Log, you can view the live console output. The following example shows typical output during a test run:
To download detailed results, including screenshots and video recordings, open the Files tab and choose Customer Artifacts. For more information, see Downloading artifacts in a custom test environment.
Handling MIUI device installation prompts
Maestro requires a driver app to be installed on the device under test. On devices with restrictive Android skins (such as Xiaomi MIUI and Oppo ColorOS, which are common in the AWS Device Farm device pool), the operating system blocks USB installations. Installation proceeds only after a user accepts a security prompt, as displayed in Figure 3.
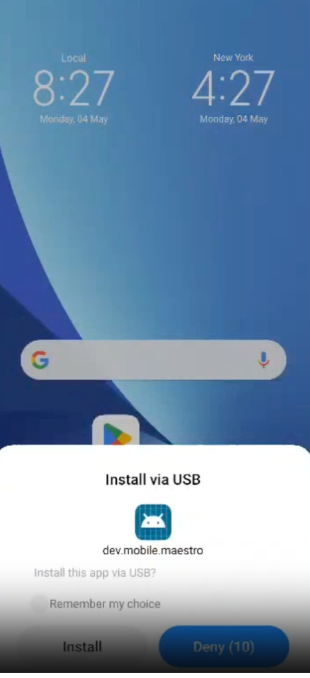
Figure 3: MIUI installation permission dialog
The way to address this scenario is by pre-installing the Maestro driver APKs as Extra Apps in the AWS Device Farm Console. When you upload the Maestro APKs alongside your application, AWS Device Farm installs them on the device before the test begins. You can then grant the necessary background permissions through ADB using appops commands in the pre_test phase:
These commands tell the OS to trust the Maestro driver app, allowing it to run in the background and start activities without user interaction. This approach removes the need for the UI watcher script and helps make sure that Maestro can start driving your application when the test begins.
Best practices
The following recommendations are based on the AWS Device Farm best practices for custom test environments:
- Use environment variables instead of absolute paths: AWS Device Farm provides
$DEVICEFARM_TEST_PACKAGE_PATH,$DEVICEFARM_LOG_DIR, and other variables that help maintain consistent behavior across test hosts. - Direct artifacts to
$DEVICEFARM_LOG_DIR: Use the--test-output-dirflag to write Maestro output to this directory. AWS Device Farm collects artifacts stored here automatically. - Verify non-zero exit codes on failure: Maestro returns a non-zero exit code when tests fail, which AWS Device Farm uses to mark the run as failed. Verify this behavior with your Maestro version.
- Do not log sensitive data: Test spec logs are available as downloadable artifacts. Do not echo API keys or secrets in your commands.
- Disable animations in your test build: Animations are a common source of test flakiness. Disable them at build time or add ADB commands in the
pre_testphase. - Use Maestro tags for selective test runs: Use
--include-tagsor--exclude-tagsto run subsets of your test suite, such as smoke tests compared with full regression.
Automate with CI/CD
You can automate this workflow by integrating AWS Device Farm into your continuous integration and continuous delivery (CI/CD) pipeline with the AWS Command Line Interface (AWS CLI) or AWS SDKs. The following are the key API operations:
CreateUpload: Upload your .apk and test package zip file.ScheduleRun: Start a test run with your test spec, app, and device pool.GetRun: Poll for run completion and retrieve the result status.ListArtifacts: Download test artifacts such as screenshots, videos, and logs.
For GitHub Actions, use the official GitHub Action, which handles uploading your application and test package, scheduling the run, polling for completion, and downloading artifacts. For AWS CodePipeline, see AWS Device Farm test action reference. For other CI/CD tools or services, use the AWS CLI or AWS SDKs with the AWS Device Farm API.
Cost considerations
AWS Device Farm pricing offers two models for automated testing:
- Pay per device minute: You pay per minute of device usage. A typical Maestro test run takes 5–15 minutes per device, depending on the number of flows.
- Unlimited testing (flat rate): A monthly flat fee per device slot gives you unlimited testing on one device at a time. This model is cost-effective for teams that run frequent test suites.
The install phase (downloading Java and Maestro) adds approximately 1–2 minutes to each run. To optimize costs, run critical smoke tests on every commit and full regression suites on release branches only. For current pricing details, see the AWS Device Farm pricing page.
Troubleshooting
The following list describes common issues and their solutions.
- Maestro times out waiting for the app: Verify that your .apk is a release build or that the app starts quickly. Increase the launch timeout by using the
appLaunchTimeoutparameter in your flow YAML file. - Tests fail on MIUI or Xiaomi devices only: Verify that the Maestro driver APKs are uploaded as Extra Apps in AWS Device Farm and that the
appopscommands in thepre_testphase grantRUN_IN_BACKGROUNDandSTART_ACTIVITIES_FROM_BACKGROUNDpermissions. - Java not found during Maestro run: Verify that the
export PATHcommands in the install phase are correct. Environment variables that are set in one phase persist to subsequent phases. - Artifacts do not appear after the run: Verify that
--test-output-dirpoints to$DEVICEFARM_LOG_DIRor a subdirectory. AWS Device Farm collects only files in paths that are listed under theartifactssection. - Test marked as passed despite flow failures: Verify that your Maestro version returns a non-zero exit code on failure. Some older versions might not exit with a non-zero code by default.
Cleaning up
To avoid incurring future charges, delete the following resources that you created during this walkthrough:
- In the AWS Device Farm Console, delete the test run and any associated uploads that you no longer need.
- If you created a device pool specifically for this walkthrough, delete it from your AWS Device Farm project.
- AWS Device Farm does not incur charges when no test runs are active. No additional cleanup is required unless you are using the unlimited testing plan.
Conclusion
By integrating Maestro with the AWS Device Farm custom test environment, ManoMano transformed their mobile testing strategy. They moved from manual validation on a handful of devices to automated end-to-end testing across real physical hardware on every release. This approach delivers:
- Broader device coverage: Tests run on devices from different manufacturers with varying screen sizes and OS versions, catching device-specific rendering issues and permission dialogs that emulators miss.
- Faster feedback cycles: Automated test runs complete in minutes rather than the hours required for manual testing across multiple devices.
- Consistent reliability: Pre-installing the Maestro driver APKs and granting background permissions through ADB eliminates flakiness caused by restrictive Android skins like MIUI.
- CI/CD integration: Tests run automatically on every pull request using the official AWS Device Farm GitHub Action, preventing regressions from reaching production.
The key enabler is the AWS Device Farm custom test environment. With it, you can run any framework that operates over ADB, without being limited to officially supported test frameworks. This means you can combine the YAML-based test authoring in Maestro with a managed fleet of real devices and extend the pattern to other ADB-compatible tools as your testing needs evolve.
In this post, you learned how to configure the custom test environment, package your Maestro flows, handle manufacturer-specific restrictions, and automate the workflow in your CI/CD pipeline. To get started, create an AWS Device Farm project and try running your existing Maestro flows by following the steps in this post.
Related resources
- AWS Device Farm Developer Guide.
- Custom test environments in AWS Device Farm.
- Test spec reference and syntax.
- Environment variables for custom test environments.
- Best practices for custom test environment execution.
- AWS Device Farm pricing.
- Amazon Corretto 21.
- Maestro – Getting started.
- Testing mobile apps with Cucumber and Appium through TestNG on AWS Device Farm.
- Build a CI/CD Pipeline for your Android App with AWS Services.