.NET on AWS Blog
AWS Transform Custom: Automating .NET Lambda Runtime Upgrades
Introduction
Upgrading .NET Lambda functions is manual, time-consuming, and error-prone, especially when managing hundreds of functions across multiple repositories. Each upgrade requires updating .csproj target framework files (the C# project configuration that specifies which .NET version to target), bumping NuGet package references (the .NET package manager, like npm for Node.js), fixing breaking API changes, and updating infrastructure as code (IaC) templates, function by function, repository by repository.
AWS Transform custom lets you define reusable transformation definitions that automate code upgrades across your repositories. While AWS Transform custom currently provides built-in managed transformations for Python, Java, and Node.js, this blog post shows you how to fill that gap for .NET by building and publishing your own transformation definition. With AWS Transform custom, you can define your own transformation, execute it consistently across codebases, and publish it for reuse across your team.
In this post, you learn how to author a AWS Transform custom transformation definition that automates .NET 6 to .NET 10 AWS Lambda (Lambda) upgrades, execute it against the open source serverless-dotnet-demo repository, validate the results, and publish the transformation for team-wide reuse.
Managing .NET Lambda Runtime Lifecycles
Lambda follows a runtime deprecation policy aligned to upstream language end-of-life schedules. For .NET, Lambda supports these Long-Term Support (LTS) releases:
| Runtime | End of Support |
| .NET 6 | November 2024 |
| .NET 8 | November 2026 |
| .NET 10 | November 2028 |
When a Lambda runtime reaches end of life, functions lose access to security patches and technical support, leaving applications without patches for known issues and potentially out of compliance. For organizations managing hundreds of .NET Lambda functions across multiple accounts and repositories, the scale of coordination required, the dependency resolution and testing effort, and upgrade expertise that is often limited to handful of engineers, adding to the challenge.
This is exactly the type of repeatable, organization-wide transformation that AWS Transform custom is built to automate, and by authoring a custom transformation definition, you can extend that capability to .NET today.
Sample Application
This demonstration uses serverless-dotnet-demo, an open source serverless application that implements a full create, read, update, delete (CRUD) API using AWS Lambda, Amazon API Gateway, and Amazon DynamoDB. The src/NET6 directory contains four Lambda functions written in C# targeting net6.0, deployed by using AWS Serverless Application Model (AWS SAM). This is the upgrade source, a realistic, deployable .NET 6 Lambda application with existing unit tests.
- The following walkthrough shows how to:
Author a custom transformation definition for .NET 6 to .NET 10 Lambda upgrade - Execute it against
src/NET6 - Validate the output
- Publish the transformation for reuse across your team
Prerequisites
Before you begin, verify that your development environment has the following. This walkthrough uses an Amazon Linux 2023 EC2 instance, but the steps are similar for other Linux distributions and macOS.
Estimated time to complete: approximately 30–45 minutes.
- AWS credentials — Configure AWS Command Line Interface (AWS CLI) with appropriate permissions for AWS Transform operations. At minimum, you need permissions for the
transformandtransform-customAPI actions. For a complete list of required AWS Identity and Access Management permissions, see the AWS Transform IAM permissions documentation. - Node.js — Install the latest LTS version from nodejs.org or use your package manager
- Git — Install from git-scm.com or use your package manager
- AWS Transform CLI — Getting started with Transform Custom CLI setup
- NET SDK — Install both .NET 6 and .NET 10 SDKs from Microsoft’s .NET download page to build and test Lambda functions before and after transformation
- AWS SAM CLI — Installing the AWS SAM CLI
Step 1: Prepare the Sample Project
Run the following command to clone the sample repository and navigate to the .NET 6 source directory.
git clone https://github.com/aws-samples/serverless-dotnet-demo.gitcd serverless-dotnet-demo/src/NET6

Figure: 1 Clone the sample repository
The following figure shows the successful build output for the .NET solution.
dotnet restore
dotnet build
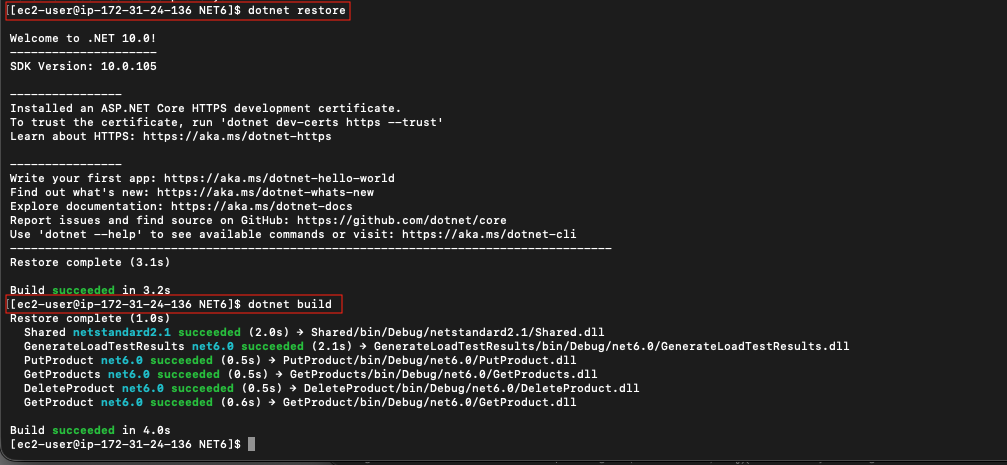
Figure 2: Build the .NET solution
Step 2: Create the Custom Transformation Definition
Since there is no AWS-managed transformation for .NET, you need to create one.
Launch the AWS Transform CLI in interactive mode:
atx -t
Interactive Mode: Type the following prompts directly into the atx -t agent session, not the terminal.
Tell the agent you want to create a new custom transformation definition:
I want to create a new custom transformation to upgrade AWS Lambda .NET 6 functions to .NET 10The agent starts by checking the registry for existing transformations that match your use case, then surfaces available out-of-the-box options.
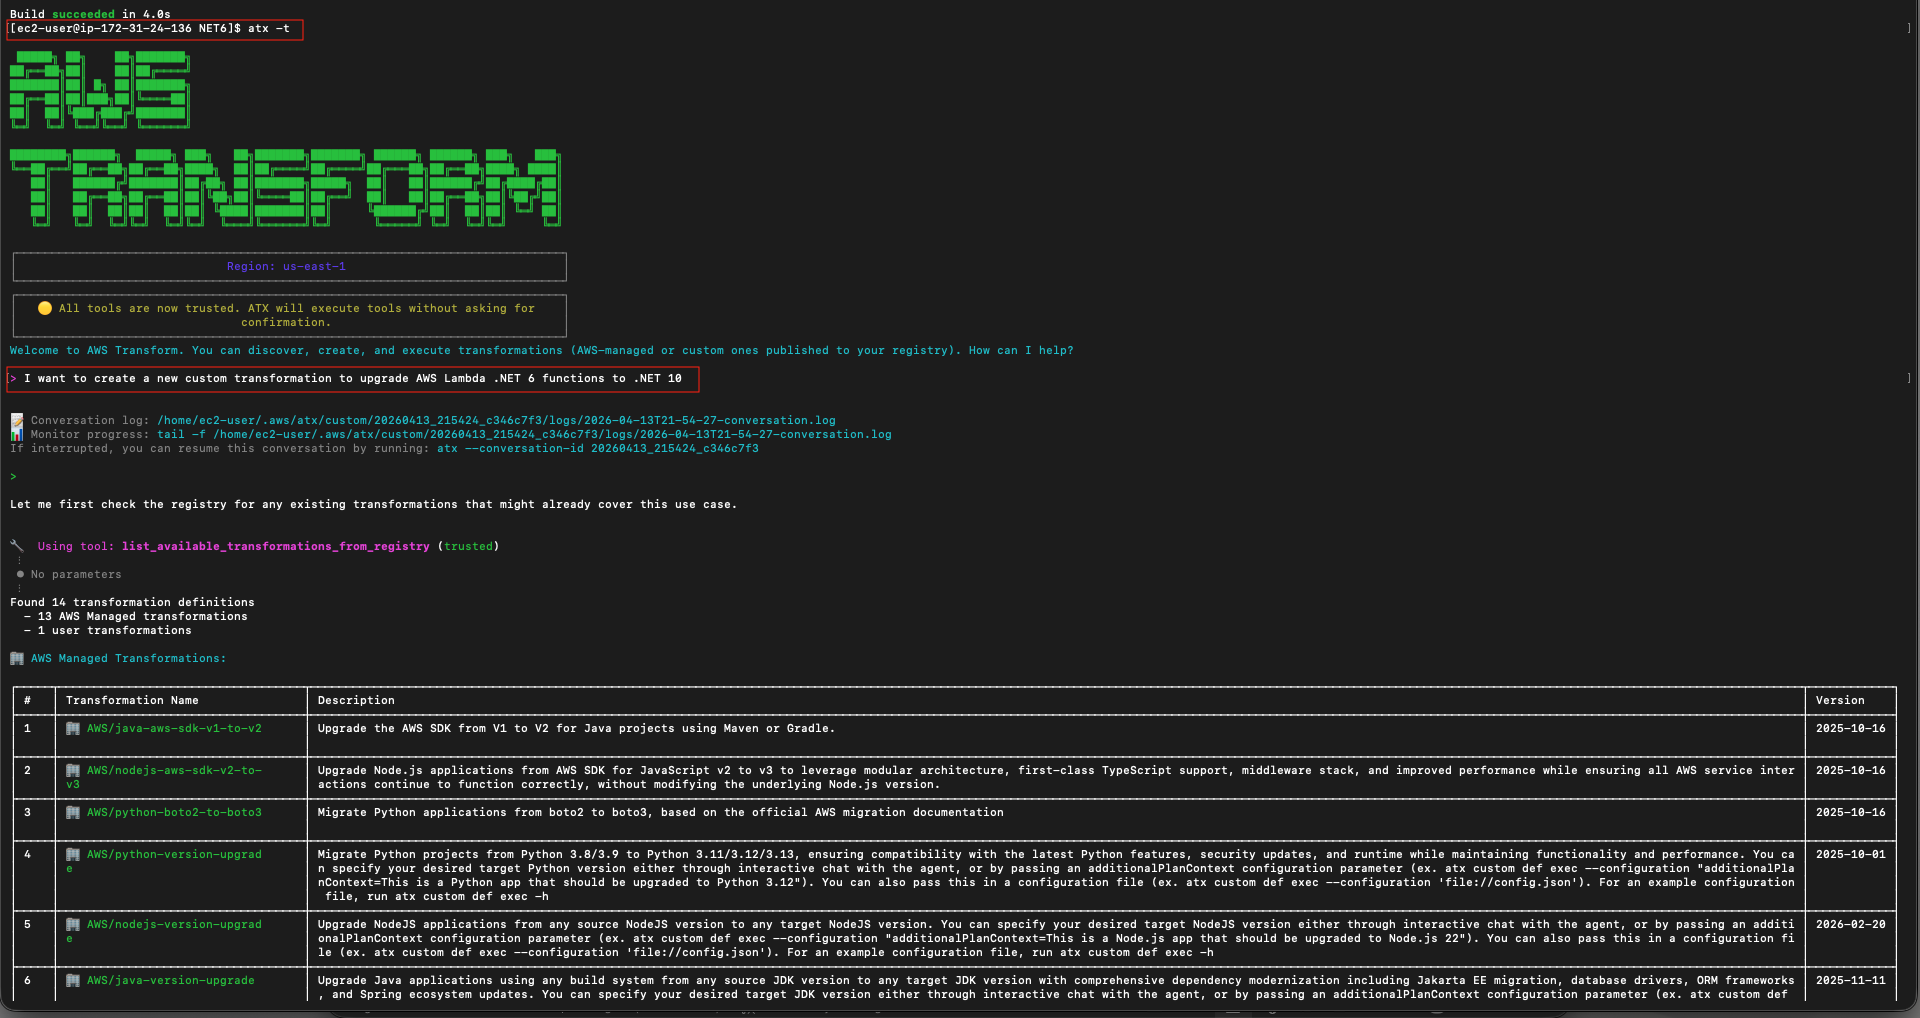
Figure 3: Agent checks the registry and lists all available out of the box transformation definitions
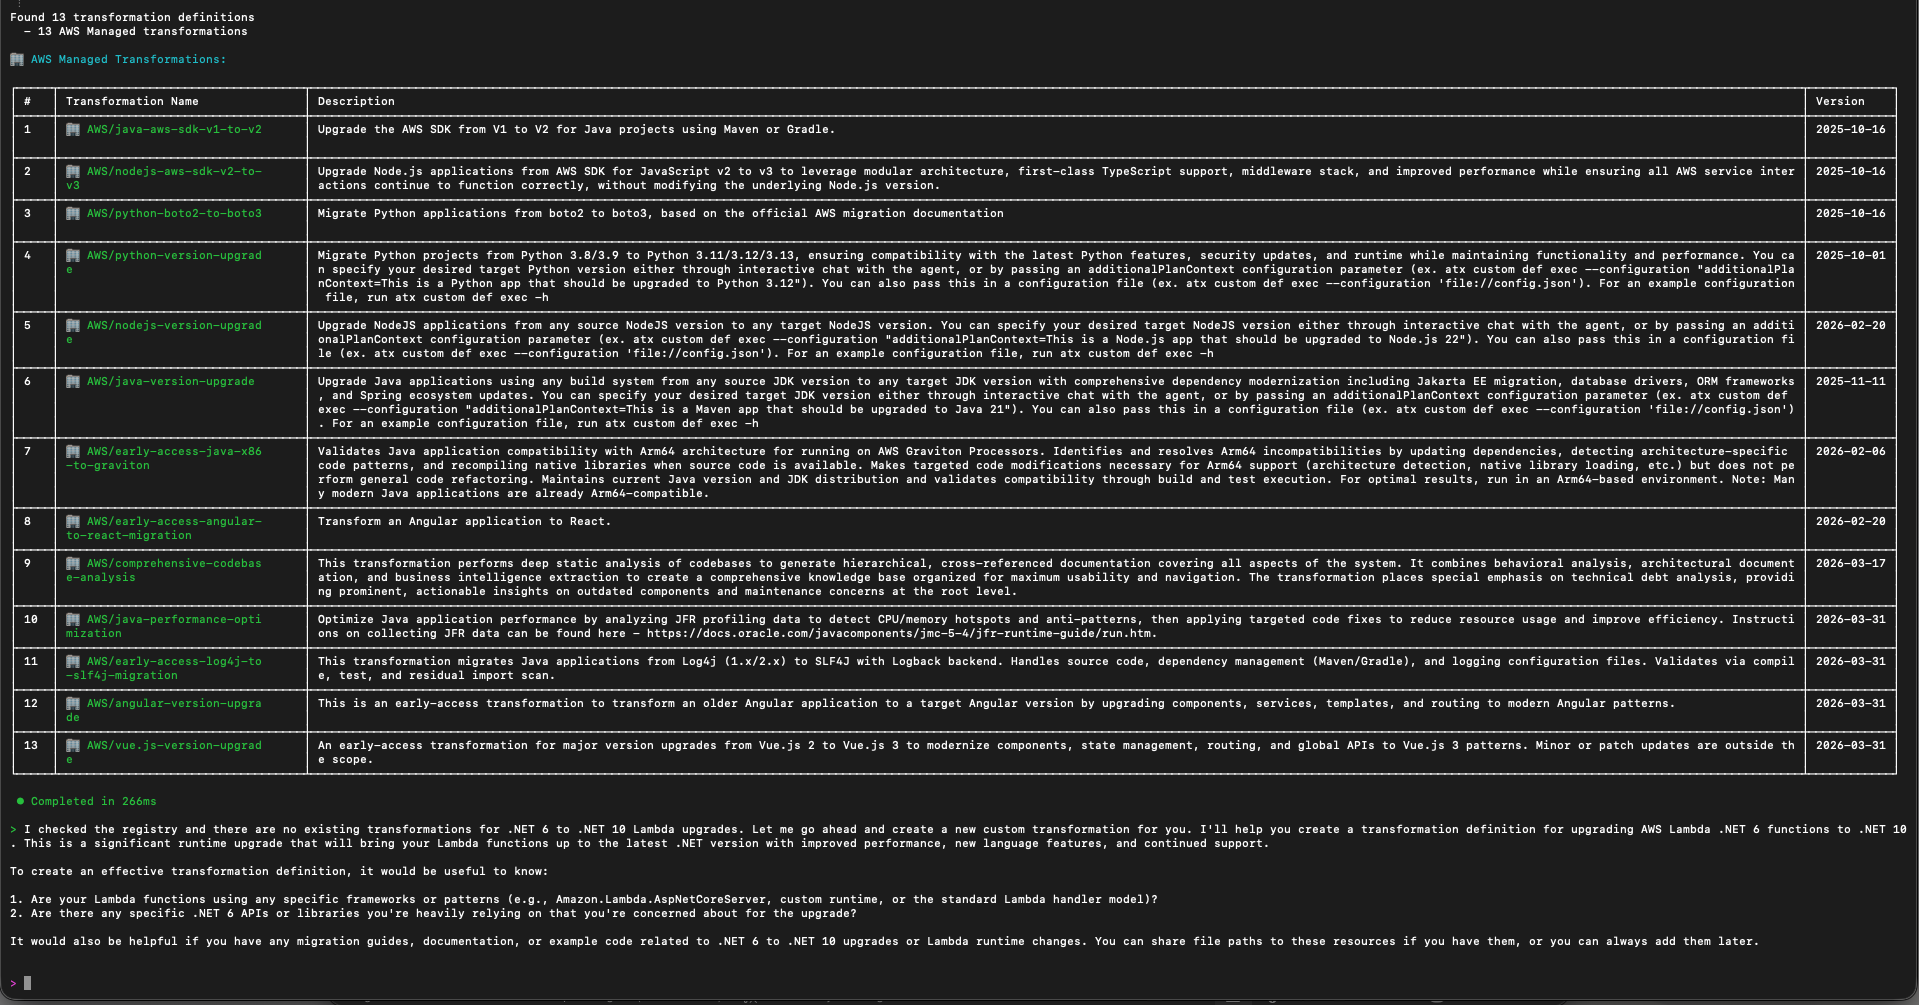
Figure 4: List of out of the box transformations that are available on AWS Transform custom.
Since none cover .NET, select the option to create a new custom transformation.
When prompted for the transformation objective, provide the following detailed context:
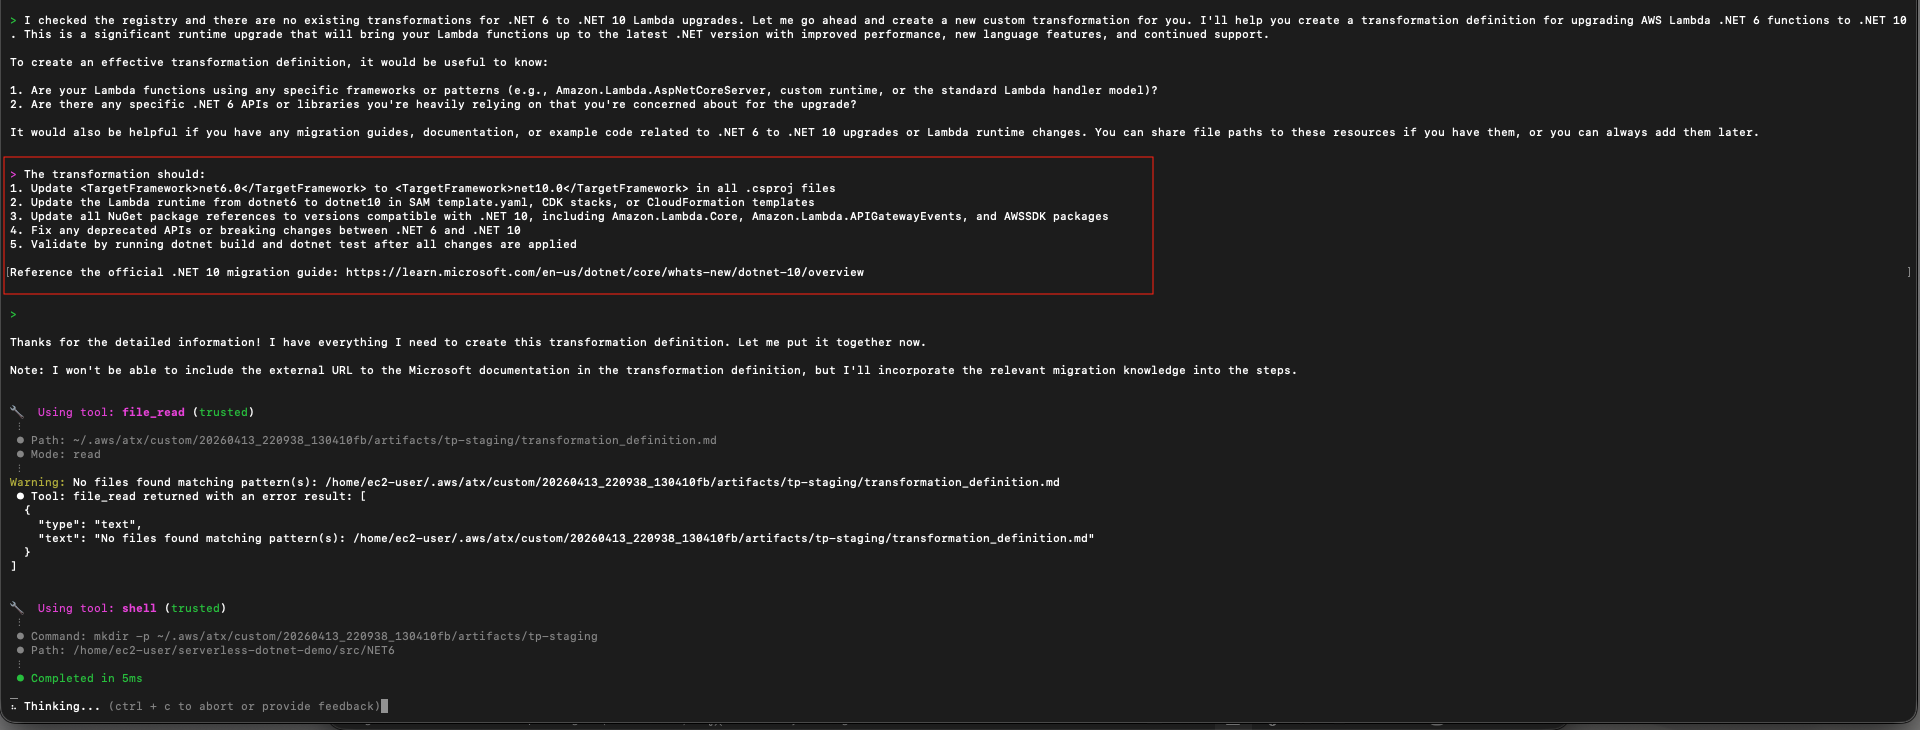
Figure 5: Provide the detailed context to the agent
The agent will generate an initial transformation definition, including updates to supporting files like global.json, Dockerfiles, and CI/CD configurations. It might ask follow-up clarifying questions. Answer them based on your requirements. Review the generated definition and iterate with the agent to refine specific steps as needed. 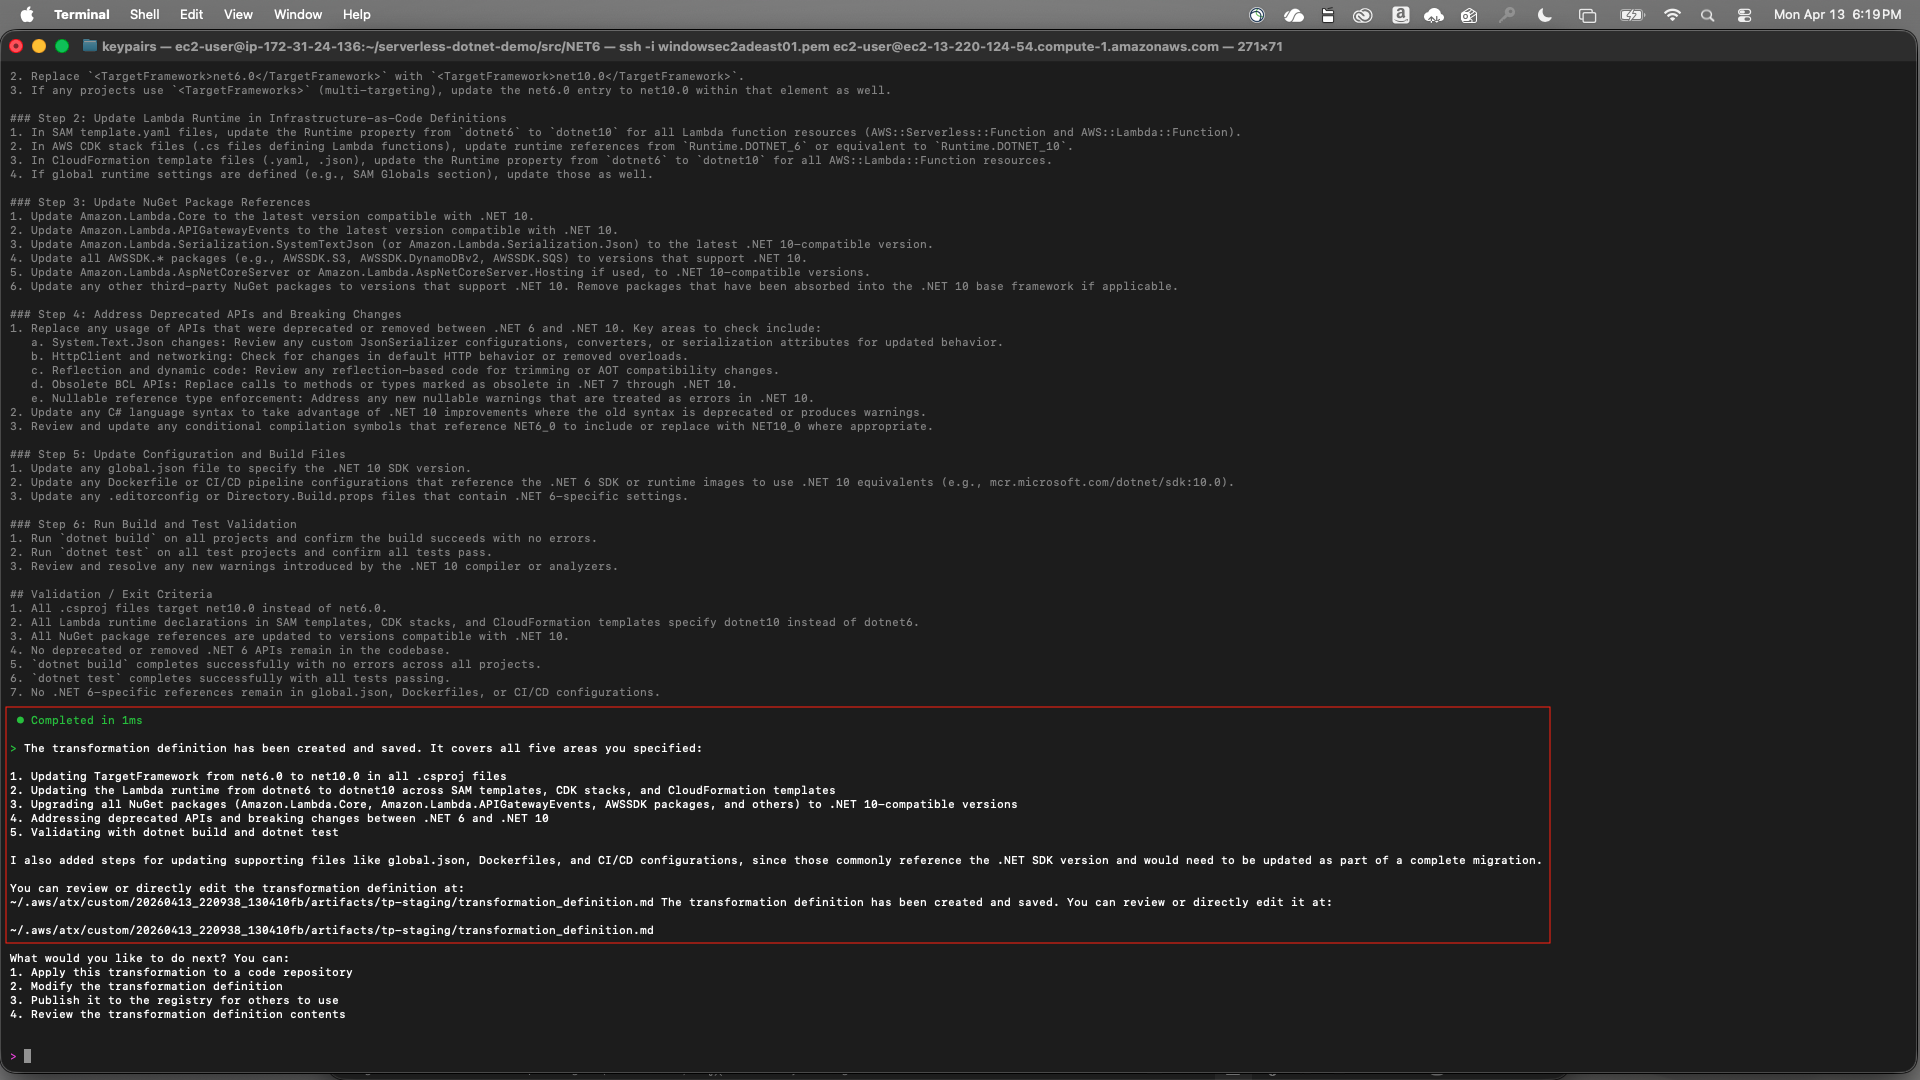
Figure 6: Agent generates an initial transformation definition
Once satisfied, save the transformation as a draft:
save a draft with name "dotnet-lambda-version-upgrade" and description "Upgrade AWS Lambda functions from .NET 6 to .NET 10, including csproj, NuGet packages, IaC templates, and deprecated API fixes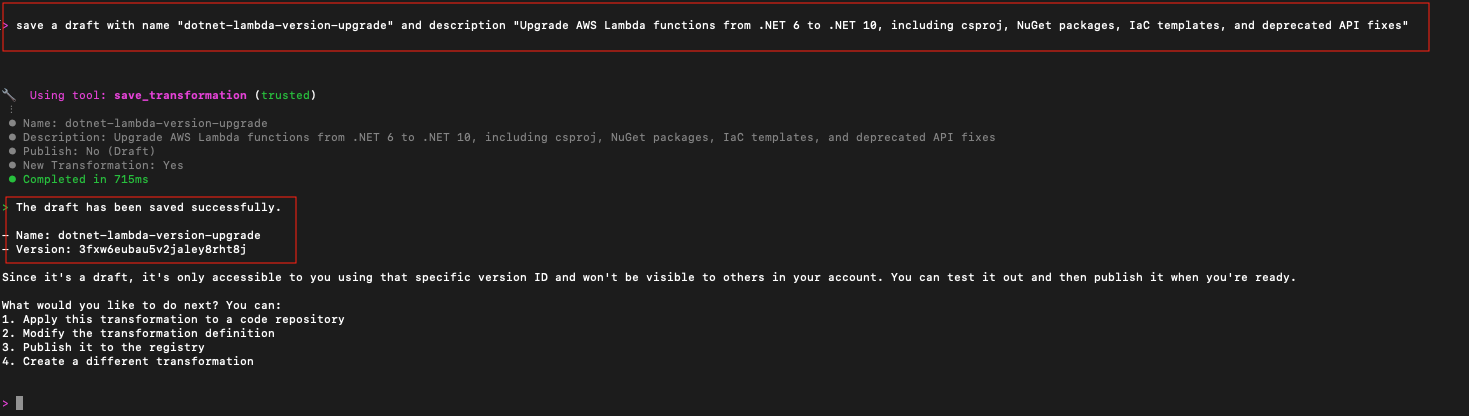
Figure 7: Save a draft of the custom transformation definition
Important: Note the version ID returned (for example, 3fxw6eubau5v2jaley8rht8j). You will need it in Step 5 to publish the custom transformation. Verify you have captured the version ID before proceeding.
Step 3: Execute the Transformation
If you exited the interactive session after Step 2, relaunch it using atx -t.
Interactive Mode: The following prompts are typed directly into the atx -t agent session.
With the custom definition saved, execute it against the src/NET6 project.
Tell the agent to apply the transformation:
"Apply the transformation to the current directory"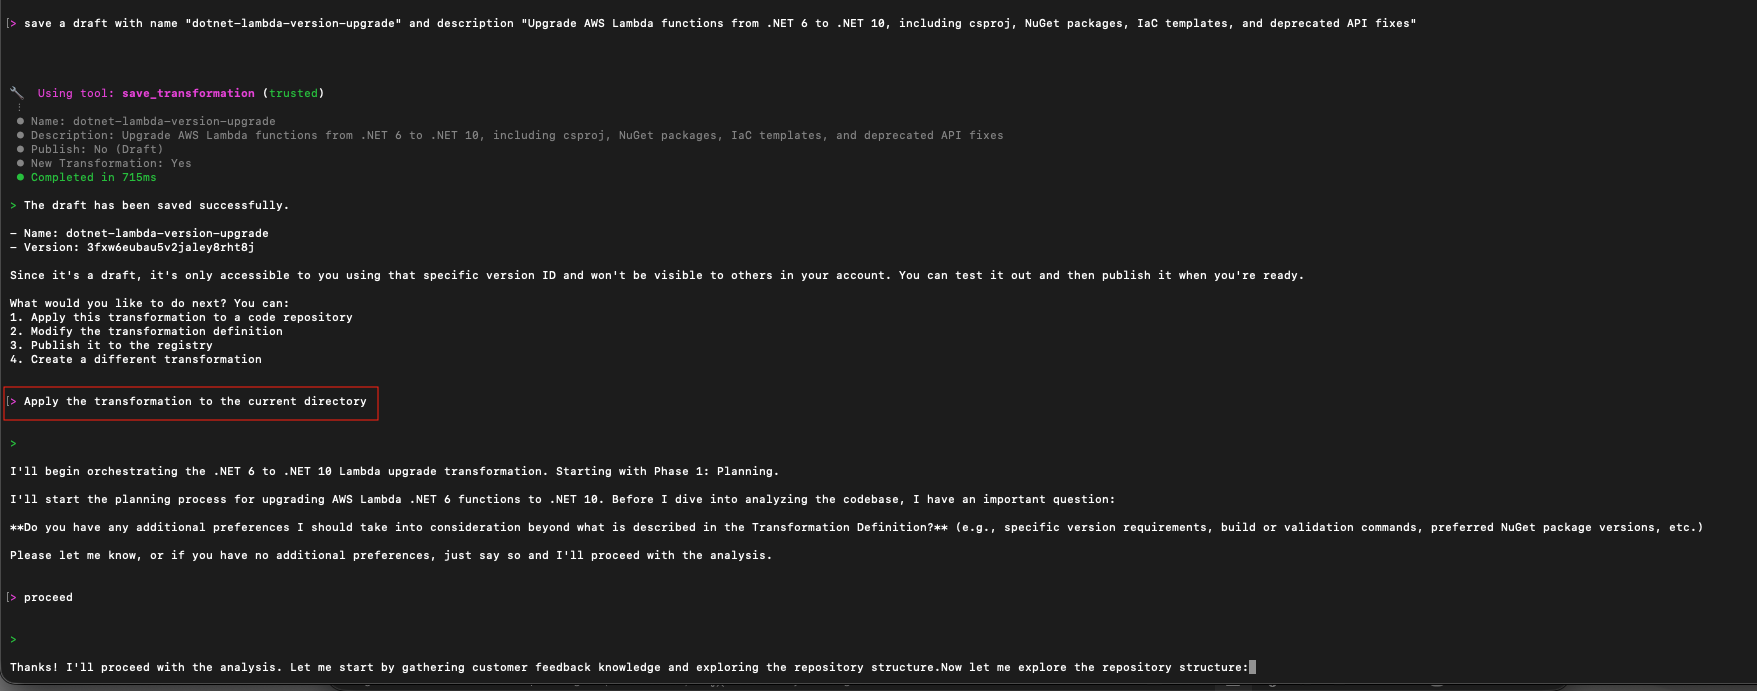
Figure 8: Apply the transformation
The agent starts orchestrating the transformation starting with phase 1, which is the planning phase. It first builds the project, then does a deep analysis of your codebase, including source files, .csproj references, NuGet dependencies, and the SAM template.yaml. It then generates a step-by-step plan tailored to your code detailing:
- TargetFramework updates across
.csprojfiles - NuGet package version compatibility checks and upgrades
- Lambda Runtime property updates in
template.yaml - Deprecated API or breaking change fixes in C# source files
- Build and test validation steps
Review the generated plan and approve it to proceed with the transformation:
"Proceed with the transformation"
Figure 9: Review, edit and approve the custom plan
The agent then executes each step sequentially, committing incremental changes to a local git staging branch. If dotnet build fails at any step, the agent will attempt to self-debug and resolve the issue before continuing. The agent will validate the exit criteria and generate a complete validation summary for you to review and provide feedback.
Once complete, the agent produces a full transformation summary. This includes the overall transformation status, exit criteria results along with the validation methods, and a summary of the changes made, including the versions, updated NuGet packages, and their new versions.
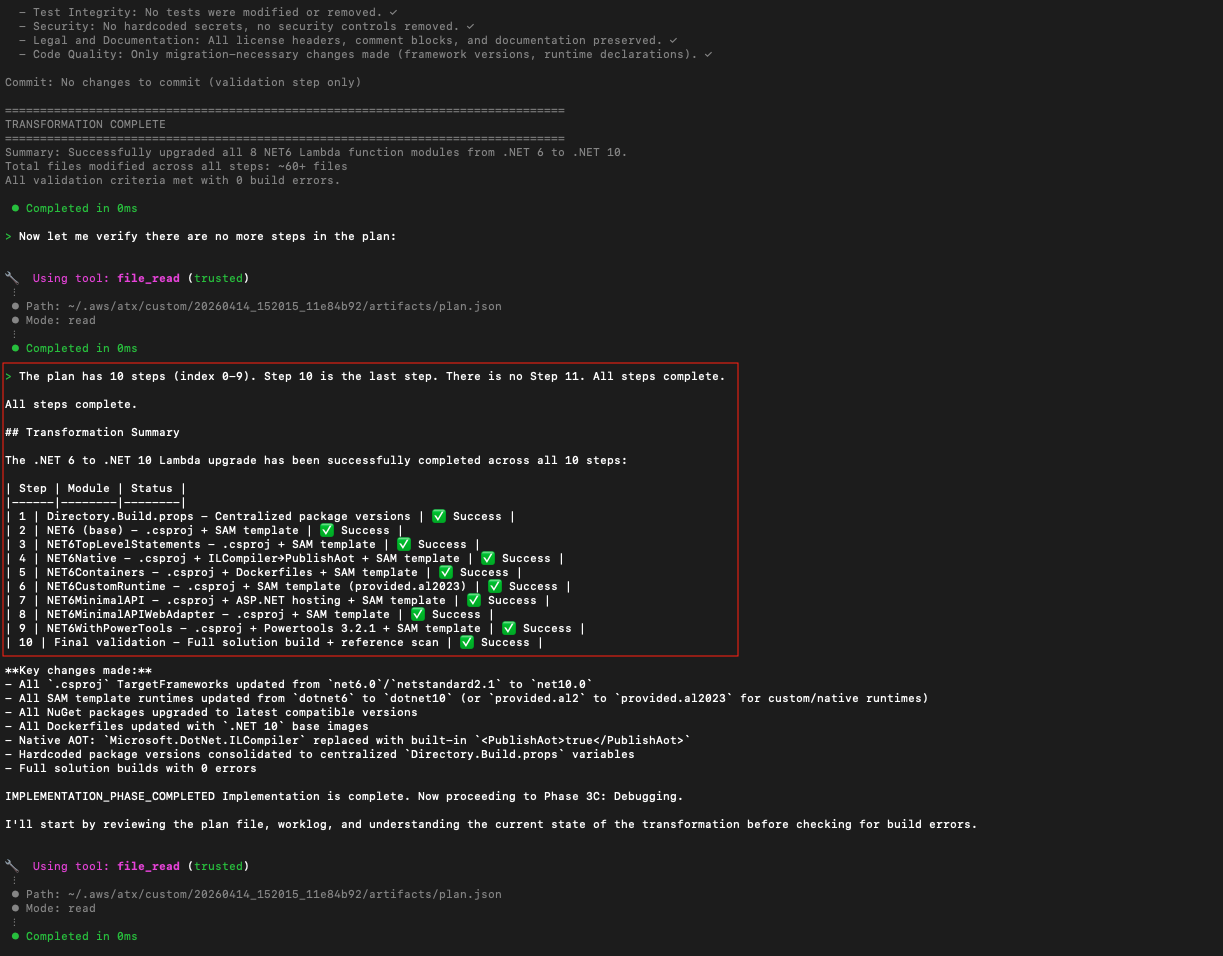
Figure 10: Transformation summary
Step 4: Validate the Changes
Review the changes; you can do a quick sanity check. Key things to verify:
- Every .csproj now targets net10.0
- template.yaml shows Runtime: dotnet10
- NuGet packages are updated to .NET 10 compatible versions
- No deprecated Amazon.Lambda.* APIs remain in source files
You can provide feedback as needed to further refine the transformation definition
Step 5: Publish the Transformation
To publish a transformation, use the AWS Transform CLI directly from your terminal rather than the interactive agent session. If you are still in the interactive session, exit it first:
exit
Then, from your terminal, publish the transformation using the version ID you noted when saving the draft in Step 2:
atx custom def publish -n dotnet-lambda-version-upgrade --tv <version-id>Replace <version-id> with the actual version ID from Step 2. For example:
atx custom def publish -n dotnet-lambda-version-upgrade --tv 3fxw6eubau5v2jaley8rht8j
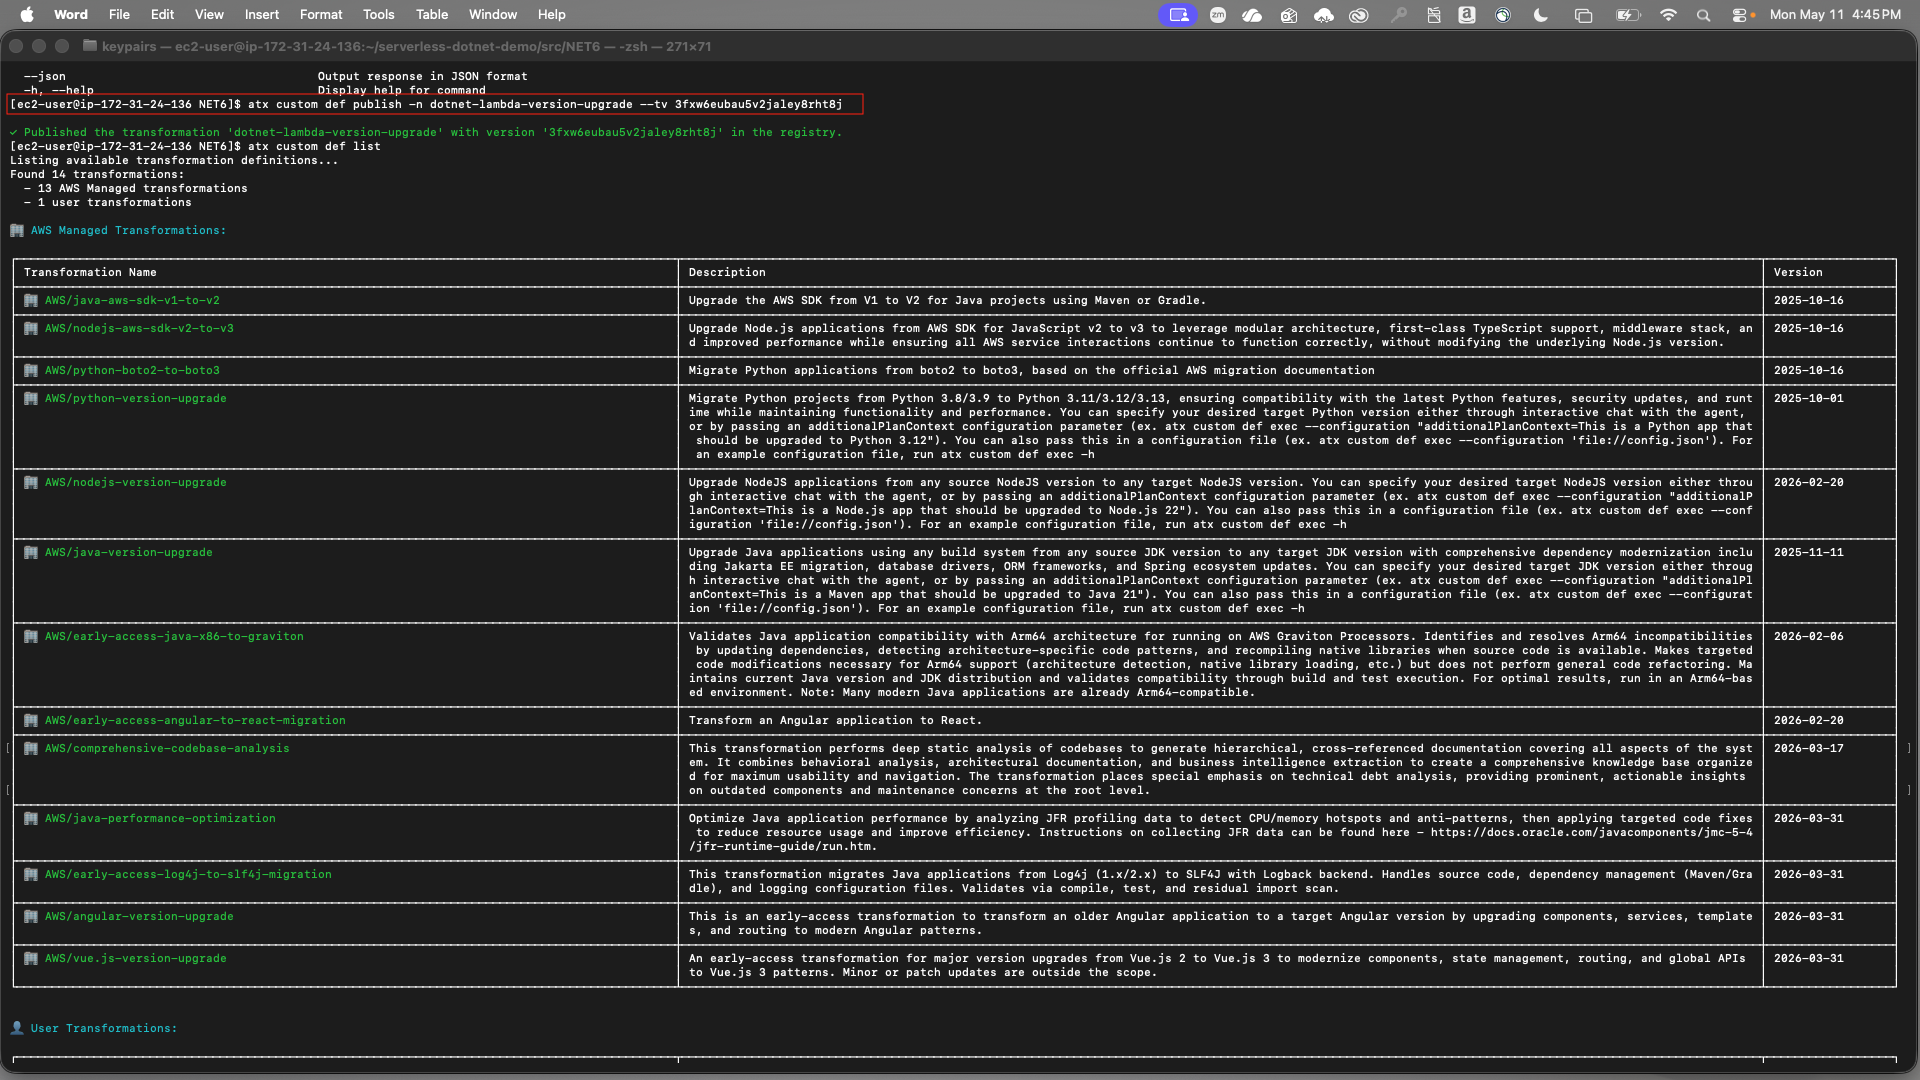
Figure 11: Publish the custom transformation definition
Team members with the appropriate IAM permissions can now run this transformation against their own .NET 6 Lambda repositories without manual authoring.
To verify the transformation was published successfully:
atx custom def listStep 6: Running Non-Interactive Mode
Once the transformation is published to the registry, you can run it without user interaction. This is ideal for CI/CD pipelines or bulk execution across multiple repositories. Pass the --configuration flag directly:
atx custom def exec -p . -n dotnet-lambda-version-upgrade --configuration "validationCommands=dotnet test,additionalPlanContext=The target .NET version is .NET 10" -x -t
Or point to a config.json file for cleaner parameterization:
atx custom def exec --configuration 'file://config.json'
Where config.json contains:
{
"codeRepositoryPath": ".",
"transformationName": "dotnet-lambda-version-upgrade",
"buildCommand": "dotnet build",
"validationCommands": "dotnet test",
"additionalPlanContext": "The target .NET version to upgrade to is .NET 10."
}
Improving the Transformation Over Time
Each time you run the transformation against a new repository, it might encounter patterns or edge cases not covered by the original definition. When this happens, the agent extracts a knowledge item that captures the new pattern. You review and approve these knowledge items, and once approved, future runs automatically apply those learnings. This human-in-the-loop process means the transformation becomes more accurate and comprehensive over time, and you retain full control over what the agent learns.
Over time, the transformation definition accumulates real-world learnings from across your organization’s repositories, becoming more accurate and comprehensive with every execution.
How to Scale This Across a .NET Lambda Fleet
With the transformation published, scaling to hundreds of repositories follows the same two patterns,
Batch script execution — Wrap atx custom def exec in a script that iterates across a CSV or JSON list of repository paths. Supports serial and parallel execution with retry logic. See the scaled execution bash samples.
Containerized execution on AWS — Deploy the transformation runner as a container on AWS Batch and AWS Fargate, with a REST API for job submission and Amazon CloudWatch monitoring, deployable with a single AWS Cloud Development Kit (AWS CDK) command. See the scaled execution containers samples.
In both cases, AWS Transform custom runs in your environment: your build systems, your toolchains, your network. You don’t move your code anywhere.
Cleanup
To remove the cloned repository:
rm -rf ./serverless-dotnet-demoTo remove the published transformation definition:
atx custom def delete -n dotnet-lambda-version-upgradeIf you deployed AWS resources during testing, delete them to avoid ongoing charges.
Conclusion
.NET runtime upgrades on Lambda are a recurring, high-friction problem for enterprise teams, especially at scale. With AWS Transform custom, you can create and publish your own transformation definitions, so .NET teams get the same automated upgrade experience already available for Python, Java, and Node.js.
As demonstrated, upgrading a multi-function .NET 6 Lambda application to .NET 10 required authoring a custom definition once, executing it with a single CLI invocation, validating with existing unit tests, and publishing it for the entire team to reuse. With non-interactive mode and the scaled execution options, this same pattern can extend to hundreds of .NET repositories, transforming a manual process into a repeatable, automated workflow.
To get started:
- Install the AWS Transform CLI and try authoring your first custom transformation
- Use serverless-dotnet-demo as your test codebase
- Explore the scaled execution samples to plan your organization-wide rollout
- Review the AWS Transform custom documentation for complete reference