IBM & Red Hat on AWS
Building integration APIs with IBM Cloud Pak for Integration and AWS services
In today’s interconnected world, customers need seamless integration between their mission-critical applications, systems, and services. IBM Cloud Pak for Integration (CP4I) when combined with Amazon Web Services (AWS) services, can help address these integration challenges.
In this blog, you will learn how to use CP4I, deployed on Red Hat OpenShift Service on AWS (ROSA), to develop and deploy an integration solution, such as a flight status checking app.
We will demonstrate how you can build this solution, by combining IBM App Connect, IBM MQ, IBM API Connect in CP4I with AWS Lambda and Amazon DynamoDB.
Scenario description
Travelers who want to check their flight status, either through a web or mobile app, provide their flight number and travel date. Once the information is submitted, the backend application integrates with AWS Lambda and Amazon DynamoDB to retrieve the flight status. The request-response process is asynchronous to enhance performance and user experience.
Architecture overview
The solution implementation combines CP4I, AWS Lambda, Amazon DynamoDB, and ROSA, as shown in Figure 1.
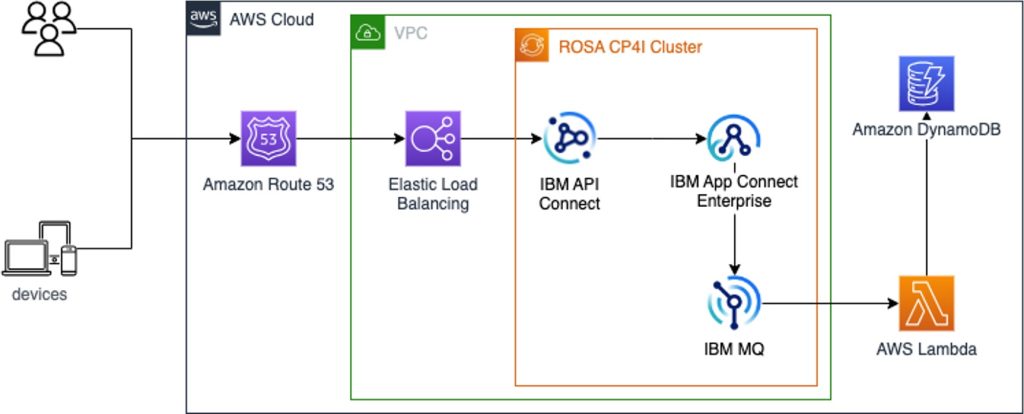
Figure 1. Use case implementation architecture.
The solution integration flow is as follows:
1. Users request flight status by providing the flight number and travel date.
2. IBM API Connect manages the integration flow APIs, authorizing the request and forwarding it to IBM App Connect flows.
3. IBM App Connect places the client request in an IBM MQ request queue.
4. Upon detecting a new message in the IBM MQ queue, IBM App Connect invokes and AWS Lambda function.
5. AWS Lambda queries an AWS DynamoDB table for flight status information.
6. The AWS Lambda response is placed in an IBM MQ response queue, which sends the information back to the users.
Cost
You are responsible for the costs incurred in your AWS account when deploying this solution. For cost estimates, refer to the pricing pages for each AWS service used, and the AWS Pricing Calculator.
Pre-requisites
Before you start, ensure you have the following:
- Familiarity with: CP4I, ROSA, Amazon Elastic Compute Cloud (Amazon EC2), Amazon Elastic Block Store (Amazon EBS), Amazon Elastic File System (Amazon EFS), Amazon Virtual Private Cloud (Amazon VPC) and AWS Identity and Access Management (IAM).
- Access to an AWS account with permissions to create the necessary resources.
- Verification of AWS service quotas for deploying ROSA. Request quota increases from the AWS console if needed.
- An IBM entitlement API key: 60-day trial or existing entitlement.
- A Red Hat ROSA token, available from the Red Hat website.
- A bastion host for CP4I installation with these software packages:
- A ROSA cluster (version 4.14 or higher) configured with Amazon EFS.
- CP4I (version 16.1.0) with these operators:
- IBM Cloud Pak foundational services (version 4.6.2)
- IBM Cloud Pak for Integration (version 7.2.4)
- IBM MQ (version 3.1.3)
- IBM API Connect (version 5.1.0)
- IBM App Connect Dashboard (version 11.6.0)
- IBM App Connect Designer (version 11.6.0)
- Refer to the Deploying CP4I on ROSA blog to install CP4I and IBM MQ on ROSA.
- IAM permissions on your bastion host to create an Amazon DynamoDB table and AWS Lambda function using the AWS CLI.
Implementation steps
AWS services configuration
This blog uses IBM App Connect to invoke existing AWS Lambda functions.
To protect your AWS account and resources, review your specific use-case and security requirements. Follow AWS Security best practices in IAM before deploying CP4I for production workloads.
1. Connect to your bastion host and setup environment variables:
$ export ACCOUNT_ID=$(aws sts get-caller-identity --query 'Account' --output text)
$ TOKEN=$(curl -X PUT "http://169.254.169.254/latest/api/token" -H "X-aws-ec2-metadata-token-ttl-seconds: 21600")
$ export AWS_REGION=$(curl -H "X-aws-ec2-metadata-token: $TOKEN" http://169.254.169.254/latest/meta-data/placement/region)
$ export SCRATCH_DIR=/tmp/scratch
$ mkdir -p $SCRATCH_DIR
2. Create your Amazon DynamoDB table:
$ DYNAMODB_TABLE_ARN=$(aws dynamodb create-table \
    --table-name Flights \
    --attribute-definitions AttributeName=FlightNum,AttributeType=S AttributeName=Date,AttributeType=S \
    --key-schema AttributeName=FlightNum,KeyType=HASH AttributeName=Date,KeyType=RANGE \
    --provisioned-throughput ReadCapacityUnits=5,WriteCapacityUnits=5 \
    --query 'TableDescription.TableArn' \
    --output text)
3. Create and IAM role for AWS Lambda:
$ ROLE_ARN=$(aws iam create-role \
  --role-name FlightInfoLambdaRole \
  --assume-role-policy-document '{
    "Version": "2012-10-17",
    "Statement": [
      {
        "Effect": "Allow",
        "Principal": {
          "Service": "lambda.amazonaws.com"
        },
        "Action": "sts:AssumeRole"
      }
    ]
  }' \
  --query 'Role.Arn' \
  --output text)
4. Attach an IAM policy to the role created above:
$ aws iam put-role-policy \
  --role-name FlightInfoLambdaRole \
  --policy-name FlightInfoPolicy \
  --policy-document "{
    \"Version\": \"2012-10-17\",
    \"Statement\": [
      {
        \"Effect\": \"Allow\",
        \"Action\": \"dynamodb:GetItem\",
        \"Resource\": \"${DYNAMODB_TABLE_ARN}\"
      },
      {
        \"Effect\": \"Allow\",
        \"Action\": [
          \"logs:CreateLogGroup\",
          \"logs:CreateLogStream\",
          \"logs:PutLogEvents\"
        ],
        \"Resource\": \"arn:aws:logs:*:*:log-group:/aws/lambda/GetFlightStatus:*\"
      }
    ]
  }"
5. Create a Python file named lambda_function.py with the following code:
import json
import boto3
import os
import logging

# Initialize DynamoDB resource and table name
dynamodb = boto3.resource('dynamodb')
table_name = os.environ['TABLE_NAME']

# Set up logging
logger = logging.getLogger()
logger.setLevel(logging.INFO)

def lambda_handler(event, context):
    logger.info('Received event: %s', json.dumps(event))
    body = None
    status_code = 200
    headers = {
        "Content-Type": "application/json",
    }

    try:
        table = dynamodb.Table(table_name)
        response = table.get_item(
            Key={
                "FlightNum": event["FlightNum"],
                "Date": event["Date"]
            }
        )
        item = response.get("Item")

        if item is None:
            body = f"No data for flight {event['FlightNum']} and date {event['Date']}"
            logger.warning(body)
        else:
            body = item
            logger.info('Retrieved item: %s', json.dumps(item))

    except Exception as err:
        status_code = 400
        body = str(err)
        logger.error('Error retrieving item: %s', body)

    response = {
        "statusCode": status_code,
        "body": json.dumps(body),
        "headers": headers
    }
    logger.info('Response: %s', json.dumps(response))
    return response
6. Run the commands below to create your AWS Lambda function:
$ zip function.zip lambda_function.py
$ aws lambda create-function \
 --function-name GetFlightStatus \
 --runtime python3.11 \
 --handler lambda_function.lambda_handler \
 --timeout 30 \
 --role ${ROLE_ARN} \
 --environment Variables={TABLE_NAME=Flights} \
 --zip-file fileb://function.zip
7. Create an IAM policy named cp4i-appconn-permissions with these permissions:
$ cat <<EOF > ${SCRATCH_DIR}/cp4i-appconn-permissions.json
{
    "Version": "2012-10-17",
    "Statement": [
        {
            "Effect": "Allow",
            "Action": [
                "cloudwatch:GetMetricData",
                "cloudwatch:ListMetrics",
                "iam:ListRoles",
                "logs:DescribeLogGroups",
                "lambda:ListFunctions",
                "tag:GetResources"
            ],
            "Resource": "*"
        },
        {
            "Effect": "Allow",
            "Action": [
                "iam:GetPolicy",
                "iam:GetPolicyVersion"
            ],
            "Resource": "arn:aws:iam::*:policy/*"
        },
        {
            "Effect": "Allow",
            "Action": [
                "iam:GetRole",
                "iam:GetRolePolicy",
                "iam:ListAttachedRolePolicies",
                "iam:ListRolePolicies"
            ],
            "Resource": "arn:aws:iam::*:role/*"
        },
        {
            "Effect": "Allow",
            "Action": [
                "logs:CreateLogGroup",
                "logs:CreateLogStream",
                "logs:PutLogEvents"
            ],
            "Resource": "arn:aws:logs:eu-west-1:582767206473:log-group:/aws/lambda/*"
        },
        {
            "Effect": "Allow",
            "Action": [
                "lambda:GetFunction",
                "lambda:InvokeFunction"
            ],
            "Resource": [
"arn:aws:lambda:${AWS_REGION}:${ACCOUNT_ID}:function:GetFlightStatus"
            ]
        },
        {
            "Effect": "Allow",
            "Action": [
                "logs:DescribeLogStreams",
                "logs:GetLogEvents",
                "logs:FilterLogEvents",
                "logs:StartQuery",
                "logs:StopQuery",
                "logs:DescribeQueries",
                "logs:GetLogGroupFields",
                "logs:GetLogRecord",
                "logs:GetQueryResults"
            ],
            "Resource": "arn:aws:logs:${AWS_REGION}:${ACCOUNT_ID}:log-group:/aws/lambda/*"
        }
    ]
}
EOF

$ POLICY=$(aws iam create-policy --policy-name "cp4i-appconn-permissions" \
   --policy-document file://$SCRATCH_DIR/cp4i-appconn-permissions.json \
   --query 'Policy.Arn' --output text)
8. Create an IAM user, assign the cp4i-appconn-permissions policy to the user, and generate an Access key:
$ aws iam create-user --user-name cp4iblog-user
$ aws iam create-access-key --user-name cp4iblog-user
$ aws iam attach-user-policy --user-name cp4iblog-user --policy-arn ${POLICY}
9. You will use your Access key and Secret access key later to allow App Connect to invoke AWS Lambda functions.
10. Run the command below to add data to your DynamoDB table:
$ aws dynamodb put-item \
  --table-name Flights \
  --item '{
    "FlightNum": {"S": "AB01"},
    "Date": {"S": "08/01/24"},
    "Dep": {"S": "1625"},
    "From": {"S": "JFK"},
    "Status": {"S": "OnTime"},
    "To": {"S": "FRA"}
  }'
Deploy CP4I components
1. Use your OpenShift credentials to log in to your ROSA cluster from your bastion host:
$ oc login https://<your_cluster_api_address>:6443 \
  --username cluster-admin \
  --password <your_cluster-admin_password>
2. Create an API Connect cluster in the same namespace as CP4I and MQ. Apply values that suit your environment:
$ cat <<EOF | oc apply -f -
apiVersion: apiconnect.ibm.com/v1beta1
kind: APIConnectCluster
metadata:
  annotations:
    apiconnect-operator/backups-not-configured: "true"
  labels:
    app.kubernetes.io/instance: apiconnect
    app.kubernetes.io/managed-by: ibm-apiconnect
    app.kubernetes.io/name: apiconnect-medium
  name: api-connect
  namespace: integration
spec:
  analytics:
    mtlsValidateClient: true
  license:
    accept: true
    license: L-MMBZ-295QZQ
    metric: VIRTUAL_PROCESSOR_CORE
    use: nonproduction
  portal:
    mtlsValidateClient: true
  profile: n1xc16.m72
  version: 10.0.7.0
  storageClassName: gp3-csi
EOF
3. Check the status of the API Connect cluster. Ensure the Status column shows Ready, indicating that the API Connect cluster was created successfully:
$ oc get APIConnectCluster -n integration4. Create an Application Integration Dashboard instance:
$ cat <<EOF | oc apply -f -
apiVersion: appconnect.ibm.com/v1beta1
kind: Dashboard
metadata:
  labels:
    backup.appconnect.ibm.com/component: dashboard
  name: db-01-quickstart-1
  namespace: integration
spec:
  api:
    enabled: true
  authentication:
    integrationKeycloak:
      enabled: true
  authorization:
    integrationKeycloak:
      enabled: true
  displayMode: IntegrationRuntimes
  license:
    accept: true
    license: L-QECF-MBXVLU
    use: CloudPakForIntegrationNonProduction
  pod:
    containers:
      content-server:
        resources:
          limits:
            memory: 512Mi
          requests:
            cpu: 50m
            memory: 50Mi
      control-ui:
        resources:
          limits:
            memory: 512Mi
          requests:
            cpu: 50m
            memory: 125Mi
  replicas: 1
  storage:
    size: 5Gi
    type: persistent-claim
    class: efs-sc
  version: '12.0'
EOF
5. Deploy an Application Integration Designer using the example below:
$ cat <<EOF | oc apply -f -
apiVersion: appconnect.ibm.com/v1beta1
kind: DesignerAuthoring
metadata:
  labels:
    backup.appconnect.ibm.com/component: designerauthoring
  name: des-03-quickstart
  namespace: integration
spec:
  authentication:
    integrationKeycloak:
      enabled: true
  authorization:
    integrationKeycloak:
      enabled: true
  couchdb:
    replicas: 1
    storage:
      size: 10Gi
      type: persistent-claim
      class: efs-sc
  designerFlowsOperationMode: local
  license:
    accept: true
    license: L-QECF-MBXVLU
    use: CloudPakForIntegrationNonProduction
  replicas: 1
  version: '12.0'
EOF
CP4I configuration
1. The initial administrator username is integration-admin. Obtain your CP4I URL and administrator password:
$ oc describe platformnavigator integration-quickstart \
  -n integration | grep "^.*UI Endpoint" | xargs | cut -d ' ' -f3

$ oc get secret integration-admin-initial-temporary-credentials -n ibm-common-services -o jsonpath='{.data.password}' | base64 --decode
2. Access your CP4I console using the URL and integration-admin credentials from the previous step.
3. On the Welcome screen, verify that the components listed in Figure 2 are installed and in Ready state.
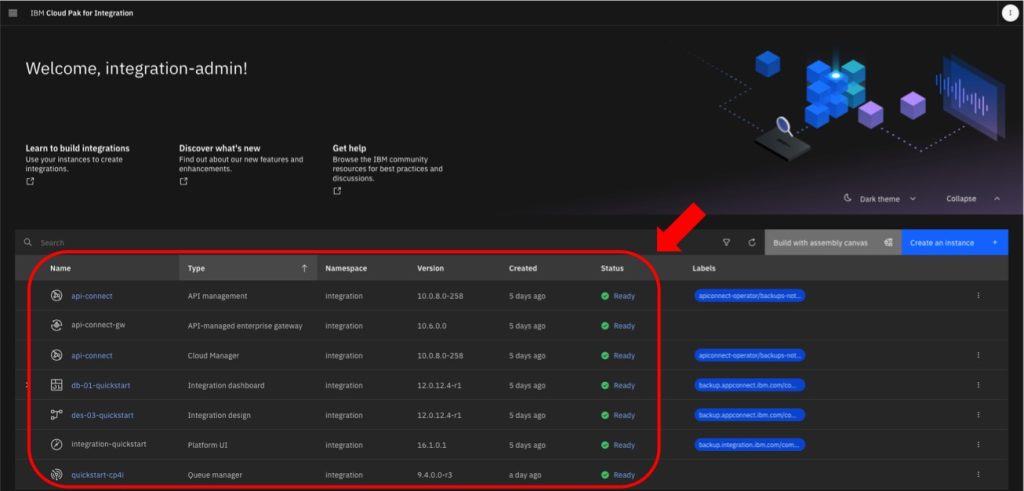
Figure 2. CP4I installed integration instances.
4. Click your Queue manager instance to access the MQ Console.
5. In the MQ console, go to the left navigation menu, click Manage, then click Create to set up two local queues named REQUESTQ and RESPONSEQ.
IBM MQ uses Channel authentication to ensure that only authorized and trusted entities can access the messaging system, providing enhanced security and control. To reduce complexity, this blog disables channel authentication. However, ensure you enable channel authentication in your production environments.
6. Click the View configuration link at top right of Queue Manager dashboard.
7. On the configuration dashboard, click Edit.
8. Click Extended and clear the value of the Connection authentication parameter, setting it to no value (figure 3).

Figure 3. Clear the value of the Connection authentication parameter.
9. Click Communication and set the value of CHLAUTH records to Disabled (figure 4).

Figure 4. Set CHLAUTH to Disabled in the Queue Manager configuration.
10. Click Save.
11. Click Actions and then click all three refresh actions (figure 5).
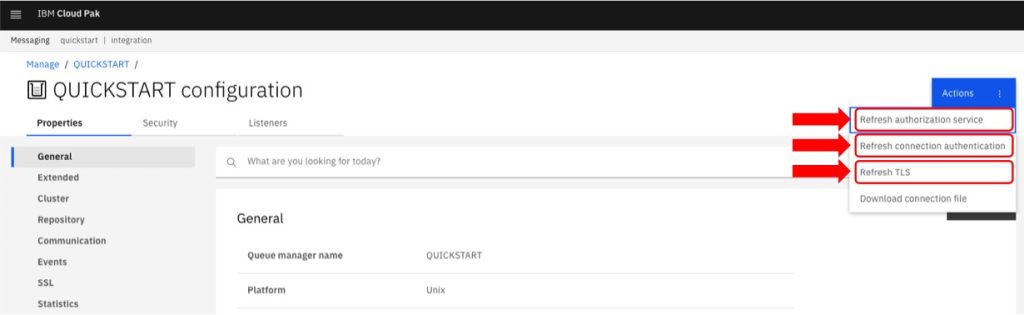
Figure 5. Refresh the Queue Manager’s authentication parameters.
12. In the MQ console, go to the left navigation menu, click Manage, then click Create, followed by Applications and App channels. Click Create to set up a channel called ACE.SVRCONN (figure 6).
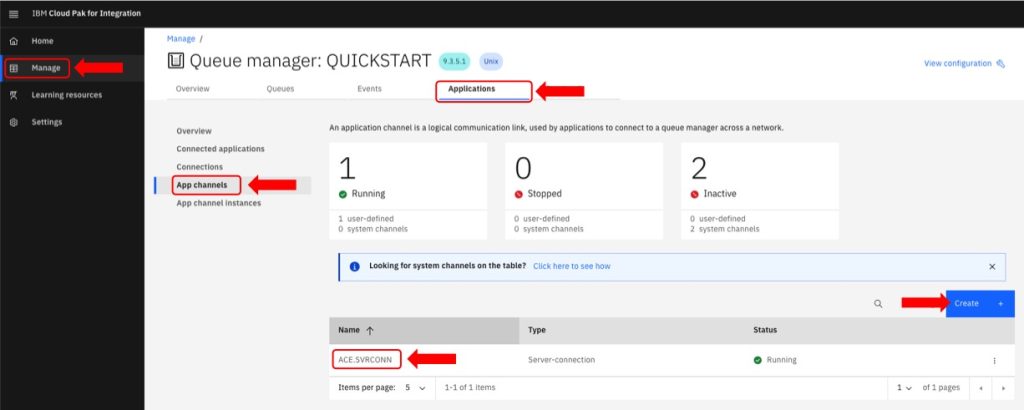
Figure 6. Create a new Queue Manager application channel.
Deploy the integration solution
Our App Connect integration flow is divided into three parts:
- Part 1: Receives the flight status request from the client and places it into REQUESTQ.
- Part 2: Retrieves the message from REQUESTQ, invokes AWS Lambda, and places the response into RESPONSEQ.
- Part 3: Fetches the message from RESPONSEQ and sends it back to the client.
Import the App Connect flows
Disclaimer: Please note that the sample code provided in this blog post is for demonstration purposes only and isn’t intended for production use. The code is not hosted and managed by AWS. We encourage you to review the code to understand how it works. For help with third-party components, please refer to the vendor documentation and support channels.
1. Download the integration flows from the IBM GitHub repository.
2. In the CP4I welcome screen, click on your Integration design
3. In the App Connect Designer home, click Import a flow.
4. In the Import a flow panel, click Add a YAML file under Drag and drop or select a file, choose the FlightStatus Process.yaml file you downloaded and click Import.
5. Once the integration loads on the dashboard, click the left-most IBM MQ node in the flow and then click Connect.
6. Enter the details of your IBM MQ instance and click Connect (figure 7). You’ll need these details for step 9 in the Deploy the flows to Integration Servers section.
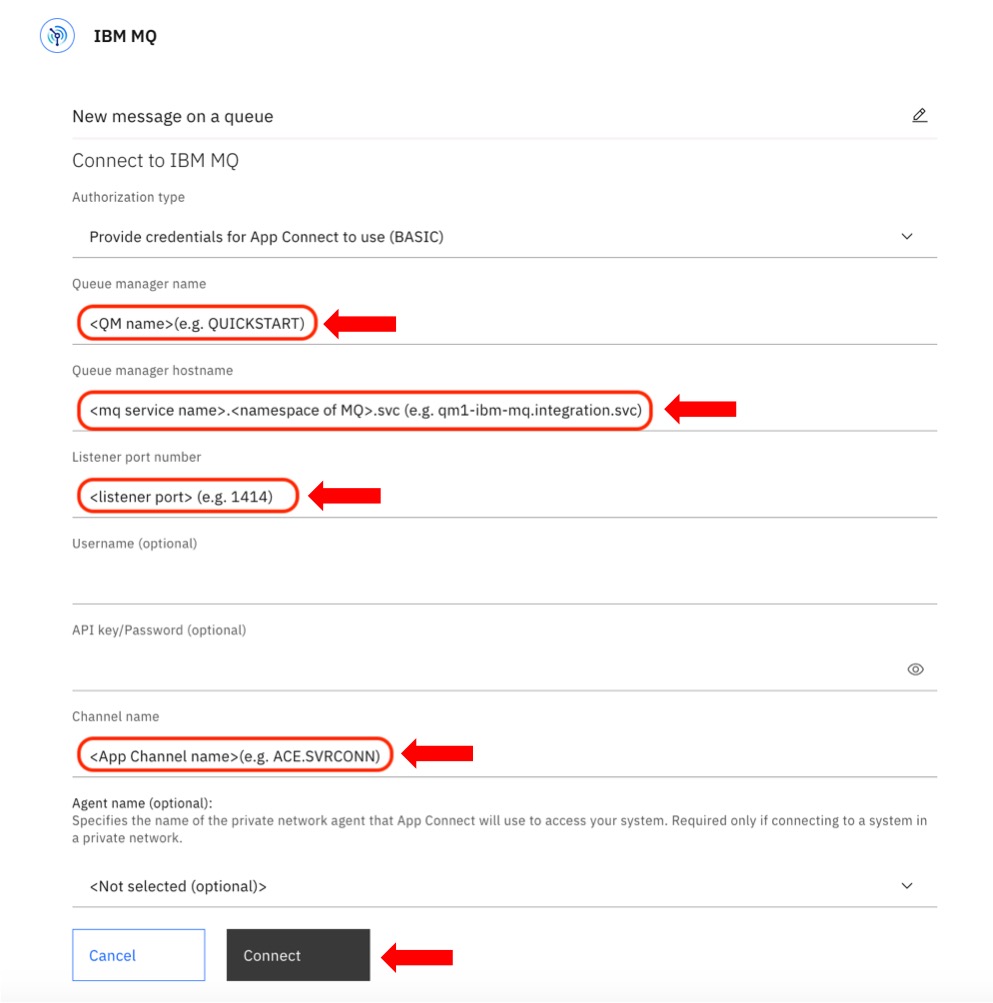
Figure 7. Provide IBM MQ queue manager connection details.
7. Set the Queue name value to REQUESTQ.
8. Click the AWS Lambda node in the flow, enter your AWS account credentials and AWS Region
9. From the dropdown, select the getFlightStatus AWS Lambda function. Choose the Invoke function action, and fill in the target fields (figure 8). Note the Account name created, as you’ll need it for step 7 in the Deploy the flows to Integration Servers section.
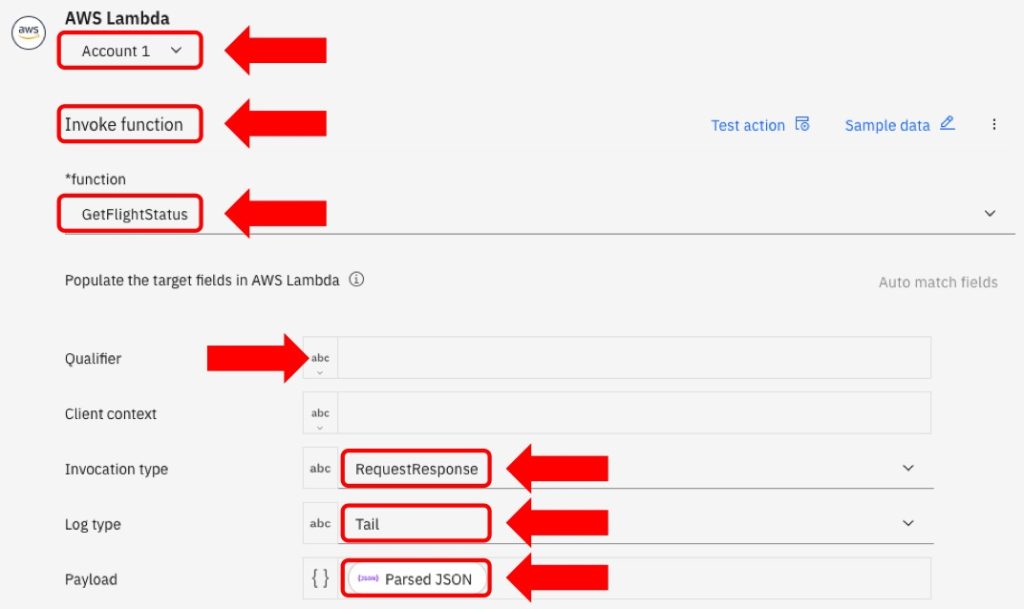
Figure 8. AWS Lambda function invocation parameters.
10. Configure the last MQ node to Account1 and Queue name to RESPONSEQ.
11. Import the FlightStatus Request.yaml Click Edit flow and configure the MQ node to Account1 and Queue name to REQUESTQ.
12. Import the FlightStatus Response.yaml Click Edit flow and configure the MQ node to Account1 and Queue name to RESPONSEQ.
Test the integration flows
Let’s test the flows before deploying them.
1. Start all thee flows from the Integration Design Click the three dots on each flow and select Start.
2. Click the FlightStatus Request tile, then click Test. Click the POST method and then click Try it.
3. Add the following content to the body field, under Parameters and click Send:
{"FlightNum": "AB01","Date": "08/01/2024"}4. You should receive a 200 OK response with the body content similar to the example below:
{
    "Date": "08/01/2024",
    "FlightNum": "AB01",
    "RequestStatus": "QU1RIFFVSUNLU1RBUlQgICI63GQBGk5A"
}
Since our request/response flow is asynchronous, you’ll receive an acknowledgement that your request was successfully received.
The IBM APP Connect flow sends the message to the REQUESTQ queue. The FlightStatus Process flow then processes this message, invoking the getFlightStatus AWS Lambda function. The response is placed in the RESPONSEQ queue.
5. Test the FlightStatus Response flow to retrieve the flight status details.
6. Return to the Integration Design dashboard, click the FlightStatus Response tile, then click Test. Click the GET method, select Try it and click Send.
7. You should receive a 200 OK response with body content similar to the example below:
{
    "FlightStatusResponse": [
        {
            "ResponseMsg": "{\"statusCode\": 200, \"body\": {\"Date\": \"08/01/2024\", \"From\": \"JFK\", \"FlightNum\": \"AB01\", \"Status\": \"OnTime\", \"To\": \"FRA\", \"Dep\": \"1625\"}, \"headers\": {\"Content-Type\": \"application/json\"}}"
        }
    ]
}
8. Finally, from the Integration Design dashboard, click the 3 dots on each flow and export the flows as .bar
Deploy the flows to Integration Servers
1. From the CP4I console welcome screen, click your Integration dashboard
2. From the App Connect dashboard, click the Deploy integrations
3. Select the size of the integration. For this example, choose Quick start integration and click Next.
4. Upload the exported bar file for the FlightStatus Process flow and click Next.
5. Uncheck any selected configurations and click Create configuration.
6. Enter a name for your configuration. Under Account details, choose AWS Lambda for Application.
7. Specify an Account name. This value must match the value used in step 9 of the Import the App Connect flows
8. Enter your AWS credentials and AWS Region details (figure 9).
9. Click Add Account, then select IBM MQ. Enter the same information used in step 6 of the Import the App Connect flows section and click Create.
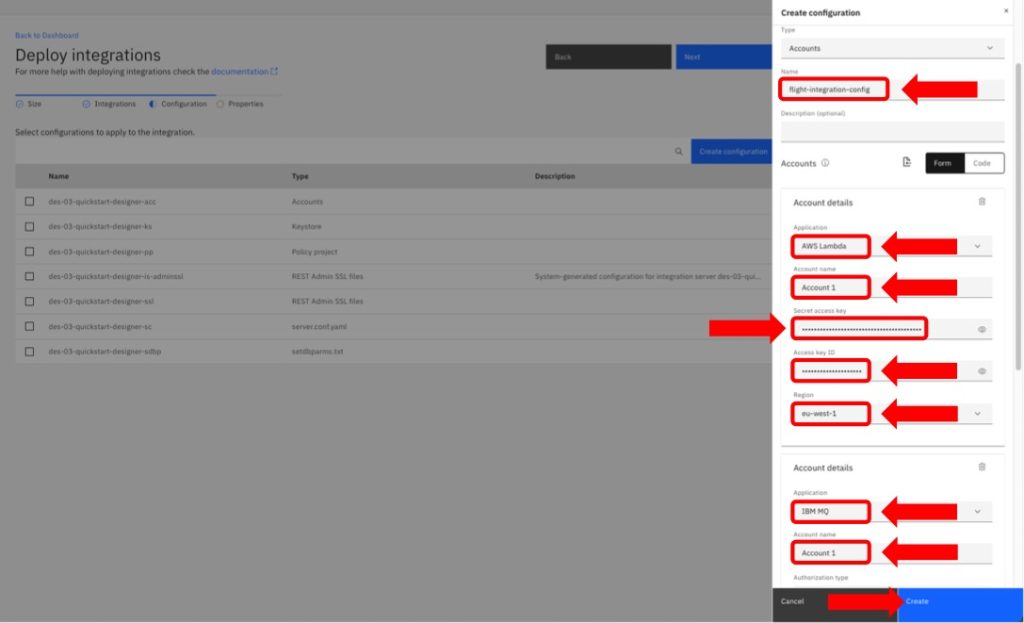
Figure 9. Create a new integration flow configuration.
10. Ensure that the newly created configuration is checked and click Next.
11. Enter an integration Name and select the appropriate license option.
12. Click on Advanced settings, then go to Flow types – Advanced. Enable the Designer API flow (optional) and Designer event-driven flow (optional) Click Create (figure 10).

Figure 10. Deploying the integration flows with required parameters.
13. Follow the same process to deploy FlightStatus Request and FlightStatus Response bar files. Use the same integration configuration created in steps 6 to 9 above.
14. Note the API endpoints for the request and response flows. These are required for the IBM API Connect configuration:
- In the App Connect dashboard, click the request tile then click the FlightStatus_Request API tile. Take note of the API endpoint (figure 11).
- Repeat these steps for the FlightStatus_Response endpoint.
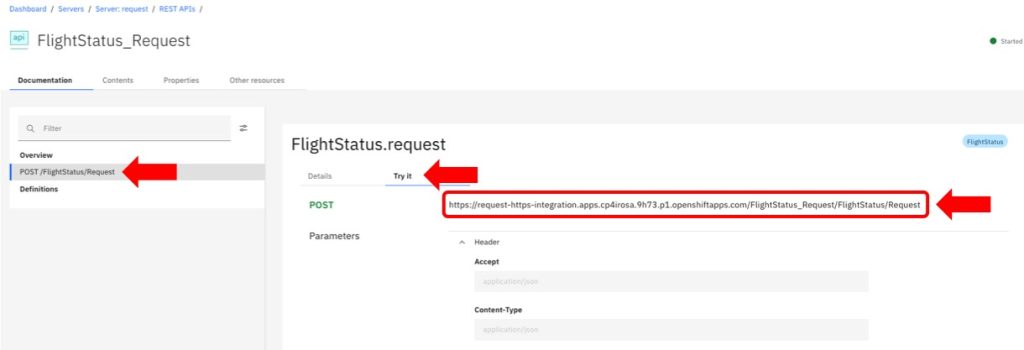
Figure 11. Get the integration endpoints on App Connect Dashboard.
Create APIs on API Connect
IBM API Connect secures and exposes IBM App Connect APIs by creating proxy APIs for the App Connect endpoints.
1. From the CP4I welcome screen, click on your API Connect Cloud Manager instance to create a provider organization. This is required to publish your APIs.
2. After creating the provider organization, navigate back to the CP4I welcome screen and click on your API management
3. In the API Manager screen click Develop APIs and products
4. In the Develop screen, click on the Add dropdown button and click API.
5. The Select API type screen is displayed. Select OpenAPI 3.0, select From target service and click Next.
6. Specify a Title, for example: flight-status-request.
7. Enter the base path of the Request API endpoint as: /request
8. In the Target Service URL field, enter the App Connect Request API endpoint from the Deploy the flows to Integration Servers section (figure 12).
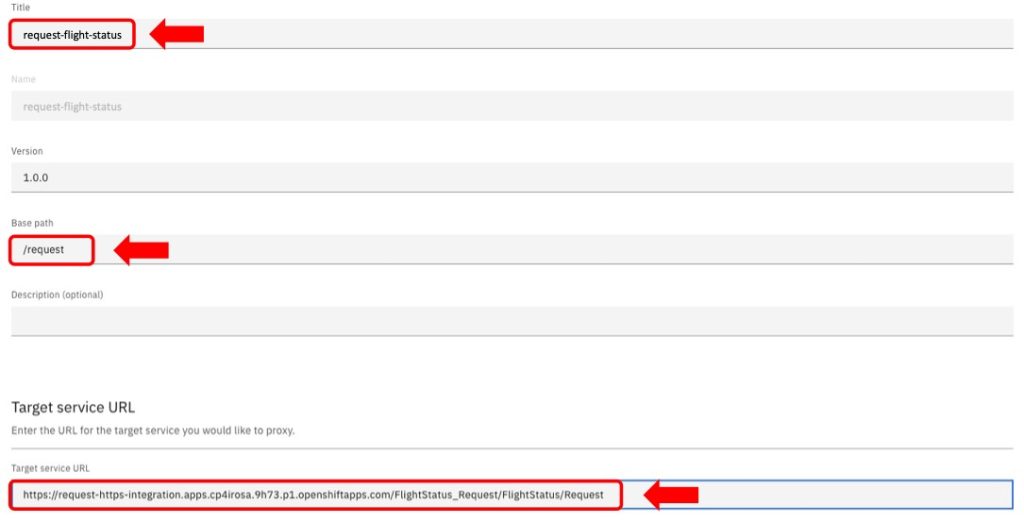
Figure 12. Create a REST proxy to route traffic to the App Connect Request API.
9. Click Next. Keep the default selections for Secure using Client ID and CORS.
10. Click Next to create your API definition, then click Edit API.
11. Go to the Test tab and click Test Configuration.
12. Enable Auto-publish. The status should now changes to Online (figure 13).
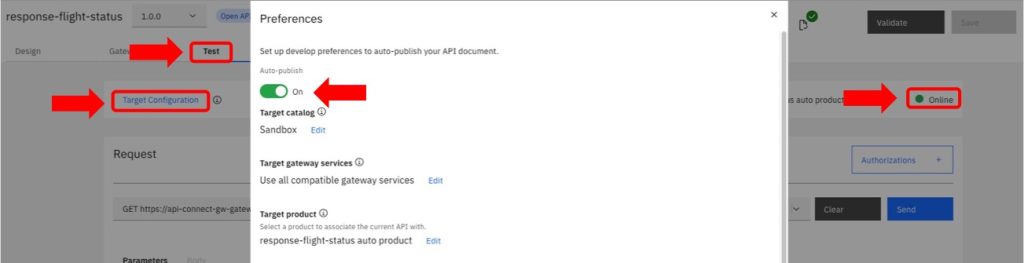
Figure 13. Publishing the REST proxy to change its status to Online.
13. Go to the Endpoint tab and take note of the API base endpoint, Client ID and Client secret (figure 14). You will use these values to invoke the API using an external client.

Figure 14. Get the REST proxy endpoint details on API Connect.
14. Repeat steps 2 to 13 to create an API proxy for the App Connect Response API. Use the App Connect Response API from the Deploy the flows to Integration Servers section and name it flight-status-response.
Test the using an external client
Let’s test the APIs using an external client. We used Visual Studio Code.
Figure 15 shows a POST request to the request-flight-status API with the X-IBM-Client_Id header and JSON payload in the body. For the response-flight-status API, include the X-IBM-Client_Id header in your GET request.
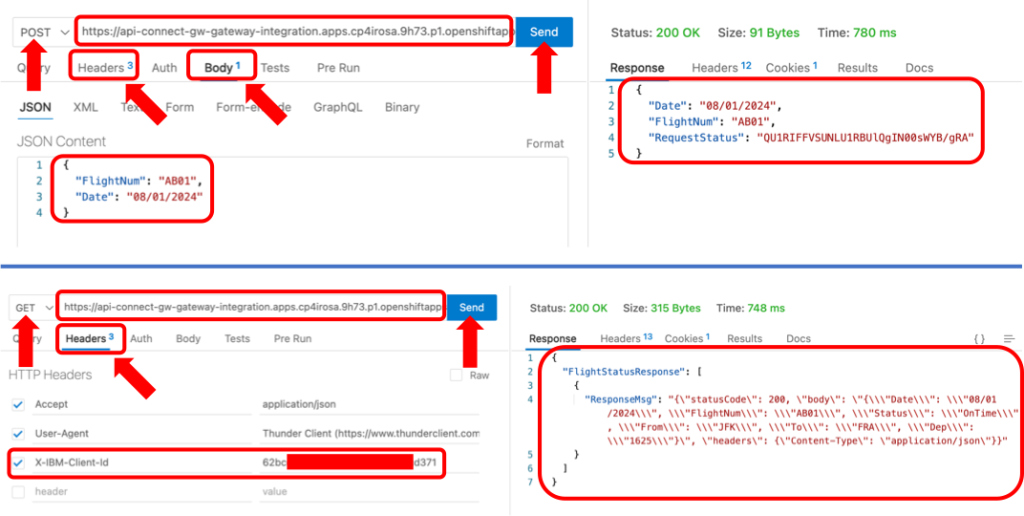
Figure 15. Test APIs using an external API client to get flight status details.
Cleanup
To avoid future charges on your AWS account, follow the steps in the Deploying IBM Cloud Pak for integration on Red Hat OpenShift Service on AWS blog. Delete the CP4I installation, including ROSA, the Amazon EFS file system, the AWS Lambda function, the Amazon DynamoDB table, bastion host and any other AWS services used for this setup.
Delete the IAM User created in step 8 of the AWS services configuration section of the blog. Also, delete the IAM Role FlightInfoLambdaRole, as well as the FlightInfoPolicy and cp4i-appconn-permissions IAM policies.
Summary
In this blog, we’ve shown how to create application integrations using queue-based and event-driven architectures. We combined AWS services like AWS Lambda and Amazon DynamoDB with IBM Cloud Pak for Integration deployed on AWS ROSA.
Visit AWS Marketplace to subscribe to IBM Integration solutions on AWS:
- IBM Cloud Pak for Integration
- IBM Cloud Pak for Integration (BYOL)
- IBM App Connect Enterprise (iPaaS)
- IBM App Connect Enterprise (Software)
- IBM MQ and IBM MQ Advanced (software)
- IBM API Connect – Full lifecycle API management
- IBM API Connect Enterprise (Software)