Artificial Intelligence
Authenticate with Private Key JWT using Amazon Bedrock AgentCore Identity
Amazon Bedrock AgentCore Identity now supports Private Key JWT client authentication for agents. With Private Key JWT client authentication, your agents can authenticate to a downstream identity provider’s token endpoint using a signed JSON Web Token (JWT) client assertion instead of a shared OAuth 2.0 client secret. You can register a public key with your identity provider, while the corresponding private key stays in an AWS Key Management Service (AWS KMS). To authenticate, AgentCore Identity uses AWS KMS to sign the assertion and sends the signed assertion to the identity provider, which verifies it using the public key you registered.
This post explains how Private Key JWT client authentication works in AgentCore Identity and reviews the supported grant flows. We then walk through creating an AWS KMS signing key, registering its public key with your identity provider, configuring a credential provider on the AWS Management Console, and reviewing example AWS CloudTrail events that record your agent’s access.
How does it work?
The following example illustrates the request flow. Consider a customer-support agent that needs to read a customer’s order history from an internal orders API protected by your identity provider.
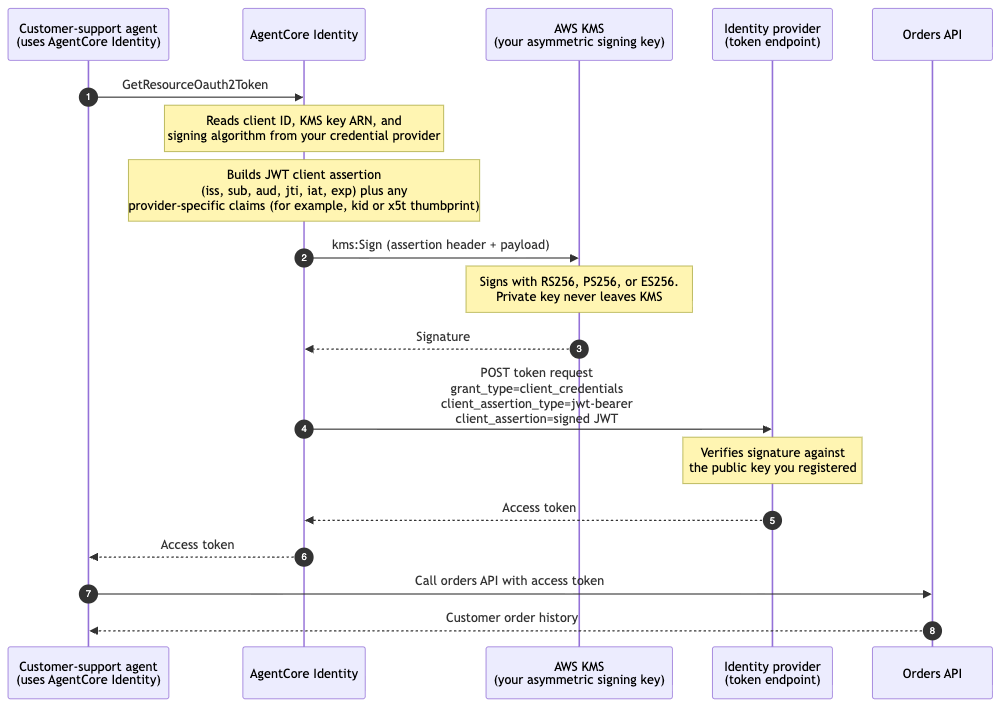
Figure 1 – Example request flow for a machine-to-machine token request, from the agent’s call through to the downstream API
The following diagram illustrates the request flow:
- The agent calls
GetResourceOauth2Tokenon AgentCore Identity to request a token for the orders API. - AgentCore Identity reads the client ID, KMS key ARN, and signing algorithm from your credential provider. It builds a short-lived JWT client assertion with the required payload claims (plus any additional header or payload claims you configured, such as a key identifier or a certificate thumbprint), and calls
kms:Signagainst your KMS asymmetric signing key using the signing algorithm you configured (RS256, PS256, or ES256). - AWS KMS signs the assertion and returns the signature to AgentCore Identity. The private key never leaves KMS.
- AgentCore Identity posts the signed assertion to your identity provider’s token endpoint with
grant_type=client_credentialsandclient_assertion_type=urn:ietf:params:oauth:client-assertion-type:jwt-bearer. - The identity provider verifies the signature against the public key you registered and returns an access token to AgentCore Identity.
- AgentCore Identity returns the access token to your agent.
- The agent calls the orders API with the access token.
- The orders API returns the customer’s order history.
Overview of supported grant flows
Private Key JWT authentication works for the three grant flows:
- Machine-to-machine (M2M): the agent acts as itself. There is no human user in the picture. The agent needs to access a resource, for example a background job syncing data, or a service that any customer-support agent can read regardless of who triggered it. The token represents the application/agent identity. Uses the client_credentials grant. The token’s subject is the client itself.
- On-behalf-of (OBO): the agent acts for a specific user, using that user’s existing token. A user has already signed in somewhere and there is an inbound user token. The agent needs to call a downstream API as that user, so their permissions and identity carry through. AgentCore Identity exchanges the inbound user token for a downstream token that represents the user, while still authenticating itself with the client assertion. You can use RFC 8693 token exchange or the RFC 7523 JWT authorization grant, depending on the identity provider.
- User-delegated access: the agent acts for a user, but the user grants consent interactively first. There is no pre-existing token to exchange. Instead, the user goes through an interactive login/consent (the authorization code / three-legged OAuth flow), approving what the agent can do. After consent, the agent gets a token representing the user. Uses the authorization code grant.
Prerequisites
This post assumes that you have
- An AWS account with AWS Management Console access to KMS, AgentCore and AWS CloudTrail.
- A tenant on your identity provider, where you can register a public key for an application.
- Discovery URL and Client ID that clients use to discover and integrate with your identity provider.
- Confirm the signing algorithm your identity provider requires for Private Key JWT client authentication. Confirm the same algorithm and key spec is supported by both AWS KMS and AgentCore Identity.
- Permissions for each part of the flow:
- Create and configure the KMS key –
kms:CreateKeyandkms:PutKeyPolicy. - Export the public key to register with your identity provider –
kms:GetPublicKey. (If your identity provider generates the key pair and gives you the private key material instead, you also needkms:GetParametersForImportandkms:ImportKeyMaterialto import it into KMS.) - Create the credential provider –
bedrock-agentcore-control:CreateOauth2CredentialProvider.
- Create and configure the KMS key –
Getting started
The following sections show how to configure Private Key JWT as the client authentication method using the AWS Management Console.
Step 1: Create the KMS signing key and register the public key
Start by creating an asymmetric KMS key that AgentCore Identity will use to sign the JWT client assertion. In this example, we create the key in KMS and export the corresponding public key to the Identity provider. However, if your identity provider generates the key pair and gives you the private key material instead, you can import it to KMS.
- Open the AWS KMS console in the same AWS Region as your credential provider.
- Choose Customer managed keys, then choose Create key.
- For Key type, choose Asymmetric.
- For Key usage, choose Sign and verify.
- For Key spec, choose a spec compatible with your signing algorithm. This example uses ECC_NIST_P256 with the ES256 signing algorithm.
- Choose Next, enter an Alias, and proceed through the key administrator and key usage permission steps.
- On the Edit key policy step, add the following statement to the key policy to grant AgentCore Identity permission to use the key, replacing
111122223333with your AWS account ID and<region>with AgentCore region in use. Thekms:ViaServicecondition verifies the key can only be used when the request originates through AgentCore Identity: - Choose Finish. On the key’s detail page, note the key ARN. You provide it when you create the credential provider.
- Next, export the public key and register it with your identity provider:
- On the key’s detail page, choose the Public key tab and download the public key. KMS provides a DER-encoded public key.
- Convert the public key into the format your provider requires (for example, an X.509 certificate for Microsoft Entra ID or a JSON Web Key for Okta) and register it on your application.
Step 2: Add an OAuth client
- Open the Amazon Bedrock AgentCore console.
- In the left navigation pane, under Build, choose Identity.
- In the Outbound Auth section, choose Add Outbound Auth, and then choose Add OAuth client.
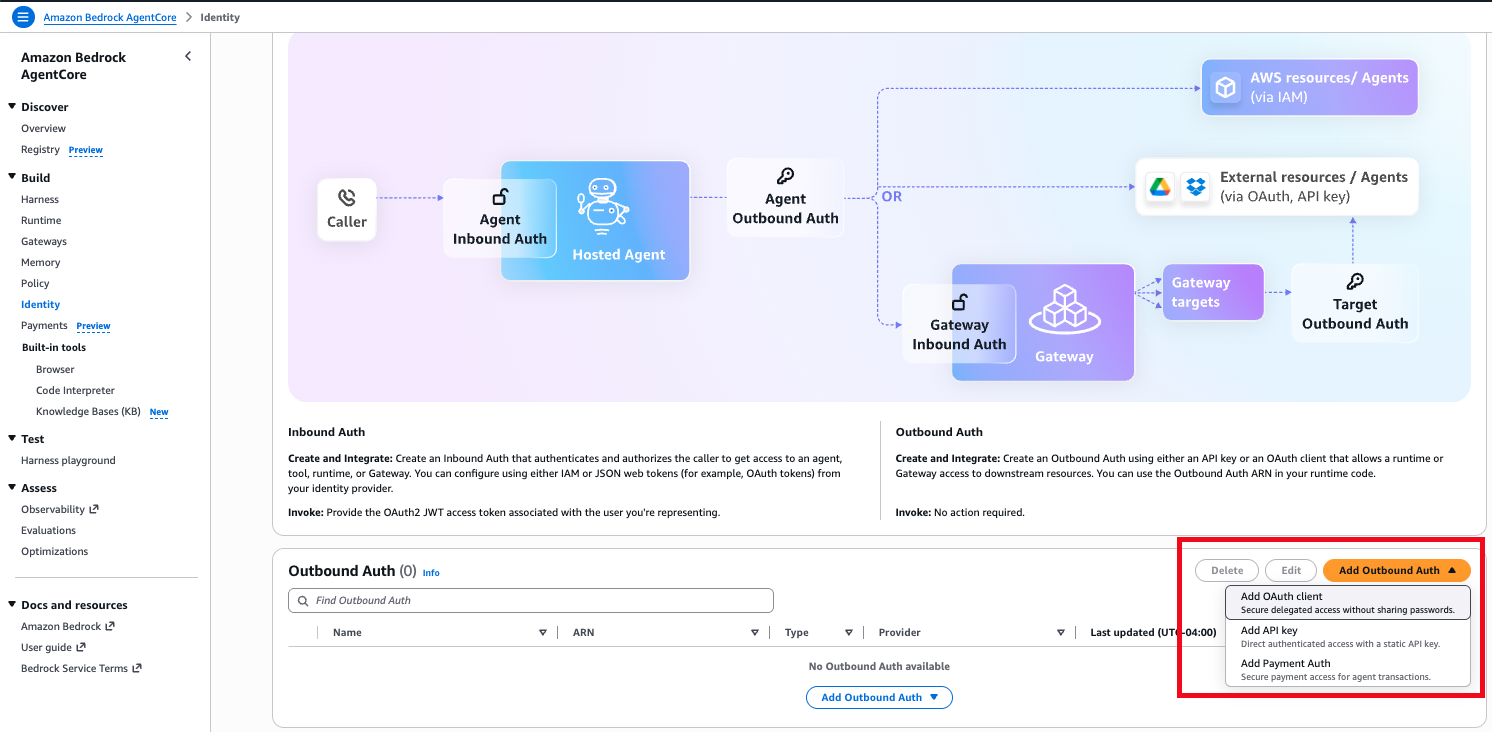
Figure 2 – Adding an OAuth client from the AgentCore Identity console
Step 3: Choose Private key JWT as the client authentication method
On the Add OAuth Client page, in the Provider configurations section:
- For Configuration type, choose Discovery URL so AgentCore Identity can retrieve your provider’s configuration automatically. (Choose Manual config if your provider does not publish a discovery endpoint.)
- For Client authentication method, choose Private key JWT.
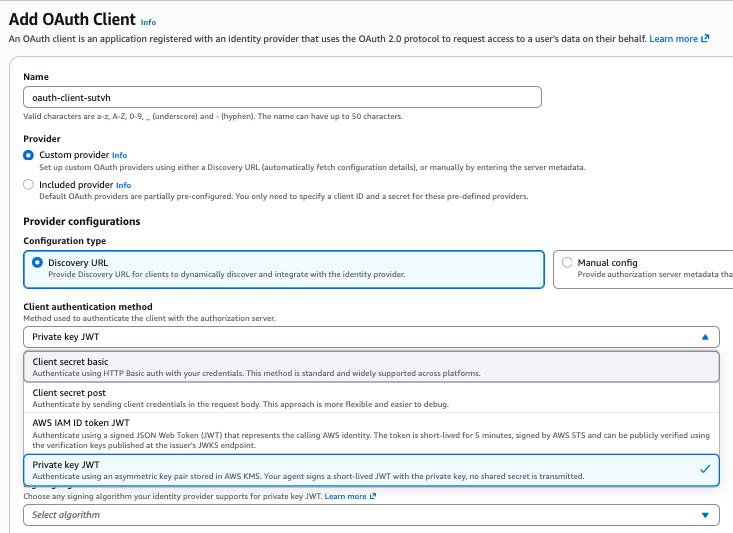
Figure 3 – Selecting Private key JWT as the client authentication method
Step 4: Provide the discovery URL, client ID, KMS key and signing algorithm
- For Discovery URL, enter the URL where your provider publishes its OpenID Connect configuration (ending in
.well-known/openid-configuration). - For Client ID, enter the client identifier registered at your identity provider.
- For KMS key, choose the ARN of your asymmetric KMS signing key. The key must have been created with
SIGN_VERIFYas usage and be in the same Region for it to show up in the list.
Note: You can also use a key from another account in the same Region by entering that key’s ARN. Cross-account access requires extra permissions in both accounts. See Allowing users in other accounts to use a KMS key.
- For Signing algorithm, choose the algorithm your identity provider requires for Private Key JWT. It must be compatible with your KMS key spec:
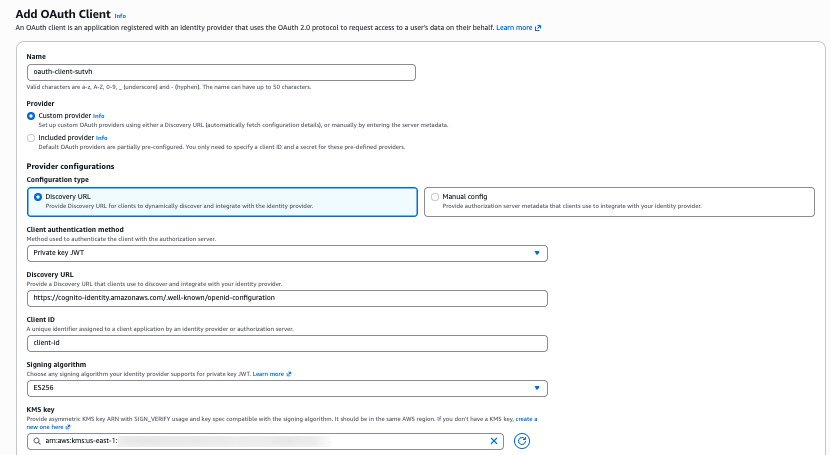
Figure 4 – Providing the discovery URL, client ID, asymmetric KMS key and signing algorithm
Step 5: (Optional) Add claims, then create the client
If your identity provider requires additional claims in the JWT client assertion, add them here:
- Under Header claims – optional, choose Add header claim to add provider-specific header claims, such as a key identifier. The reserved keys
algandtypcannot be set. - Under Payload claims – optional, choose Add payload claim to add provider-specific payload claims. The reserved keys
iss,sub,jti,exp,iat, andnbfcannot be set. - Choose Add OAuth Client.
- Verify that the credential provider was created by checking that it appears in the Outbound Auth list.
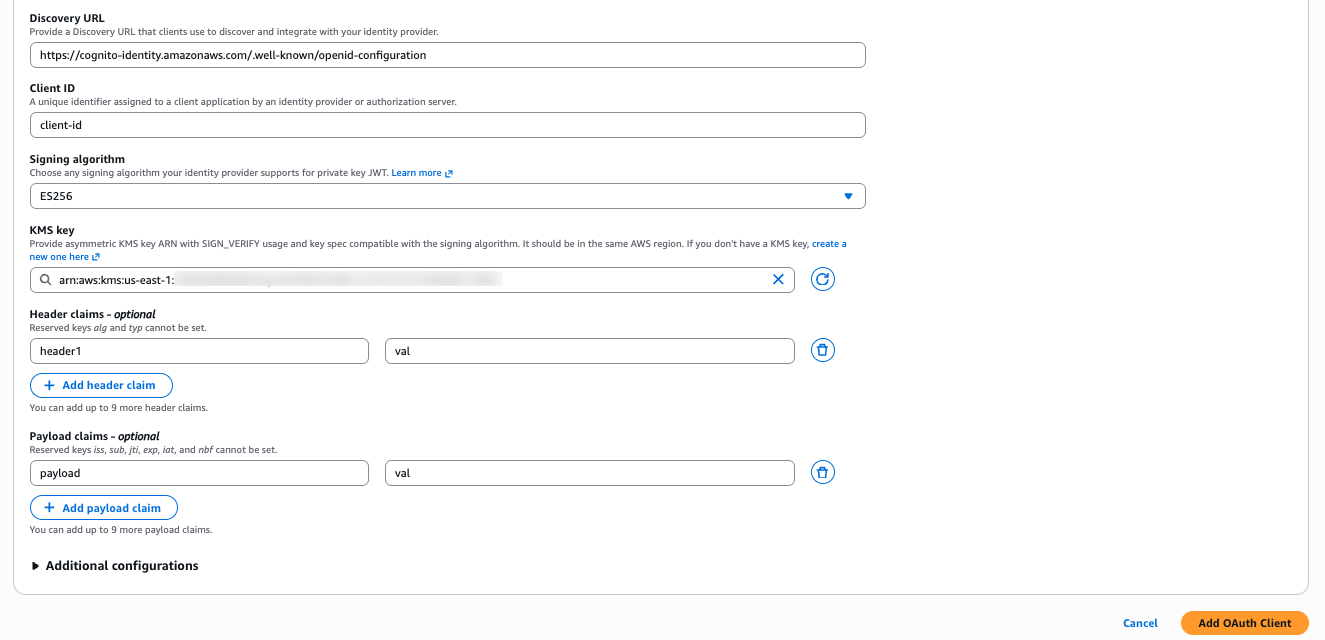
Figure 5 – Adding optional header and payload claims before creating the client
Example CloudTrail logs for the agent access
When an agent uses the credential provider to fetch a token, the operations are recorded on AWS CloudTrail so you can audit each access. You will see event names such as:
- GetWorkloadAccessToken (event source
bedrock-agentcore.amazonaws.com) – the agent obtains its workload identity token. TherequestParametersrecord theworkloadName, theresourcesblock identifies the workload identity, and the returned token is redacted: - GetResourceOauth2Token (event source
bedrock-agentcore.amazonaws.com) – the agent requests an access token for the downstream resource. TherequestParametersshow which credential provider, scopes, and grant flow were used, and the inbound token is redacted. - Sign (event source
kms.amazonaws.com) – AgentCore Identity signs the JWT client assertion with your KMS key. This is the event that shows Private Key JWT working:userIdentity.invokedBy,sourceIPAddress, anduserAgentare allbedrock-agentcore.amazonaws.com, confirming that AgentCore Identity calledkms:Signon your behalf. Note that theSignevent records the KMS signing algorithm name, not the JWT algorithm name you configured.
Clean up
To avoid incurring ongoing charges and to remove resources you no longer need, clean up the credential provider and the KMS signing key you created in this walkthrough.
Remove the OAuth credential provider
- Open the Amazon Bedrock AgentCore console.
- In the left navigation pane, under Build, choose Identity.
- In the Outbound Auth section, locate the credential provider you created.
- Select the provider, choose Delete, and confirm the deletion.
Schedule deletion of the KMS key
Deleting a KMS key is irreversible and permanent. Once the key is deleted, any data or signatures that depend on it can no longer be produced, so KMS requires you to schedule deletion with a waiting period rather than deleting immediately. Before you schedule deletion, confirm the key is no longer referenced by any credential provider or identity provider registration. If you are unsure whether the key is still in use, consider disabling the key instead, which stops it from being used while keeping it recoverable.
- Open the AWS KMS console in the Region where you created the key.
- Choose Customer managed keys, then select the asymmetric signing key you created.
- Choose Key actions, then choose Schedule key deletion.
- Enter a waiting period between 7 and 30 days. During this window the key is disabled but can still be recovered by canceling the scheduled deletion.
- Confirm that you want to schedule the key for deletion.
After the waiting period elapses, KMS permanently deletes the key. Remember to also remove or rotate the corresponding public key you registered with your identity provider, so it no longer trusts the retired key.
Conclusion
By using Private Key JWT client authentication in AgentCore Identity, you can give your agents a secret-less, auditable way to authenticate to identity providers. The signing key stays on AWS KMS, every signing operation is recorded on AWS CloudTrail, and the same credential provider extends across M2M, on-behalf-of, and user-delegated flows. For end-to-end samples, including Entra and Okta identity-provider registration and both M2M and OBO flows, see the Amazon Bedrock AgentCore samples on GitHub.