Artificial Intelligence
Build an agentic incident triage assistant with Amazon Quick and New Relic
Incident triage is time-sensitive because site reliability engineers (SREs) and support engineers often need to collect evidence, assess user impact, and create follow-up work across separate tools. With Amazon Quick and New Relic, you can coordinate those investigation and handoff steps in a single conversational workflow.
This post shows engineering teams how to apply that principle to one of the most time-sensitive workflows in engineering: incident triage. You will build a custom incident triage assistant agent using Amazon Quick that orchestrates a response with the New Relic Model Context Protocol (MCP) Server and Asana through native integrations. From a single prompt, the Amazon Quick agent investigates the incident, assembles a root cause analysis (RCA) brief with evidence links, and creates a tracked Asana task ready for handoff.
For engineering leaders, reducing mean time to resolution (MTTR) is one way to drive better business impact. In internal testing using New Relic’s own applications, the agent reduced the evidence-gathering phase of incident triage. This led to faster resolution, lower risk of knowledge loss between engineering shifts, and a consistent investigation standard across the entire on-call rotation.
The incident triage assistant pattern in this post is one application of a broader capability in Amazon Quick: connecting enterprise tools to AI agents through native integrations.
New Relic MCP Server integration for Amazon Quick overview
With Amazon Quick chat agents, you can explore data and take actions through open-ended conversations backed by connected action connectors, pre-built integrations that link Amazon Quick to external services. New Relic is a built-in connector in Amazon Quick, providing access to its AI reasoning tools for incident response and performance analysis. Asana is another Amazon Quick built-in connector that supports task creation. The agent orchestrates both, producing an RCA brief and an Asana task from a single prompt. There are five New Relic reasoning tools the agent uses.
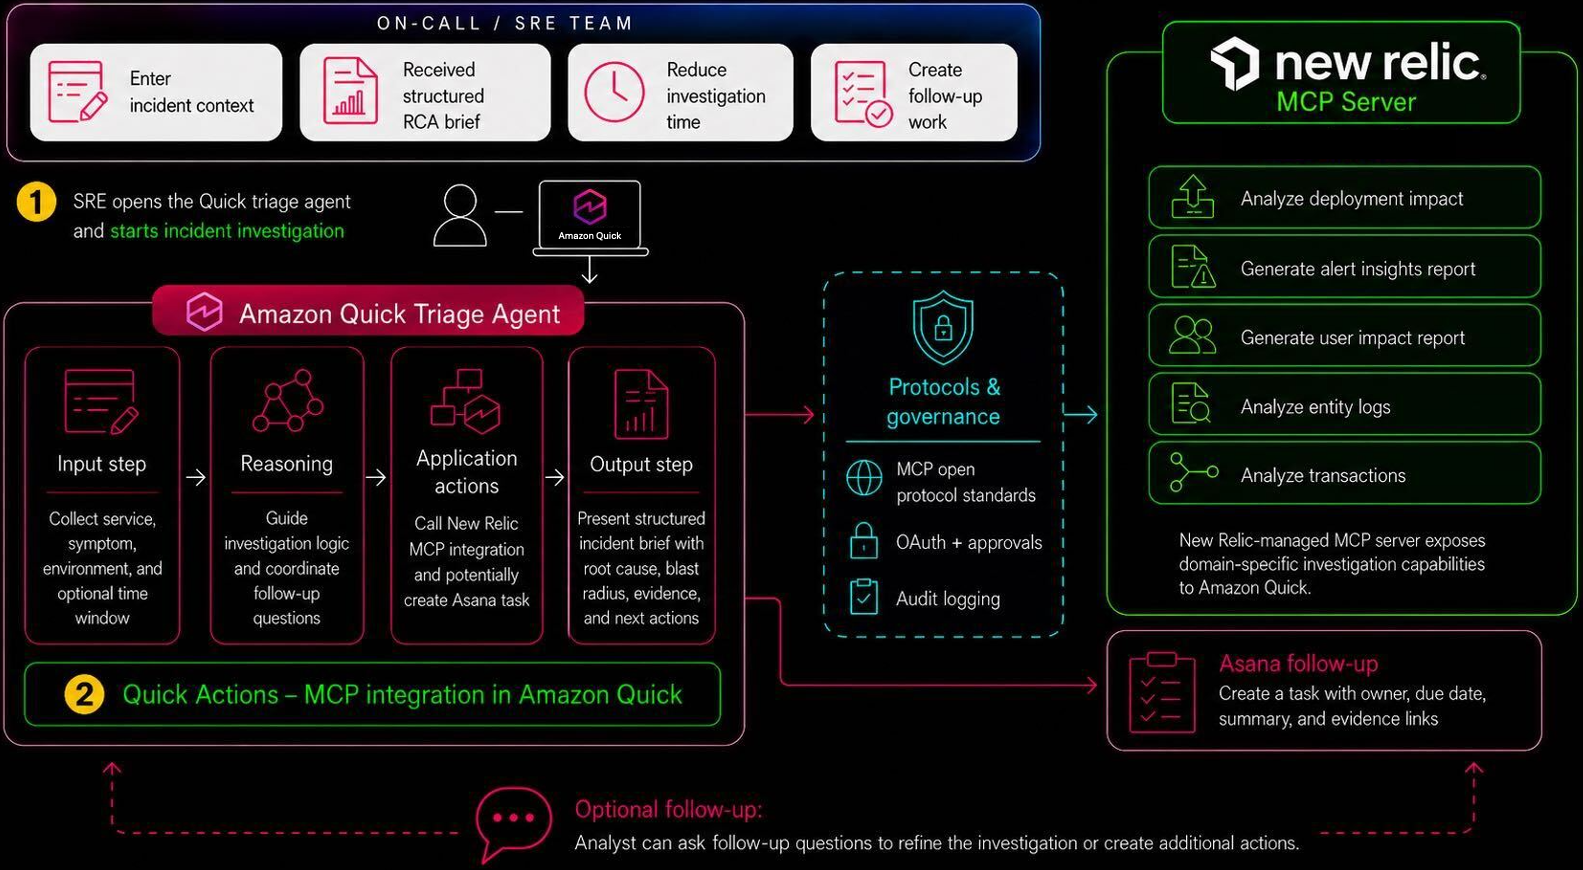
These tools do the investigative work, and the agent decides which ones to call based on your prompt:
- generate_alert_insights_report identifies key alert drivers.
- generate_user_impact_report quantifies blast radius, including the number of users and services affected.
- analyze_entity_logs surfaces error signatures and exceptions.
- analyze_transactions identifies slow or failing requests.
- natural_language_to_nrql_query converts plain-English questions into New Relic Query Language (NRQL) and runs them against your observability data.
The following image shows the end-to-end workflow from prompt to Asana task.
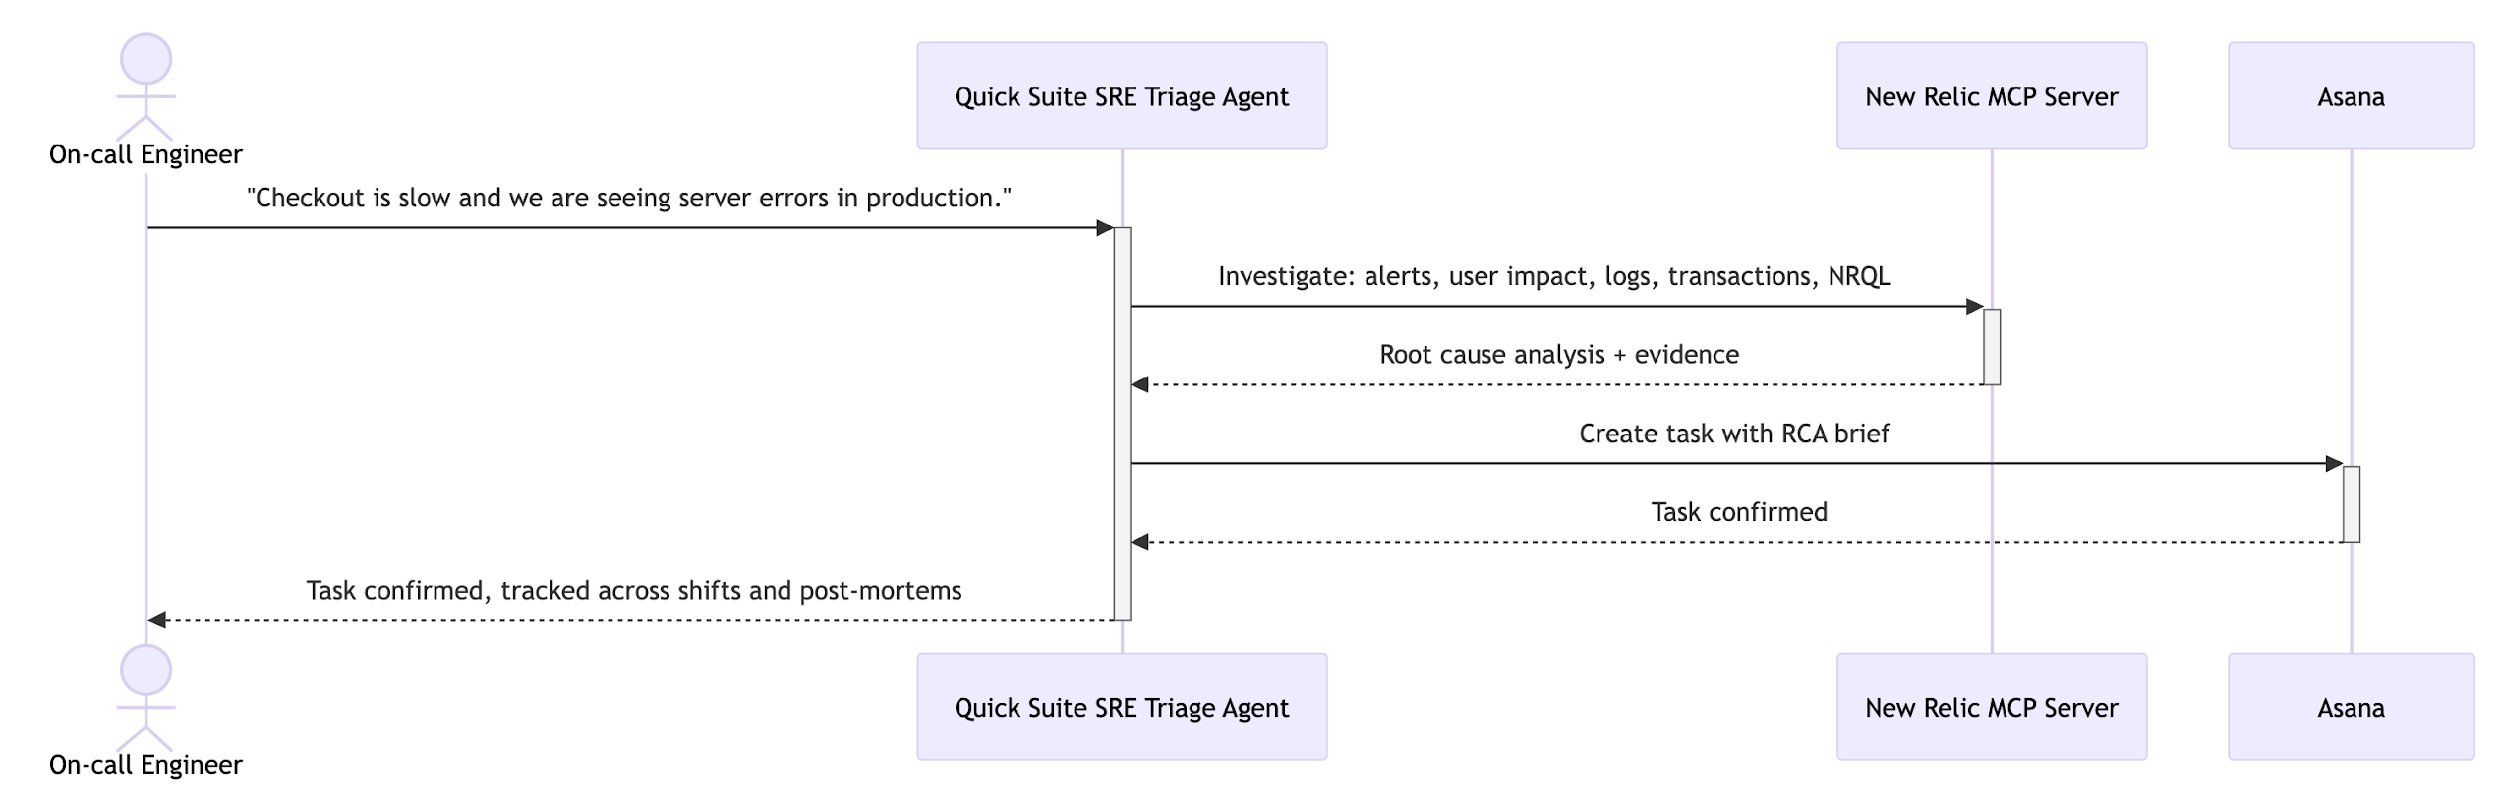
Figure 1: Incident triage workflow using Amazon Quick, New Relic MCP Server, and Asana.
The following implementation section walks through the full setup with screenshots. The following prompt is what an on-call engineer sends to start the investigation. Amazon Quick calls all five New Relic tools in one response, assembles the RCA brief, and then creates the Asana task:
“Checkout is slow and we are seeing server errors on checkout-service in production. Check the last 24 hours. Generate RCA brief.”
Prerequisites
Before building the incident triage assistant, make sure that you have the required Amazon Quick, New Relic, and Asana access in place, including the permissions needed to create integrations, authenticate connectors, and configure task handoff.
- Amazon Quick account. A Professional subscription is required. You need Author permissions or higher to create integrations and chat agents. See Amazon Quick pricing for current tier details.
- New Relic account. The New Relic connector is built into Amazon Quick. You authenticate using your existing New Relic account credentials during connector setup.
- Asana account. A workspace containing a project named SRE Incident Triage. You need administrative access to create an OAuth application in the Asana developer console to obtain OAuth credentials.
Implementation
In this section, you will set up the New Relic and Asana integrations, create the incident triage assistant in Amazon Quick, and test the end-to-end workflow from investigation to RCA brief to Asana task creation.
Step 1: Set up the New Relic integration
New Relic is available as a built-in connector in the Amazon Quick Integrations console. Navigate to Integrations and choose the Actions tab. Locate the New Relic tile (Figure 2) and choose the plus (+) icon to begin setup.
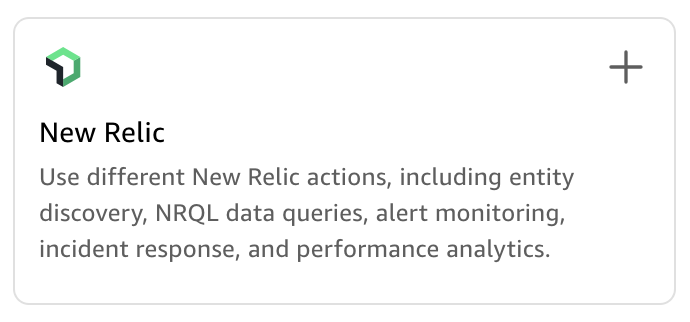
Figure 2: New Relic tile in the Amazon Quick Integrations console.
In the Create integration dialog (Figure 3), enter a name for the New Relic Integration and an optional description. Keep the connection type as Public network. The authentication method shows No additional credentials are needed at this stage. You authenticate with your New Relic account in a later step. Choose Create and continue, then choose Done.
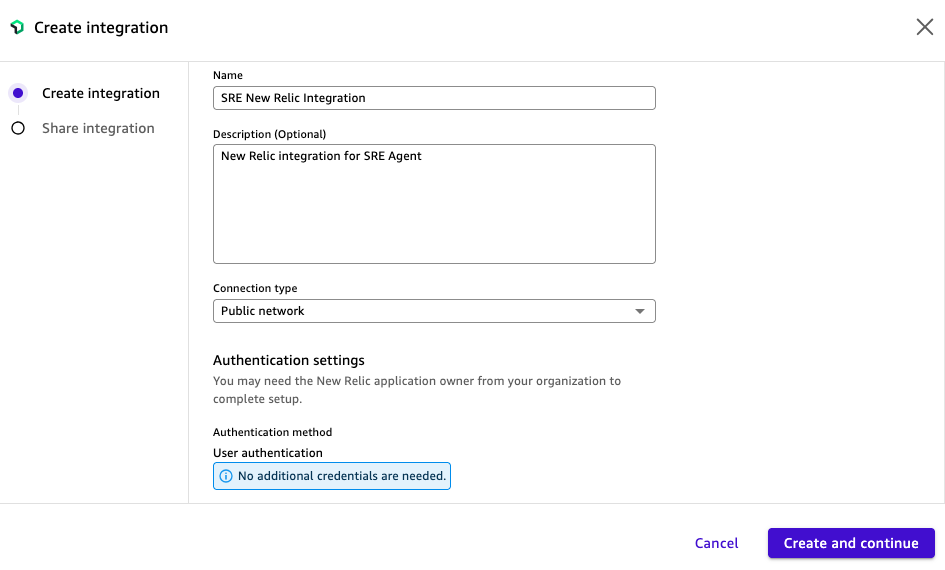
Figure 3: Creating the New Relic MCP Server integration in Amazon Quick.
The integration now appears in the Existing actions panel with a status of Available (Figure 4). Choose the integration name to open its detail page.
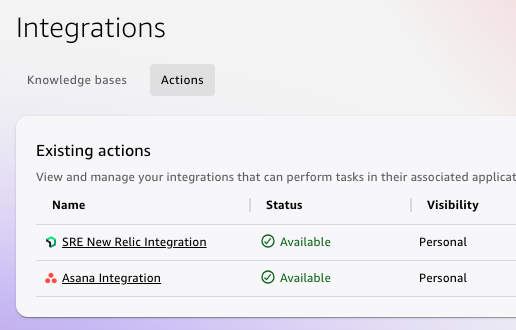
Figure 4: New Relic and Asana integrations listed as Available in the Amazon Quick Integrations console.
The detail page shows the available New Relic actions and the connection details including the Base URL, Authorization URL, and Token URL (Figure 5). Choose Sign in and authenticate with your New Relic account credentials to activate the connection.
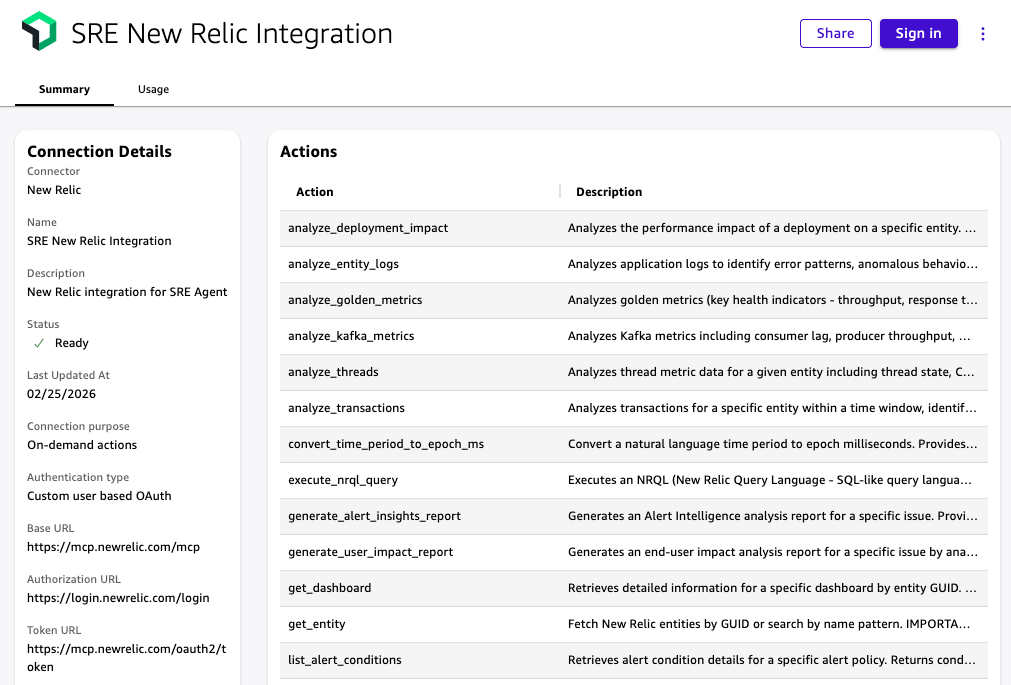
Figure 5: New Relic MCP Server integration detail page showing available actions. Choose Sign in to authenticate with your New Relic account.
Step 2: Set up the Asana integration
The Asana connector uses OAuth 2.0. Before configuring it in Amazon Quick, create an OAuth application in the Asana developer console to obtain your Client ID and Client Secret. Then navigate to Integrations → Actions in Amazon Quick and select Asana. Enter the following values:
- Base URL: https://app.asana.com/api/1.0.
- Authorization URL: https://app.asana.com/-/oauth_authorize.
- Redirect URL: Copy this value from the Amazon Quick configuration screen and paste it into your Asana OAuth app’s allowed redirect URLs before saving.
- Client ID and Client Secret: From your Asana OAuth application.
For full setup instructions, see Asana integration in the Amazon Quick User Guide.
The integration now appears in the Existing actions panel with a status of Available.
Figure 6: New Relic and Asana integrations listed as Available in the Amazon Quick Integrations console.
Step 3: Create the Incident triage assistant chat agent
Navigate to Chat agents and choose Create chat agent. Give the agent a name and purpose, then replace the generated instructions with the following. For full setup steps, see Custom chat agents in the Amazon Quick User Guide.
In the Actions section of the agent builder, choose Link existing integration and add both the New Relic integration and the Asana integration you created in Steps 1 and 2. After linking, the available actions from each integration are accessible to the agent.
Replace the generated agent instructions with the following:
Step 4: Test the workflow
Open the Incident triage assistant from Amazon Quick and send the following prompt. The agent calls New Relic reasoning tools, assembles the RCA brief, and asks you to confirm before creating the Asana task.
“Checkout is slow and we are seeing server errors on checkout-service in production. Check the last 24 hours. Generate RCA brief.”
The following image shows the agent calling New Relic reasoning tools in sequence before assembling the RCA brief.
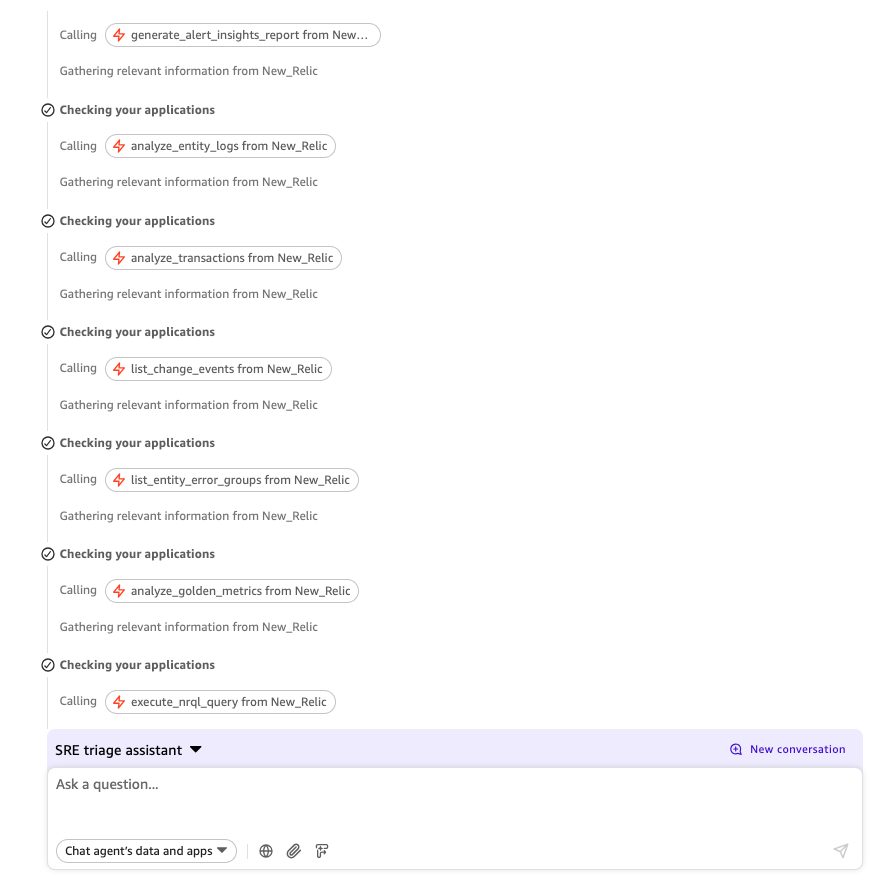
Figure 7: The Incident triage agent calling New Relic reasoning tools from a single prompt.
The following image shows the full RCA brief, including summary, blast radius, likely trigger, key evidence with links back to New Relic, and three recommended next actions.
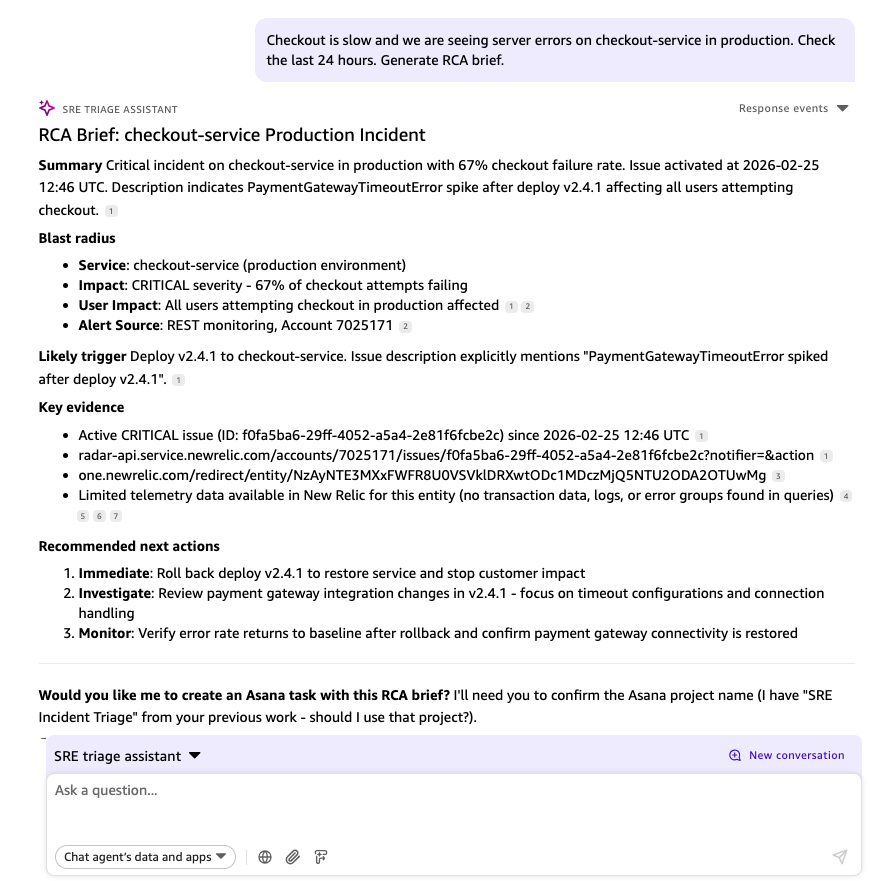
Figure 8: RCA brief generated by the Incident triage agent for the checkout-service incident.
When the agent asks to confirm the Asana project, reply: “Yes, create an Asana task in project SRE Incident Triage with this RCA brief.”
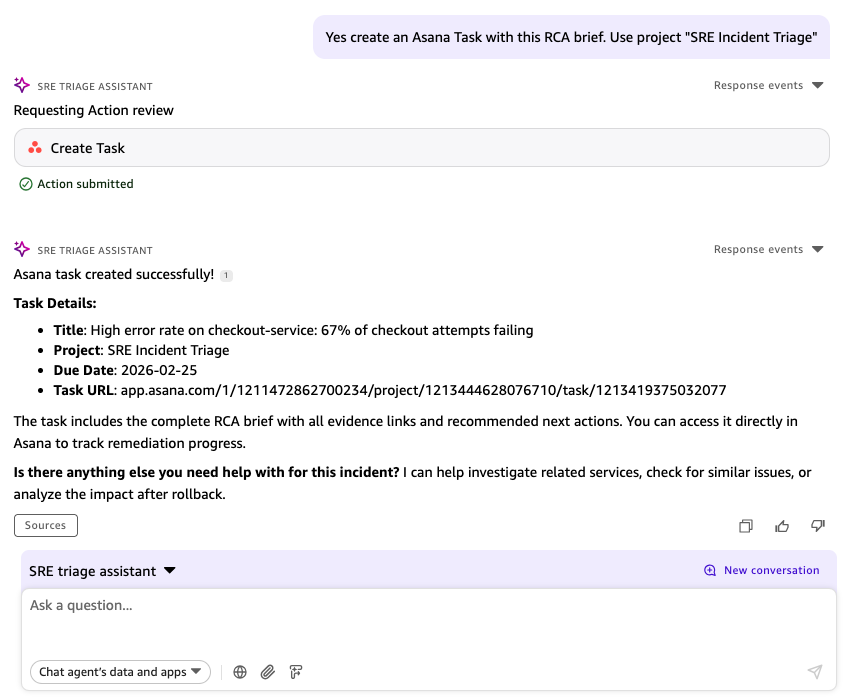
Figure 9: Asana task created by the Incident triage agent in the SRE Incident Triage project.
Security and governance considerations
Before sharing the agent with your on-call rotation, address the following:
- Least privilege for New Relic. The New Relic connector runs with the permissions of your authenticated account. Use a dedicated service account with the New Relic standard Read only role, or a custom role limited to the application performance monitoring (APM), logs, alerts, entities, and NRQL read or query access required for the triage actions. Do not use full admin credentials.
- Asana permission scoping. Use a dedicated Asana service account with create-task access limited to the SRE Incident Triage project. Verify your OAuth app scopes include only what the agent requires: tasks:write, tasks:read, projects:read, and workspaces:read.
- Treat Asana task notes as a handoff summary, not a raw incident data export. Don’t include personally identifiable information (PII), customer identifiers, user IDs, email addresses, IP addresses, session tokens, internal hostnames, infrastructure topology details, database connection strings, environment variables, or raw credentials in Asana tasks.
- Credential storage. Rotate New Relic and Asana OAuth credentials according to your organization’s key rotation policy.
- Audit logging. Amazon Quick logs the action connector invocations.
Clean up resources
If you built this solution as a prototype, remove the following resources to avoid ongoing charges:
- In Amazon Quick, delete the custom chat agent.
- In Amazon Quick, delete the New Relic Integration and Asana Integration connectors.
- In the Asana developer console, revoke the OAuth application credentials created for this integration.
- Rotate or delete any test credentials used during setup, following your organization’s security policy.
Conclusion
In this post, we showed you how to build an agentic incident triage agent using Amazon Quick that connects to the New Relic MCP Server and Asana through native integrations. From a single prompt, the agent calls five New Relic reasoning tools, assembles a root cause analysis brief with evidence links, and creates a tracked Asana task ready for handoff.
The agent removes the manual coordination between your observability system and your tracking system. Every investigation produces a consistent RCA format, regardless of who is on call, making shift handoffs faster and post-mortems more straightforward to run.
To get started, follow the New Relic integration for Amazon Quick article, and the Amazon Quick User Guide. We encourage you to explore the solution and adapt it for your environment.