AWS for M&E Blog
Getting Started with Wait and Save service-managed fleets on AWS Deadline Cloud
Visual effects and animation studios can accelerate creative iterations and explore more rendering options with AWS Deadline Cloud, a fully managed service that simplifies render management for teams creating computer-generated 2D and 3D graphics and visual effects. Deadline Cloud offers service-managed fleets, where AWS automatically provisions and manages compute resources to simplify infrastructure management. Wait and Save, now available for service-managed fleets on Deadline Cloud, offers discounts on CPU rendering compute rates in exchange for flexibility in job scheduling times.
This post shows how to configure Wait and Save for service-managed fleets on Deadline Cloud to reduce CPU rendering costs. We will cover the following topics:
- Understanding service-managed fleet capacity fulfillment
- Setting up a dedicated Wait and Save queue and fleet for maximum cost savings
- Comparing costs across Wait and Save, Spot, and On-Demand fleets
- Monitoring job status, wait times, and cost tracking in Deadline Cloud Monitor
- Automating capacity management for a hybrid fleet setup with Wait and Save and Spot fleets for capacity and cost optimization
Understanding service-managed fleet capacity fulfillment
Deadline Cloud service-managed fleets can acquire Amazon Elastic Compute Cloud (Amazon EC2) instances through two primary methods: On-Demand Instances and Spot Instances. On-Demand Instances provide reliable compute capacity, making them ideal for workloads that require consistent, uninterrupted processing. With Spot Instances, you can take advantage of unused Amazon EC2 capacity at steep discounts compared to On-Demand prices—often up to 90% savings. This capacity becomes available when AWS has unused compute resources across its data centers. Workloads on Spot Instances might be interrupted to supply On-Demand requests.
Wait and Save uses excess CPU Spot capacity by offering discounted compute rates in exchange for flexibility in when your rendering jobs start. By allowing Deadline Cloud to use periods of higher Spot capacity availability, you can achieve significant cost savings while maintaining the quality and throughput of your rendering workloads. For current pricing details, see AWS Deadline Cloud pricing.
Smart scheduling with Wait and Save
The following are key optimization factors to improve capacity and pricing:
- Time of day – Customer usage patterns typically align with the cyclic working hours of the day—namely greater capacity availability in evenings and early mornings. Submitting jobs during off-peak hours offers faster capacity availability.
- Regional strategy – Consider submitting jobs to an AWS Region where it’s currently outside of business hours. For example, if you’re working during the day in the US, a Region in a different time zone might have more capacity available at that time. When using different Regions, ensure compliance with your organization’s data governance and residency requirements.
By submitting jobs during off-peak hours or selecting different Regions, you can increase your access to available Wait and Save capacity and benefit from its pricing.
A straightforward way to use Wait and Save is with dedicated queues that map exclusively to Wait and Save fleets. In the following sections, we walk through the basic setup for Wait and Save fleets, demonstrate the cost savings, and show how you can integrate Wait and Save fleets with your existing EC2 Spot or On-Demand fleets.
Prerequisites
Before you begin, verify that Wait and Save aligns with your workload requirements and you have the necessary AWS resources configured.
Wait and Save supports the following workloads:
- CPU-based rendering workloads only (GPU not supported)
- Projects with flexible scheduling requirements
- Workloads that can accommodate variable start times
Key limitations to consider:
- Instance type selection – Wait and Save automatically selects from CPU instance types that match your capability requirements. You can’t specify exact instance types.
- Wait times – Jobs typically start within 24 hours. Actual wait times vary based on Region, time of day, and available capacity.
- Interruptions – Workers might be interrupted to fulfill On-Demand requests. Interrupted tasks restart from the beginning.
Ensure you have the following required AWS resources in place:
- An AWS account to use Deadline Cloud
- The Deadline Cloud monitor set up in the Region of your choice, including:
- A Regional AWS IAM Identity Center for your user
- A monitor URL
- A farm to which you want to configure your Wait and Save fleet (or use the Quickstart guide to provision these resources if this is your first time using Deadline Cloud)
- A supported Digital Content Creation (DCC) application with the corresponding Deadline Cloud submitter installed
Create dedicated queue
Complete the following steps to create a dedicated queue:
- On the Deadline Cloud console, choose Farms in the navigation pane.
- Choose your farm from the farms list.
- On the Queues tab, choose Create queue.
- Configure the queue settings (see Deadline Cloud queues for additional options):
- For Queue name, enter a descriptive name (for example,
Wait and Save Queue). - For Job attachments, configure your Amazon Simple Storage Service (Amazon S3) bucket for job attachments.
- For Queue name, enter a descriptive name (for example,
- Choose Create queue.
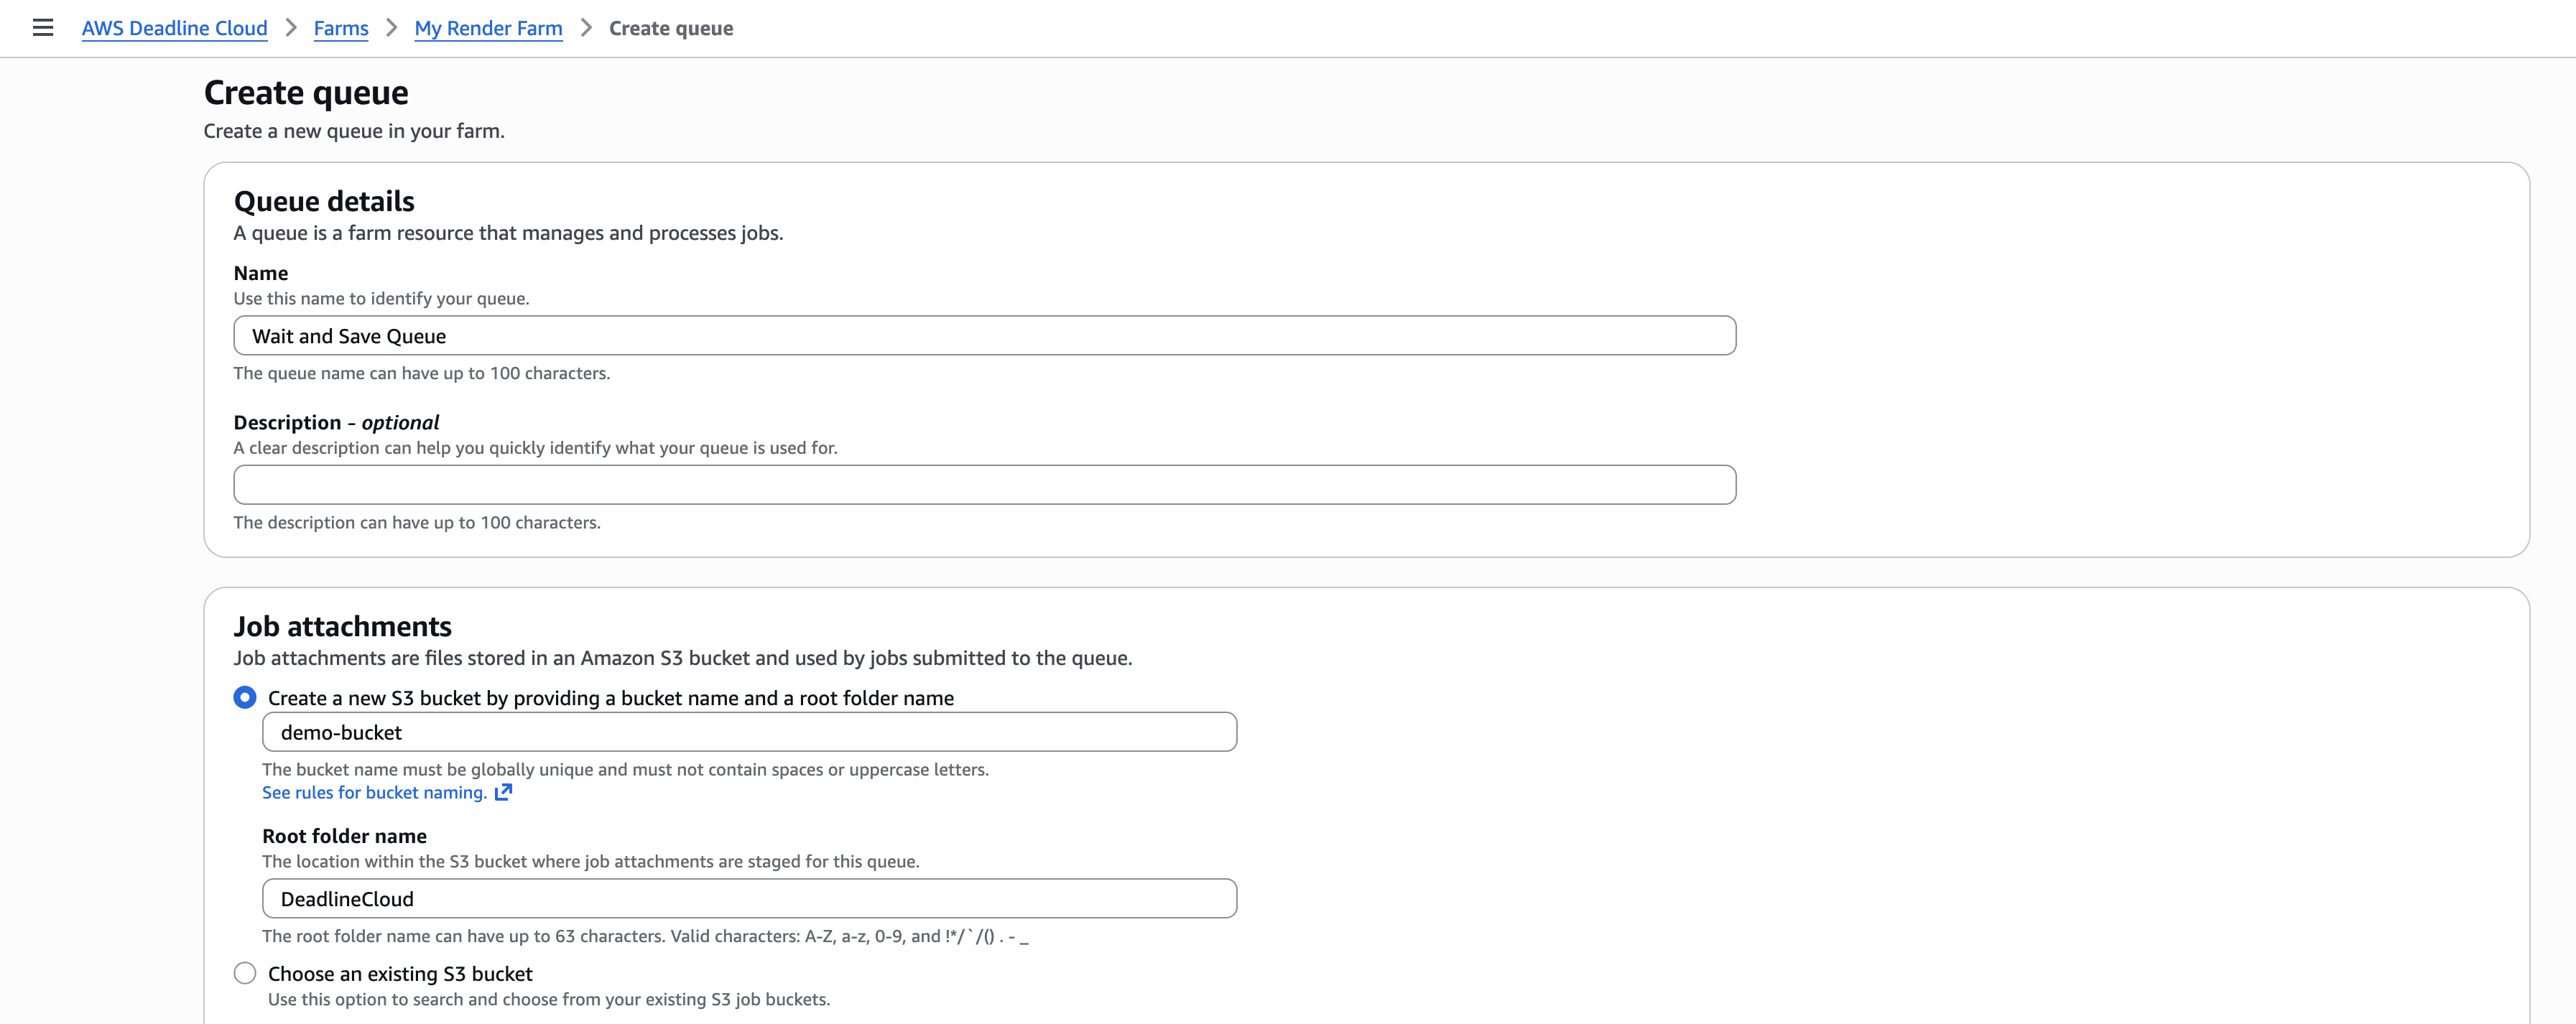
Figure 1: Create a queue specifically for Wait and Save fleets
Create Wait and Save fleet
Complete the following steps to create a Wait and Save fleet:
- On the Deadline Cloud console, choose Farms in the navigation pane.
- Choose your farm from the farms list.
- On the Fleets tab, choose Create fleet.
- Configure the fleet details:
- For Fleet name, enter a descriptive name (for example,
Wait and Save Fleet). - For Fleet type, select Service-managed.
- For Instance market type, select Wait and Save.
- For Fleet name, enter a descriptive name (for example,
- Choose Next.
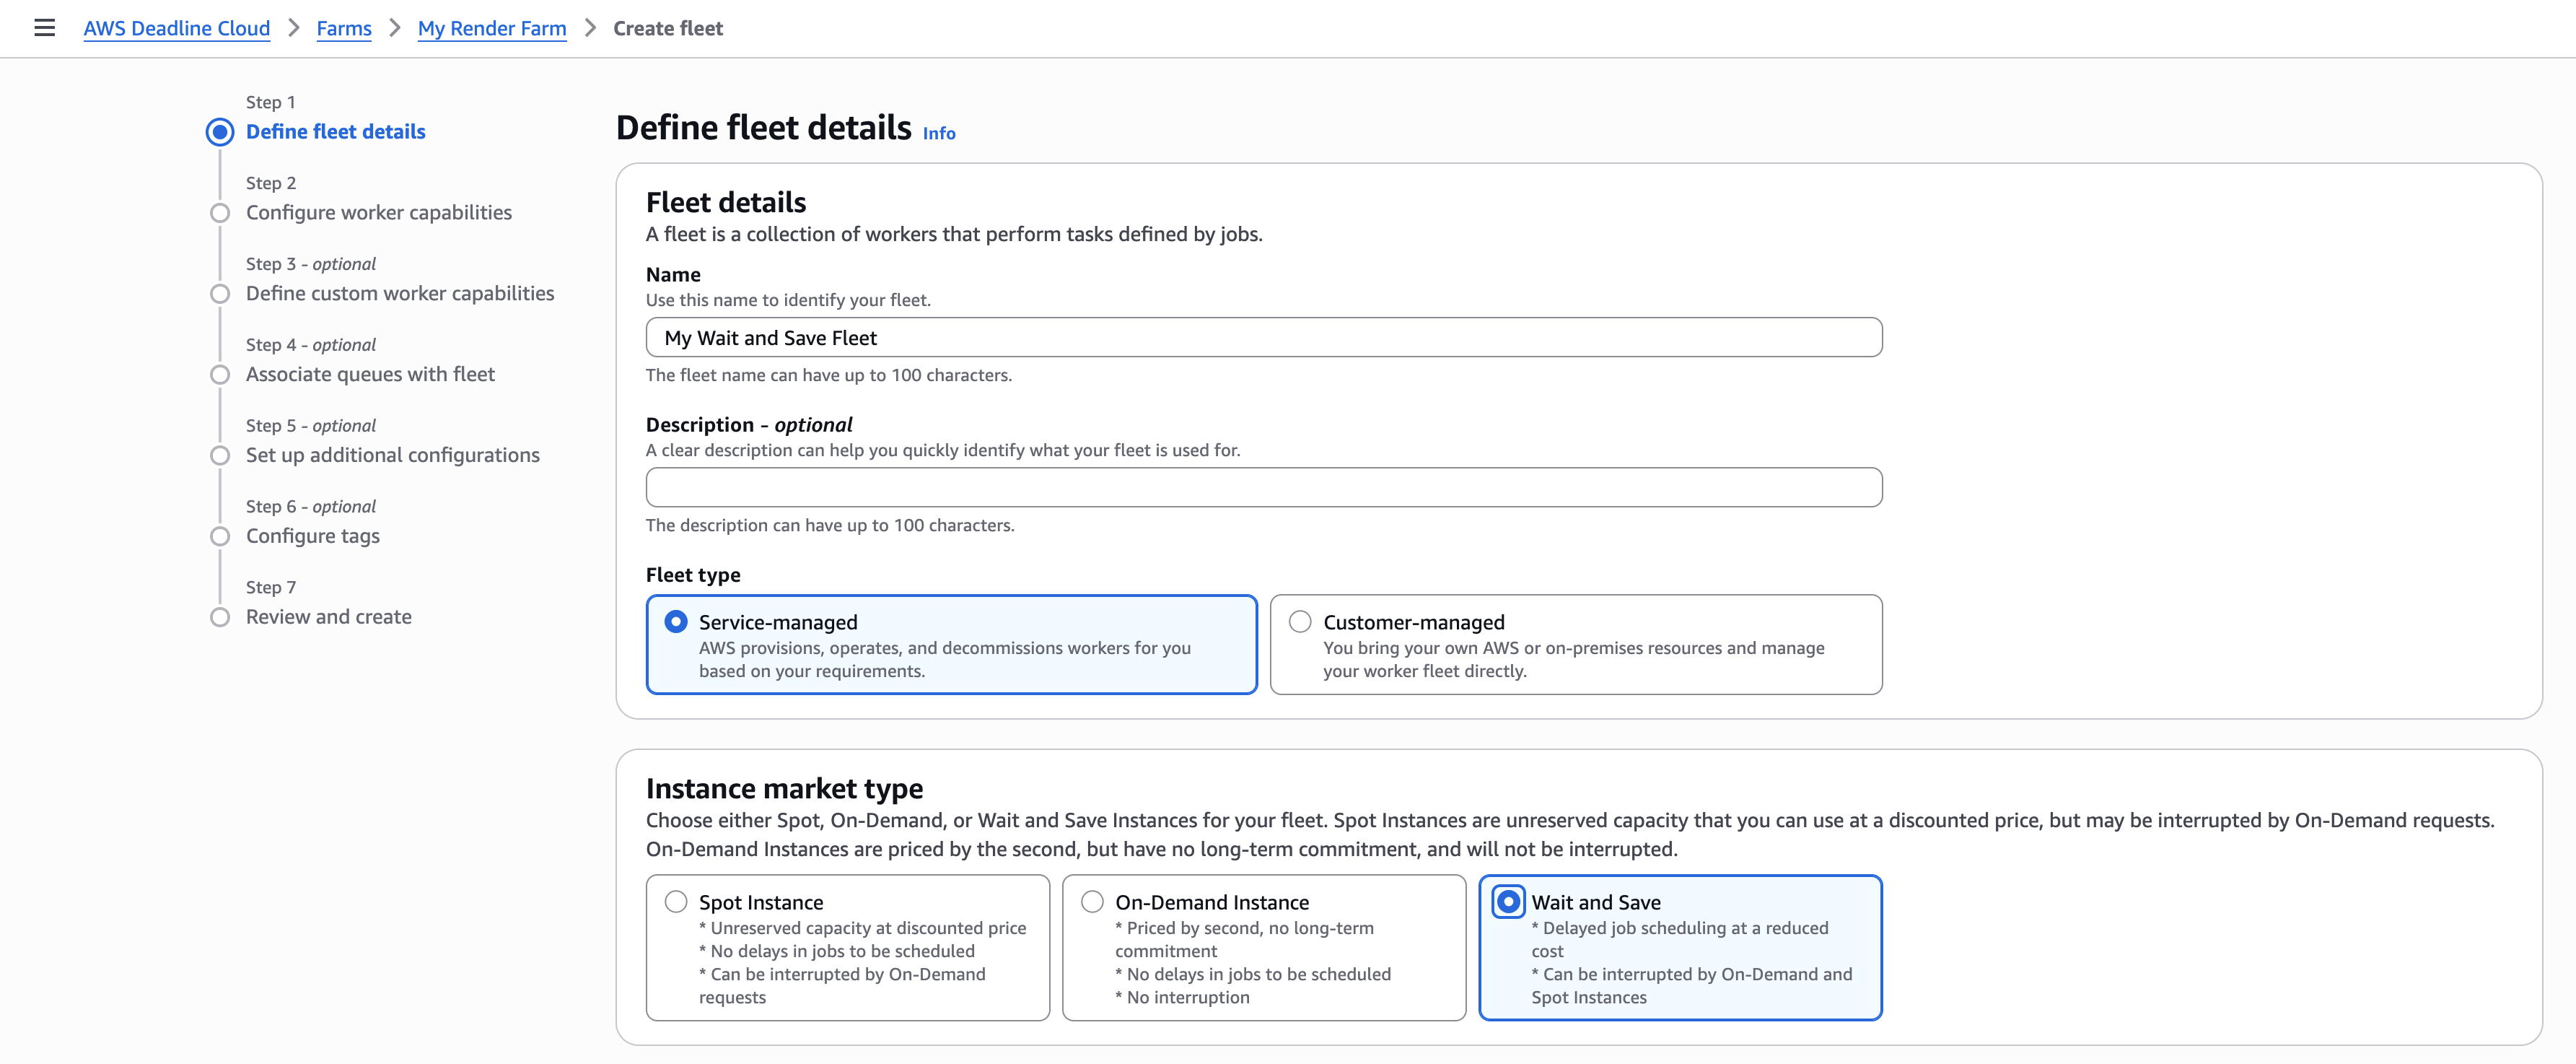
Figure 2: Select service-managed fleet type and Wait and Save instance market type
- Define the hardware and software requirements for your fleet. You don’t need to select specific EC2 instance types—Wait and Save automatically pulls from a range of instance types that match your criteria.
- For Amount vCPU, enter the minimum and maximum vCPU count (for example, 4–16).
- For Amount memory (GiB), enter the minimum and maximum memory (for example, 32–64).
- Choose Next.
- Set Maximum worker count based on your workload needs. The default quota is 50 Wait and Save vCPUs per Region. Quotas help facilitate responsible resource usage and cost management. To support larger production workloads, request a quota increase for Wait and Save vCPUs per Region for Deadline Cloud. See the Service Quotas User Guide for instructions on requesting quota increases.
- Choose Next.
- For Associate queues, associate the Wait and Save fleet with the queue you created earlier.
- Choose Next.

Figure 3: Associate the Wait and Save queue with the fleet
- Set up additional configurations and tags (optional), then choose Next.
- Review and choose Create fleet.
Submit job to Wait and Save queue
To demonstrate Wait and Save in action, we will submit a 200-frame turntable render. This example uses Autodesk Maya with the Deadline Cloud submitter, though the submission process works similarly with other supported DCCs.
- Save your Maya file.
- In Maya’s shelf, choose Deadline Cloud to open the submitter.
- In the Shared job settings section:
- For Farm Selection, choose the farm that contains your Wait and Save queue.
- For Queue Selection, select the Wait and Save queue you created.
- Choose Submit and follow the prompts to send your job to Deadline Cloud.
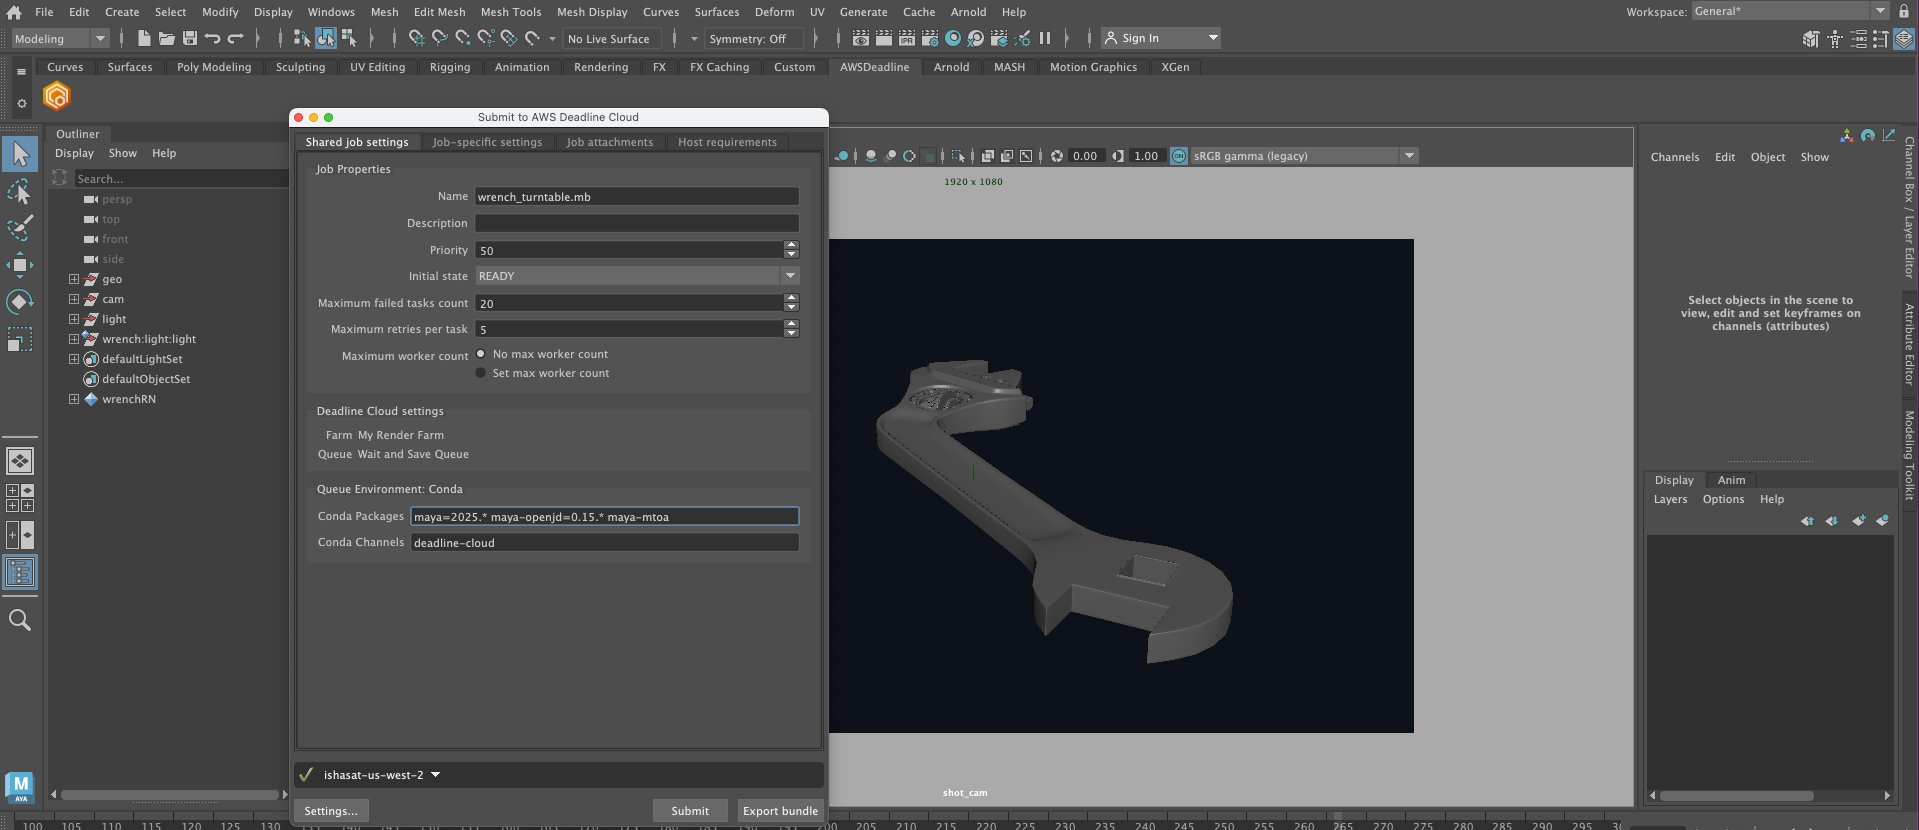
Figure 4: Maya Deadline Cloud submitter configured with the dedicated Wait and Save queue
Monitor job status and costs in Deadline Cloud Monitor
Track the job in the Deadline Cloud Monitor to observe the following:
- Job status – Track when the job transitions from Ready to Running as Wait and Save capacity becomes available. You can configure Amazon EventBridge notifications for job start and completion to get updates on your job when you’re away from your desk. See Job Run Status Change event for more information.
- Wait time – Monitor the duration between job submission and when it starts running. Wait and Save times can vary based on time of day, Region, workload size, and fleet configuration. Typically, wait times are less than 24 hours. As shown in the following screenshot of the job’s Create time to Start time details in the job monitor, the job took approximately 7 hours to start running.

Figure 5: Job monitor shows when the job was created, started, and ended
- Interruption handling – If interrupted, incomplete tasks will restart from the beginning; interrupted workers will be replenished from other available instance types, provided resources are available. For short tasks, this typically has minimal impact, but longer-running tasks might lose progress.
- Usage and cost tracking – Use the Deadline Cloud usage explorer to compare costs against Spot or On-Demand pricing and track runtime patterns. With a dedicated Wait and Save queue, the queue filter shows hourly usage patterns indicating when jobs are running, waiting, or being interrupted.

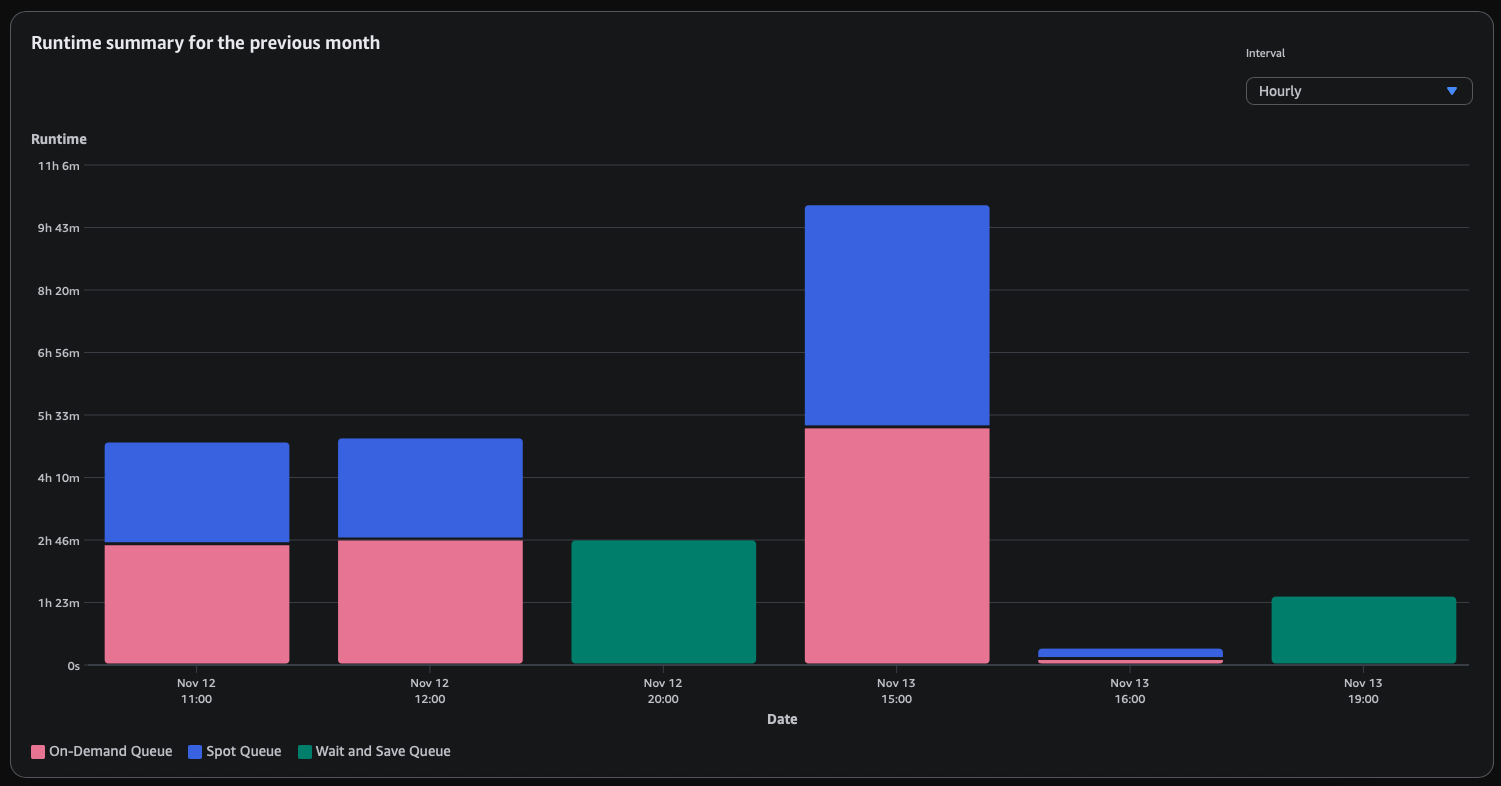
Figure 6: This usage explorer view demonstrates dedicated queues created for each market type with identical job submissions. The hourly interval setting shows when the jobs ran.
Dedicated Wait and Save setup cost savings
Let’s examine the cost impact of the 200-frame Maya turntable render we submitted in our example. To demonstrate the true savings potential, we created dedicated queues for each market type fleet with identical worker capabilities and ran the same Maya job on Wait and Save, Spot, and On-Demand fleets.
Running our 200-frame Maya turntable render on all three market types reveals significant compute cost differences, as shown in the following table. For this single job, Wait and Save yielded 92% savings vs. Deadline Cloud’s On-Demand and 78% savings vs. Deadline Cloud Spot.
| Service-Managed Fleet Market Type | Compute Cost | License Cost | Total Rendering Cost for 200-Frame Maya Job |
| On-Demand | $2.09 | $2.86 | $4.95 |
| Spot | $0.76 | $2.04 | $2.80 |
| Wait and Save | $0.17 | $2.18 | $2.35 |
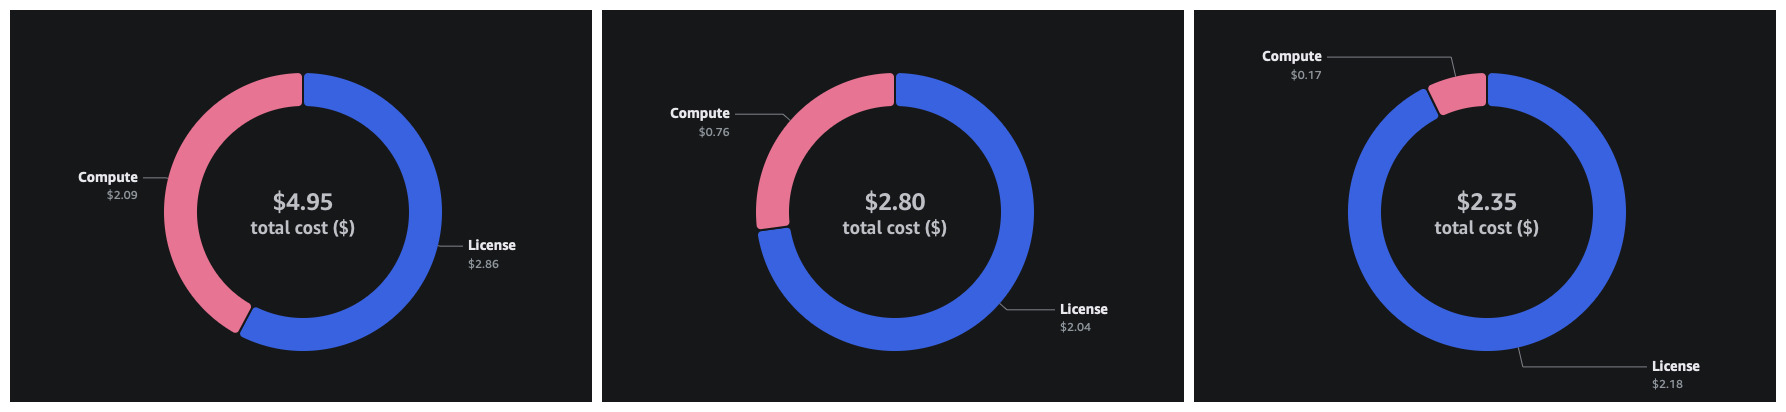
Figure 7: Total compute and licensing cost for our 200-frame Maya turntable render on each market type: On Demand (left), Spot (center), and Wait and Save (right).
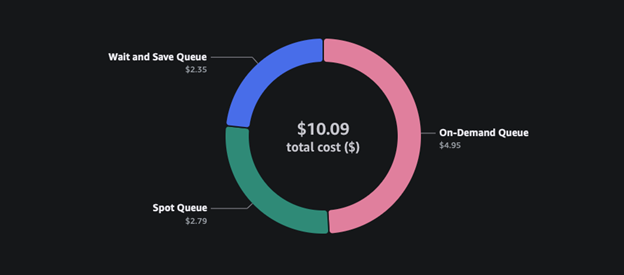
Figure 8: Total Cost breakdown for each market type from Deadline Cloud Monitor usage explorer.
Automated hybrid fleet setup for capacity and cost optimization
When you need higher capacity availability for your jobs, but want to capture cost savings when possible, you can associate Wait and Save alongside your current Spot and On-Demand fleets in the same queue. This automatically balances cost optimization with capacity availability, so your jobs run without delay.
The following open source AWS CloudFormation template uses AWS Lambda and Amazon EventBridge Scheduler to automatically adjust Spot fleet capacity based on real-time Wait and Save worker availability. The Lambda function will monitor your desired fleet size at regular intervals, fulfilling your desired fleet size of workers from the Wait and Save fleets primarily, but covering deficits by adding instances from a secondary Spot Fleet. Because the Deadline Cloud worker termination policy is derived at the worker level, instances will only be terminated upon completion of tasks, so your fleets balance for their most cost-effective configuration, without any loss of rendering.
To deploy automated capacity management, complete the following steps:
- Associate the Wait and Save fleet with your existing queue alongside On-Demand or Spot fleets.
- Configure your Wait and Save fleet’s maxWorkerCount to your desired total fleet size (for example, 20 workers across both fleets).
- Download the CloudFormation template and follow the deployment instructions in the README with the following parameters:
TargetMaxWorkerCount: Total workers across both fleets (must match Wait and SavemaxWorkerCount)FarmId: Your Deadline Cloud farm IDWaitAndSaveFleetId: Your Wait and Save fleet IDSpotFleetId: Your Spot fleet IDCapacityCheckRateMinutes: Interval between capacity checks (default: 2 minutes)
The Lambda function will automatically scale your Spot fleet up or down to maintain your desired total capacity as Wait and Save workers come online or go offline.
As with many AWS services, Lambda has a pay-as-you-go cost, starting at $0.20 per 1 million requests, making it a cost-effective solution to quickly establish code-based automation within you AWS environment. When you’re not actively rendering, you can disable the EventBridge schedule to stop the automated capacity management and Lambda invocation costs. You will not incur rendering costs because the minimum worker count is set to 0 in the fleet configurations, which means no workers will start without jobs.
Clean up
If you no longer need the resources created in this post, follow these steps:
- Open the CloudFormation console in your AWS account.
- Search for the stack you created while following this post.
- Choose Delete the stack and wait for the status to change to DELETE_COMPLETE.
This will delete the Lambda function, EventBridge schedule, and IAM role from your account. - To delete your Deadline Cloud resources (farm, fleets, queue, and more), refer to Clean up your farm resources in Deadline Cloud.
Conclusion
Wait and Save offers substantial cost savings for flexible CPU rendering workloads, as shown in our Maya example with 78% savings with dedicated Wait and Save setup compared to Spot pricing. Whether you use dedicated queues for maximum savings or hybrid fleet setups for flexible execution, Wait and Save can significantly reduce your rendering costs. These savings add up quickly across larger projects, helping studios render more content within their budgets.
Contact an AWS Representative to learn how we can help accelerate your business.
Further reading
Now that you have set up Wait and Save fleets and seen the cost savings, continue learning about Deadline Cloud features to further optimize your rendering workflows:
- Learn about other fleet types and configurations to optimize your rendering pipeline. Explore Service-managed fleets for advanced configuration options.
- Review detailed pricing information and Regional rates for Wait and Save compared to other instance market types on the AWS Deadline Cloud pricing page.
- Learn more about setting up automated notifications for job status changes using EventBridge integration for job run status events to get alerts when your Wait and Save jobs start or complete.
- To learn more about tracking costs and analyzing usage patterns, see Track usage and costs with the Deadline Cloud usage explorer.
- Explore more open source samples for CloudFormation templates provided by Deadline Cloud.