Migration & Modernization
How to size your AWS Outposts rack configuration from server inventory
You may need to run workloads in your data center on AWS Outposts for low-latency access to on-premises systems, data residency requirements, or local data processing. With Outposts, you get the same AWS APIs, instance types, and tools available in the AWS Region, on hardware that AWS delivers, installs, and manages in your facility. But because Outposts is physical infrastructure with a term commitment, you size your rack configuration before deployment.
This post walks you through five steps to translate your server inventory into an Outposts rack configuration ready for ordering: inventory collection, workload placement, instance right-sizing, host calculation, and order validation.
Overview
The following five steps walk you through translating your server inventory into a validated Outposts rack configuration, each building on the output of the previous one.
- Collect and categorize inventory. Gather your server and application data, including provisioned specs and actual utilization. Categorize each workload by latency, data residency, local data processing needs, dependencies, and workload pattern.
- Determine workload placement. Using the categories from Step 1, decide which workloads go to the AWS Region, AWS Local Zones, or Outposts.
- Right-size and map to Amazon EC2 instance families. Use utilization data to determine actual resource needs and map each workload to the appropriate Amazon Elastic Compute Cloud (Amazon EC2) instance family.
- Determine host and rack configuration. Translate instance requirements into host counts, add buffers for growth and fault tolerance, and map to rack configurations.
- Validate and order. Confirm the configuration, verify site readiness, and submit the order.
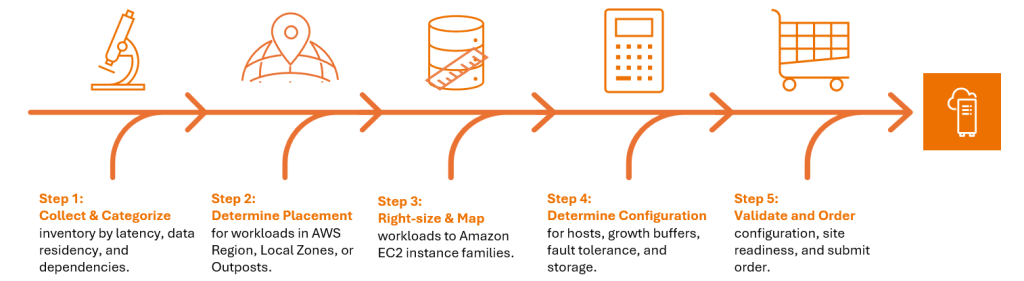
Figure 1: Overview
The following sections walk through each step in detail.
Step 1: Collect and categorize inventory
This step builds the data foundation for your sizing decisions. Start with your server inventory. Use a discovery tool to collect data, such as AWS Transform for discovery and dependency mapping, third-party discovery tools, or a platform export (RVTools or similar for VMware environments). If you already have data from an existing discovery tool, you can use that as well.
Capture both provisioned and actual utilization for vCPU, memory, storage, and IOPS. Virtualized environments are commonly overprovisioned, so utilization data tells you what the workload needs and drives the sizing in Step 3. Provisioned specs serve as a conservative fallback for workloads where utilization data is incomplete or unavailable.
Collect at least two weeks of utilization data to capture weekly patterns. Four weeks is better if your workload has monthly cycles like batch processing or month-end reporting.
Beyond raw specs, understand each workload’s characteristics:
- Latency requirements. What is the latency between this workload and its dependencies? Measure the round-trip time from the server to the systems it talks to. Record whether the application has a specific latency threshold it cannot exceed.
- Data residency. Are there regulatory or compliance reasons that require this data to stay on premises?
- Local data processing. Does this workload generate or consume large volumes of data that cannot practically be sent to the Region? Workloads with high data throughput or large local datasets may need to stay on premises for bandwidth constraints.
- Dependencies (local system interdependencies). Map which systems each workload communicates with, because placement decisions cascade. If you move one workload to the Outpost, dependent workloads that require low-latency communication with it may also need to be placed on the Outpost.
- Workload pattern. Is the workload steady-state, bursty, batch/scheduled, or seasonal? Bursty or seasonal workloads may be better suited to the Region where they can scale elastically. For workloads that stay on Outposts, this affects how you plan spare capacity and growth buffers.
- Role. Is this instance a primary, high availability (HA) standby, or does it need a disaster recovery (DR) copy? Primary and HA standby are placed on the same Outpost on separate racks. DR workloads that require on-premises placement need a separate Outpost at a different site, sized independently using the same steps in this guide.
After completing Step 1, you have a categorized inventory: every workload with its specs, utilization, and placement-relevant attributes.
Step 2: Determine workload placement
This step identifies the workloads that belong on Outposts. Using the categories from Step 1, place each workload in the right location. You have three deployment options:
- AWS Region: Place workloads in the Region when they have no requirement to run in your data center. You get elastic scaling, the full AWS service catalog, and on-demand pricing.
- AWS Local Zones: Place workloads on AWS Local Zones when they need single-digit millisecond latency to end users in a specific metro area but don’t need to be in your data center. Local Zones are AWS-managed and support on-demand scaling, making them suited for edge workloads like media rendering, real-time gaming, or local content delivery.
- AWS Outposts: Place workloads on Outposts when they need low-latency access to on-premises systems or must remain on premises for data residency or local data processing requirements.
For more detail on this decision, see Choosing the right technology for your edge workload.
Default to the Region. Only place workloads on Outposts when there is a concrete requirement to stay on premises. This keeps your Outposts footprint and cost to a minimum. You now have a list of workloads that belong on Outposts. This is what you size for in the remaining steps.
Step 3: Right-size and map to Amazon EC2 instance families
This step translates your workload resource needs into specific Amazon EC2 instance families. Use the utilization data from Step 1 to determine actual resource needs, then map to Amazon EC2 instance families based on whether the workload is vCPU-bound (C family), balanced (M family), or memory-bound (R family).
Mapping workloads to instance families involves several considerations beyond the vCPU-to-memory ratio, including family selection trade-offs and sizing for consolidation.
Select instance family
Each Outpost host supports a single Amazon EC2 instance family. For the current generation of instance types, see AWS Outposts rack hardware specs. The following table summarizes the three primary families:
| Amazon EC2 Family | Ratio (vCPU:Memory) | Use Cases |
|---|---|---|
| General Purpose (M) | 1:4 | Mixed workloads, application servers, mid-size databases |
| Compute Optimized (C) | 1:2 | Batch processing, analytics, high-performance web servers |
| Memory Optimized (R) | 1:8 | Large databases, in-memory caches, real-time analytics |
Table 1: Amazon EC2 instance families
In special cases for workloads requiring ultra-low latency networking or multicast support, Outposts offers bare metal networking instances. These require a different configuration and ordering process. Contact your AWS account team for bare metal sizing . For more information on ultra-low latency capabilities, visit Specialized Amazon EC2 instances with accelerated networking for more details.
For the current list of supported instance types, see Amazon EC2 instance types on AWS Outposts.
Consolidate instance families
If most of your workloads are memory-heavy (databases, application servers with large heaps), consider standardizing on R-family hosts instead of mixing M and R. The trade-off is that some workloads run on slightly oversized instances, but fewer families means fewer spare hosts for fault tolerance, which reduces the overall order size. We expand on this in Step 4. If you are unsure whether a workload needs M or R, choosing R gives you more flexibility since it can accommodate both memory-heavy and balanced workloads.
Review your right-sized workload list and group by the dominant resource dimension:
- vCPU-bound workloads → C family
- Balanced workloads → M family
- Memory-bound workloads → R family
If a workload falls between two families, round up to the more generous family. The additional capacity on the host is available for future growth or new workloads. It’s better to have a workload on a larger instance than to introduce another instance family that requires its own spare capacity hosts.
At the end of Step 3, you have a list of instance families and sizes with counts for each workload.
Step 4: Determine host and rack configuration
This step translates your instance requirements into a hardware order, starting with host counts, then accounting for slotting, managed services, growth, fault tolerance, and storage.
Count hosts
Start with the instance counts from Step 3. For each instance family:
- Count the total instances needed (primary and HA standby combined).
- Determine how many instances fit on one host.
- Divide to get the number of hosts (N). Round up.
For example, if you need 120 m7i.8xlarge (32 vCPU) instances across primary and HA standby, and each m7i host holds 6 (192 vCPU / 32 vCPU per instance = 6), you need 20 hosts.
Configure slotting
Each Outposts host has a fixed amount of vCPU and memory. Slotting is how you divide that capacity into individual Amazon EC2 instances. You can slot a host homogeneously (all the same instance size, such as 6x m7i.8xlarge) or heterogeneously (a mix of sizes, such as m7i.xlarge and m7i.4xlarge).
There are additional slotting constraints to be aware of. You cannot slot across two physical hosts, and not all instance size combinations are valid on a single host due to hardware architecture boundaries. However, these constraints do not affect your initial sizing calculations. They are validated and adjusted during the ordering process before the configuration is finalized.
You configure slotting after the hardware arrives using capacity tasks, and you can reconfigure it later without replacing hardware. For more information on slotting and capacity tasks, see Dynamically reconfigure your AWS Outposts capacity using Capacity Tasks.
Account for managed service capacity
If you plan to replace existing on-premises services with AWS managed services on Outposts, account for the host capacity those services consume. For example, Application Load Balancer and Amazon Elastic Kubernetes Service (Amazon EKS) control plane instances run on your Outpost hosts and use compute slots alongside your workloads. Include these when calculating your host count.
Add a growth buffer
Plan for your future scaling needs in addition to your current state. Use your historical growth rate as a baseline. Factor in planned new workloads, upcoming projects, and any workloads currently in the Region placement category that might move to Outposts later. Environments with active development or acquisition activity may need more.
Add spare capacity for fault tolerance (N+M) and resilience
When an Outposts host fails, AWS schedules a site visit to replace it. Until the replacement arrives, the instances on that host need somewhere to run. This is the N+M model: N hosts for your workloads, plus M spare hosts to absorb failures.
N+1 is the minimum recommendation: for every instance family, provision at least one extra host worth of capacity. N+2 provides tolerance for a second concurrent failure. Amazon EC2 instance recovery on AWS Outposts is limited to the same instance family and size. For example, a c7i.4xlarge instance can only recover onto another available c7i.4xlarge slot on a different host. Capacity from other instance families cannot be used for recovery. This is why spare capacity planning matters: without enough spare slots of the right family and size, a host failure can leave instances unrecoverable.
See Capacity planning in the AWS Outposts High Availability Design whitepaper for spare capacity guidance.
Also consider the placement requirements for the Amazon EC2 instances on the Outpost hosts. You can create a placement group with a spread strategy on an Outpost where you can choose to have the placement group spread instances across hosts or racks. This way, if an instance fails, it recovers on a different host or rack, improving fault tolerance. See the Multi-rack and multiple logical AWS Outposts architecture considerations for resiliency blog for more information.
Plan storage
From Step 1, you will have a storage requirement. AWS Outposts supports Amazon Elastic Block Store (Amazon EBS) and Amazon Simple Storage Service (Amazon S3) storage. Capacity is shared across the Outpost, not split by rack.
AWS Outposts also supports third-party storage integration, which lets you connect existing storage systems to your Outpost deployment. Like Amazon EC2, plan for growth of your storage requirements. Amazon EBS and Amazon S3 data on an Outpost resides on dedicated storage hosts with built-in fault tolerance.
Step 4 produces an Outpost configuration that defines the Amazon EC2 host count per instance family, Amazon EBS storage requirements, optional Amazon S3 storage, and rack count
Step 5: Validate and order
This step finalizes your Outposts configuration and submits the order. Before submitting:
- Validate the configuration with your AWS account team. The team can confirm that the slotting layout is valid, the rack configuration supports your host count, and the Amazon EBS and Amazon S3 tiers match your storage needs.
- Choose the contract term and payment option. Outposts capacity is available on 1-year, 3-year, or 5-year terms with three payment options: All Upfront, Partial Upfront, and No Upfront. A 1-year term is useful for proof-of-concept (POC) or R&D workloads where you are still validating the architecture. Also consider a 1-year term if you anticipate a data center move, since relocating an Outpost is equivalent to deploying a new one. For production workloads, 3-year or 5-year terms provide lower monthly costs. You can add capacity mid-term, and scale-up orders are co-termed to the original order.
The price includes delivery, installation, and servicing. OS charges and AWS service charges for managed services running on the Outpost are billed separately based on usage. AWS Enterprise Support is required. See Outposts racks pricing for details.
Start site preparation in parallel with the sizing exercise to keep your deployment timeline on track. See site requirements for Outposts racks for site readiness guidance.
Conclusion
In this post, we walked through five steps for translating your server inventory into an AWS Outposts rack configuration. The key to getting the order right is starting with accurate utilization data and being selective about which workloads belong on Outposts. To get started, visit the AWS Outposts console.