Microsoft Workloads on AWS
Generating CI/CD Pipelines for Containerized ASP.NET Applications using AWS App2Container
Every day, companies are running legacy applications on top of highly scalable container architectures such as Amazon Elastic Container Service (Amazon ECS) and Amazon Elastic Kubernetes Services (Amazon EKS). These legacy applications, many of them Windows-based, can be difficult for companies to manage and often need a heavy infrastructure lift to maintain. Because many legacy applications are no longer receiving software updates and run on operating systems that have reached end-of-support, customers are looking for new ways to re-platform and manage them.
In 2020 Amazon Web Services launched AWS App2Container, a service that helps customers containerize legacy applications without making any code changes. This helps customers run ASP.NET or Java applications the same way they run new applications on Amazon ECS and Amazon EKS.
This post will cover how to containerize an ASP.NET application easily and deploy a CI/CD pipeline based on AWS Developer Tools using AWS App2Container.
Prerequisites
For this tutorial, you should have:
- An App2Container worker machine configured and an application server ready to establish WinRM over HTTPS.
- Amazon ECS cluster with Windows container instances.
In this blog post, we will use a real application called nopCommerce. The current versions of nopCommerce are based on ASP.NET Core. Since we want to focus on legacy ASP.NET applications built on .NET framework, we will use nopCommerce version 3.90 that is built on .NET 4.5.1. The nopCommerce application in this blog is installed on a Windows Server 2008, IIS 7.5, .NET 4.5.1 and uses Amazon RDS for SQL Server as a database.
AWS App2Container has recently added the ability to containerize an application without installing App2Container on the application server. You can find more information on App2Container in the official documentation or the blog post containerizing legacy ASP.NET applications using AWS App2Container (A2C).
The first step for application containerization is to run the remote inventory command against the application server (remote server) and fetch all the necessary artifacts to containerize the application on an App2Container worker machine. Run the following command:
app2container remote inventory --target ApplicationServer_IP or FQDNOutput:
PS C:\> app2container remote inventory --target 10.0.3.233
√ Server inventory has been stored under c:\app2container\remote\10.0.3.233\inventory.json
Remote inventory retrieved successfully
The previous command generates a file called inventory.json, which contains the application ID for the IIS Website you want to containerize. The original path for this file should be: Workspace\remote\ApplicationServer_IP or FQDN\inventory.json
Run the remote analyze command from a worker machine to analyze the specified application by identifying the application ID on the inventory.json file.
app2container remote analyze --application-id Application_ID --target ApplicationServer_IP or FQDNOutput:
PS C:\> app2container remote analyze --application-id iis-default-web-site-4914b3d369bc --target 10.0.3.233
Analysis successful for application iis-default-web-site-4914b3d369bc
To extract all the necessary artifacts to containerize the application, run the following command.
app2container remote extract --application-id Application_ID --target ApplicationServer_IP or FQDNOutput:
PS C:\> app2container remote extract --application-id iis-default-web-site-4914b3d369bc --target 10.0.3.233
Extraction successful for application iis-default-web-site-4914b3d369bc
App2Container easily containerizes the application with a pre-generated Dockerfile. If somehow you need setup additional configurations on the container image, you can modify the Dockerfile on the following directory: Workspace\Application-ID\Artifacts\.
Run the following command:
app2container containerize --input-archive C:\Workspace\remote\ApplicationServer_IP or FQDN\Application_ID\Application_ID.zipOutput:
PS C:\> app2container containerize --input-archive c:\app2container\remote\10.0.3.233\iis-default-web-site-4914b3d369bc\iis-default-web-site-4914b3d369bc.zip
√ AWS prerequisite check succeeded
√ Docker prerequisite check succeeded
√ Dockerfile generated under c:\app2container\iis-default-web-site-4914b3d369bc\Artifacts
√ Generated dockerfile.update under c:\app2container\iis-default-web-site-4914b3d369bc\Artifacts
√ Generated deployment file at c:\app2container\iis-default-web-site-4914b3d369bc\deployment.json
Containerization successful. Generated docker image iis-default-web-site-4914b3d369bc
You're all set to test and deploy your container image.
Next, push the local container image generated by the command containerize to an image repository on Amazon Elastic Container Registry (ECR) and create a task definition. When you run the app2container generate app-deployment command, it generates the artifacts required to deploy your application container in AWS. App2Container pre-fills key values in the artifacts based on your profile, the application analysis, and best practices. You have two options for deployment to your target container management environment (Amazon ECR with Amazon ECS or Amazon EKS). This command accesses AWS resources to generate and deploy artifacts to your target environment. The IAM user with AdministratorAccess that you created during security setup is required to run the command with the –deploy option. See Identity and Access Management in App2Container for more information about setting up IAM users for App2Container.
app2container generate app-deployment --application-id Application_IDOutput:
PS C:\> app2container generate app-deployment --application-id iis-default-web-site-4914b3d369bc
√ AWS prerequisite check succeeded
√ Docker prerequisite check succeeded
√ Processing application iis-default-web-site-4914b3d369bc...
√ ECR repository 146567939617.dkr.ecr.us-east-1.amazonaws.com/iis-default-web-site-4914b3d369bc already exists
√ Pushed docker image 146567939617.dkr.ecr.us-east-1.amazonaws.com/iis-default-web-site-4914b3d369bc:latest to ECR repository
√ Registered ECS Task Definition with ECS
√ Uploaded CloudFormation resources to S3 Bucket: octank-a2c
√ Generated CloudFormation Master template at: c:\app2container\iis-default-web-site-4914b3d369bc\EcsDeployment\ecs-master.yml
CloudFormation templates and additional deployment artifacts generated successfully for application iis-default-web-site-4914b3d369bc
You're all set to use AWS CloudFormation to manage your application stack.
App2Container not only pushed the container image to Amazon ECR, but also it generated artifacts to help you build your CI/CD pipeline, Amazon ECS or Amazon EKS cluster, and run the container on the cluster.
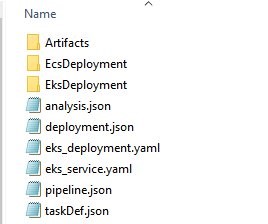
Figure 1: Files generated by App2Container
The pipeline.json is a configuration file that contains the Amazon ECR repository and Amazon EKS cluster names. In the example below, I enabled the Amazon ECS cluster (“prod”), and provided the name of an existing Amazon ECS cluster and service.
{
    "a2CTemplateVersion": "1.0",
    "sourceInfo": {
        "CodeCommit": {
            "repositoryName": "a2c-iis-default-web-site-4914b3d369bc-ecs",
            "branch": "master"
        }
    },
    "imageInfo": {
        "image": Account_ID.dkr.ecr.Region.amazonaws.com/iis-default-web-site-4914b3d369bc:latest"
    },
    "releaseInfo": {
        "ECS": {
            "beta": {
                "clusterName": "",
                "serviceName": "",
                "enabled": false
            },
            "prod": {
                "clusterName": "nopCommerce-cluster",
                "serviceName": "nopCommerce-service",
                "enabled": true
            }
        }
    }
}
Now, it is time to generate all the AWS CodePipeline artifacts by running the following command:
app2container generate pipeline --application-id Application_IDOutput:
PS C:\> app2container generate pipeline --application-id iis-default-web-site-4914b3d369bc
√ Discovered existing CodeCommit repository
√ Generated buildspec file(s)
√ Generated CloudFormation templates
√ Committed files to CodeCommit repository
Pipeline resource template generation successful for application iis-default-web-site-4914b3d369bc
You're all set to use AWS CloudFormation to manage your pipeline stack.
To deploy the CodePipeline, run the following command:
aws cloudformation deploy --template-file C:\Workspace\Application_ID\Artifacts\Pipeline\CodePipeline\eks-pipeline-master.yml --capabilities CAPABILITY_NAMED_IAM CAPABILITY_AUTO_EXPAND --stack-name StackNameOutput:
PS C:\> aws cloudformation deploy --template-file c:\app2container\iis-default-web-site-4914b3d369bc\Artifacts\Pipeline\CodePipeline\ecs-pipeline-master.yml --capabilities CAPABILITY_NAMED_IAM CAPABILITY_AUTO_EXPAND --stack-name a2c-iis-default-web-site-4914b3d369bc-ecs-pipeline-stack

Waiting for changeset to be created..
Waiting for stack create/update to complete
Successfully created/updated stack - a2c-iis-default-web-site-4914b3d369bc-ecs-pipeline-stack
This step may take five minutes to be completed.
In the AWS CodePipeline console, you can see the CI/CD pipeline that App2Container created. This pipeline runs when a change is detected in the Source repository, and it builds and deploys the container image to Amazon Elastic Container Service (ECS).
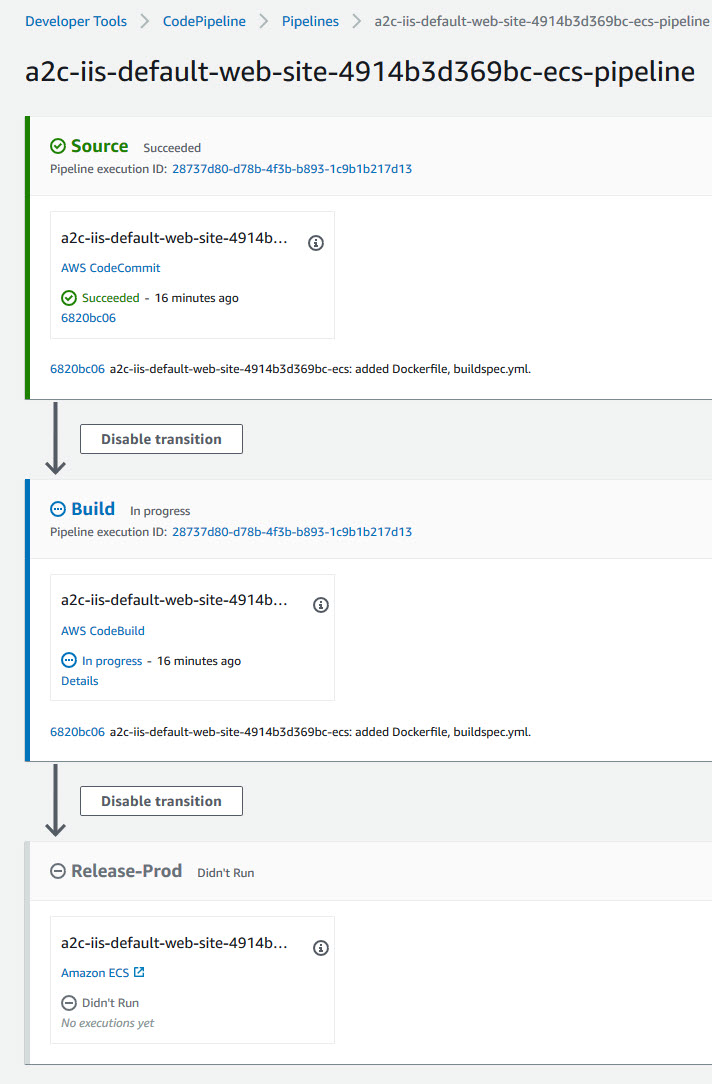
Figure 2: AWS CodePipeline created by App2Container
To enable the source action in CodePipeline, App2Container created an AWS CodeCommit repository using repositoryName specified in pipeline.json. If an AWS CodeCommit repository with that name already exists, App2Container uses the existing repository. To enable build and deploy actions in CodePipeline, App2Container created an AWS CodeBuild project to build the container image and push it to Amazon Elastic Container Registry (ECR), and a deploy stage to run the container image on Amazon Elastic Container Service (ECS).
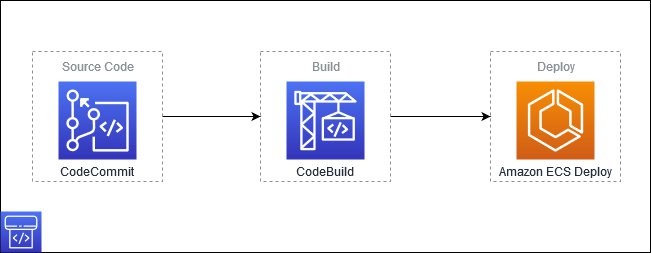
Figure 3: Stages in AWS CodePipeline generated by App2Container
Let’s examine each stage of this pipeline.
Source stage
The source stage contains an AWS CodeCommit repository. AWS CodeCommit is a fully managed source control service that hosts secure Git-based repositories and integrates with existing Git tools.
Click on AWS CodeCommit in the AWS CodePipeline source stage.
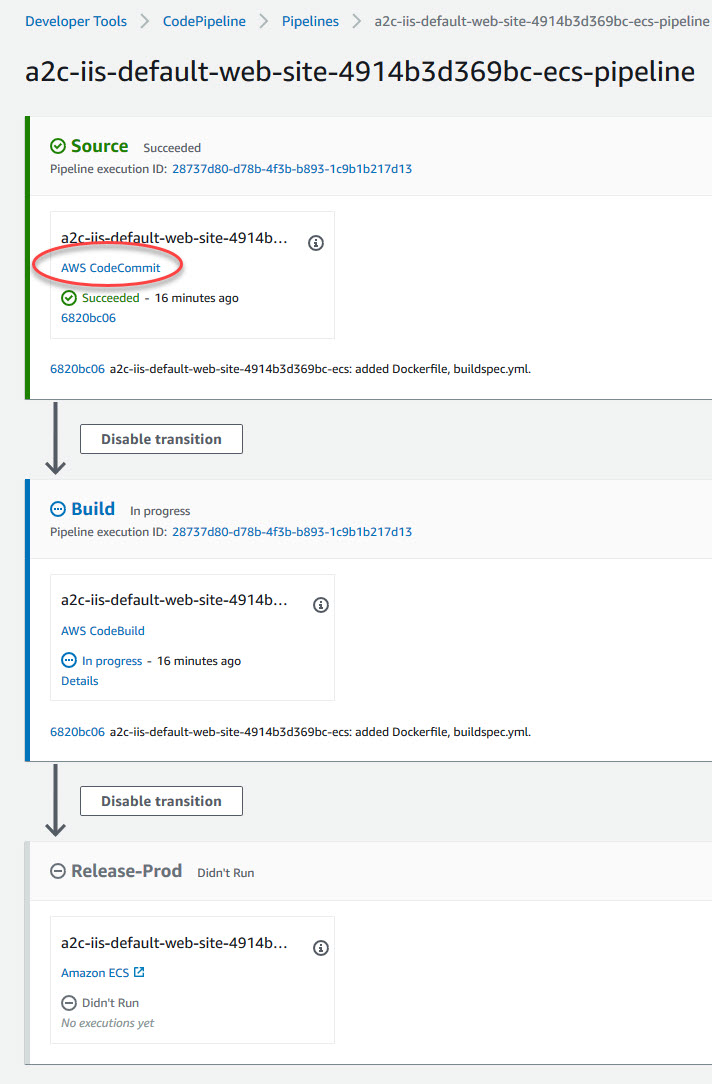
Figure 4: Location of AWS CodeCommit in AWS CodePipeline
You should see that App2Container pushed two files into the AWS CodeCommit repository.
- Dockerfile – This file contains the commands and settings necessary for Docker to build the container image with the application being containerized.
- buildspec.yml – This file contains build commands and related settings, in YAML format, that CodeBuild uses to build the container image (using the Dockerfile mentioned above) and push it to Amazon ECR.
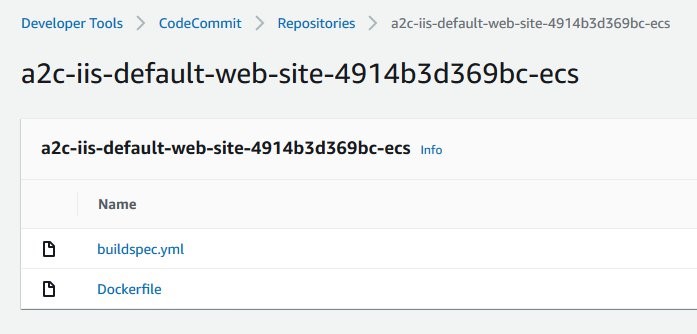
Figure 5: Files committed to CodeCommit repository by App2Container
The next step is to the clone the repository onto your local machine so you can add files and make changes. On the top-right corner of the repository page, click on Clone URL → Connection steps.
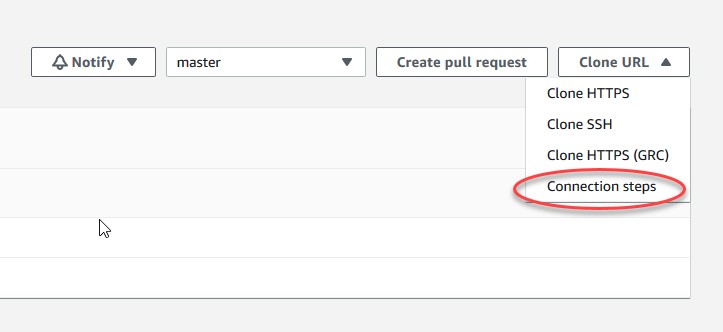
Figure 6: Location of Connection steps in AWS CodeCommit repository
You should see the for HTTPS, SSH, and HTTPS (GRC).
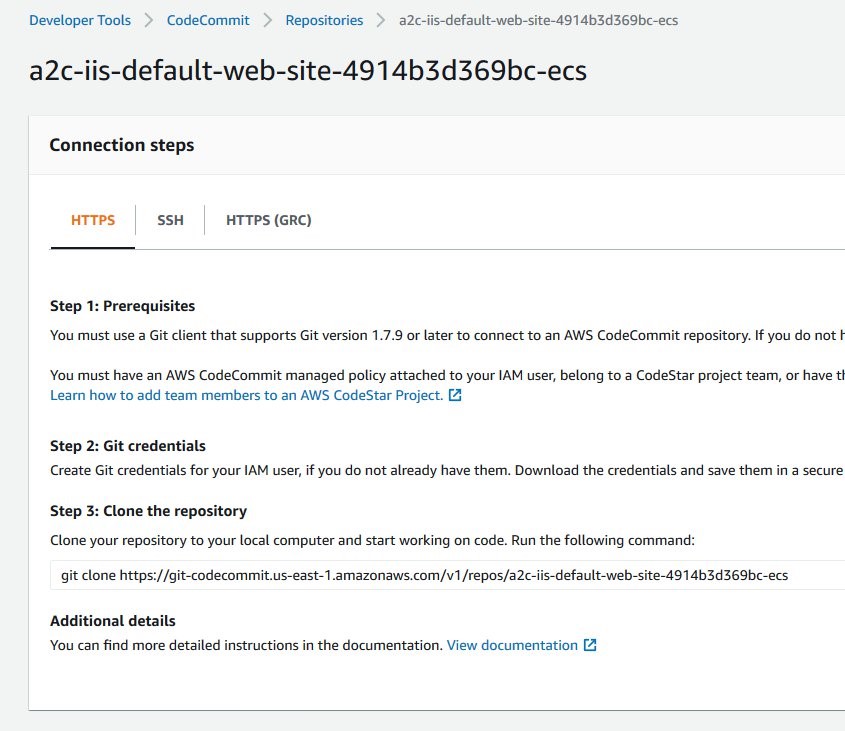
Figure 7: Connection steps for the AWS CodeCommit repository
Follow one of the listed methods to clone the repository locally.
c:\source>git clone https://git-codecommit.us-east-1.amazonaws.com/v1/repos/a2c-iis-default-web-site-4914b3d369bc-ecs

Cloning into 'a2c-iis-default-web-site-4914b3d369bc-ecs'...
remote: Counting objects: 6064, done.
Receiving objects: 100% (6064/6064), 92.31 MiB | 6.20 MiB/s, done.
Resolving deltas: 100% (2232/2232), done.
Updating files: 100% (5399/5399), done.
If you already have a local repository that needs to connect to the AWS CodeCommit repository created by AWS App2Container, follow the steps listed in the documentation.
Copy the source code of the nopCommerce application into local repository. You can skip this step if you connected a local repository with the source code to the AWS CodeCommit repository in the previous step. Your local repository should now contain the source code that you copied. It should look like the following screenshot.
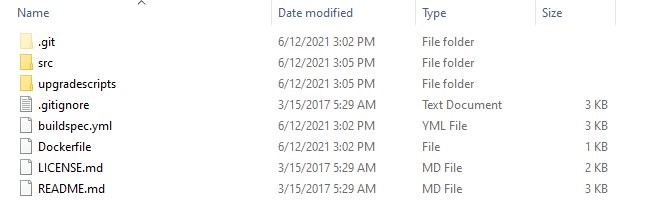
Figure 8: Local repository after copying the source code
The next step is to open the .gitignore file and in the section with the title nopCommerce specific. This ensures that the files and folders that needed to build the application in the Build stage can be committed and pushed into the AWS CodeCommit repository.
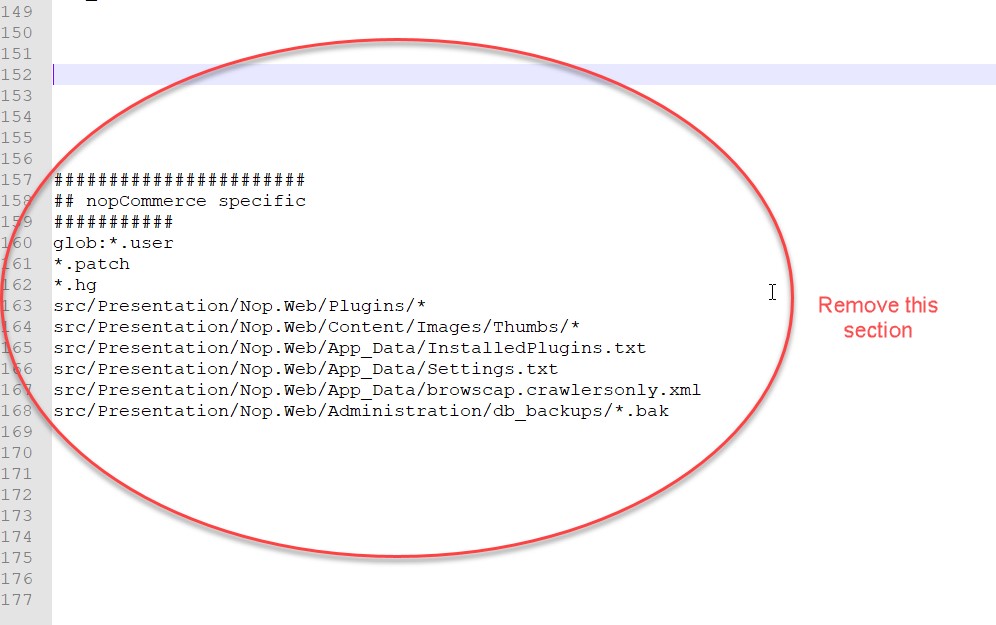
Figure 9: Entries to be removed from .gitignore
Build stage
The build stage of your CodePipeline contains an AWS CodeBuild action. AWS CodeBuild is a fully managed continuous integration service that compiles source code, runs tests, and produces software packages that are ready to deploy.
The build steps for the pipeline are specified in the file buildspec.yml. You can find this file in the root of the AWS CodeCommit repository. AWS CodeBuild runs these steps in a temporary container instance. Let’s examine the buildspec.yml that was created by App2Container.
version: 0.2

env:
  variables:
    APP_ID: iis-default-web-site-4914b3d369bc
    DOCUMENT_NAME: a2c-iis-default-web-site-4914b3d369bc-ecs-image-build
    BUILD_KEY: iis-default-web-site-4914b3d369bc.zip
    BUCKET_NAME: a2c-iis-default-web-site-4914b3d369bc-us-east-1-ecs-pipeline
    ECR_REPO_URI: Account_ID.dkr.ecr.Region.amazonaws.com/iis-default-web-site-4914b3d369bc
    LOG_GROUP_NAME: a2c-iis-default-web-site-4914b3d369bc-ecs-image-build
phases:
  install:
    commands:
      - echo Installing dependencies...
      - apt-get update && apt-get -y install jq zip python3-pip python3-dev && pip3 install --upgrade awscli
  pre_build:
    commands:
      - BUILD_ID=$(echo $CODEBUILD_RESOLVED_SOURCE_VERSION | cut -c 1-7)
      - IMAGE_TAG=build-$BUILD_ID
      - echo Compressing artifacts...
      - zip -r $BUILD_KEY .
      - echo Uploading artifacts to S3...
      - S3_FILE="s3://$BUCKET_NAME/$BUILD_KEY"
      - aws s3 cp $BUILD_KEY $S3_FILE
  build:
    commands:
      - echo Starting automation execution using document $DOCUMENT_NAME...
      - echo Logs are stored under CloudWatch Log Group $LOG_GROUP_NAME...
      - EXECUTION_ID=$(aws ssm start-automation-execution --document-name $DOCUMENT_NAME --parameters "ImageTag=$IMAGE_TAG" --output text)
      - echo Running execution $EXECUTION_ID...
      - COMMAND="aws ssm describe-automation-executions --filters Key=ExecutionId,Values=$EXECUTION_ID"
      - STATUS=$($COMMAND | jq -r ".AutomationExecutionMetadataList[0].AutomationExecutionStatus")
      - while [ $STATUS = "InProgress" ]; do sleep 3; STATUS=$($COMMAND | jq -r ".AutomationExecutionMetadataList[0].AutomationExecutionStatus"); done
      - if [ $STATUS = "Success" ]; then echo Automation execution succeeded.; else echo Automation execution failed. Please check CloudWatch log for details.; exit 1; fi
      - echo Writing image definition file...
      - printf '[{"name":"%s","imageUri":"%s"}]' $APP_ID $ECR_REPO_URI:$IMAGE_TAG > imagedefinitions.json
      - cat imagedefinitions.json
artifacts:
  files:
    - imagedefinitions.json
The buildspec.yml file specifies a sequence of steps.
- In the pre-build phase, it zips the code package and upload it to an Amazon Simple Storage Service (S3) Bucket using AWS CLI.
- In the build phase, it runs an AWS Systems Manager
Let’s look at the Document that AWS Systems Manager automation is running. Note the value of DOCUMENT_NAME in the environment variables section in buildspec.yml. You can find that document in the AWS Systems Manager Console.
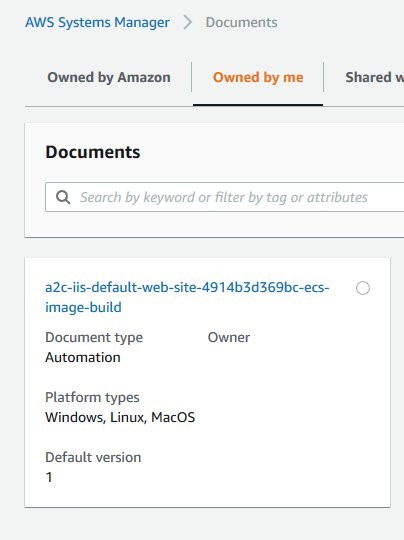
Figure 10: AWS Systems Manager Document for building the container image
Based on the contents of the AWS Systems Manager Document that App2Container created, you can expand the CodePipeline architecture with some details.
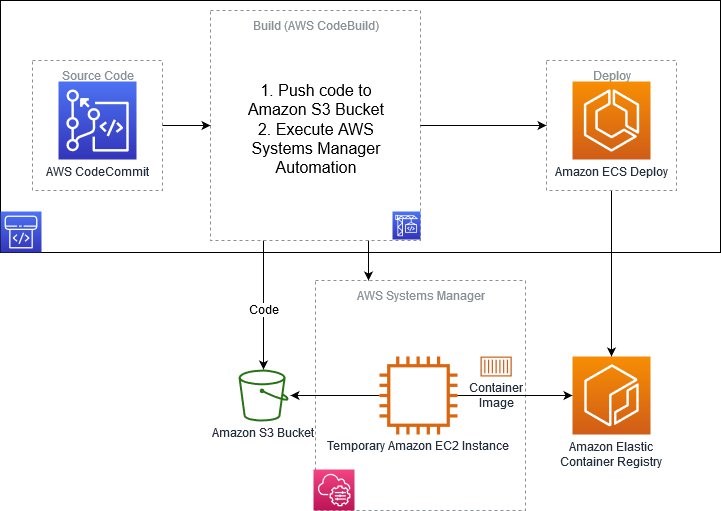
Figure 11: Detailed architecture of AWS CodePipeline created by App2Container
Now, you can see that the AWS CodeBuild stage performs the following actions
- Zips the code and push it to an Amazon S3 bucket.
- Creates a new Amazon Elastic Compute Cloud (EC2) instance running Windows.
- Runs Docker commands on the new Amazon EC2 instance to build the Windows container image and push it to Amazon Elastic Container Registry.
- Terminates the Amazon EC2 instance.
AWS CodeBuild runs build jobs inside Docker containers. .NET Framework applications need to be built on Windows, and Windows containers don’t support DIND (Docker in Docker). Hence, it’s not currently possible to create a Windows container image in AWS CodeBuild. To work around this limitation, the CodeBuild stage uses the previous steps 2 –4 to run Docker commands on a temporary Amazon EC2 instance running Windows.
To build your source code, we can use Docker multi-stage builds using the Dockerfile which can be found at the root of our AWS CodeCommit repository. In the example below, you have added build commands for our source code.
# escape= `
FROM mcr.microsoft.com/dotnet/framework/sdk:4.8 AS build
WORKDIR /app
COPY . .
RUN nuget restore -SolutionDirectory .\\src .\\src\\Presentation\\Nop.Web\\Nop.Web.csproj ; msbuild .\\src\\Presentation\\Nop.Web\\Nop.Web.csproj /p:Configuration=Release /p:publishUrl=/out /p:DeployDefaultTarget=WebPublish /p:DeployOnBuild=True /p:WebPublishMethod=FileSystem /p:DeleteExistingFiles=True
FROM Account_ID.dkr.ecr.Region.amazonaws.com/iis-default-web-site-4914b3d369bc:latest
WORKDIR /app
RUN "Remove-Item c:\\inetpub\\wwwroot\\* -Recurse -Force"
COPY --from=build /out "c:\\inetpub\wwwroot\\"
RUN New-Item -Path "C:\\inetpub\\wwwroot\\" -Name Plugins -ItemType "directory"
RUN New-Item -Path "C:\\inetpub\\wwwroot\\Plugins\\" -Name bin -ItemType "directory"
RUN $path='C:\inetpub\wwwroot'; `
    $acl = Get-Acl $path; `
    $newOwner = [System.Security.Principal.NTAccount]('BUILTIN\IIS_IUSRS'); `
    $acl.SetOwner($newOwner); `
    dir -r $path | Set-Acl -aclobject  $acl
Deploy stage
Since you enabled Amazon ECS deployment in pipeline.json, the deploy stage uses Amazon ECS as a deployment provider in the CodePipeline generated by App2Container. You do not need to change anything here.
CodePipeline in action
Now that you have added your source code and added build commands for it, your CodePipeline is ready to be tested. By default, a Git push to the remote CodeCommit repository will trigger the pipeline. By default, the pipeline will deploy automatically to the configured Amazon ECS cluster. If a Manual Approval stage before deployment is needed you can add one by following this documentation.
In this example, you will trigger the pipeline by running Git commands to commit the source code and changes to Dockerfile to the remote AWS CodeCommit repository.
Stage all your changes for the next commit.
git add .Next, commit your changes locally.
git commit -m "Added source code"Now, push your changes to the remote AWS CodeCommit repository.
git push originUpon the completion of a successful Git push operation, you can see the CI/CD pipeline execution happening in the AWS CodePipeline console.
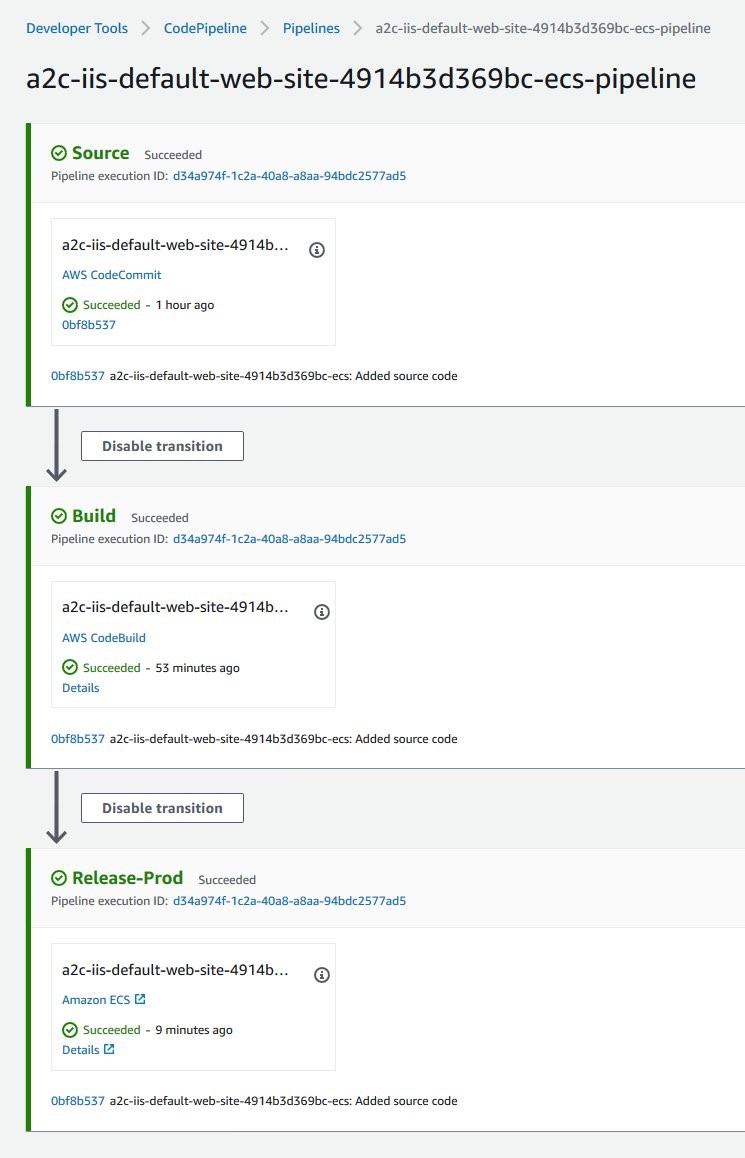
Figure 12: AWS CodePipeline execution on source code change
Now that the CI/CD pipeline has successfully run, open a web browser and visit the Amazon Elastic Load Balancing URL for the Amazon ECS service to access the application.
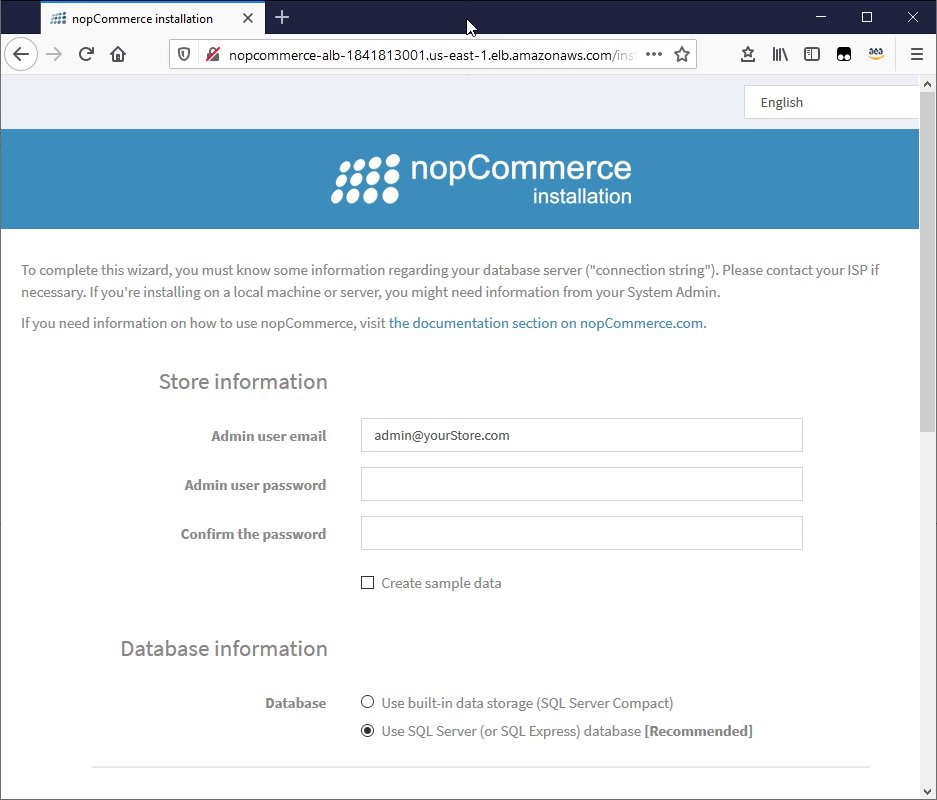
Figure 13: Containerized application running on Amazon ECS
Cleaning up
Run the following commands to delete the created infrastructure:
aws s3 rm s3://a2c-Application_ID-Region-ecs-pipeline --recursive
aws cloudformation delete-stack --stack-name StackName
Conclusion
In this blog, you used AWS App2Container to containerize an ASP.NET application and generate a CI/CD pipeline for the application using AWS CodePipeline. You walked through the steps required to add source code to the pipeline and add build commands for the source code. AWS App2Container helps you accelerate containerization of applications using best practices for networking and security. By generating CI/CD pipelines automatically for your containerized applications, AWS App2Container helps you automate your release pipelines for fast and reliable application features and updates.
AWS can help you assess how your company can get the most out of cloud. Join the millions of AWS customers that trust us to migrate and modernize their most important applications in the cloud. To learn more on modernizing Windows Server or SQL Server, visit Windows on AWS. Contact us to start your migration journey today.