Microsoft Workloads on AWS
Simplify SQL Server Developer edition deployments with AWS Launch Wizard
Microsoft SQL Server Developer edition offers organizations a cost-effective solution for their non-production database workloads on AWS. While many enterprises rely on this edition for development and pre-production testing environments, the traditional deployment process can be cumbersome – requiring manual steps like logging into Amazon Elastic Compute Cloud (Amazon EC2) instances, downloading installation media, and performing individual instance configurations.
AWS Launch Wizard now streamlines this entire process, offering an efficient way to deploy SQL Server Developer edition. In this blog post, we will demonstrate how you can leverage AWS Launch Wizard to simplify your SQL Server Developer edition deployment, reducing both the time and complexity traditionally associated with manual setup procedures. Whether you’re a database administrator, developer, or solutions architect, you’ll discover how to accelerate your deployment workflow while maintaining best practices for your non-production environments.
Why use Launch Wizard for SQL Server Developer edition?
AWS Launch Wizard deploys Microsoft SQL Server solutions on AWS through a guided deployment process. The service reduces deployment time from hours to minutes and automates infrastructure provisioning. By providing a few high-level details about the application, such as required performance characteristics, the wizard will then take care of identifying, provisioning, and configuring matching AWS resources such as Amazon Elastic Compute Cloud (Amazon EC2) instances, and an Amazon Virtual Private Cloud (Amazon VPC). The wizard displays cost estimates for your deployment. Each resource selection update shows the new total cost, helping you align with your budget requirements. After your inputs are complete, Launch Wizard provisions these resources and configures them to create a fully functioning SQL Server deployment. The created resources are tagged, making it easy to identity and work with them, and the wizard also creates AWS CloudFormation templates, providing you with a baseline for repeatable and consistent application deployments.
How does Bring Your Own Media (BYOM) work?
For installation of SQL Server Developer edition, you must use your own media; setup files. In Launch Wizard, there are two installation mechanisms:
1. Bring Your Own Media (BYOM) – In this option, you can put SQL Server Developer setup files and place it in your S3 bucket. During the console or API experience, you provide AWS Launch Wizard with the location of the S3 object (setup file) for the deployment (for API, use the parameter SQLDeveloperEditionInstallMediaBucket). Launch Wizard places the S3 location of the S3 object (not the object itself) into the CloudFormation template in your account which executes the download and install of the software from the S3 bucket to the Windows instance already launched in your account. The S3 Bucket name must start with launchwizard prefix.
2. Bring Your Own URL (BYOURL) – In this option, you provide the public Microsoft URL of the downloadable setup file in the console or API that would be passed to the CloudFormation template like the BYOM approach (URL instead of S3 object). You can use SQLDeveloperEditionInstallMediaURL parameter to input URL for the API request. The URL below must start with “https://go.microsoft.com/” prefix. This option eliminates the need to download setup files and provide access to an S3 bucket. The difference between the two methods is BYOM is an S3 bucket with the dev edition installation executable in it, whereas the BYOURL method downloads the executable to the instance.
You can select the option that best fits your need. Here, Launch Wizard builds the orchestrations from your provided inputs. Since SQL Server Developer edition requires explicit acceptance of the End User License Agreement (EULA) for non-production workloads, Launch Wizard has integrated this step seamlessly into the deployment process. Instead of manually clicking through the EULA during installation, you can now accept these terms directly through the AWS console. Launch Wizard then automatically scripts this acceptance during the installation process, streamlining your deployment while ensuring compliance with Microsoft’s licensing requirements.
Supported configurations
At the launch time, AWS Launch Wizard supports SQL Server 2019 and 2022 Developer editions. SQL Server 2025 Developer edition will be supported once Microsoft releases general availability.
Getting started with AWS Launch Wizard
- Navigate to AWS Launch Wizard console and choose View workloads
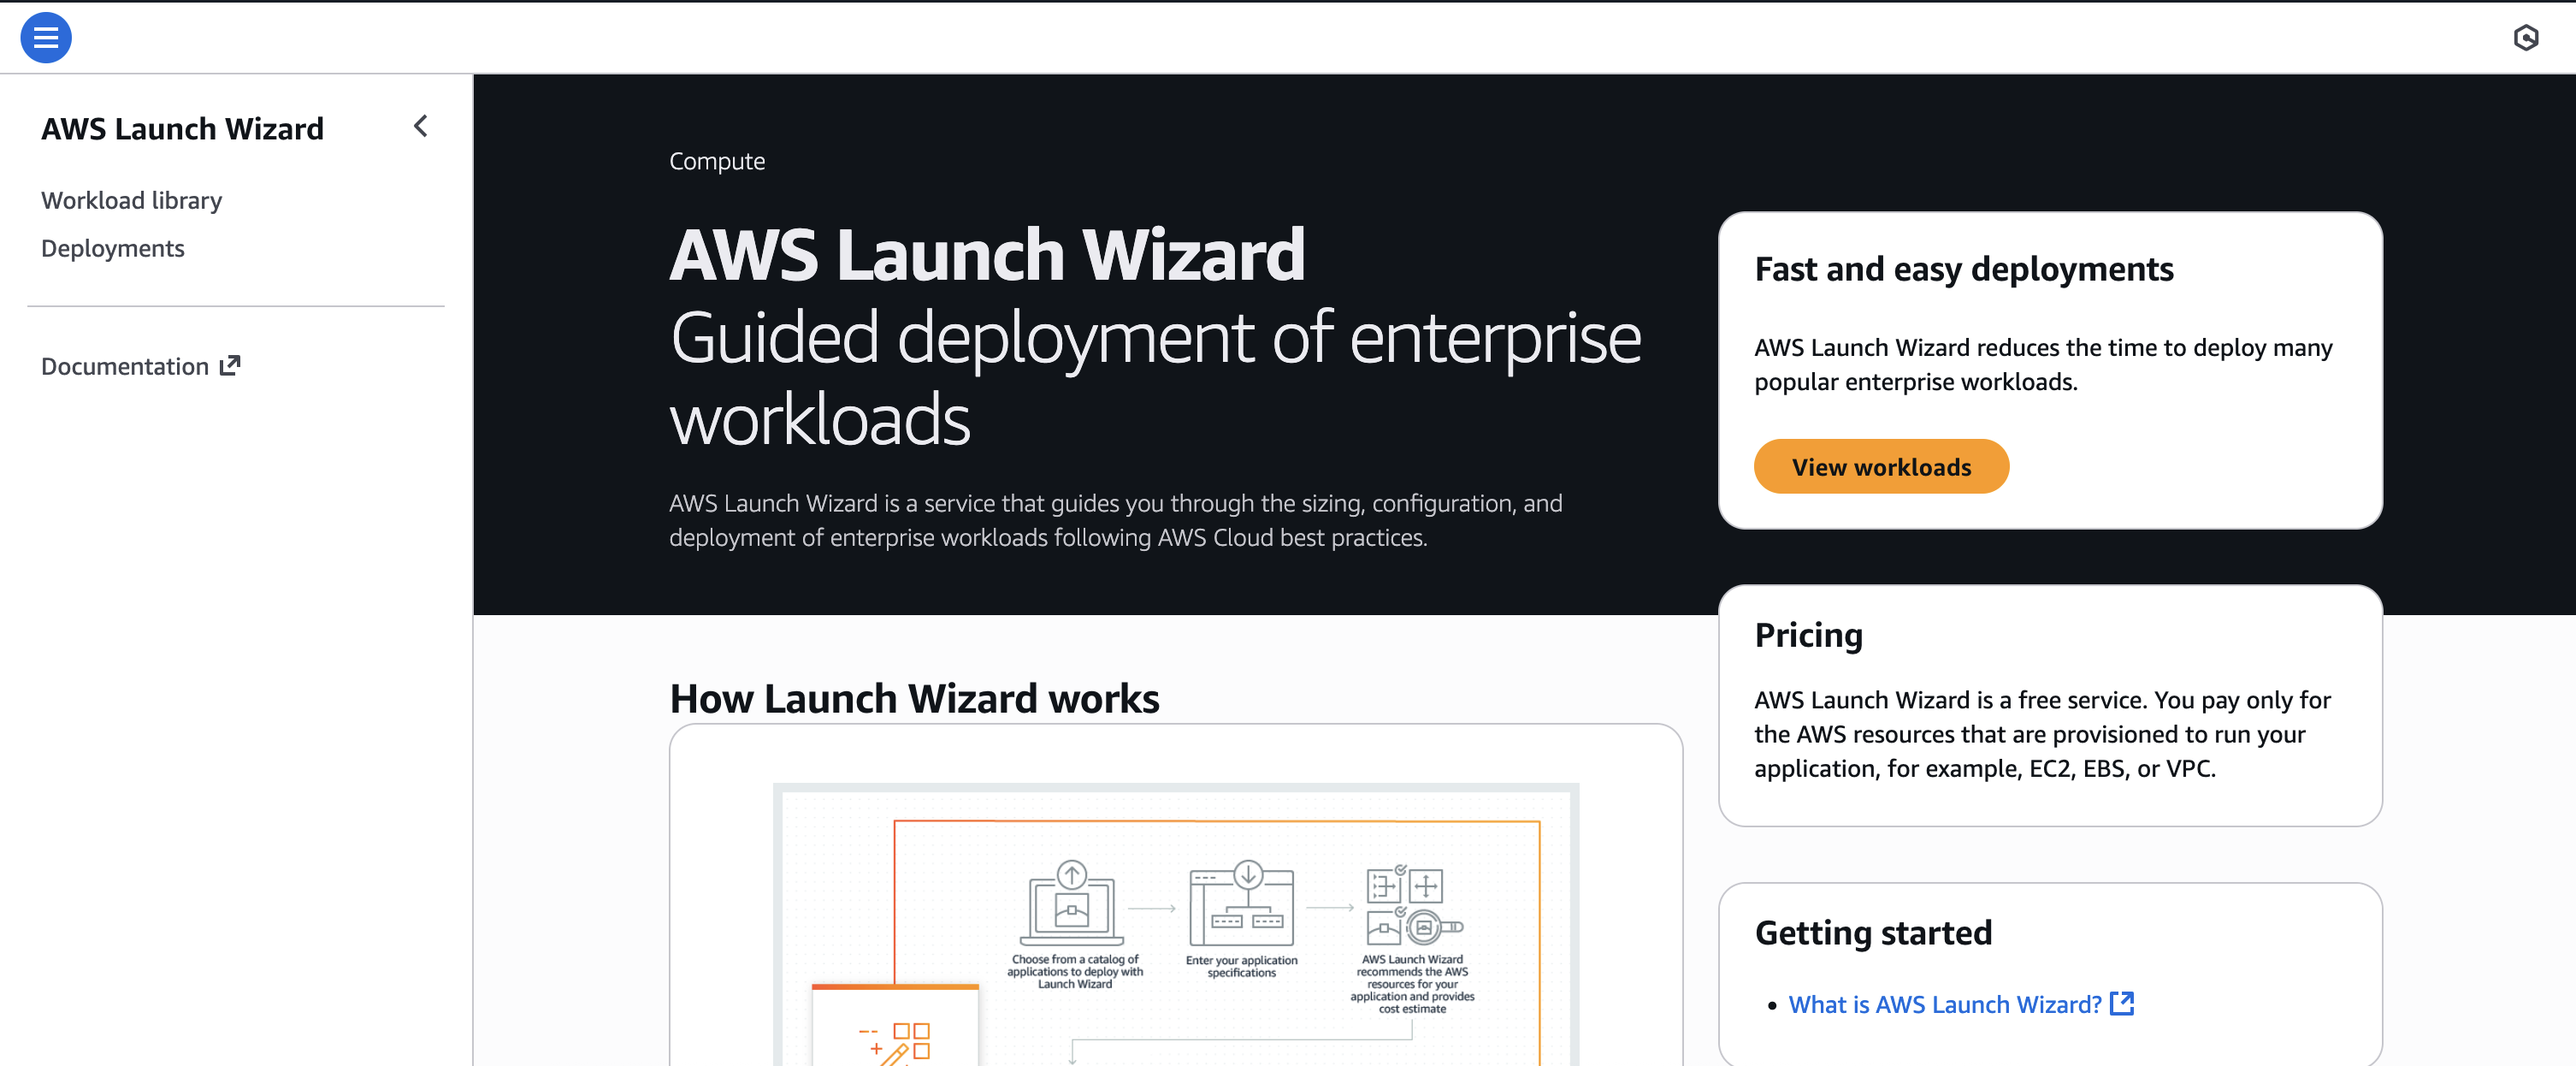
Figure 1: AWS Launch Wizard console
- Search for “sql” and choose MS SQL Server
- Choose Launch new deployment.
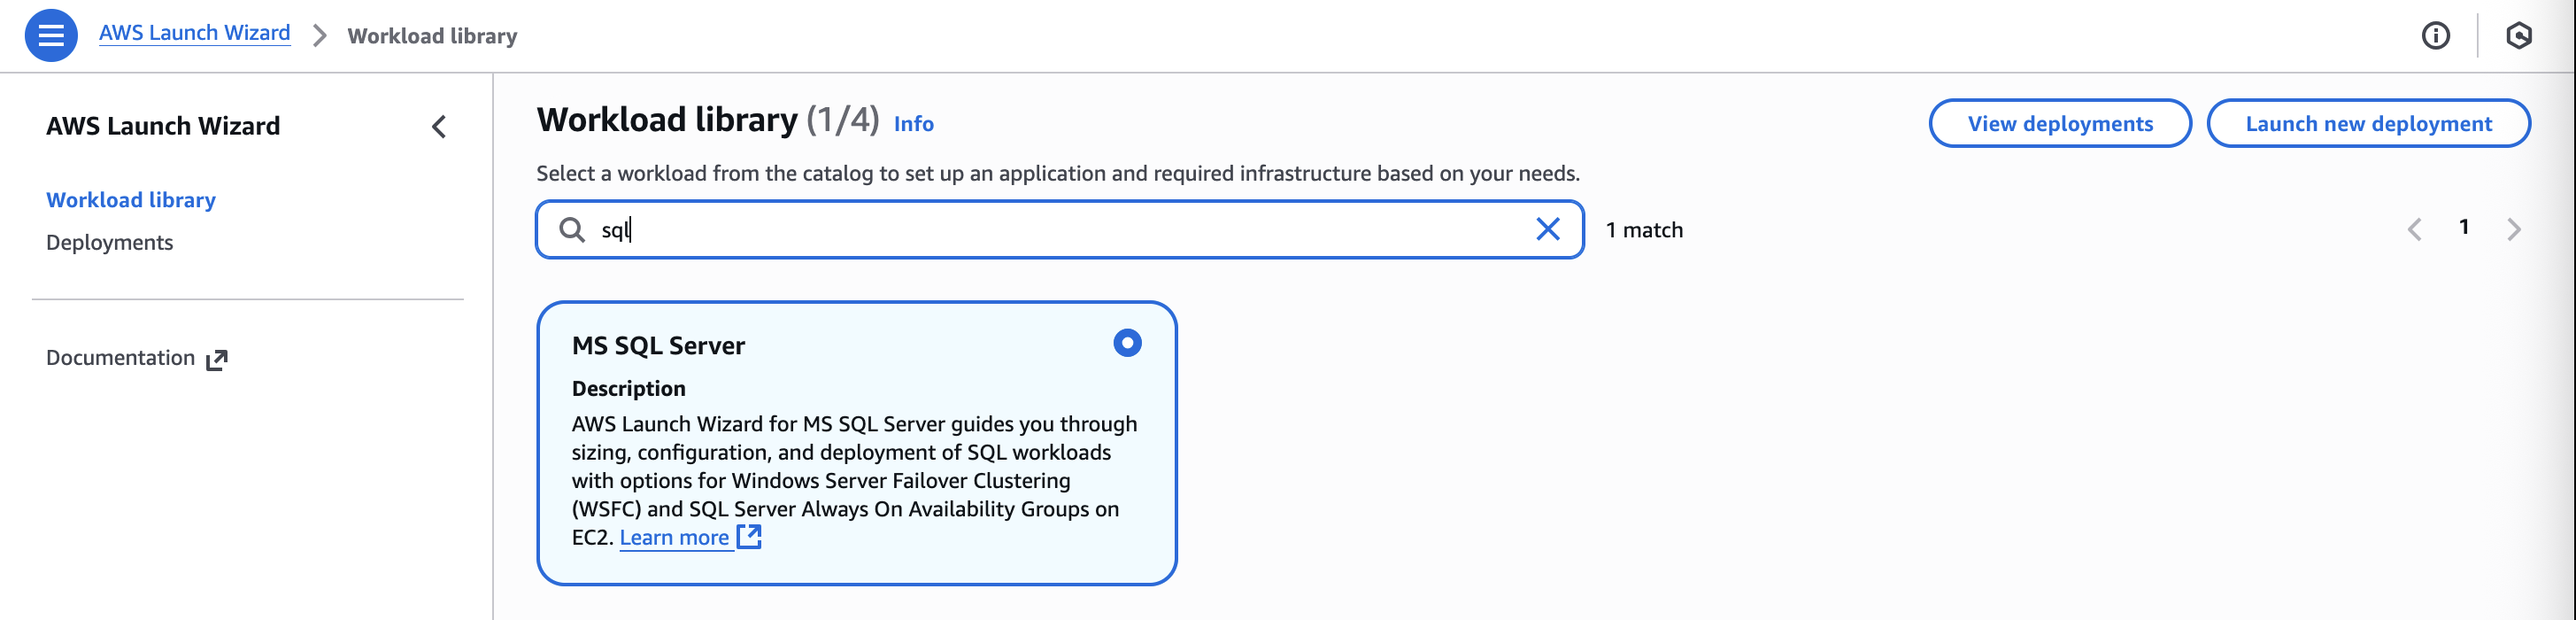
Figure 2: AWS Launch Wizard workloads library
- Under Choose deployment pattern dropdown, select SQL Server Developer Edition – Single Node – Windows. Choose Configure deployment.
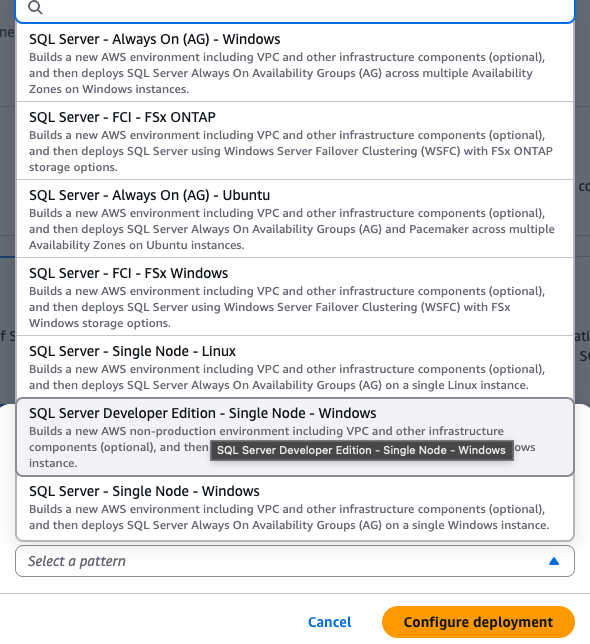
Figure 3: Deployment pattern drop down
- In the SQL Server Launch Wizard, Step 1: Review Permissions displays information regarding the AWS Identity and Access Management (IAM) role used for the deployment. Launch Wizard creates this role on your behalf in your account so that it can provision the resources across AWS services for SQL Server deployment. This role includes permissions to get the object from S3 bucket starting with launchwizard prefix for BYOM deployments. If part of an organization, your account must have permissions to create or access AWS resources such as EC2 instances, an Amazon VPC, etc.
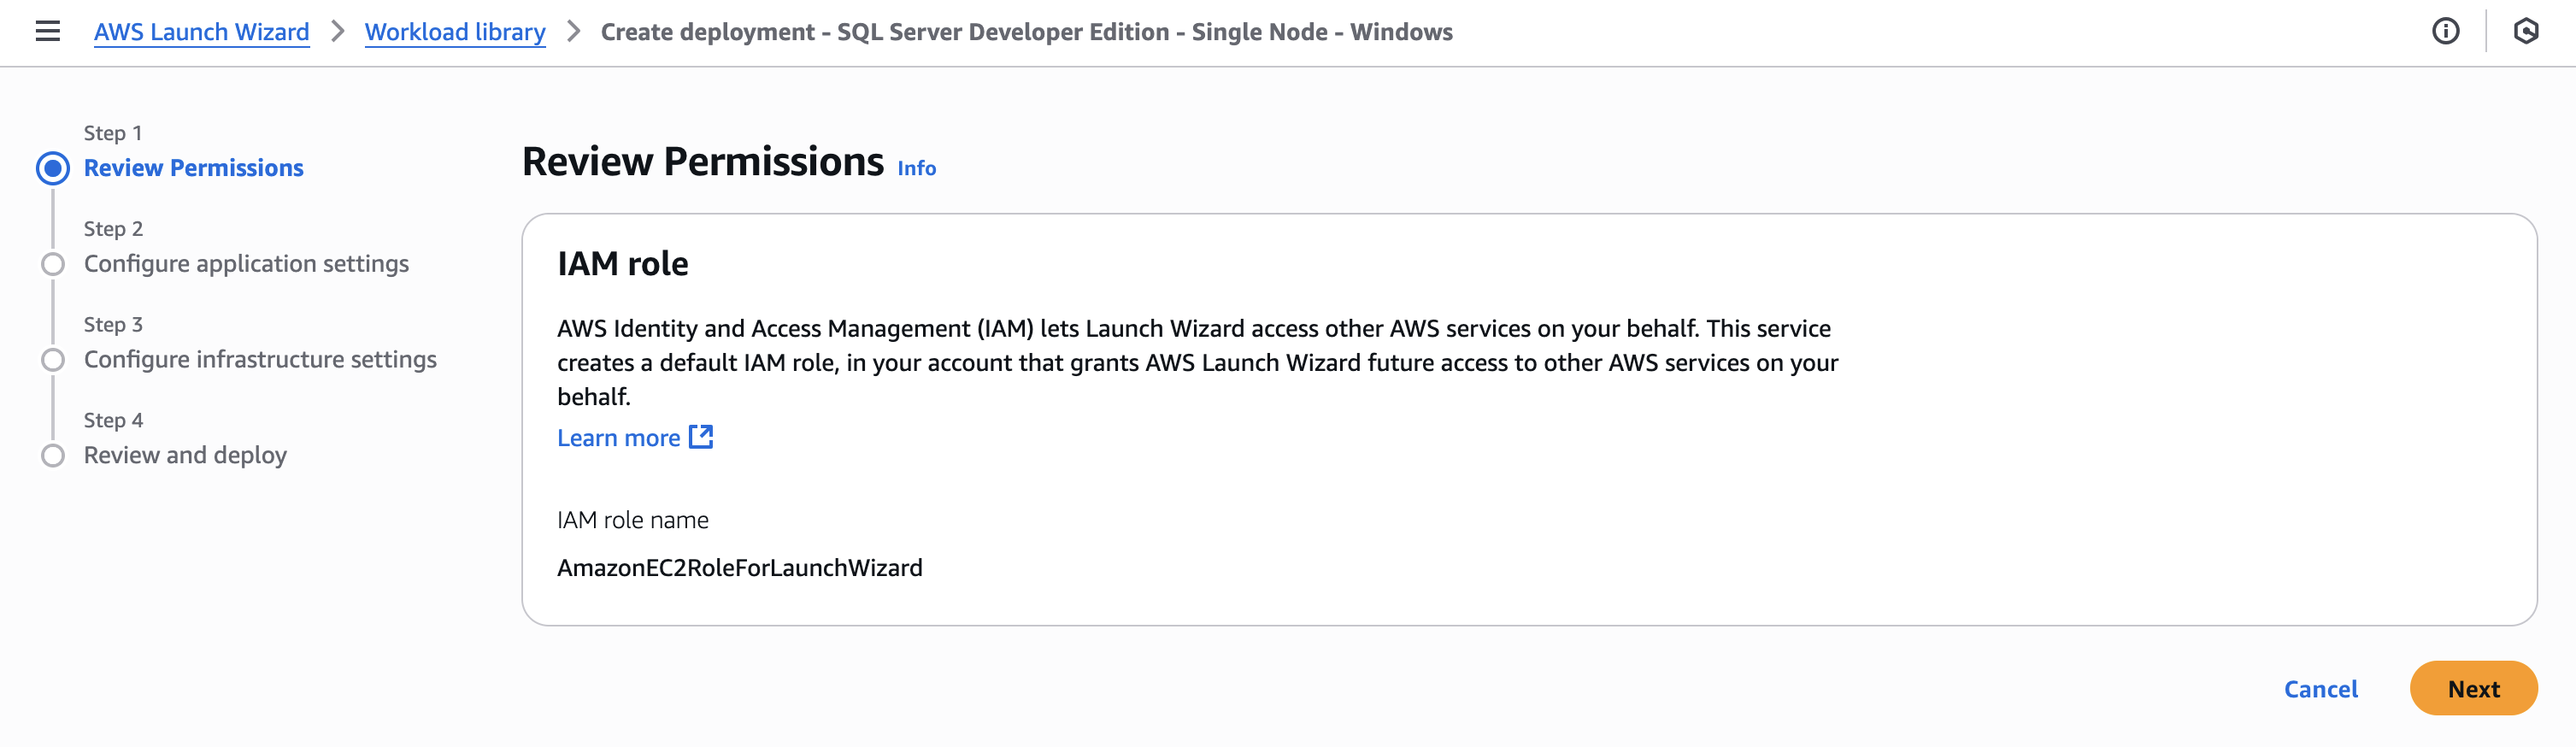
Figure 4: AWS Launch Wizard IAM permissions
- Under Step 2: Configure application settings, you can configure the application settings. In the General settings section, enter a Deployment name and specify a Simple Notification Service (SNS) topic ARN (Amazon Resource Name) to receive notifications and alerts about your application deployment status. You also have the option to select Enable rollback on failed deployment, which would immediately delete the resources created by the Launch Wizard deployment. This is useful if the deployment fails due to issues such as lack of permissions or incorrect Active Directory credentials. This option is disabled by default so that you have an opportunity to debug resources if a deployment fails. After diagnosing the issue, when you delete the failed Launch Wizard deployment, the related resources will be deleted.
- (Optional) You can enable CloudWatch Application Insights monitoring to monitor metrics and logs to detect and correlate anomalies and errors with your SQL application.
- (Optional) You can enable AWS Service Catalog product creation to export AWS CloudFormation template to create AWS Service Catalog for the deployment.
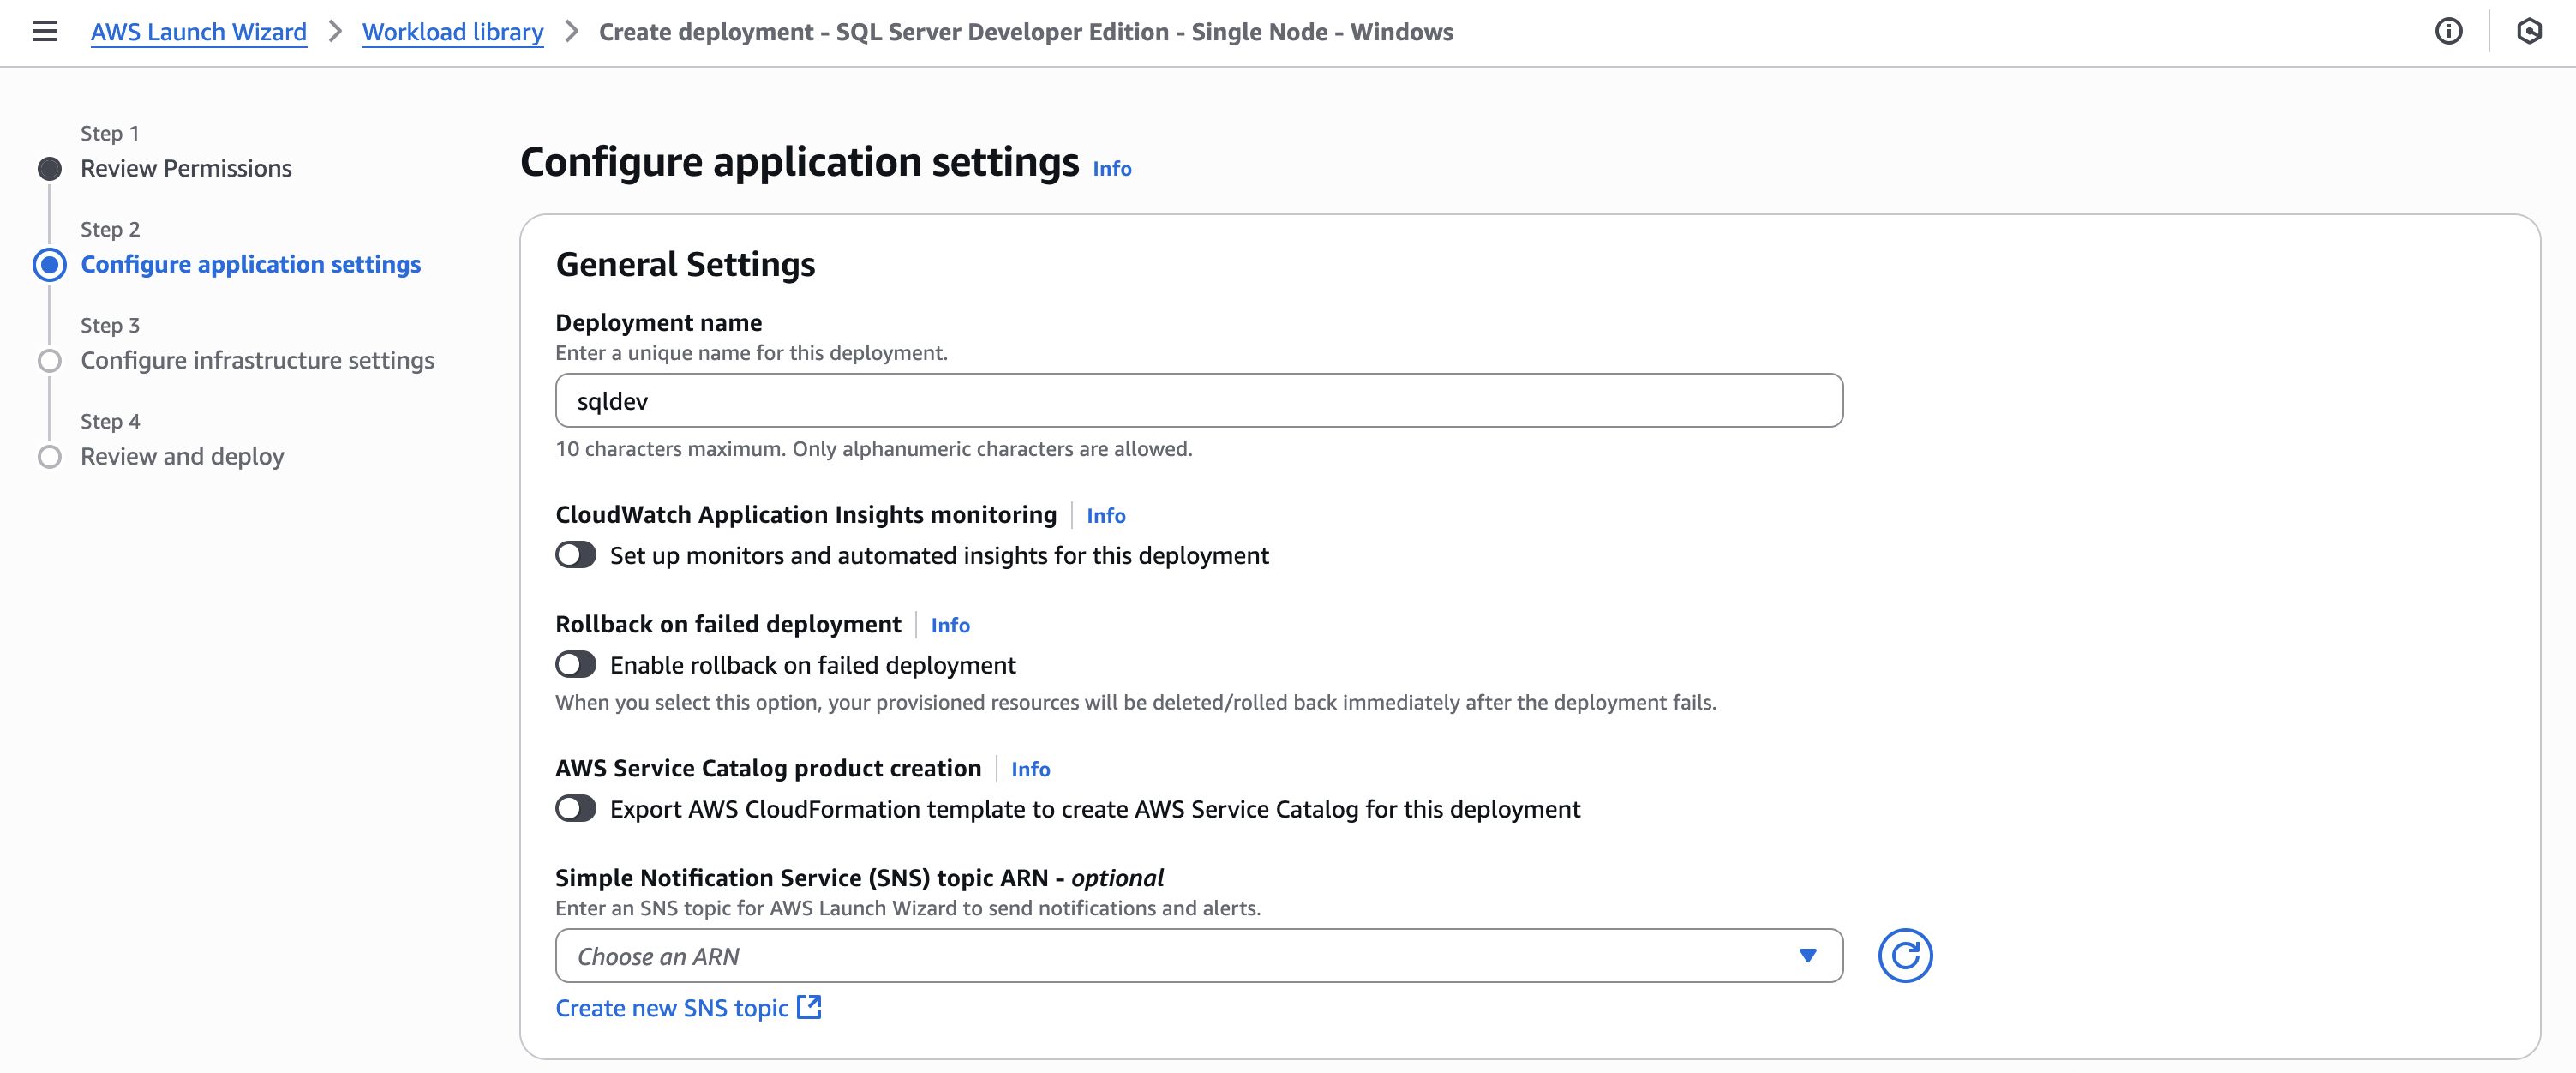
Figure 5: AWS Launch Wizard application settings
- In the Connectivity section, you provide inputs for the networking infrastructure of your application resources. You can choose an existing Key pair name or create a new one. If you create a new key pair, hit the refresh button on the right to display the newly create key pair in the drop-down menu. The key pair will be used if you want to connect to the instances using RDP or obtain the administrator password. You have the option to select an existing Virtual Private Cloud (VPC) or create a new VPC.
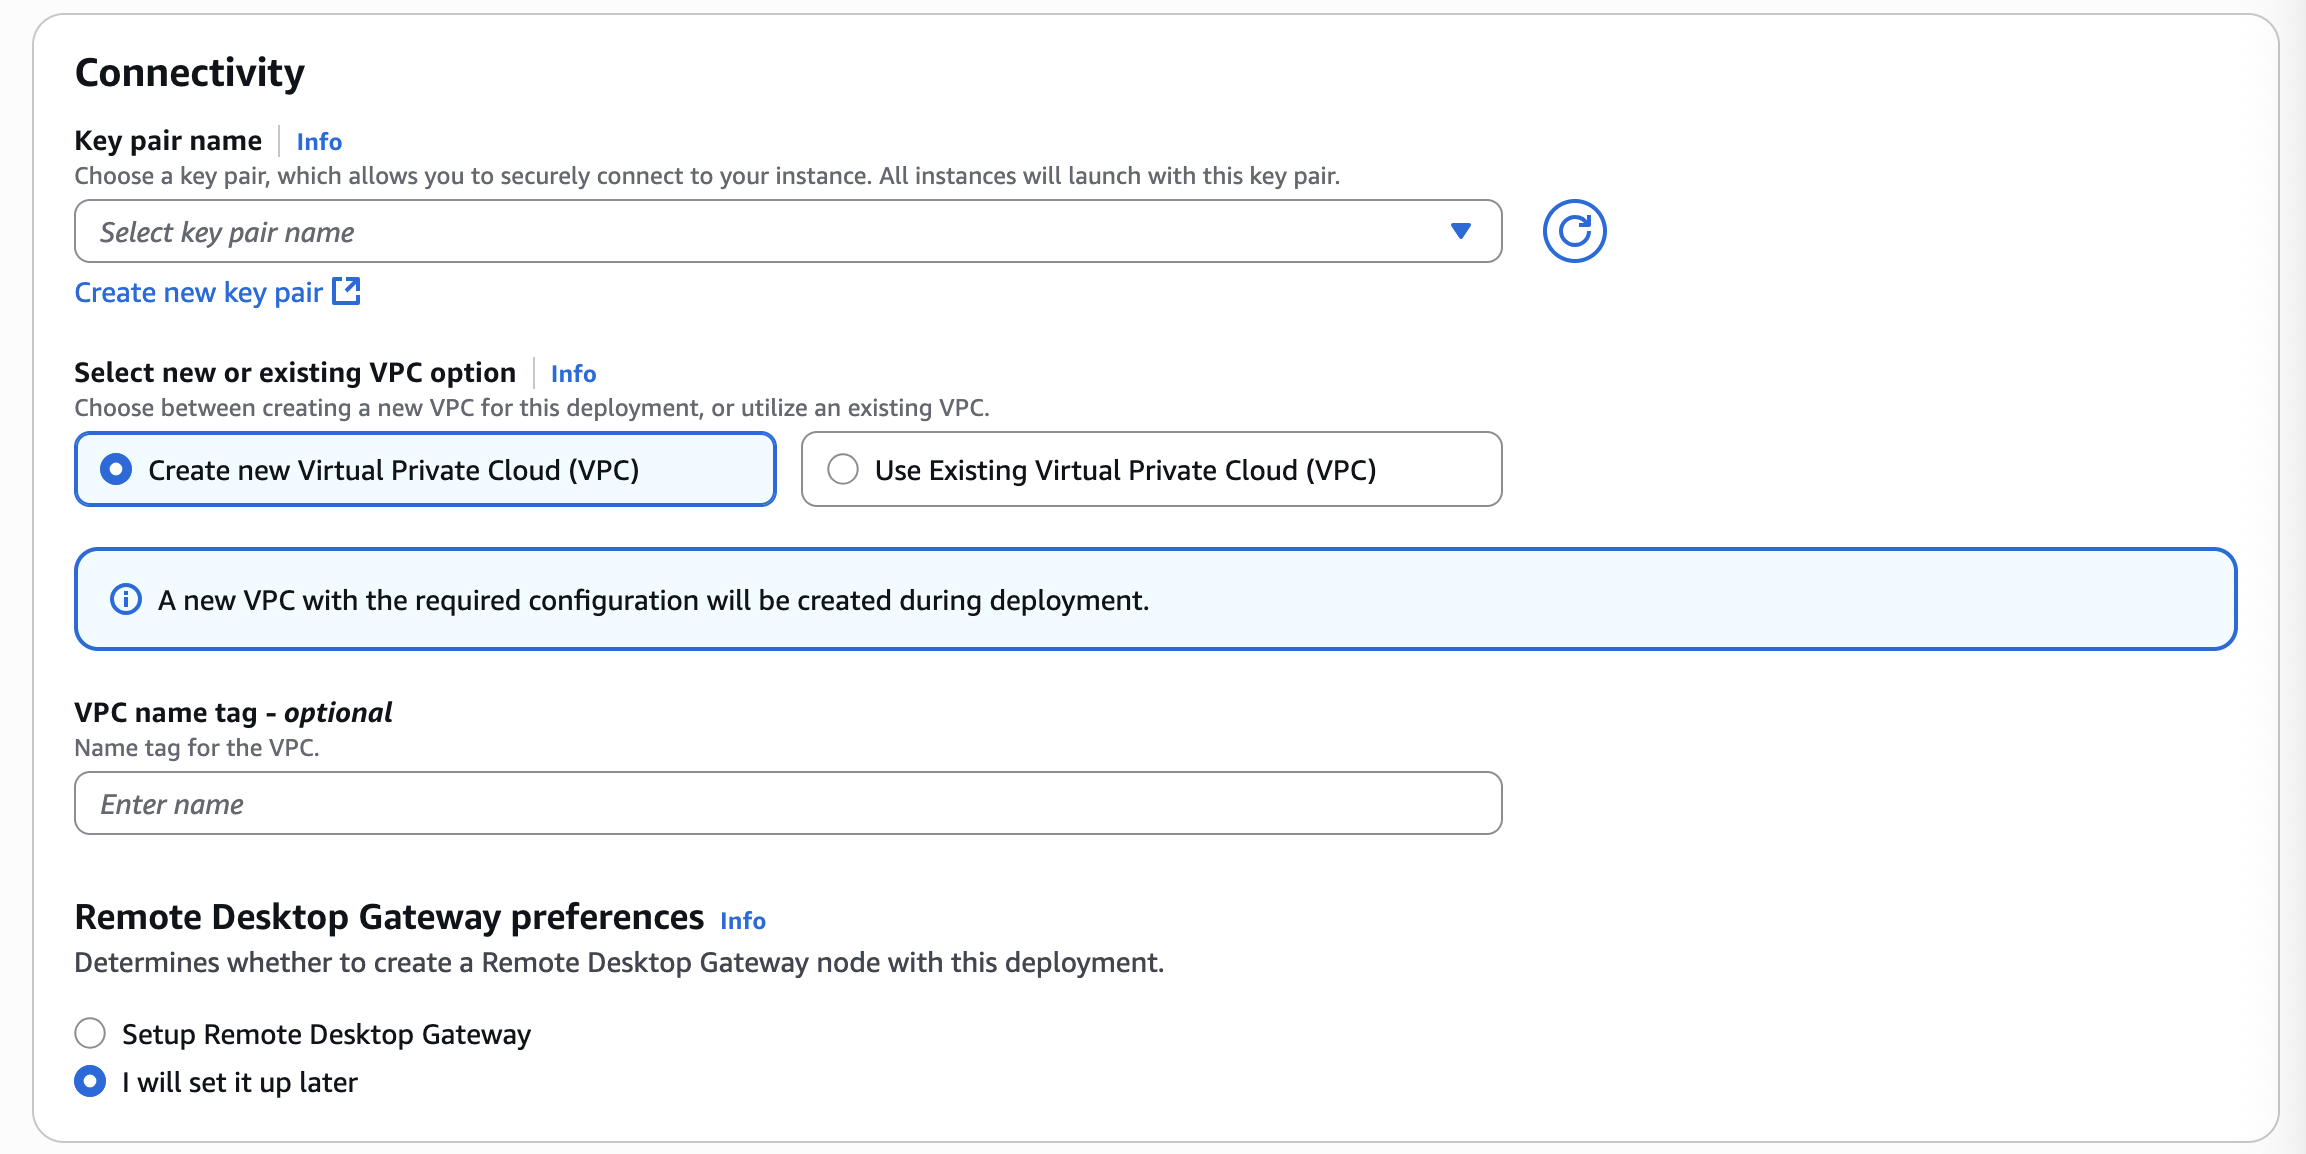
Figure 6: AWS Launch Wizard connectivity settings
- For existing VPC, you need to select the Availability Zone (AZ) and private subnet, and select the Outbound Connectivity check box to confirm that public connectivity is established for the private subnets. If creating a new VPC, Launch Wizard will create and configure the subnets for you.
- Optionally, you can enable setup Remote Desktop Gateway preferences, which allows you to establish a secure, encrypted connection to your SQL instance via RDP over HTTPS.
- In Active Directory section, you can choose to enable or disable Active Directory. This gives flexibility to use the SQL instance with or without an Active Directory. The directory allows authorized users to authenticate with this SQL server instance using Windows authentication. Disable Active Directory option is only available for SQL Server Developer edition.
- If you choose to create a new VPC on the connectivity section, you must select to create a new Active Directory if it is enabled. For existing VPC, you can connect to existing Active Directory.
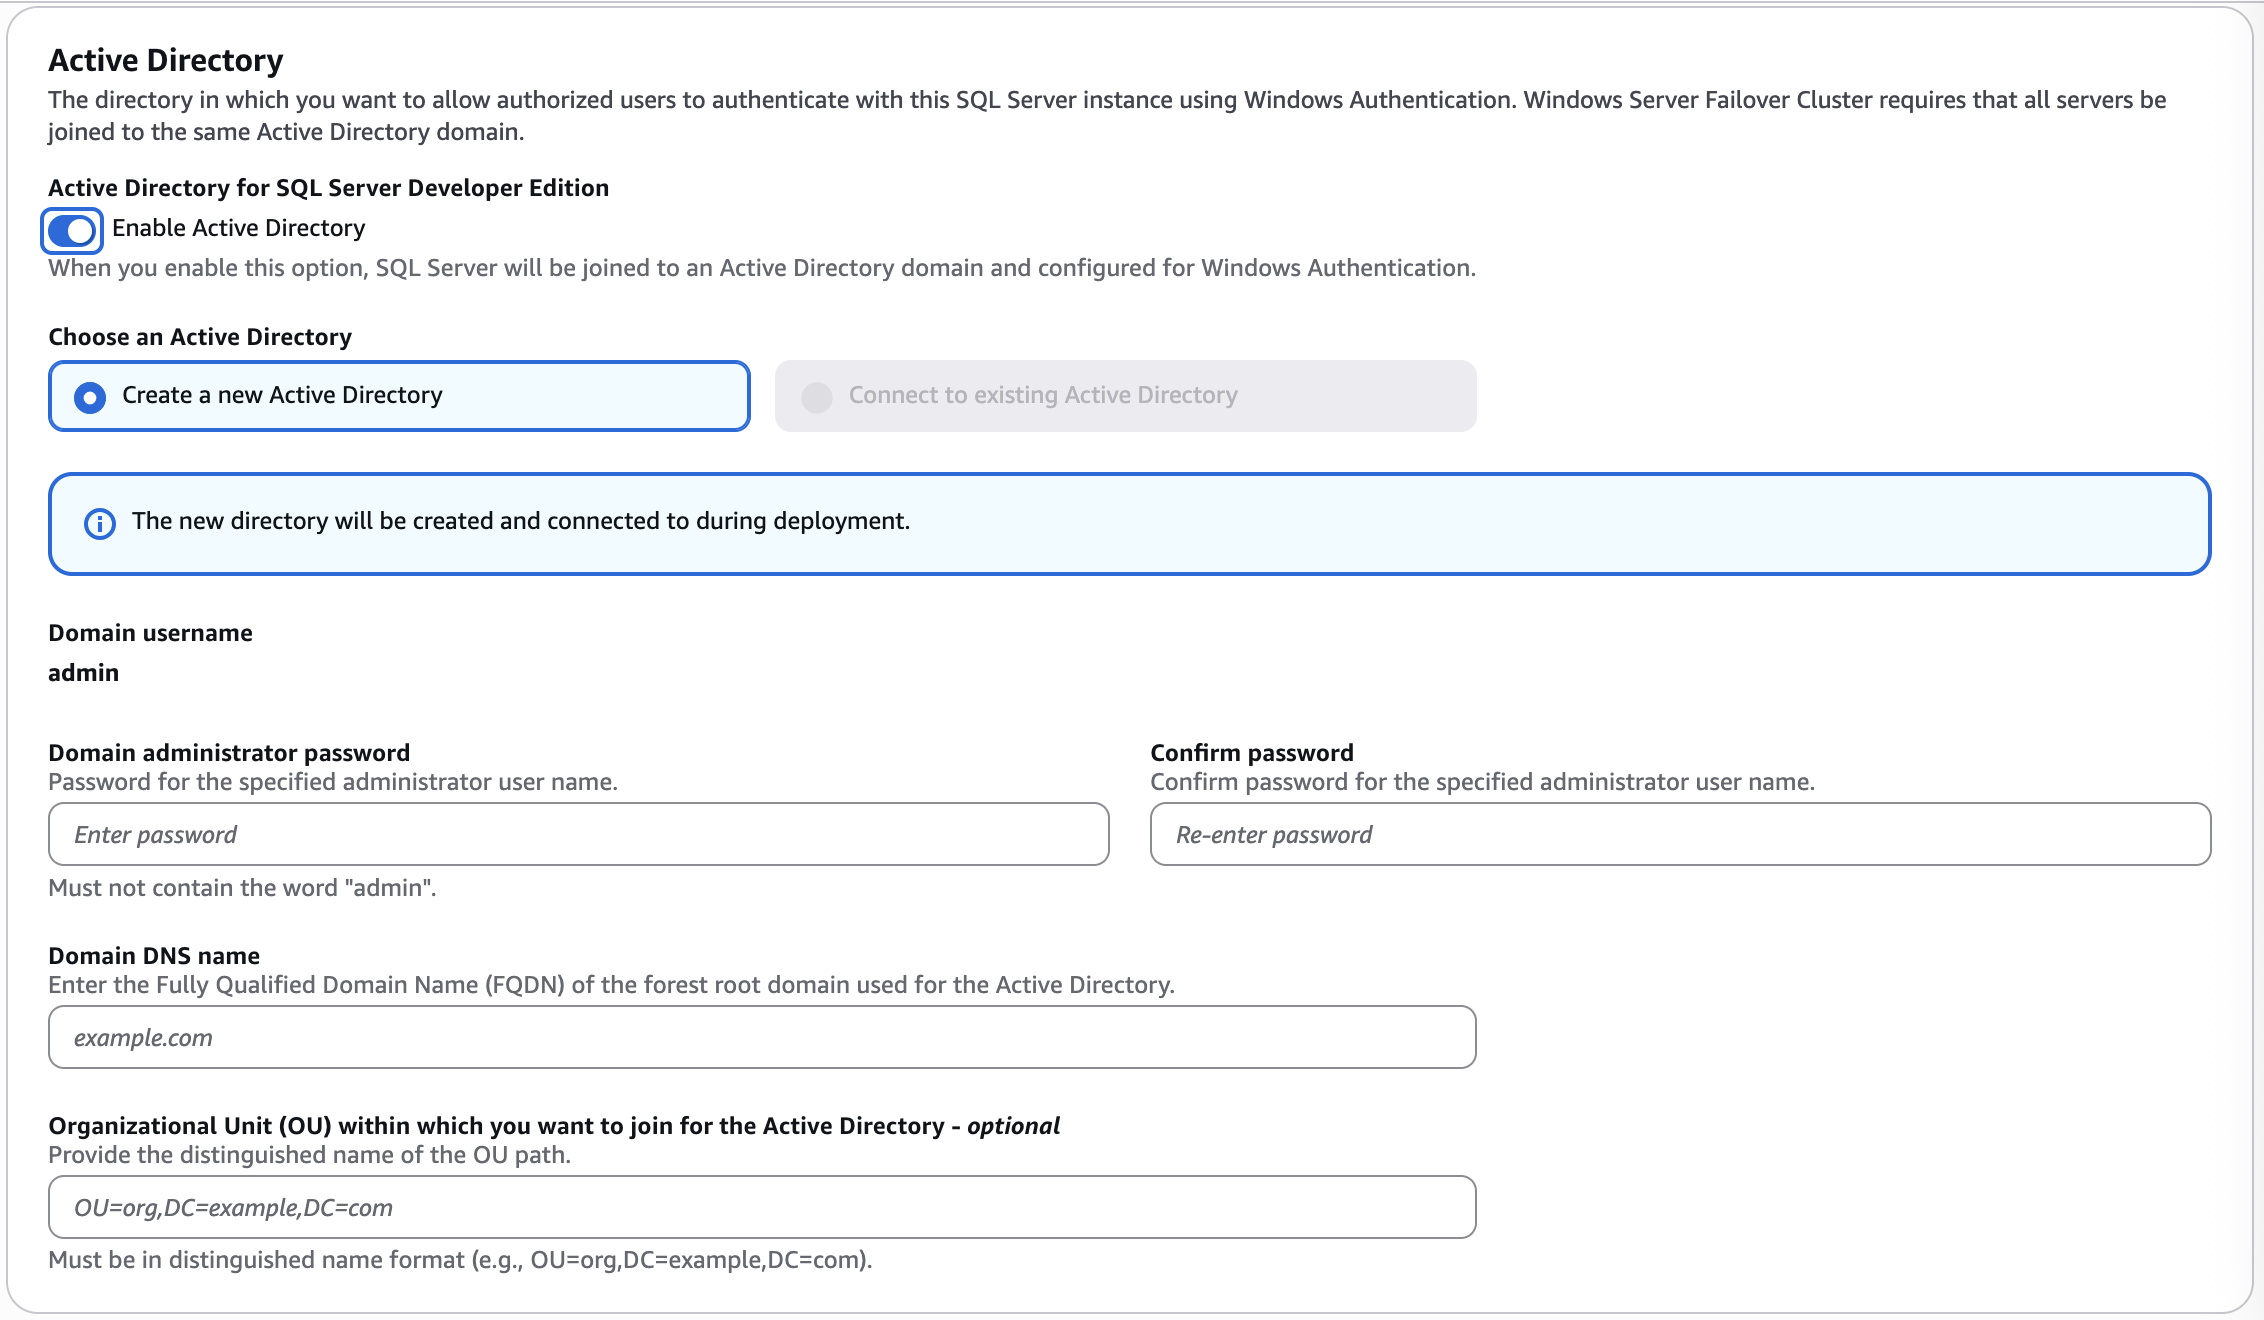
Figure 7: AWS Launch Wizard Active Directory settings
- You can enter the domain administrator password, DNS name and optionally specify the Organization Unit (OU) within which you want to join the SQL instance to Active Directory.
- Next, under SQL Server Configuration, provide your SQL Server account details. For existing Active Directory, choose to use an existing service account or create a new account. For new Active Directory, you must create new SQL service account. If Active Directory is disabled, you can proceed and select SQL Server install type.
- For the SQL Server install type, choose License-included AWS provided AMI or use your own custom AMI. The License included AMI will include the Windows Licensing.
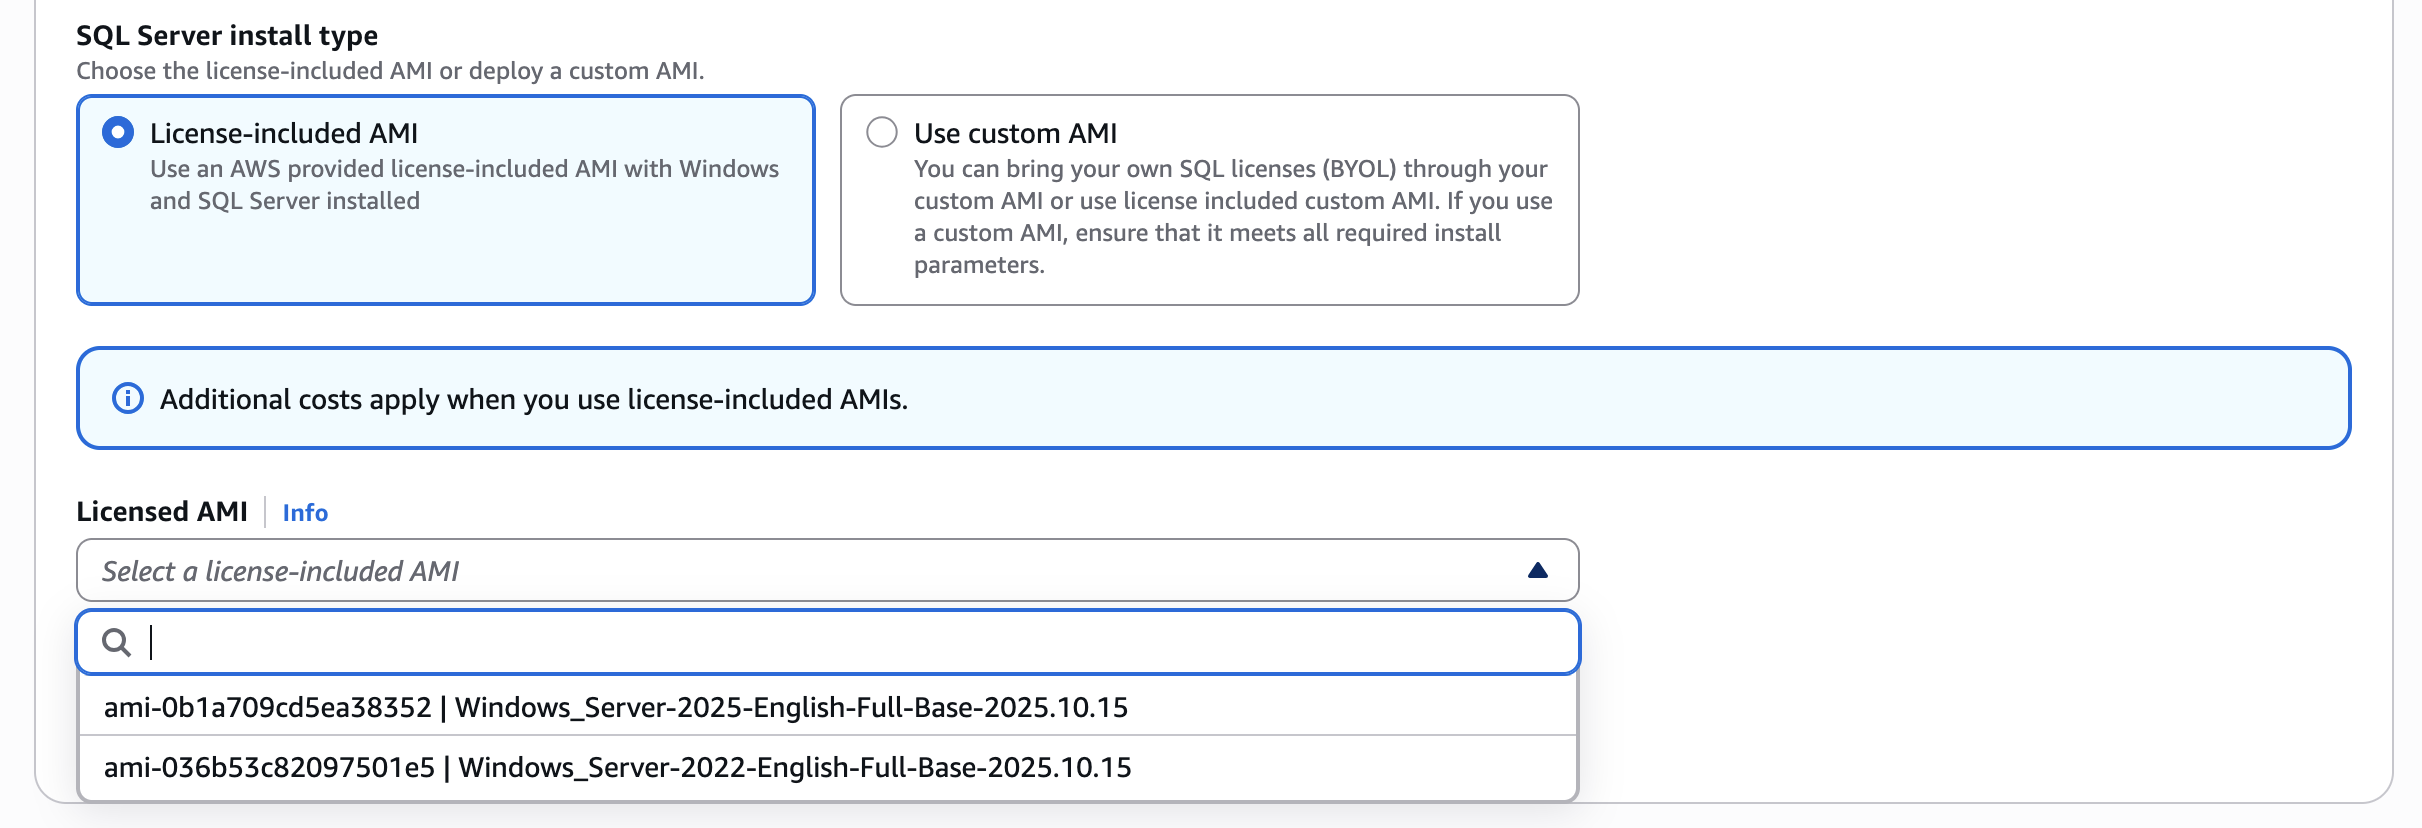
Figure 8: AWS Launch Wizard SQL Server installation type
- In Additional SQL Server settings – optional you can provide SQL node names. If you leave this fields blank, then Launch Wizard will assign unique name for you.
- Select Next to go to next step, Step 3: Configure infrastructure settings.
- Under SQL Server Developer Edition Version dropdown, you can choose SQL Server 2019 or 2022 Developer edition.
- Select the checkbox to accept the Microsoft End User License Agreement (EULA). This gives permissions to download and install SQL Developer edition on EC2 instance.
- Under installation method, choose one of the options: Bring Your Own Media (BYOM) or Bring your Own URL (BYOURL).
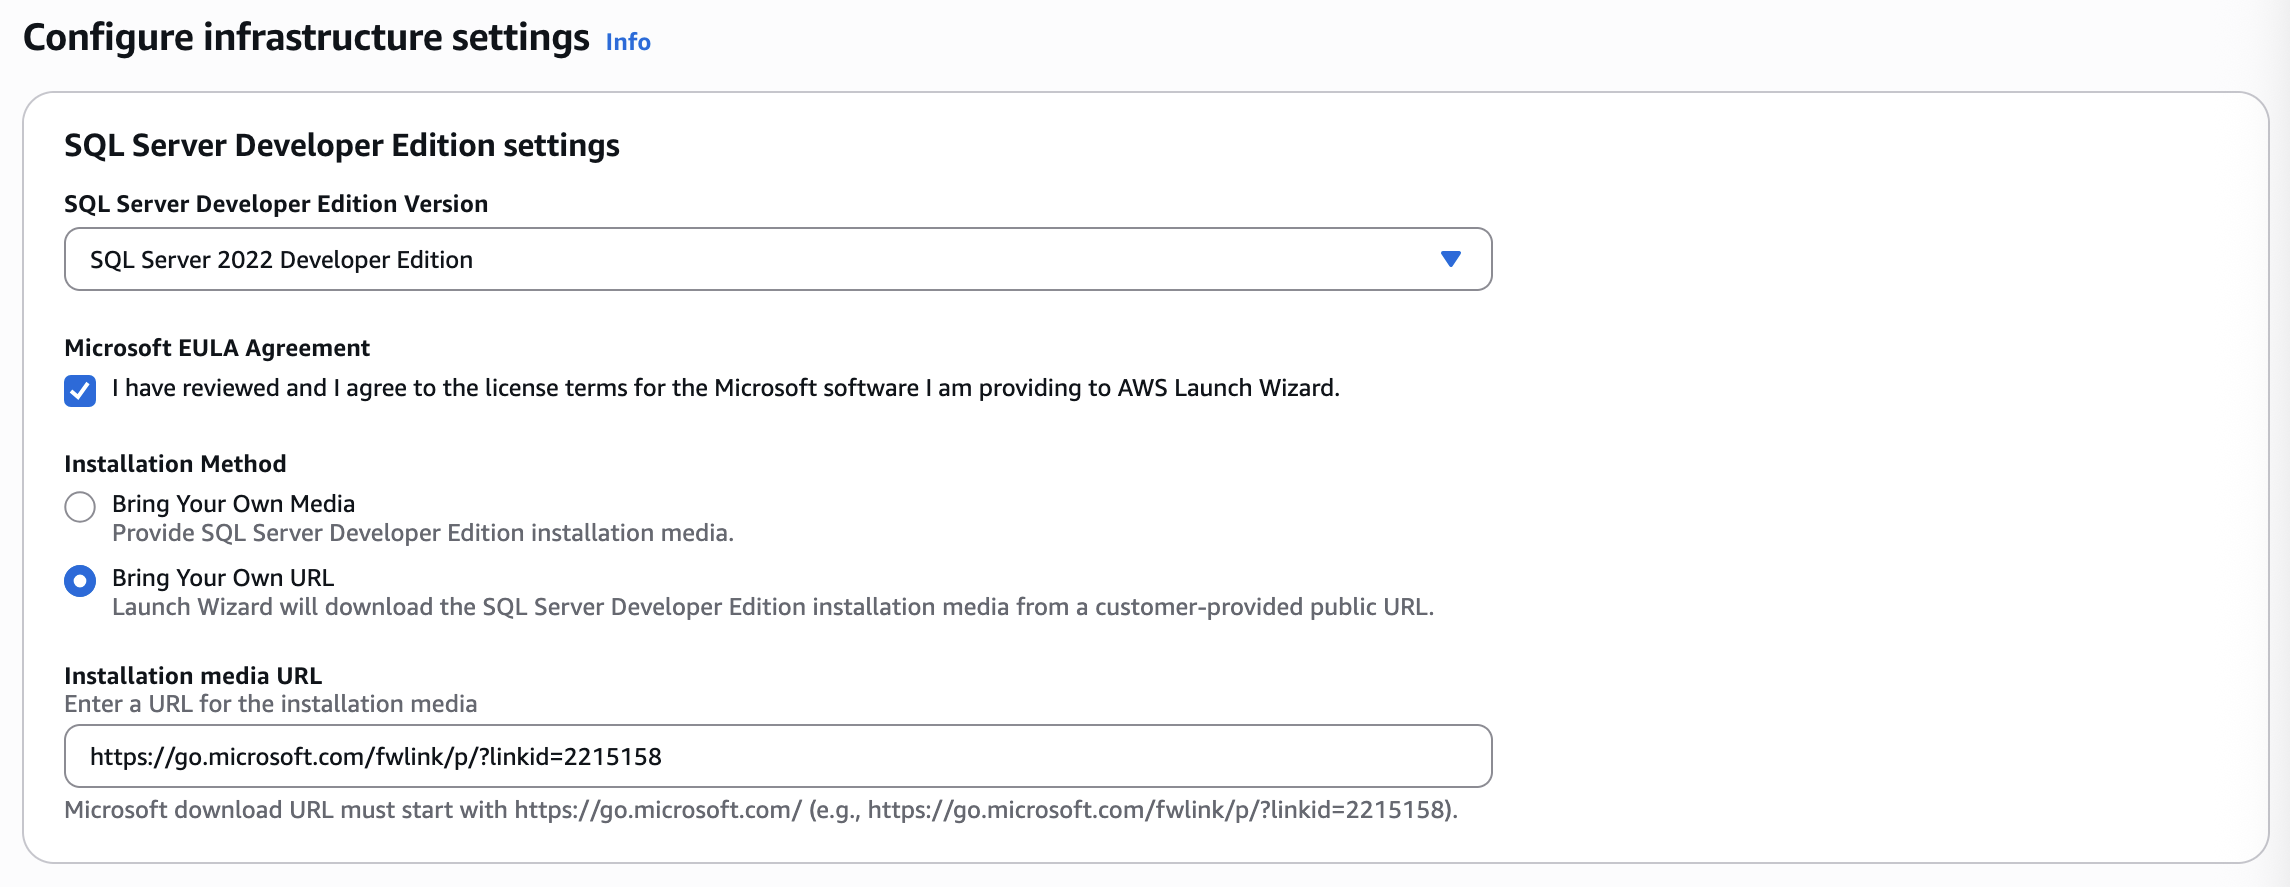
Figure 9: AWS Launch Wizard infrastructure settings
- For BYOM, select Browse S3 and select the S3 bucket starting with launchwizard prefix containing the SQL Server installation media.
- For Bring your Own URL, enter the public Microsoft URL where SQL Server Developer edition setup could be found. The URL must start with https://go.microsoft.com.
- Under Choose how you would like to define your infrastructure, you have two options. By default, you will see Launch Wizard recommends AWS infrastructure based on your needs. Here, under Compute needs, you can input your network, memory, and processor requirements for your instance, and Launch Wizard will recommend an instance type that can be seen under Recommended infrastructure. Similarly, under Storage and performance needs, you can input the type of storage drive and SQL Server throughput, and Launch Wizard will recommend the volume type.
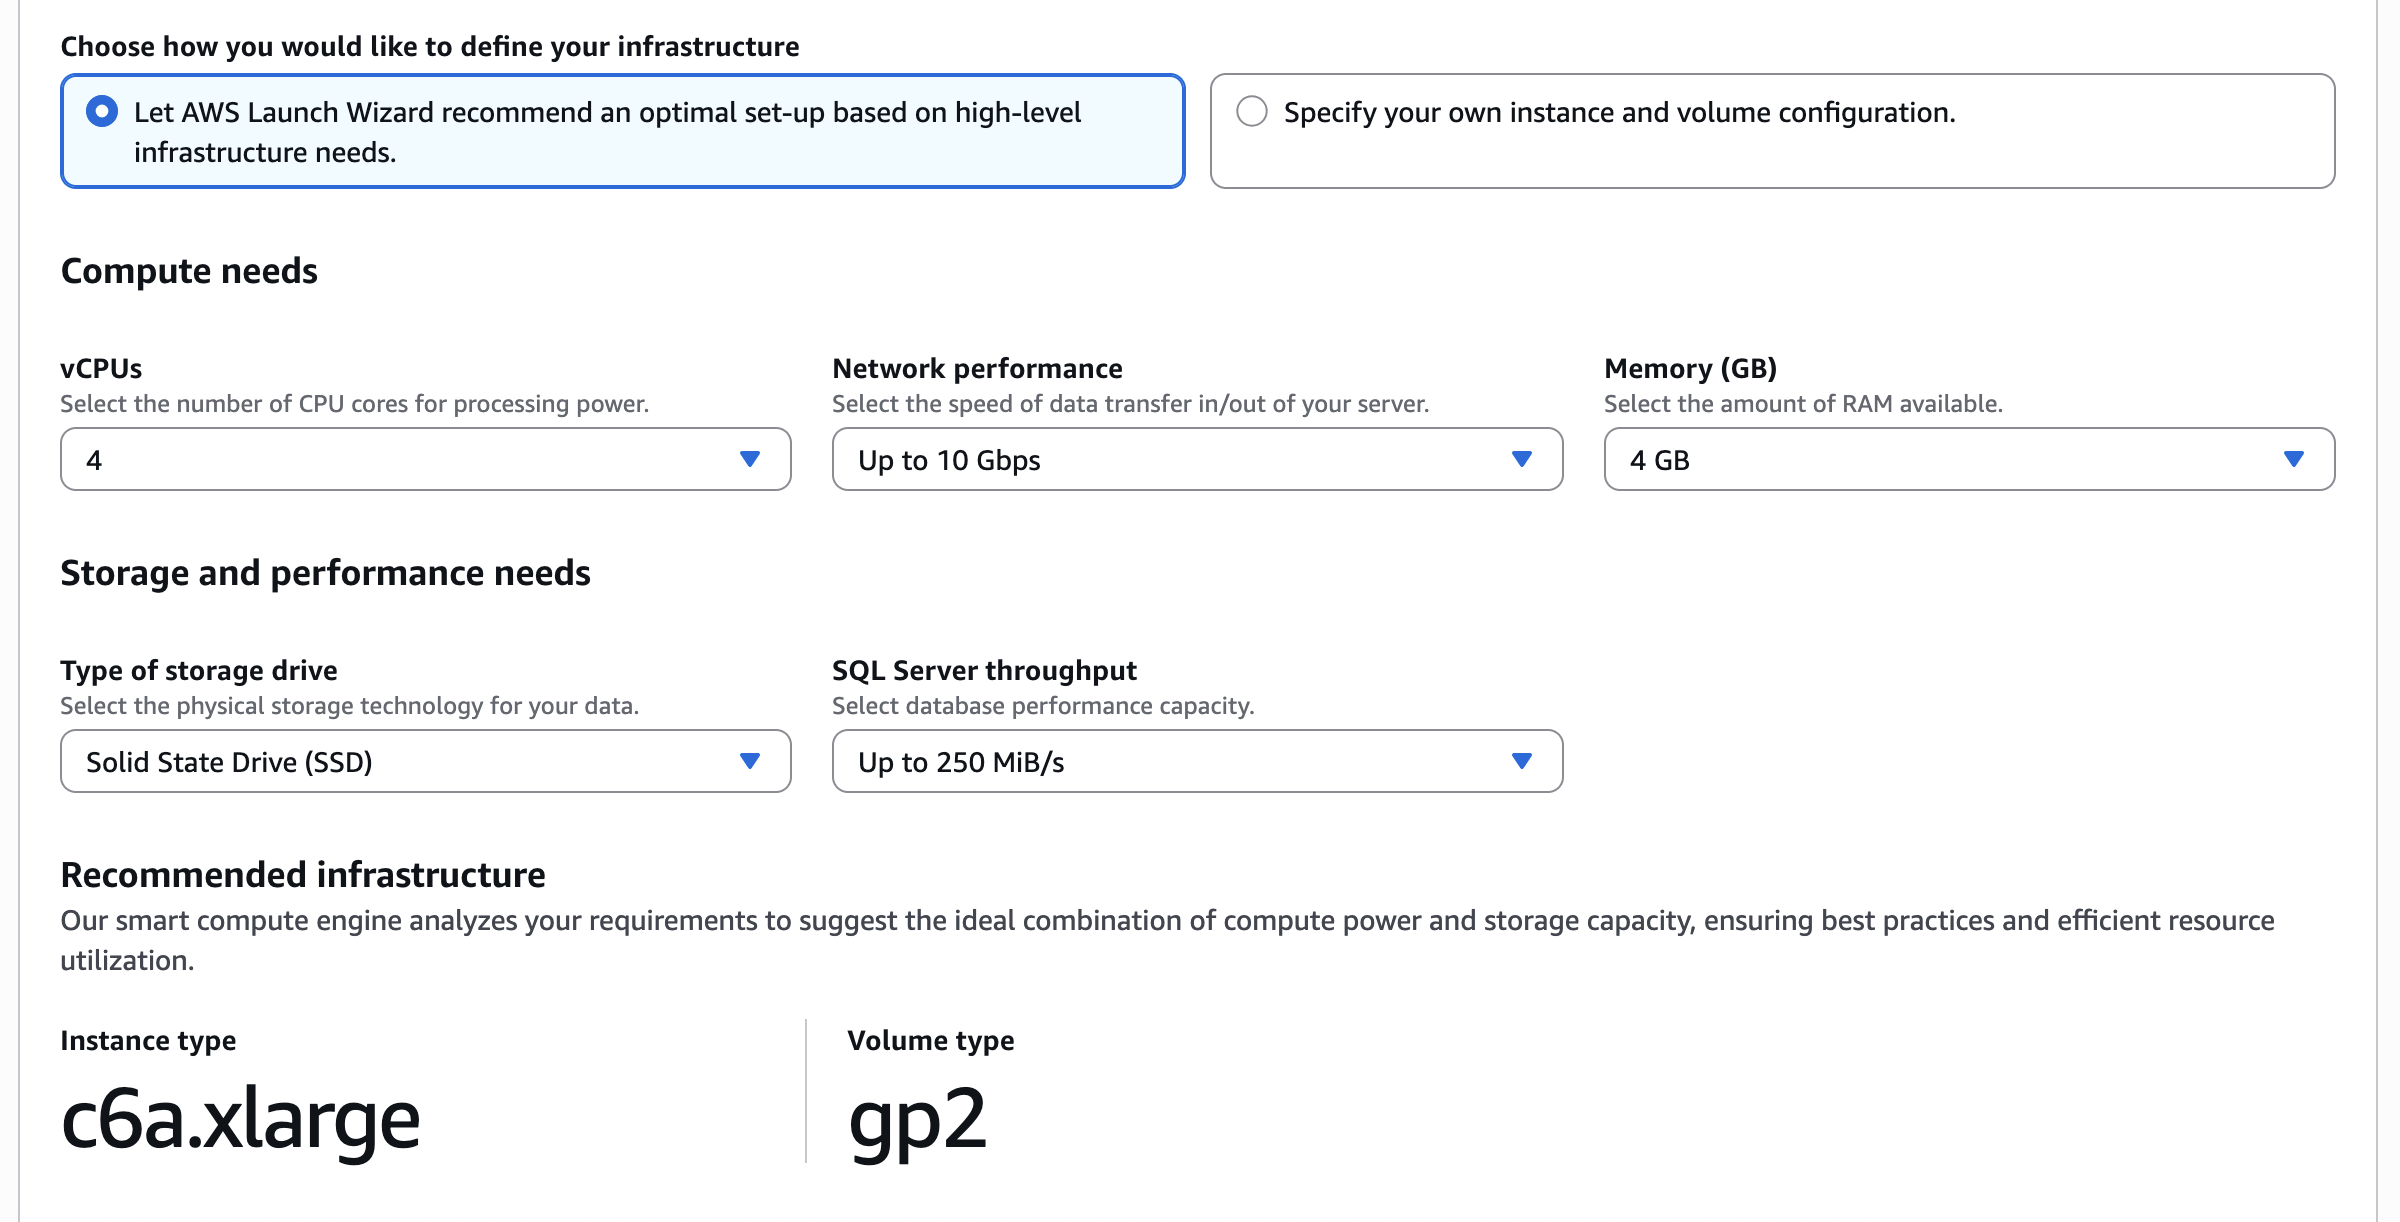
Figure 10: AWS Launch Wizard recommended infrastructure
- Alternately, you can choose Specify your own instance and volume configuration to manually select the instance type and volume type. For volume type, you can consider to choose gp3 volume.
- Under Advanced settings, you can choose vCPU optimization options. By default, it will use all available vCPU for maximum performance.
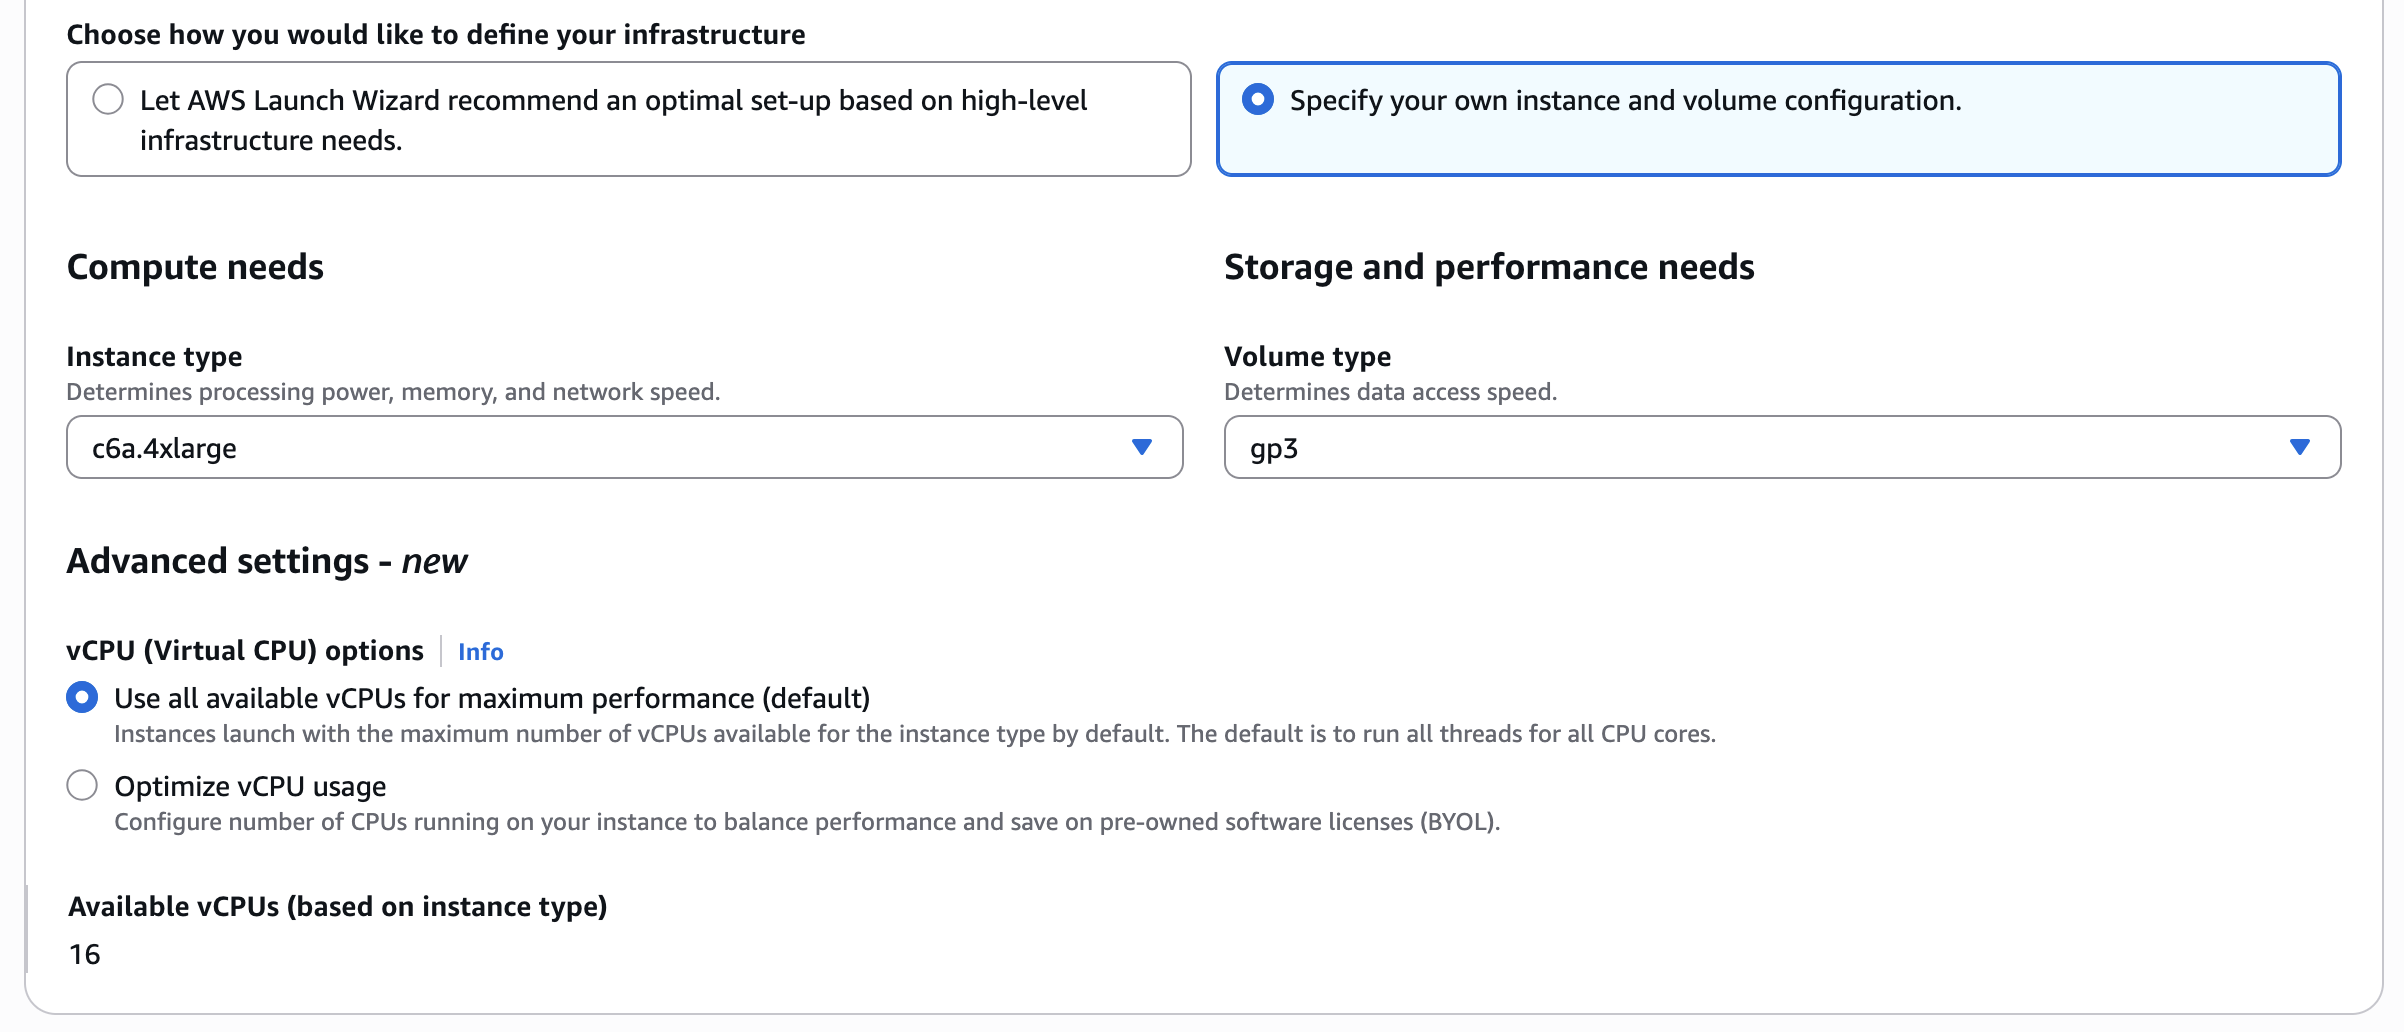
Figure 11: AWS Launch Wizard manual infrastructure selection
- Under Drive letters and volume size, you can optionally update the volume letters and volume size.
- At the end of the page, you can see the estimated monthly costs to deploy the resources, which gets updated as you modify your inputs, and can help you select what’s best for your needs.
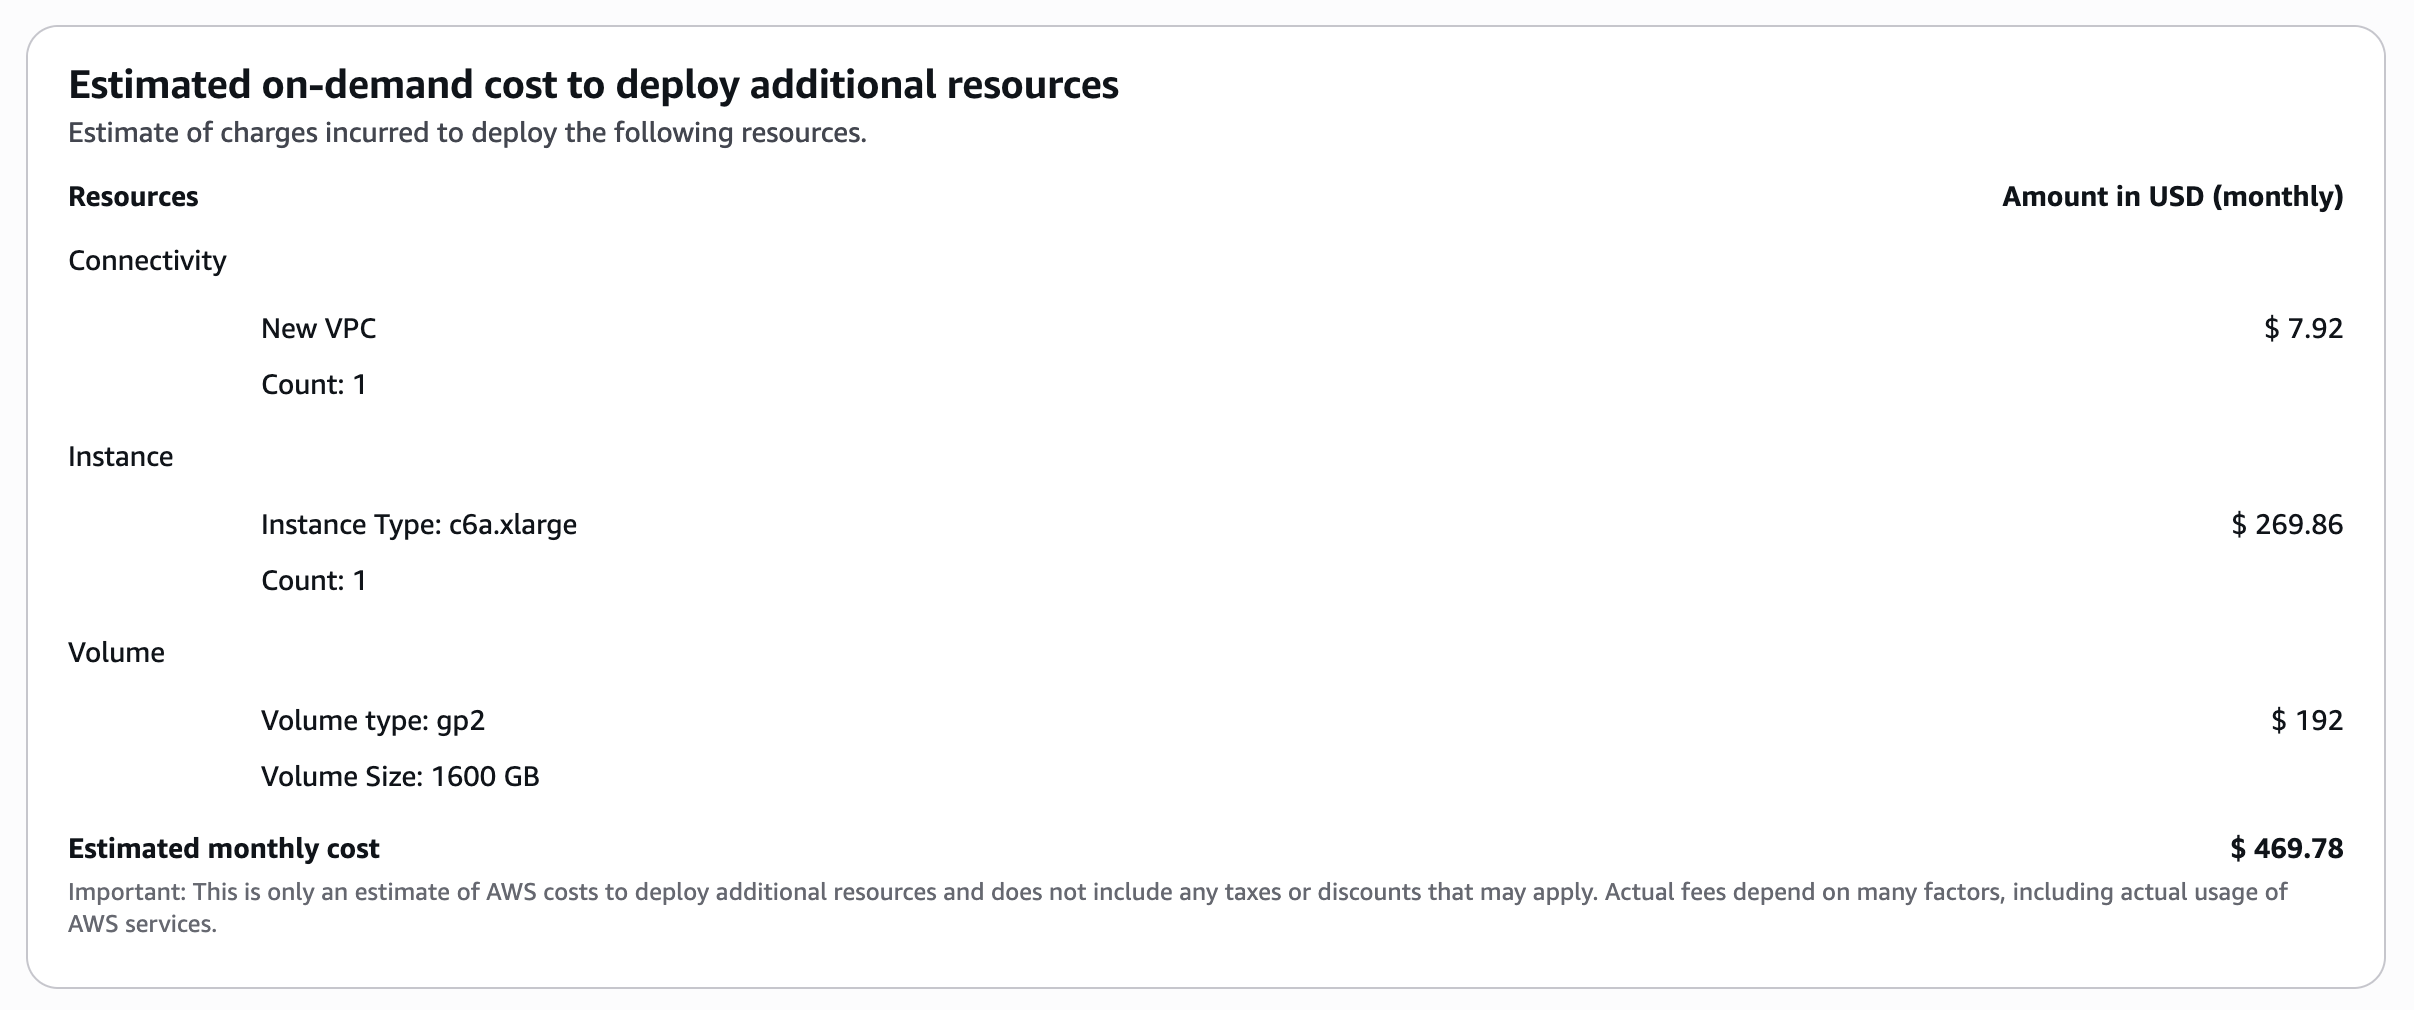
Figure 12: AWS Launch Wizard cost estimation
- The final step is Step 4: Review and deploy, which shows the summary with all the configuration options selected on the previous steps. Once you hit Deploy, the Launch Wizard begins to spin up the resources and configure your application.
The deployment completes in 45 to 60 minutes, and you can go into the Amazon EC2 console to access your EC2 instances, AWS Systems Manager Application Manager to manage your application. In AWS CloudFormation, you can view the stack and template generated by Launch Wizard based on your selections, and this code can be re-used for future deployments or for integration with your CloudFormation-supported CI/CD tools.
Cleaning up
While there is no cost to use Launch Wizard, you will be charged for resources created as part of the application deployment. If you no longer need the application running, you can delete the deployment in Launch Wizard, which will delete all the AWS resources created as part of the deployment. Following are the steps to delete the deployment:
- Navigate to AWS Launch Wizard console
- From the left menu, choose Deployments
- Select your SQL Server Deployment and choose Delete
Conclusion
In this blog post, we have demonstrated how AWS Launch Wizard simplifies the deployment of SQL Server Developer edition, transforming a once manual process into a streamlined, wizard-driven experience. The service offers guided steps, flexible installation options, and automated resource provisioning while maintaining compliance with Microsoft’s licensing requirements. AWS Launch Wizard’s cost estimation features and reusable CloudFormation templates help teams plan and execute deployments more efficiently. Whether setting up development environments or test instances, this tool significantly reduces complexity and time, eliminating licensing costs for non-production workloads and offering an efficient path for organizations to leverage SQL Server in their development lifecycle.
To further explore SQL Server deployments on AWS, we recommend checking out our related resources on Simplify SQL Server Always On deployments with AWS Launch Wizard and Amazon FSx, and SQL Server Always On Failover Cluster Instances with Amazon FSx for NetApp ONTAP.