AWS Cloud Operations Blog
Automate your Multicloud operations with AWS Systems Manager and AWS Lambda
A multicloud strategy presents various challenges, including observing and managing applications and infrastructure across multiple cloud platforms. Maintaining consistent tooling for visualizing operational data and automating actions helps organizations address this challenge. Amazon CloudWatch and AWS Systems Manager are two services that provide unified monitoring, observability, and automation capabilities for workloads deployed on AWS, on-premises, and multicloud environments.
CloudWatch is a monitoring service that enables you to improve your monitoring and observability posture across hybrid and multicloud environments, including Azure. In Observe your Azure and AWS workloads simultaneously with Amazon CloudWatch we show you how to setup CloudWatch to query metric data from Azure Monitor and create a holistic and unified operational view of your workloads.
Systems Manager is a secure end-to-end management solution that offers centralized node management capabilities, inventory collection, secure session initiation, automation, software patching, and package deployment.
The Automation capability of Systems Manager offers a way to automate operational tasks across your AWS infrastructure. Automation runbooks can invoke AWS APIs and make OS level changes on your managed nodes to enable complete control over your AWS resources. Customers often ask us how to extend the Automation capability beyond AWS, to manage and perform API actions on resources hosted in other cloud platforms like Azure.
In this blog post, we will show you how to create runbooks that can automate tasks against Azure resources by interacting with Azure Resource Manager APIs using AWS Lambda as shown in Figure 1.

Figure 1: Feature Overview
Solution Demonstration
The use cases for the solution are many, such as scheduled maintenance tasks or automating remediation tasks triggered by an alarm or event. The Patch Manager feature of Systems Manager provides scanning and rollout of software patches, and is one of the most common Systems Manager use cases.
The AWS-PatchInstanceWithRollback runbook combines the Automation capabilities of Systems Manager with Patch Manager to give you the operational safeguard of automatically rolling back the root volume of your EC2 instance to a stable state, from an EBS Snapshot, if an error is detected after software patches have been installed.
To demonstrate the solution, we will replicate the functionality of the AWS-PatchInstanceWithRollback Automation runbook to patch Azure VMs with the same safeguard of rolling back the root disk to a known working state from an Azure Managed Disk Snapshot as shown in Figure 2.

Figure 2: Automate Azure VM Patching with rollback using Systems Manager
To combine Systems Manager Automation with Azure Resource Manager, the solution creates a new runbook Azure-PatchVMWithRollback and Lambda function AzureManagedDiskSnapshots that work together to automate and manage the lifecycle of Azure Managed Disk Snapshots and the scanning and installation of software patches.
Azure-PatchVMWithRollback Runbook
The Azure-PatchVMWithRollback runbook owns the end-to-end workflow of the Automation and controls the behavior of the Lambda Function, passing data about the Azure Virtual Machine and the operation it must perform at each invocation.

Figure 3: Azure-PatchVMWithRollback runbook visual diagram
The Azure-PatchVMWithRollback runbook uses a combination of the Run Command, executeScript, Loop, Sleep, Branch and InvokeLambdaFunction actions to execute the steps in the workflow.
- Extract VM Details: Retrieve the hostname, root volume name, resource group, and subscription ID from the Azure VM’s metadata service using a PowerShell or Bash script.
- Convert to JSON: Convert the retrieved VM metadata into JSON format using a Python script.
- Create Snapshot: Create a snapshot of the VM’s root volume by invoking a Lambda function with the VM details in JSON format.
- Check Snapshot Status: Using Loop and Sleep automation actions, monitors the snapshot creation process by periodically invoking the Lambda function to check the snapshot status until it’s complete.
- Install Missing Patches: Run a runbook to install any missing patches required by the Security Patch Baseline.
- Delete Snapshot (OnSuccess): If the patch installation is successful, invoke the Lambda function to delete the root volume snapshot.
- Restore from Snapshot (OnFailure): If the patch installation fails, invoke the Lambda function to restore the VM to its previous state using the snapshot, and then delete the snapshot.
AzureManagedDiskSnapshots Lambda Function
The AzureManagedDiskSnapshots Lambda Function, creates the bridge between Systems Manager and Azure Resource Manager enabling the runbook to execute the steps necessary to manage the lifecycle of the Azure Managed Disk Snapshots.
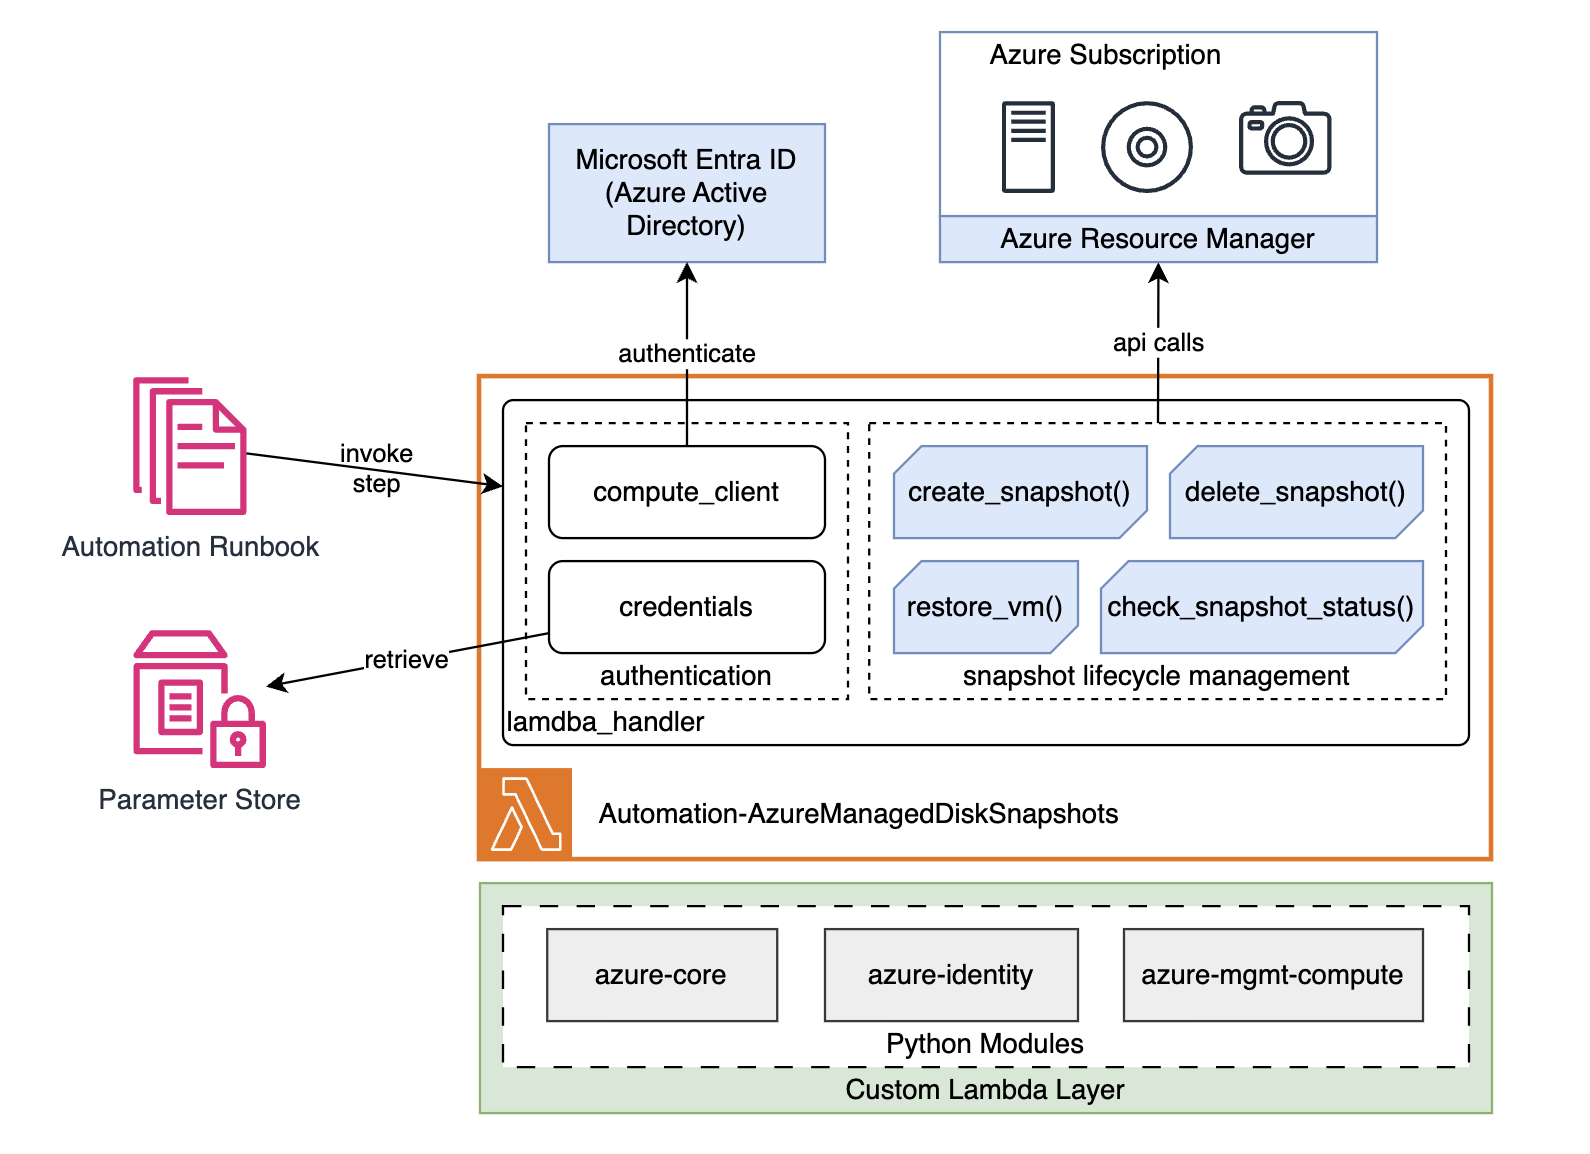
The AzureManagedDiskSnapshots Lambda Function uses a custom Lambda layer populated with the Azure python modules to interact with the Azure Resource Manager APIs and help reduce the execution time. The Lambda Function retrieves credentials from Parameter Store, authenticates with Microsoft Entra ID and performs the create, delete, check status and restore actions to manage the lifecycle of the Azure Managed Disk Snapshot.
Solution Deployment
Prerequisites
- An AWS account.
- An Azure account subscription with Owner role.
- An Azure VM managed by Systems Manager as Hybrid Managed node. To learn more, please see Quickstart: Create a Linux virtual machine in the Azure portal and Setting up Systems Manager for hybrid and multicloud environments.
Setup Instructions
Setup Instructions are divided into two sections:
- Azure Setup
- Creating the Azure App registration in the Microsoft Entra ID portal.
- Granting necessary permissions to Azure subscription for Lambda function to manage the Azure VMs in your Resource Group.
- AWS Setup
- Storing the Azure App registration credentials securely in the Parameter Store.
- Preparing and uploading the Azure python module package to Amazon S3. This S3 bucket will be passed as input to CFN template in the next step to prepare custom lambda layer.
- Deploying the AWS CloudFormation template to provision Azure-PatchVMWithRollback runbook and AzureManagedDiskSnapshots Lambda Function.
Azure Setup
Step 1 – Create the Azure App Registrations in Microsoft Entra ID portal
Before implementing the process outlined here, make sure to review it to ensure that it meets your security requirements. This configuration will grant Contributor access to all resources within the Resource Group to the AzureManagedDiskSnapshots Lambda Function.
- Open the Microsoft Entra admin center console.
- Select the Identity menu option, followed by Applications, then select App registrations.
- Select New registration and enter
AppReg-AzureManagedDiskSnapshotsfor registration name. - Select the Accounts in this organizational directory only (Default Directory only – Single tenant) setting for the tenant option.
- Select Register.
- Select the Certificates & secrets from the menu blade, then select New client secret and enter the following details.
- Description:
ClientSecret for AzureManagedDiskSnapshots Lambda Function. - Expiration time: Enter a date in the future that aligns with your Security Policy. Note: You must update this secret on the AWS-side prior to expiration.
- Description:
- Select Add.
- Copy the Value of ClientSecret1 and keep it safe. This is a sensitive string similar to a password or other access tokens.
- Copy the Values from the following fields on the Overview menu option
- Application (client) ID
- Directory (tenant) ID
Step 2 – Grant permissions to the Azure subscription in the portal
- Return to the Microsoft Azure Portal, open the Resource Group where your VMs are located.
- Select Access control (IAM) from the menu blade, then Add role assignment from the Add dropdown button.
- Select the Privileged administrator roles tab.
- Select Contributor from the list and then select Next.
- Choose Select members and then type the name of your app registration AppReg-AzureManagedDiskSnapshots. Note that the name may not appear in the list until entered.
- Select the AppReg-AzureManagedDiskSnapshots app registration name, and then click Select.
- Finally, choose Next, then Review and assign.
You can validate these permissions are applied by reviewing other resources in your subscription, such as virtual machines from their IAM pages. With the permissions granted to the app registration, we will now need to store the credentials securely in Parameter Store in the next step.
AWS Setup
Perform the following steps in the AWS Region where your Systems Manager setup is located.
Step 3 – Store app registration in Parameter Store
- Open the Parameter Store page of Systems Manager console.
- Choose Create parameter.
- For the Parameter Name field, enter a unique name for the Azure Client ID (e.g., “
client_id“) - For Parameter tier, choose Standard.
- For Type, choose SecureString.
- For the KMS Key ID, select alias/aws/ssm. Note: If you encrypt with custom KMS key, you must provide explicit kms:Encrypt permissions for the key in the Lambda IAM role (LambdaRole-AzureManagedDiskSnapshots) created by CloudFormation in Step 5.
- In the Value box, enter the Application (client) ID copied from the Azure Portal in Step 1.
- Choose Create parameter.
- Repeat steps 2-8 to create two more parameters, one for the Azure Directory (tenant) ID and another for the Azure Client Secret that you created in Step 1. Use unique and descriptive names for these parameters (e.g., “
tenant_id” and “client_secret” respectively).
By following these steps, you will have securely stored the Azure Client ID, Tenant ID, and Client Secret as encrypted parameters in the AWS Systems Manager Parameter Store. These parameters will be required during the execution of the CloudFormation template in Step 5.
Step 4 – Prepare the Azure python modules package and upload to S3
- Download the python3-azure-modules.sh
- Open AWS CloudShell and run
nano azurepackage.shto create a new bash script. - Copy paste the contents of python3-azure-modules.sh into nano and save (Ctrl+s) the file and exit nano (Ctrl+x).
- Run
chmod +x azurepackage.shto give the execute permissions to the file. - Run
./azurepackage.shto execute the script. - Download the python3-azure-modules.zip from CloudShell to your local machine.
- Select the Actions dropdown menu in your CloudShell session, choose Download file.
- Enter
/home/cloudshell-user/dockerimages/python3-azure-modules.zipand choose Download as shown in Figure 5 .
Figure 5: Download Azure Python module package from AWS CloudShell
Note:- To learn how to manually package custom python modules, please see Create a custom Lambda Layer with Azure Python Modules using CloudShell
- Next, open the Buckets page of Amazon S3 console.
- Choose Create bucket.
- Under Bucket type, choose General purpose.
- For Bucket name, enter a unique name for your bucket.
- Under Block Public Access settings for this bucket, choose the Block all Public Access.
- Under Default encryption, choose the default encryption, Amazon S3 managed key (SSE-S3). Note: If you wish to use an SSE-KMS Key or DSSE-KMS Key you will need to update the CloudFormation Template and code of the Lambda Function accordingly.
- Choose Create bucket.
- In the console, open your newly created bucket and choose Upload.
- Choose Add files and select the python3-azure-modules.zip file from your local computer.
- Choose Upload.
Step 5 – Deploy the CloudFormation Template
- Download Cfn-Deploy-Azure-PatchVMWithRollback.yml.
- Open the Stacks page in the CloudFormation console and select Create stack.
- Under Specify template, choose Upload a template file.
- Under Upload a template file, select Choose file.
- Select the Cfn-Deploy-Azure-PatchVMWithRollback.yml file from your local computer.
- Choose Next.
- Enter Azure-PatchVMWithRollback for the Stack name.
- In the Parameters area, do the following:
- Choose Next.
- On the Configure stack options page, choose Next.
- On the Review and create page, accept the option “I acknowledge that AWS CloudFormation might create IAM resources“.
- Choose Submit.

Figure 6: CloudFormation stack output
The setup of Azure and Systems Manager is now complete and ready to execute the solution.
Execute the Automation document
- Open the Automation page in the Systems Manager console.
- Choose Execute Automation and select the Owned by me tab.
- Locate and open the Azure-PatchVMWithRollback document.
- Choose Execute Automation and Simple Execution.
- For Input Parameters, do the following
- Instance Ids, select the managed instance id for the Azure Virtual Machine (starting with mi-*).
- Under AutomationAssumeRole, select Azure-PatchVMWithRollback-AWSSystemsManagerAutomationRunbook-* from the drop down list.
- Enter a value for SleepDuration, default value is 30 sec. The AssertSnapshotProvisionStatus step will retry 3 times before exiting with a failed status. If necessary, increase the SleepDuration to accommodate VMs with busy or large root volumes that take a longer time to snapshot (e.g.: For 5mins, enter
PT5M).

Figure 7: Automation Runbook input parameters
- Choose Execute.
In a successful execution, Step 10 will delete the snapshot as shown in Figure 8.

Figure 8: Successful patching execution steps
In a failed execution, Step 10 will restore the root disk as shown in Figure 9.

Figure 9: Failed patching and rollback execution steps
You can view the actions performed by the Lambda Function by accessing the Activity Log of the Azure VM in the Azure Portal.
- Open the Azure Portal and locate the Resource Group of Azure VM.
- Select the VM and under the properties, you will see the restored disk in the format {VMName} -restored-{patch execution date} as shown in figure 10.

Figure 10: Restored Disk in Azure portal
- Select Activity Log to view the recent activity. Here you will find all the operations initiated by the AzureManagedDiskSnapshots Lambda Function to create the pre-patch snapshot and revert the root volume in case of patch failure, as shown in figure 11.

Figure 11: Azure Activity log
Clean Up
Azure Clean up
- Delete the App Registrations in Microsoft Entra ID portal
- Sign in to the Microsoft Entra admin center as at least a Cloud Application Administrator.
- Select the Identity menu option, followed by Applications, then select App registrations.
- Select the All applications tab and then select AppReg-AzureManagedDiskSnapshots.
- Select the Delete button.
- On the Delete app registration blade, choose Delete.
- Delete the Azure VM and its attached resources.
AWS Clean up
- Delete the S3 Bucket
- Empty all objects from the bucket created in Step 4.
- Then, from the Buckets page of Amazon S3 console, choose Delete bucket.
- Enter the bucket name and choose the Delete bucket to confirm deletion.
- Delete the CloudFormation Stack
- Open the CloudFormation console
- Select the Stack name
Azure-PatchVMWithRollback - Choose Delete.
- Choose Delete again to confirm the deletion of the stack.
- Delete the Parameters for the App Registration in Parameter Store
- Open the Parameters page of Systems Manager console.
- Select the check marks for the
client_id,tenant_idandclient_secret - Choose Delete.
- Choose Delete parameters to confirm the deletion.
Conclusion
AWS can help you successfully manage your Cloud Operations in a multicloud environment. In this post, we demonstrate how you can further extend your cloud operations by building Automation documents in Systems Manager that integrate with Azure Resource Manager to control Azure resources using a Lambda Function.
Lambda is an extremely useful service that is frequently used to combine AWS Services together to create a custom solution. Lambda can be extended to work with the APIs of almost any platform, by importing their python modules or other supported languages, to create solutions for use cases like workflow automation, observability, data retrieval and much more.
The use case described in this post can be replicated to work with Google Cloud Compute or VMware Virtual Machines or to create Automaton Runbooks that enables System Manager to interact with other services like Azure SQL or Google Cloud SQL. These use cases also aren’t limited to Systems Manager. For example, the data sources feature of CloudWatch uses Lambda to pull metrics from Azure Monitor, or to pull configuration data into AWS Config to simplify compliance.
This blog provides you with a template for how you can create a solution to your multicloud use cases. Why not Leverage the techniques described in this post to build your own multicloud automation and operational visibility across AWS, Azure, Google Cloud, and more.