AWS Cloud Operations Blog
View multi-account Service Quotas Increase using AWS CloudTrail Lake
In this post, you’ll learn how to find all of the Service Quotas that were modified across all accounts and regions using AWS CloudTrail Lake. The solution uses AWS CloudTrail’s new feature CloudTrail Lake to analyze CloudTrail events.
This solution can help customers be proactive in scenarios including:
- Workload promotion from lower environment to Production environment by helping teams have visibility to modified Service Quotas in lower environment.
- Visibility to the cloud governance team on requested Service Quotas changes.
- Helping the IT Operations team during troubleshoot to identify “what” changed.
- Assisting in IT Service Management Change Management processes by providing before and after change results.
Customers request to modify Service quotas using AWS Service Quotas in a region and account to which they are logged in. With Service Quotas, you can view and manage your quotas for AWS services for an account in a region. If you have to know all Service quota changes across all regions and all accounts then you have to log into each account and check into each region. This solution will provide you consolidated list of Service quota changes by using CloudTrail Lake.
If you are creating event data store for first time, please refer this blog. CloudTrail Lake has a feature to copy existing trail events into event data store to create a point-in-time snapshot of events logged to the trail. You can also refer this blog to learn more on how to copy existing trail events.
We’ll utilize the AWS Console and AWS Command Line Interface (AWS CLI) to demonstrate how to query CloudTrail Lake to identify all of the requested Service Quotas to increase requests across all of the accounts and regions. Furthermore, we’ll demonstrate a solution which will leverage AWS Lambda and AWS Step Functions to notify periodically with modified Service Quotas.
Prerequisites
The following prerequisites are necessary to follow along with this post:
- If you’re using CloudTrail Lake for the first time, then follow these steps to create an event data store. Only Management events are required for this solution.
- You can install or upgrade AWS CLI using this document.
- You should have at least one service quota request.
- Access to create an AWS Cloud9 environment to deploy the AWS Cloud Development Kit (AWS CDK) solution.
- Run AWS Configure command in your terminal, and if you’re using AWS CLI for the first time, then see the following:
Run AWS Configure and provide the Access Key ID and Secret access key for your terminal to connect to your AWS Account.
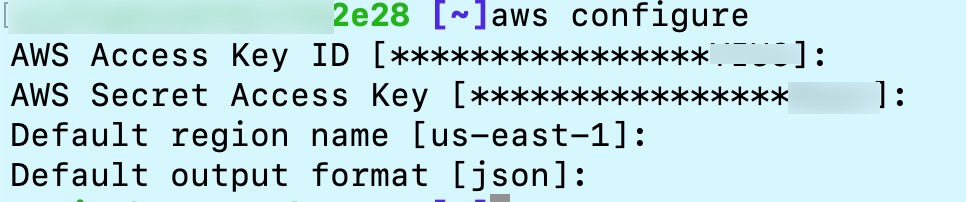
Figure 1. AWS Configure on Terminal.
Step 1: Log in to your AWS account, access CloudTrail, and select Lake on the left navigation.
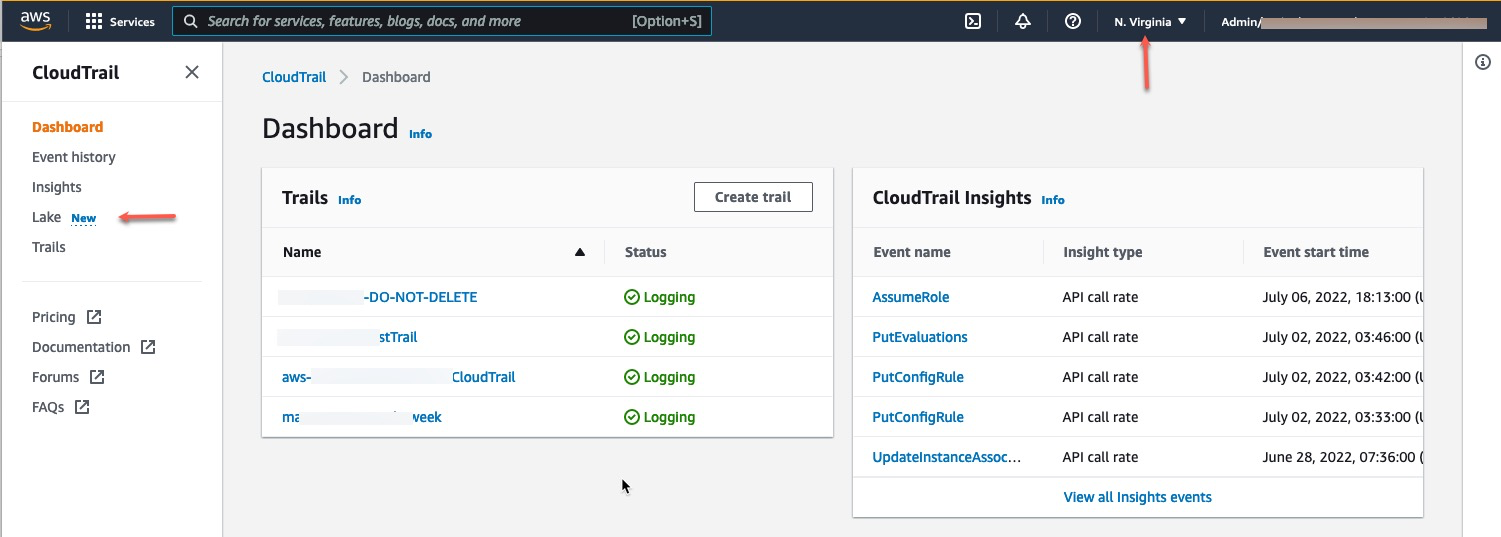
Figure 2. Log in to AWS account and access CloudTrail.
Step 2: Make sure that you’re in the same region where CloudTrail Lake was created. If you have created the event data store in a different region than where you’re logged in, then you won’t see event data store.

Figure 3. event data store is available in the connected region.
Step 3: In the editor pane, paste the following query and enter event data store ID as shown in your console. Execute your query after replacing <Event_Data_Store> with your data store ID.

Figure 4. Paste query in the query editor section.
Let’s run the same steps above in AWS CLI. We must find Event Data Store ID using aws cloudtrail list-event-data-stores to find the CloudTrail Lake event data store ID information. We’ll use this information to run the query throughout the post. Let’s refer to this as the event data store step.

Figure 4.1. Find event data store ID information.
Run the following Query on AWS CLI and replace <EVENT_DATA_STORE_ID> with Data store ID information from the previous step.
On AWS CLI, you’ll get QueryID as a response for running above query. We’ll utilize this QueryID to find the query status, metadata, and output. Let’s refer to this step as the QueryID Step.

Figure 4.2. Run Query CLI.
Let’s review the query result output and details in the bottom section of the console. First, we’ll review “Command Output”, which talks about query metadata, and then we’ll review “Query Results”.
Step 4: In the bottom section of the screen, under the command output section, check for the status of the query. This section will show some other useful information, such as how many records matched, the amount of data scanned, and at what throughput.
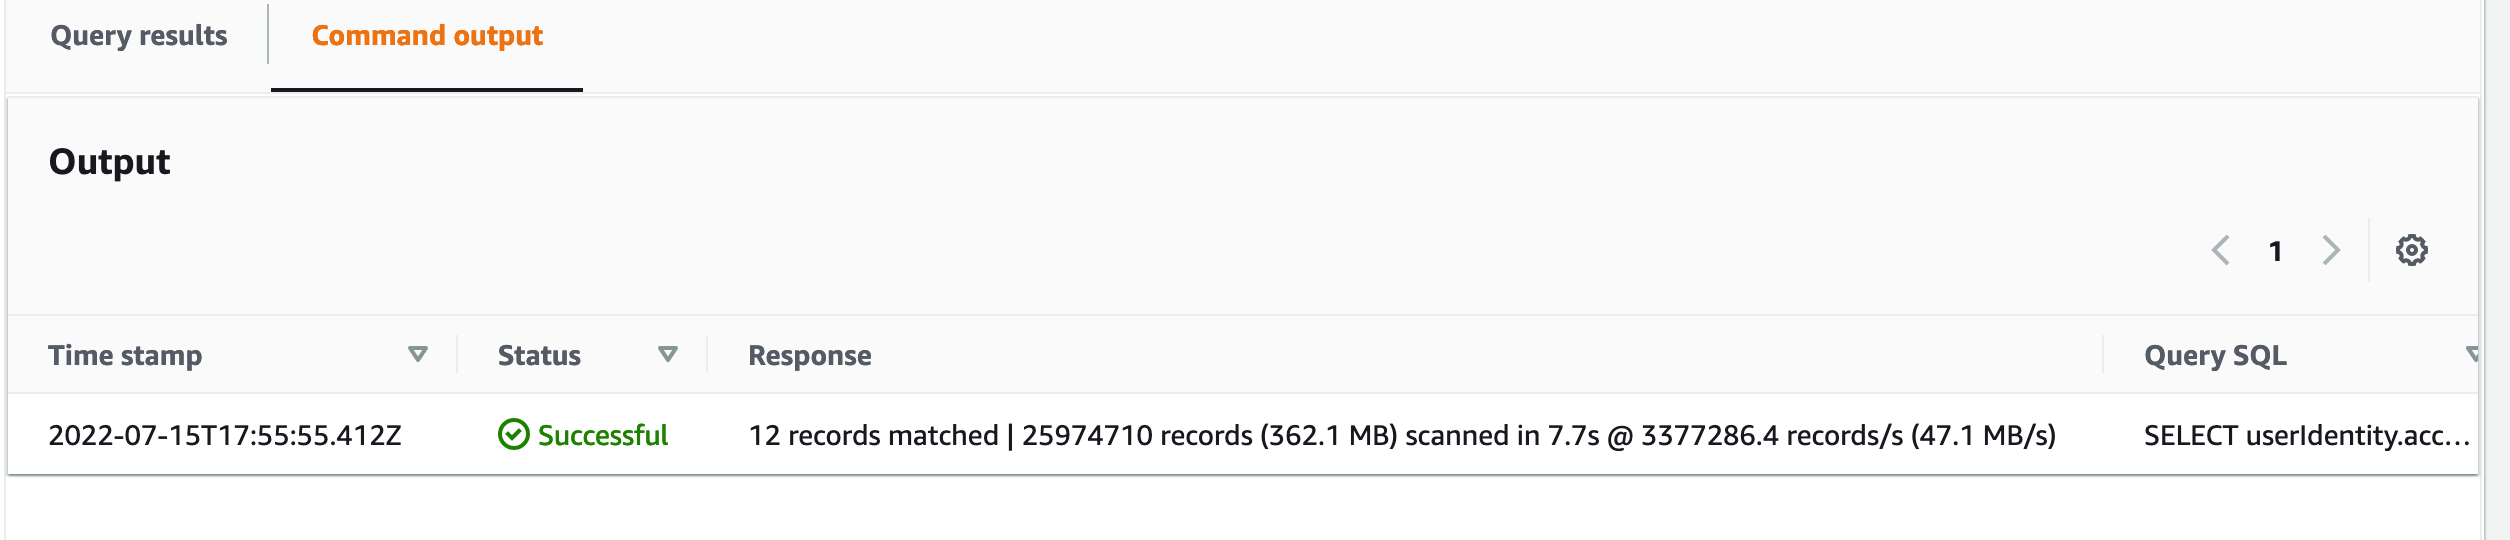
Figure 5. Query output showing status of query execution and response details.
Now, let’s see how you can get the query status and metadata via AWS CLI.
Run the following command to find the query status and metadata from the query run. Replace <EVENT_DATA_STORE_ID> value with Event data store step output and <QUERY_ID> value with the QueryID step from above.

Figure 5.1. Run Describe-query command to check status and output meta data.
Step 5: We’ve reviewed “Command Output” and looked into the metadata of the query run. Now let’s review the “Query Output” tab. This tab will show the result of the query, and we can see the requested Service Quotas values for each AWS account under each region for different AWS Services.
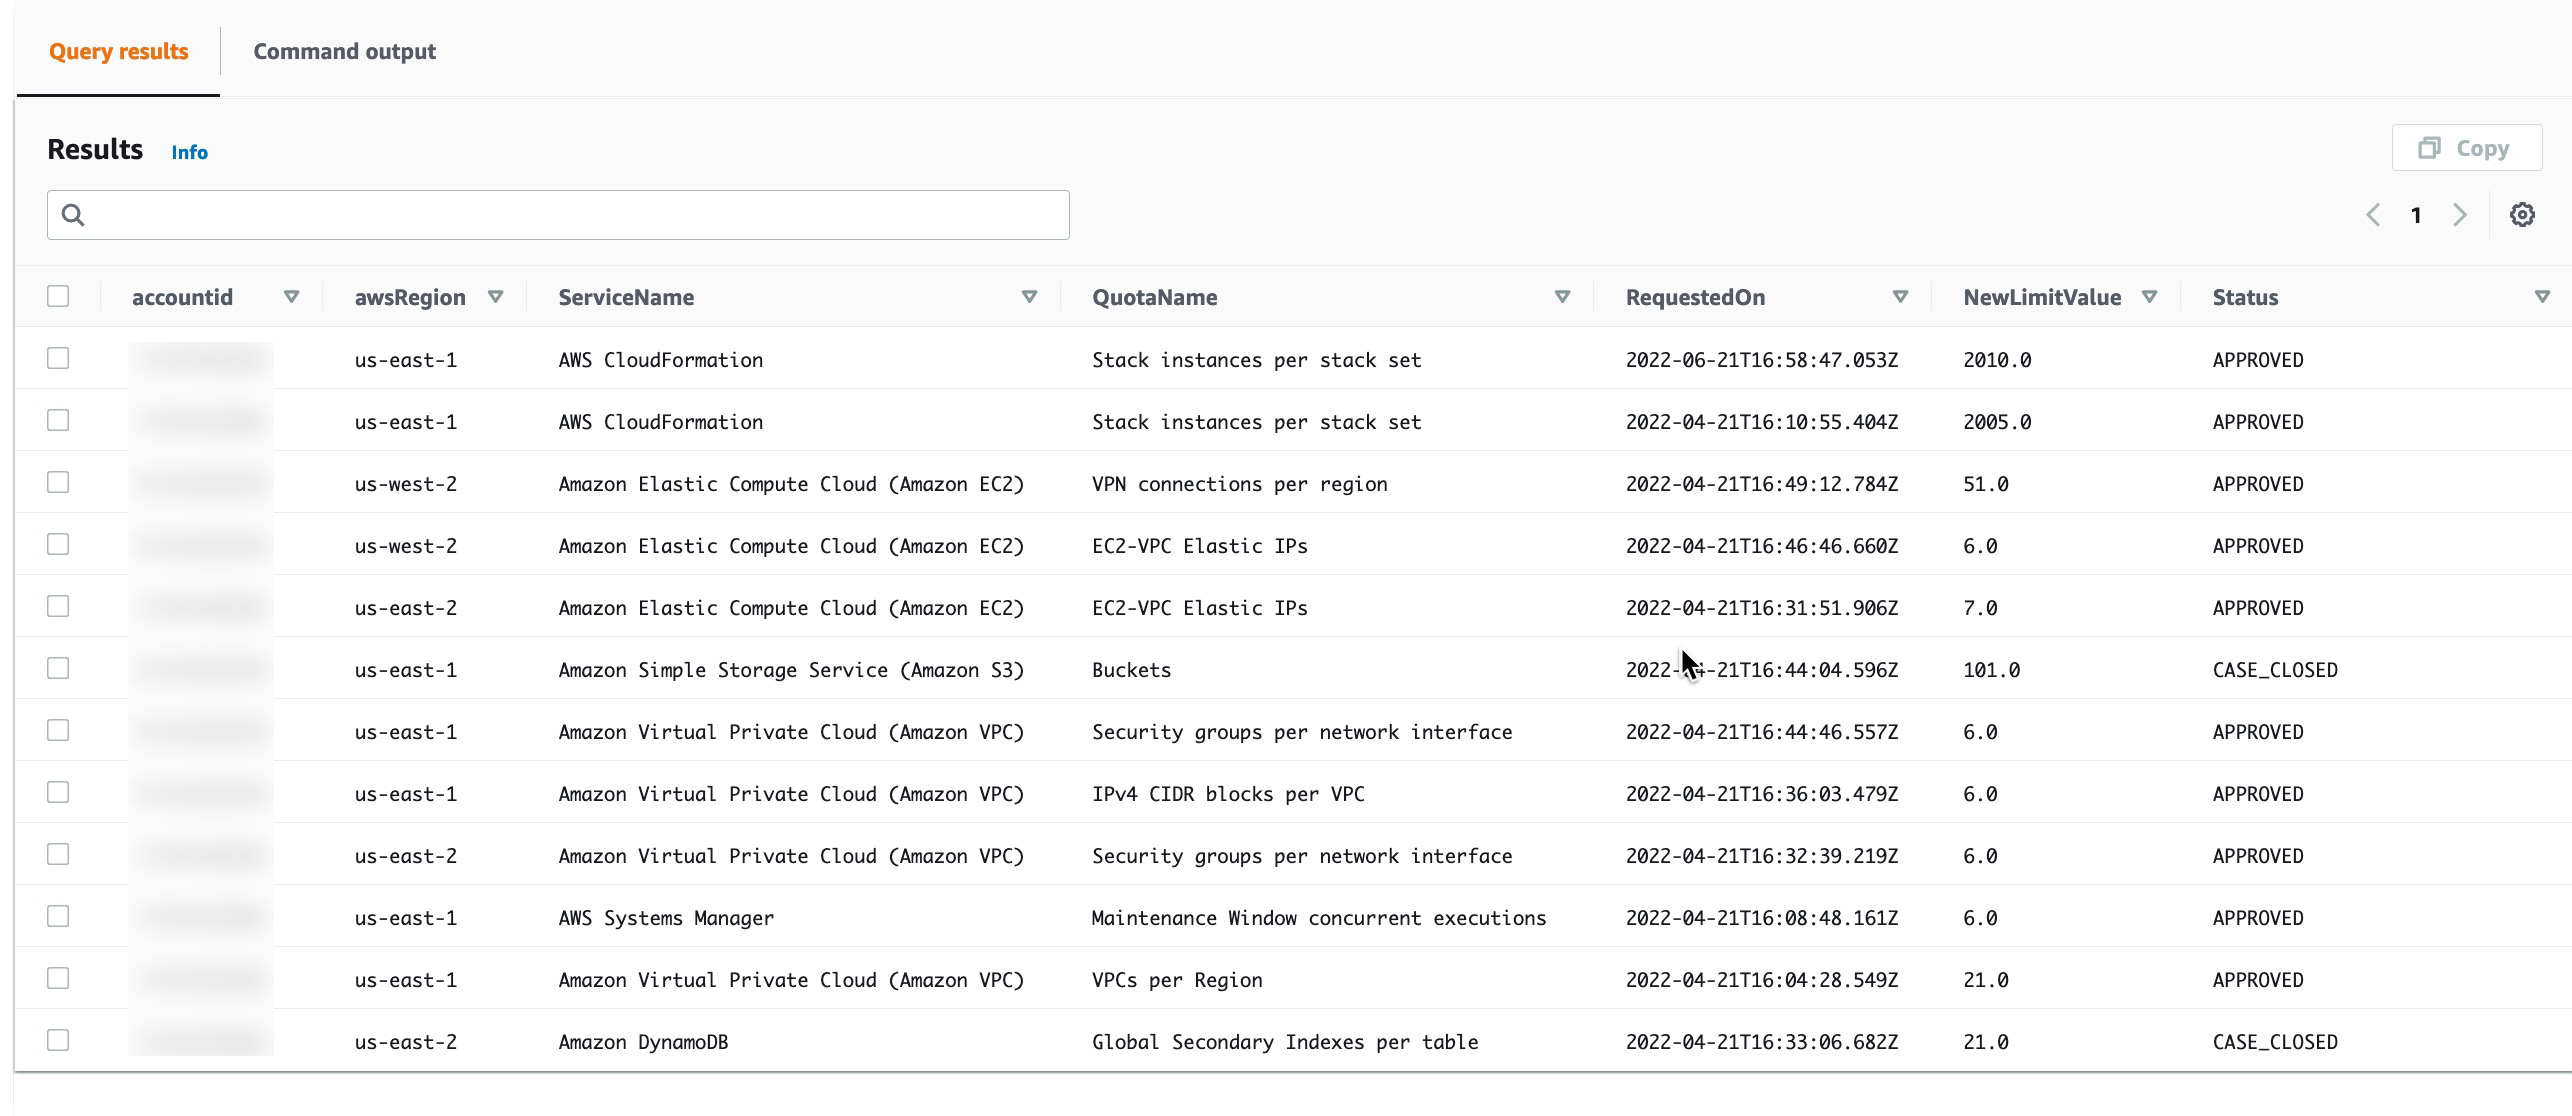
Figure 6. Output result shows requested Service Quotas for different accounts under different regions for different AWS Services.
For AWS CLI, run the following command to get the query result. Replace <EVENT_DATA_STORE_ID> and <QUERY_ID> from the Event data store step and QueryID step from previous commands that we ran.

Figure 6.1. Run get-query-results to get result of query.
Now that we’ve demonstrated how you can use the Console and AWS CLI to query CloudTrail Lake to find the information that you need from Service Quotas, we’ll show you how to automate the queries on a schedule and integrate them into your business processes.
Automating the CloudTrail Lake query process
The CloudTrail Lake Orchestrator solution uses Lambda and Step Functions to orchestrate complex CloudTrail Lake queries. Lambda is a serverless, event-driven compute service that lets you run code for virtually any type of application or backend service without provisioning or managing servers. Step Functions is a low-code, visual workflow service that developers use to automate IT and business processes.
The architecture for the CloudTrail Lake Orchestrator is as follow:
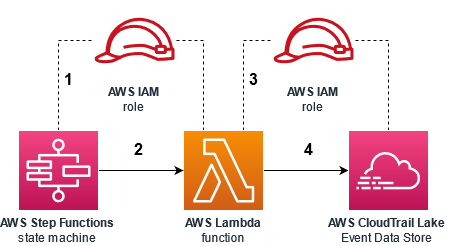
Figure 7. Architecture diagram showing the AWS services and interaction points of the CloudTrail Lake Orchestrator solution.
The interaction points are as follows:
- A Step Functions state machine assumes an AWS Identity and Access Management (IAM) role that gives it permission to invoke the Lambda function.
- The state machine invokes the function one or more times, as configured by the business logic defined by the state machine. Parameters are passed from the state machine into the function that tells it how to query CloudTrail Lake.
- The Lambda function assumes an IAM role that gives it permission to query the CloudTrail Lake event data store.
- The Lambda function queries the CloudTrail Lake event data store with the information that was given, and returns the results back to the state machine for further business logic.
After you deploy the solution, look at the sample state machine in the Step Functions console. This state machine implements the business logic of the application. It’s represented visually for the ease of development and troubleshooting executions. The following image is the visual representation of the state machine in the Workflow Studio editor.
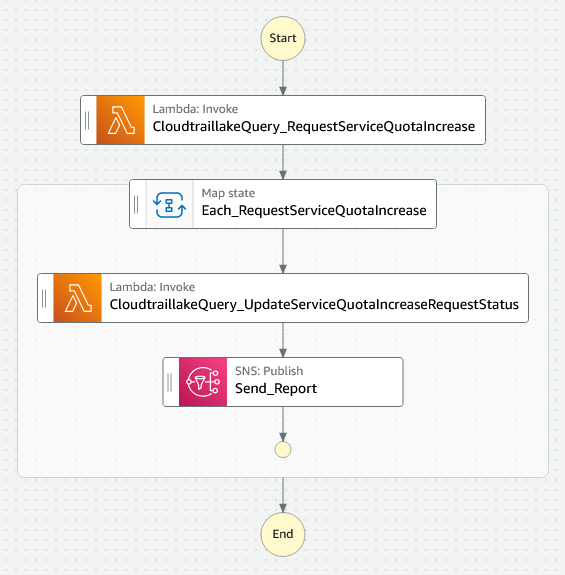
Figure 8. Visual representation of the CloudTrail Lake Orchestrator state machine in Step Functions Workflow Studio.
Similar to the manual queries outlined in the beginning section of this post, it makes queries to CloudTrail Lake to determine the Service Quotas that have been requested to be increased. Then it iterates on each of those quotas to determine the status of each request. The state machine will finally send a message to Amazon Simple Notification Service (Amazon SNS), which you’ll receive via email. We’ll walk you through this.
Deploy the solution
There are two ways to deploy this solution.
Option 1 – Deploy with CloudFormation Launch Stack URL
To deploy the solution in your account without incorporating changes to your state machine back into your version control and deployment processes:
- Download this CloudFormation template to your computer
- From the CloudFormation console, select the same region that your CloudTrail Lake event data store is located
- Create a new stack and choose option With new resources (standard)
- Choose Upload a template file, and then click Choose file. Upload the CloudFormation template that you downloaded in the first step.
- Click Next
- Enter your CloudTrail Lake event data store ARN into the CloudtraillakeEventDataStoreArn parameter
- Enter your email address into the NotifyEmailAddress parameter
- Specify a name for your stack, and then click Next, and then click Next again.
- Check the box next to I acknowledge that AWS CloudFormation might create IAM resources, and then click Submit
Option 2 – Deploy and customize with CDK
To deploy the solution using CDK, which allows you to incorporate customizations to your state machine and save those changes to version control, we recommend using AWS Cloud9. AWS Cloud9 is a cloud-based integrated development environment (IDE) that lets you write, run, and debug your code with just a browser. It includes a code editor, debugger, and terminal. AWS Cloud9 comes prepackaged with the essential tools required for deploying and maintaining this solution. These tools include the following:
- AWS CDK – The AWS CDK is an open-source software development framework to define your cloud application resources using familiar programming languages.
- Git libraries to run GIT commands.
From your AWS Cloud9 IDE, find the bash shell window and run the following command to clone the Github repository and navigate to the CloudTrail Lake Orchestrator solution:
Edit the config.ts file under AWSCloudTrail/cloudtraillake-orchestrator
- Replace the CloudtraillakeEventDataStoreArn variable with your CloudTrail Lake Event Data Store Arn.
- Replace the NotifyEmailAddress variable with your email address.
- Save the file.
In the bash terminal from the aws-management-and-governance-samples/AWSCloudTrail/cloudtraillake-orchestrator directory, run the following:
When prompted Do you wish to deploy these changes (y/n)? Review the IAM changes and type y.
Post deployment steps
The AWS CDK solution will create an Amazon SNS topic and subscribe your email address to the topic.
- Check your email now to confirm the subscription.
Once the solution is successfully deployed, the Step Functions state machine, Lambda function, and IAM roles will exist in your AWS account. You can view the function in the Lambda console, the state machine in the Step Functions console, and the roles in the IAM console.
Test the state machine
From the Step Functions console, select State Machines, and select the CloudtraillakeOrchestrator state machine.
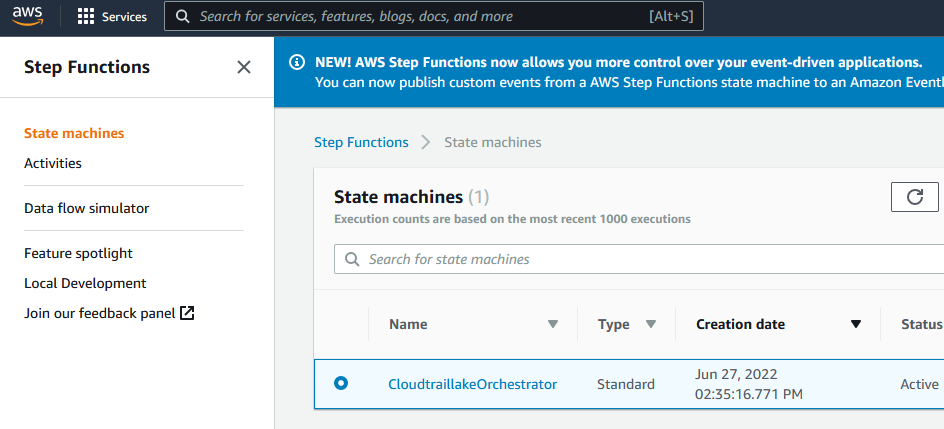
Figure 9. Step Functions console with the newly deployed CloudtraillakeOrchestrator state machine.
Select the Start execution button.

Figure 10. Select Start execution button.
You don’t need to modify the Input. Select Start execution again.
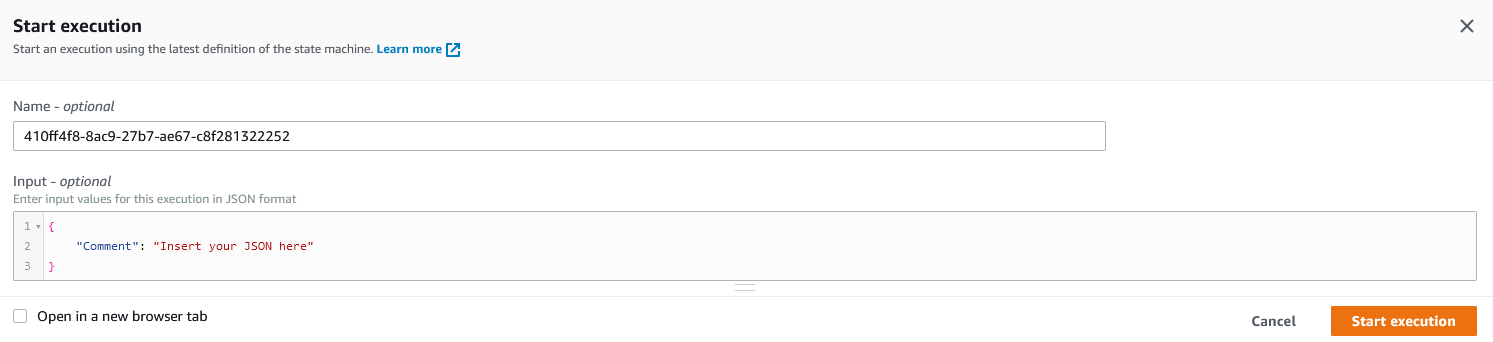
Figure 11. Keep defaults as is and select Start execution button.
You’ll see the result of the execution.
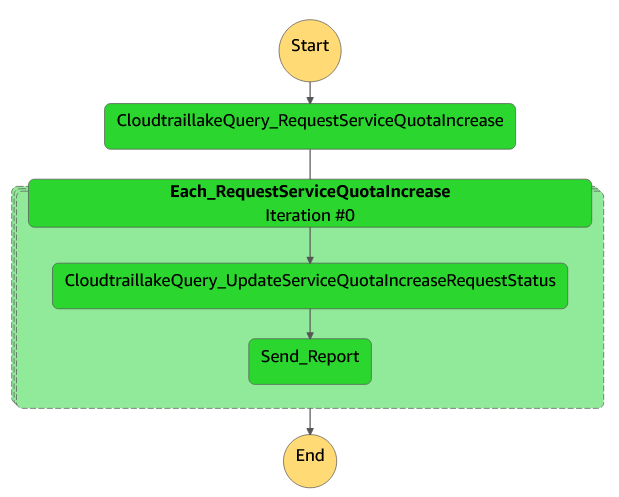
Figure 12. Step function execution results.
Depending on which Service Quotas in your environment have been requested or modified, you will see the results in the input of the Send_Report state. If there are multiple quotas in your environment, then you must look at each iteration of the Each_RequestServiceQuotaIncrease map state.
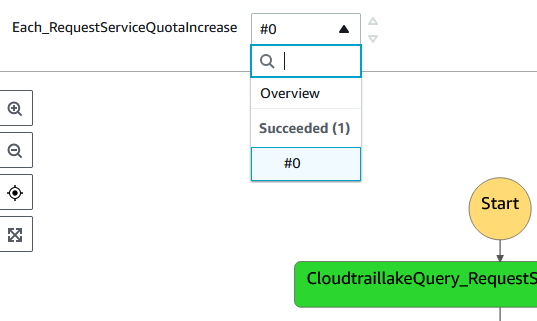
Figure 13. Each Service Quota Increase request will display as iteration line item.
How the solution works
Select Edit state machine, and then select Workflow Studio.
Select the Lambda invoke state: CloudtraillakeQuery_RequestServiceQuotaIncrease. Notice how it’s configured to invoke the CloudTrailLakeQuery function, and look at the payload.
It’s passing your event data store ID as a parameter to the function instead of including it as part of the SQL query.
SQL query is designed to look for RequestServiceQuotaIncrease events, as well as return the requestQuota IDs as a list. This makes it easy for the subsequent map state to iterate on each of the requestQuota IDs.
Next, select the CloudtraillakeQuery_UpdateServiceQuotaIncreaseRequestStatus
Lambda invoke state. Notice how it’s configured to query the same Lambda function as the prior.
Now look at the Payload:
This time the SQL is looking for UpdateServiceQuotaIncreaseRequestStatus event IDs relevant to the requestQuota ID from each iteration.
In summary, the Lambda function is simple. It makes it easy to make queries to CloudTrail Lake in a way that enables integration with other services, including Step Functions. This allows you to build flexible and powerful business logic workflows to achieve your desired business results. After the state machine completes the process, an email will be sent to the configured email address with modified service quota details.
Conclusion
This post demonstrates how to use the CloudTrail Lake feature to query CloudTrail events from all of the accounts in your organization across multiple regions. I recommend exploring CloudTrail Lake and querying CloudTrail events during troubleshooting to find who did what right before an incident occurred, and many other scenarios.
About the authors: