Networking & Content Delivery
Building production-ready DNS infrastructure with AWS CDK
DNS outages have immediate and severe ripple effects on enterprise infrastructure, yet many Amazon Web Services (AWS) organizations still manage Amazon Route 53 configurations manually instead of using infrastructure as code (IaC) tools such as AWS Cloud Development Kit (AWS CDK). Consider a common scenario: an engineer accidentally deletes a critical DNS record while troubleshooting. The team scrambles to remember the exact configuration. Was it an A record or a CNAME? What was the IP address? What was the TTL? Now you’re recreating records from memory, instead of from a definitive point in time.
Manual DNS management through the console lacks version control, making recovery from these incidents time-consuming and error prone. Organizations implementing IaC for DNS management report Mean Time to Recover (MTTR) improvements, with automation reducing recovery times by up to 90%. This scenario plays out in organizations every day, but there’s a better way.
The problem with manual DNS management
Organizations managing DNS through the AWS Management Console face several challenges:
| Challenge | Impact | Result | Risk priority |
|---|---|---|---|
| Slow rollback | Minutes to hours to manually fix mistakes | Extended outages | High |
| No version history | Can’t see who changed what or when | Lost audit trail | High |
| Human errors | Typos in records cause production incidents | Revenue loss | Medium |
| No testing | Changes go direct to production | High risk for outage | High |
| Configuration drift | Infrastructure doesn’t match documentation | Team confusion | Medium/Low |
| Knowledge silos | Only 1-2 people know DNS configuration | Single point of failure | Medium |
Solution overview
In this post, we demonstrate how to build production-ready Route 53 DNS using IaC with the AWS CDK and Python. You can implement Route 53 hosted zones with:
- Support for Route 53 public and private hosted zones
- All DNS record types (A, CNAME, MX, TXT, SRV, and more)
- Amazon CloudWatch monitoring and alerting
- Git version control
By the end, you can reduce DNS incident recovery time from 30-60 minutes to less than 3 minutes, while preventing configuration errors before they reach production.
Code examples
All code examples are available in the GitHub repository.
AWS CDK transforms DNS management by treating infrastructure as software. Instead of clicking through the Console, you define your DNS configuration using Python.
Create a hosted zone with monitoring:
dns_zone = DnsZoneConstruct(
self, "DnsZone",
domain_name="example.com"
)
Add records with type-safe APIs:
dns_zone.add_a_record("api", "1.2.3.4")
dns_zone.add_cname_record("www", "example.com")
Managing DNS infrastructure through code has become essential for modern cloud operations, yet teams still rely on manual console configurations or static AWS CloudFormation templates. AWS CDK offers an approach for version-controlling DNS resources, which brings software engineering best practices to infrastructure management.
Advantages of using AWS CDK:
- Type safety: The AWS CDK Python type hints catch configuration errors during development, before they reach production. When managing Route 53 hosted zones or record sets, type checking means that you’re passing valid values – removing the trial-and-error approach common with YAML-based CloudFormation templates.
- IDE support: Modern IDEs provide autocomplete and inline documentation for AWS CDK constructs, which speeds up DNS configuration. Instead of searching through CloudFormation documentation, developers get instant access to available properties, methods, and examples directly in their editor.
- Reusable constructs: Build DNS configuration patterns once and share them across all teams. Whether it’s a standard multi-Region failover setup or a common subdomain delegation pattern, AWS CDK constructs encapsulate best practices and provide consistency across your organization’s DNS infrastructure.
- Testability: Write unit tests for your DNS configurations just like application code. Validate that your Route 53 records point to the correct endpoints, verify failover configurations, and ensure compliance requirements are met – all before deployment.
- Python-native workflows: Python developers can use their existing skills instead of learning YAML syntax or navigating the Console. This reduces onboarding time so that teams can apply familiar programming patterns such as loops, conditionals, and functions to infrastructure code.
- Version control and governance: AWS CDK code lives in Git alongside your application code. Every DNS change is tracked, reviewed through pull requests, and can be rolled back to previous versions if needed. This provides the governance and collaboration capabilities that are essential for production environments.
After implementing this solution, organizations observe the following improvements:
| Metric | Before (Manual) | After (IaC) | Improvement |
|---|---|---|---|
| Configuration errors | 2-3 per month | 0 | 100% reduction |
| Incident recovery time | 30-60 minutes | 2-3 minutes | 95% faster |
| DNS change deployment | 15-30 minutes | 2-3 minutes | 90% faster |
| Audit compliance | Manual tracking | Automatic | Full compliance |
| Team productivity | Blocked on DNS changes | Self-service | More deployments |
Solution architecture
The following figure shows what you build:
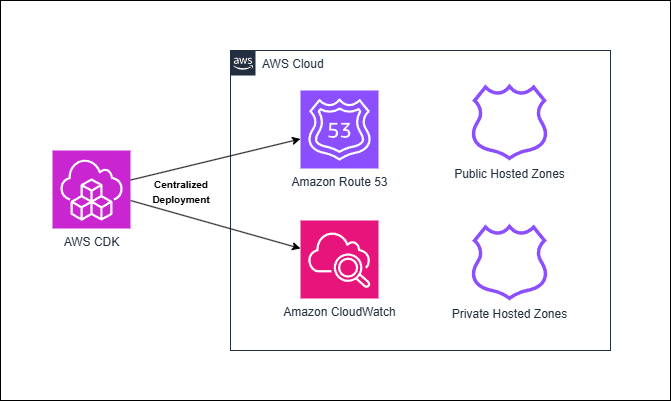
Figure 1: Centralized deployment of Route 53 DNS with AWS CDK
How the solution works
The infrastructure is organized into three layers:
1. Reusable constructs (building blocks)
Located in dns_constructs/ – Pre-built components you don’t need to modify:
dns_zone.py: Creates Route 53 hosted zones with helper methods for adding DNS recordsmonitoring.py: Sets up CloudWatch dashboards, alarms, and DNS query logging
2. Your configuration (where you make changes)
Located in stacks/single_domain_stack.py – The file you edit to configure your DNS:
- Define which domain to manage
- Add your DNS records (A, CNAME, MX, TXT, etc.)
- Configure monitoring settings
- Choose public or private zone
3. Deployment entry point
Located in app.py – Instantiates your stack and handles deployment:
- Reads domain name from command-line parameters
- Creates the stack with your configuration
- Manages multiple domains if needed
Your workflow
- Edit
stacks/single_domain_stack.pyto add your DNS records - Run
cdk deployto deploy your changes - All infrastructure is stored in Git for version control and rollback
This separation means that you only edit configuration files, while the complex AWS CDK logic is handled by reusable constructs.
Prerequisites for Route 53 DNS automation
Before you begin, make sure that you have the following:
- AWS account with appropriate permissions (create one)
- Python 3.10+ (download)
- Node.js 18+ for AWS CDK CLI (download)
- AWS Command Line Interface (AWS CLI) configured (setup guide)
- AWS CDK configured (setup guide)
- A registered public domain name (optional for public zone testing)
- 20-30 minutes to deploy the solution
New to CDK? Check out Getting Started with AWS CDK.
IAM permissions
When using AWS CDK, your AWS Identity and Access Management (IAM) user or role needs permissions for AWS CloudFormation, Amazon Route 53, CloudWatch, Amazon Simple Storage Service (Amazon S3), and IAM. For development, use AdministratorAccess. For production, use a least-privilege policy (see iam/iam-policy.json in the GitHub repository for an example).
Key permissions required:
- CloudFormation: Stack operations (create, update, delete, and describe)
- Route 53: Hosted zone and record management, VPC associations
- CloudWatch: Dashboards, alarms, and log groups
- Amazon Simple Notification Service (Amazon SNS): Topic creation for DNS alerts
- Amazon S3: AWS CDK asset storage
- Amazon Elastic Compute Cloud (Amazon EC2): VPC lookups (for private zones)
CDK setup
Install AWS CDK CLI:
npm install -g aws-cdk
cdk --version
Configure AWS credentials:
AWS CDK requires AWS credentials to deploy infrastructure. Configure credentials using the AWS CLI:
aws configure
Verify that AWS credentials are configured:
aws sts get-caller-identity
Bootstrap AWS CDK (one-time per account/Region):
cdk bootstrap
The CDK bootstrap command creates an S3 bucket and other resources needed for AWS CDK deployments. Run this once per AWS account and Region.
Implementing Route 53 DNS zones with AWS CDK
Step 1: Set up the project
Clone the repository:
git clone git@ssh.gitlab.aws.dev:tracyhon/route53-iac.git
cd route53-iac
Install dependencies:
pip install -r requirements.txt
pip install -r requirements-dev.txt
Step 2: Configure your DNS records using the included script
Open stacks/single_domain_stack.py. This is the file that you edit to configure your DNS records. The file includes sample records to get you started. You can comment those out or edit them using the DNS record types that you want to create. The following shows what you must customize in this file:
- DNS records (lines 70-90): Add, remove, or modify A, CNAME, MX, TXT records for your domain
- IP addresses: Replace
"1.2.3.4"with your actual server IPs - Subdomains: Add records for
api,www,mail, or any subdomain you need - Email configuration: Update MX records with your mail server details
Use an empty string
""for root domain records (e.g.,example.com), not"@". AWS CDK handles the root domain automatically. The GitHub repo includes examples.
This is the only file you need to edit to configure your DNS. The constructs in dns_constructs/ handle all of the complex AWS CDK logic.
Step 3: Deploy your infrastructure
First, preview the stack to observe what is built:
- Preview before deploying (recommended):
cdk diff DnsStack-dev -c domainName=example.com - Preview the CloudFormation template before deploying:
cdk synth DnsStack-dev -c domainName=example.com
After reviewing the preview, deploy the stack:
- Deploy to AWS:
cdk deploy DnsStack-dev -c domainName=example.com - Wait for deployment to complete (about 2-3 minutes). AWS CDK does the following:
- Creates the Route 53 hosted zone
- Adds your configured DNS records
- Sets up CloudWatch monitoring
If using a public hosted zone, update your domain registrar’s nameservers. Copy the nameserver values from the NameServers output and update them at your domain registrar (for example GoDaddy, Namecheap, or Route 53 Registrar).
Use a subdomain such as dev.example.com for your first deployment to avoid affecting production DNS.
Go to the README for complete deployment documentation and the stacks/private_example_com.py file for a complete custom stack example.
Verify your deployment
After deployment completes, verify your resources:
1. Check CloudFormation stack outputs:
aws cloudformation describe-stacks \
  --stack-name DnsStack-dev \
  --query 'Stacks[0].Outputs' \
  --output table
Look for:
HostedZoneId: Your Route 53 zone IDNameServers: Nameservers to configure at your registrar
2. Test DNS resolution:
dig is pre-installed on most Linux distributions. To check, run dig -v in the terminal. If it isn’t found, install it using sudo apt install dnsutils (Debian/Ubuntu) or sudo dnf install bind-utils (Fedora/RHEL/CentOS).
If you’re using Windows, you can install dig or use the Windows tool nslookup.
# Test root domain
dig @8.8.8.8 example.com

# Test API subdomain
dig @8.8.8.8 api.example.com

# Test CNAME record
dig @8.8.8.8 www.example.com
3. Check the CloudWatch dashboard:
- Navigate to: CloudWatch > Dashboards > DnsStack-dev-Dashboard
- Verify that the DNS query metrics are being collected
- Confirm that the alarms are in the OK state
Disaster recovery and auditing
Now that your DNS is code, you gain instant rollback, detailed audit trails, and the ability to test and deploy changes in a development environment first. Each commit serves as a backup point. Commits are distributed across team members’ environments and stored in remote Git repositories. Therefore, your DNS configuration remains recoverable even if your AWS account is compromised. You can tag milestones in Git to restore your DNS infrastructure to any point in time by checking out the desired tag and redeploying the stack. The following sections detail how to do each of these using AWS CDK and Git:
Instant rollback
Made a mistake? Roll back in seconds:
git revert HEAD          # Undo last change (5 seconds)
cdk deploy DnsStack-prod # Deploy previous state (2 minutes)
# Total recovery time: 2-3 minutes as opposed to 30-60 minutes manual
Complete audit trail
Every change is tracked:
# Who changed the API endpoint?
git log --grep="api" -- stacks/

# What changed during the incident?
git log --since="2024-12-01" --until="2024-12-02"

# Compare the current state with production
git diff main production
Safe testing workflow
Test changes before production:
git checkout -b feature/new-subdomain

# Make changes
cdk deploy DnsStack-dev  # Test in dev

# Create pull request for review
# After approval, merge and deploy to prod
Disaster recovery
Recover to a specific point in time:
# Tag important milestones
git tag -a v1.0-prod -m "Production DNS 2024-12-09"

# Later, restore from any point in time
git checkout v1.0-prod
cdk deploy DnsStack-prod
Cleaning up
To avoid ongoing charges, delete the stack when you’re done testing:
cdk destroy DnsStack-dev
This removes all resources except for the following:
- Domain registration (not managed by AWS CDK)
- Route 53 query logs (retained for compliance)
Estimated cost if left running: $0.50/month per hosted zone for the first 25 zones, and $0.10/month per added hosted zone after. For more details on Route 53 pricing, go to the Route 53 pricing page.
Conclusion
In this post, we demonstrated how to build production-ready DNS infrastructure using AWS CDK and Amazon Route 53. Using AWS CDK gives you version control needed for faster recovery and change management of your DNS. This included the following:
- Implement version-controlled DNS management with Git
- Enable instant rollback capabilities (recovering in 2-3 minutes instead of 30-60 minutes)
- Set up comprehensive monitoring with Amazon CloudWatch
- Maintain complete audit trails for compliance
You can extend this solution by implementing multi-account DNS architectures, adding health checks for failover routing, or integrating with CI/CD pipelines for automated deployments. For further reading, refer to the following resources:
- Complete code: GitLab repository
- AWS CDK: Developer Guide | Best Practices
- Route 53: Developer Guide | Routing Policies | Pricing
- Examples: Record Types | Routing Policies | Examples Directory
- IAM setup: IAM Policy | Deployment Role Template
About the authors

Jason Polce
Jason is a Senior Solutions Architect supporting Enterprise Financial Services customers, where he helps clients solve complex challenges using modern, cloud-based solutions. As a member of the AWS Networking community, he works closely with customers to tackle complex networking problems using his experience designing cloud-native, on-premises, and hybrid environments across various industries. When he’s not working, he enjoys traveling the world, always seeking out new experiences to try.

Tracy Honeycutt
Tracy is a Solutions Architect Manager based in Atlanta, GA. Tracy leads a team focused on helping Restaurants, Retail, and Consumer Packaged Goods (RRCPG) customers accelerate their cloud journeys — from migration and modernization to adopting innovative solutions that drive business outcomes. With a specialty in networking, including Cloud WAN and DNS, Tracy is passionate about meeting customers where they are and guiding them through every stage of their cloud transformation.