Networking & Content Delivery
Building Zero Trust Access Across Multi-Account AWS Environments
Security teams managing multi-account Amazon Web Services (AWS) environments face significant operational challenges when implementing consistent access controls. Traditional approaches necessitate duplicating VPN infrastructure, managing separate bastion hosts in each account, and maintaining fragmented security policies across multiple applications. This operational overhead increases infrastructure costs and attack surfaces. This post walks you through implementing AWS Verified Access (AVA) in a centralized architecture while enforcing zero trust principles across your entire AWS organization.
Verified Access secures application access by evaluating each request based on user identity and device health rather than network location. Unlike network-based solutions, Verified Access operates at the application layer so that you can define granular access policies using the Cedar policy language. When deployed in a shared services model, Verified Access significantly reduces your attack surface by eliminating broad network exposure and centralizing policy management across multiple AWS accounts. You deploy Verified Access in a dedicated networking account, share access groups across Organizational Units (OUs) using AWS Resource Access Manager (AWS RAM), and integrate with AWS IAM Identity Center for centralized identity management.
Customer architecture
Figure 1 shows how workload accounts host private applications, a dedicated networking account manages the centralized Verified Access instance, and the management account provides organizational governance through AWS IAM Identity Center and AWS RAM.

Figure 1: Multi-account Verified Access architecture
The three workload accounts show different application patterns across OUs. The Data Science OU contains two accounts: Data Science Workload 1 hosts a web application behind an AWS Application Load Balancer (ALB), while Data Science Workload 2 runs an Amazon Aurora database cluster. The HR OU contains the HR Application account with a web-based human resources system. Each workload operates in private subnets within Amazon Virtual Private Cloud (Amazon VPC) environments, so that there is no direct internet exposure. Verified Access Groups determine which applications users can access, with each group containing their access policies and associated with Verified Access endpoints of the applications or resources. Verified Access supports both HTTPS and non-HTTPS applications, so that you can secure web applications, APIs, databases, and legacy systems through a unified access control plane.
The dedicated networking account hosts the centralized Verified Access instance that serves as the secure entry point for all remote access requests. This instance handles authentication and authorization for every connection attempt, evaluating user identity and device posture against defined policies before allowing traffic to reach backend applications. Access policies use the Cedar policy language to define fine-grained conditions based on user attributes, group membership and device compliance status. This approach ensures that access decisions consider multiple security factors rather than relying solely on network location.
The management account provides organization-wide governance through two key services. IAM Identity Center serves as the central identity provider, managing user accounts, group memberships, and authentication workflows across the entire organization. AWS RAM enables secure sharing of Verified Access Groups to specific OUs. This means that each business unit can create endpoints while inheriting appropriate security policies.
Key architecture benefits
- Centralized security management: The networking account manages all Verified Access resources, trust providers, and policies from a single location, reducing operational complexity and providing consistent security standards.
- Resource sharing: Verified Access Groups shared through AWS RAM allow OUs to create application endpoints while automatically inheriting appropriate security policies.
- Consistent policy enforcement: Uniform security policies apply across all business units and applications, eliminating configuration drift and security gaps that occur with distributed access management.
You must configure IAM Identity Center in organization mode from the management account to centrally manage user and group access across member accounts. For detailed configuration guidance, refer to the IAM Identity Center User Guide.
Setting up your environment
Before deploying this solution, complete these steps in your management account:
- Enable the Organization instance of IAM Identity Center in the AWS Region where you plan to deploy the solution.
- Create the following users and groups in IAM Identity Center following the IAM Identity Center User Guide.

- Enable resource sharing within your AWS Organizations using AWS RAM.
- Create the Organizational Structure
- Create a dedicated networking account for shared networking resources following the multi-account best practices
- Create OU: HR Team OU and Data Science Team OU
- Create member accounts: HR Application (in HR OU), and Data Science Workload 1 and 2 (in Data Science OU)
- Create Amazon Certificate Manager (ACM) SSL Certificate ARN for hrapp and dsapp provisioned in their respective accounts. You can use SSL Certificate issued by Trusted CA or Private CA (only recommended for Testing environment).
- If you want to create a private CA certificate for the “Testing only” environment, then you can use following process. This process creates a private CA certificate for the “hrapp” and “dsapp” application domain names, and uploads it to ACM.
- Create a private key using openssl:
openssl genrsa -out private.key 2048The command generates a secure 2048-bit RSA private key and saves it to a file named ‘private.key’.
-
- Generate the certificate using the private key:
openssl req -new -x509 -nodes -sha1 -days 365 -extensions v3_ca -key private.key -out certificate.crtThe command generates a self-signed X.509 certificate valid for 365 days using the private key created previously. It creates a complete SSL certificate that can be used for testing environments or internal applications.
-
- The system prompts you for certificate generation details:
You are about to be asked to enter information that will be incorporated
into your certificate request.
What you are about to enter is what is called a Distinguished Name or a DN.
There are quite a few fields but you can leave some blank
For some fields there will be a default value,
If you enter '.', the field will be left blank.
-----
Country Name (2 letter code) [AU]:<COUNTRY>
State or Province Name (full name) [Some-State]:<STATE>
Locality Name (eg, city) []:<CITY>
Organization Name (eg, company) [Internet Widgits Pty Ltd]:<ORGANIZATION NAME>
Organizational Unit Name (eg, section) []:<UNIT NAME>
Common Name (e.g. server FQDN or YOUR name) []:<APPLICATION DOMAIN NAME>
Email Address []:<EMAIL ADDRESS>
-
- Import the certificate to ACM using AWS Command Line Interface (AWS CLI):
aws acm import-certificate --certificate fileb://certificate.crt --private-key fileb://private.key --region us-west-2
{
     "CertificateArn": "arn:aws:acm:<REGION>:<ACCOUNT ID>:certificate/<CERTIFICATE ID>"
}
Solution deployment
To deploy the central Verified Access instance:
- Sign in to the AWS Management Console in your networking account.
- Navigate to the AWS CloudFormation service.
- Choose Create stack and choose With new resources (standard).
- Upload the AVA-CentralInstance.yaml template file.
- Configure the stack parameters using the values in the following table.
 Review the stack configuration and choose Create stack.
- Navigate to the Verified Access Instance by navigating to VPC, then Verified Access, and Verified Access instances, as shown in Figure 2.
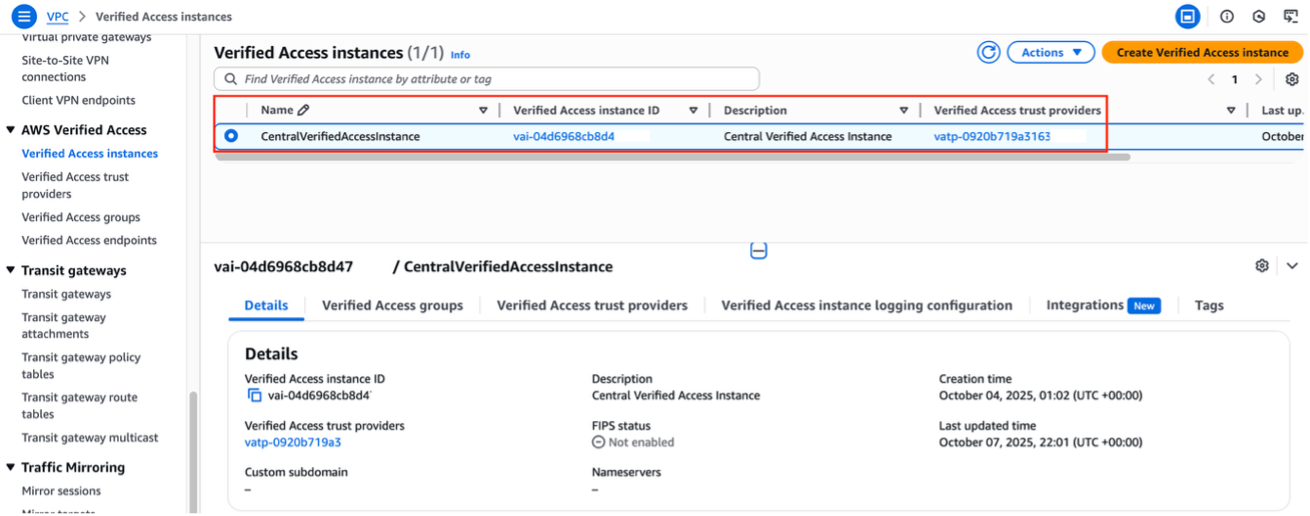 Figure 2: Verified Access instances page showing the deployed instance with the instance ID, creation timestamp, and associated trust providers
 - Navigate to the Verified Access trust providers tab to verify the configured IAM Identity Center as a User-identity trust provider, as shown in Figure 3.

Figure 3: User identity Trust provider in Verified Access Trust providers tab - Choose the Verified Access groups tab for configured verified access group ID and associated policy, as shown in Figure 4.
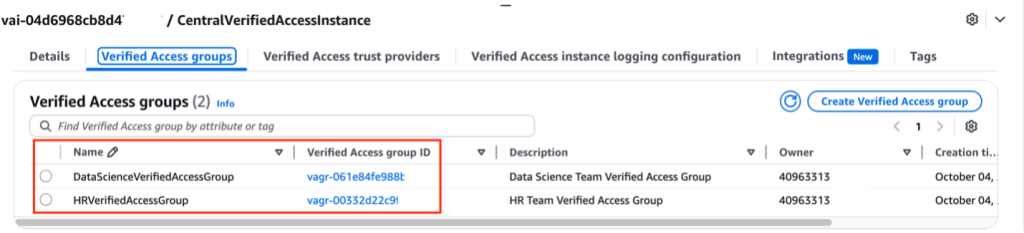
Figure 4: Verified Access Groups showing the groups created
Deploying the AVA Web Application in the HR Account
- Sign in to the Console in your HR Account.
- Navigate to the CloudFormation service.
- Choose Create stack and choose With new resources (standard).
- Upload AVA-AppEndpoint.yaml with the following parameters.
 Review the stack configuration and choose Create stack.
- After the stack is deployed, navigate to VPC, then AWS Verified Access, and Verified Access endpoints.
- Verify that the endpoint is associated with the HR Verified Access Group shared with the HR OU from the Networking account, as shown in Figure 5.
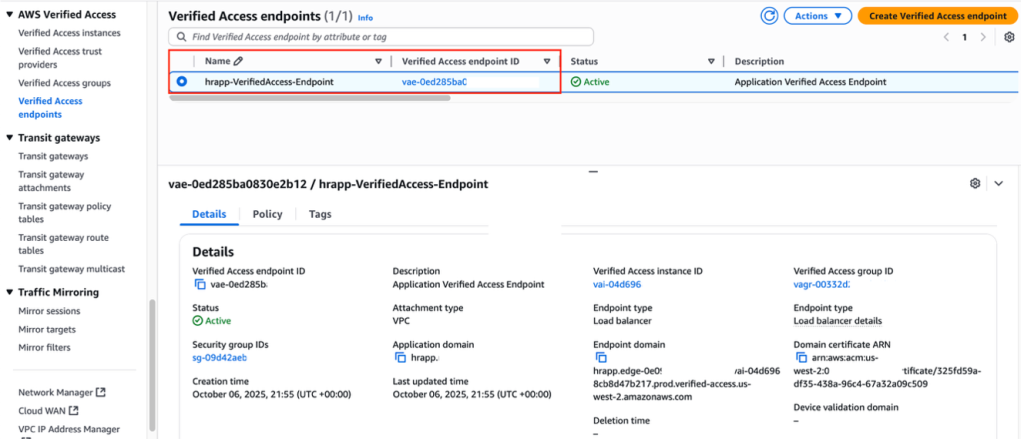
Figure 5: Verified Access Endpoint for HR Application
Deploying the AVA Web Application in the Data Science Workload 1 Account
- Follow the same steps from Deploying the AVA Web Application in the HR Account except
- Use the Data Science account
- Use the VerifiedAccessGroupId for the Data Science Team
- Use dsapp for the AppName
Deploying the AVA Database endpoint in the Data Science Workload 2 Account
- Sign in to the Console in your “Data Science Workload 2” account.
- Navigate to the CloudFormation service.
- Choose Create stack and choose With new resources (standard).
- Upload AVA-DatabaseEndpoint.yaml.
- Configure the stack parameters using the following parameters:

- Review the stack configuration and choose Create stack.
- After the stack is deployed, navigate to VPC, then AWS Verified Access, and Verified Access endpoints.
- Verify the endpoint is associated with the Data Science Verified Access Group shared with the Data Science OU from the Networking account.
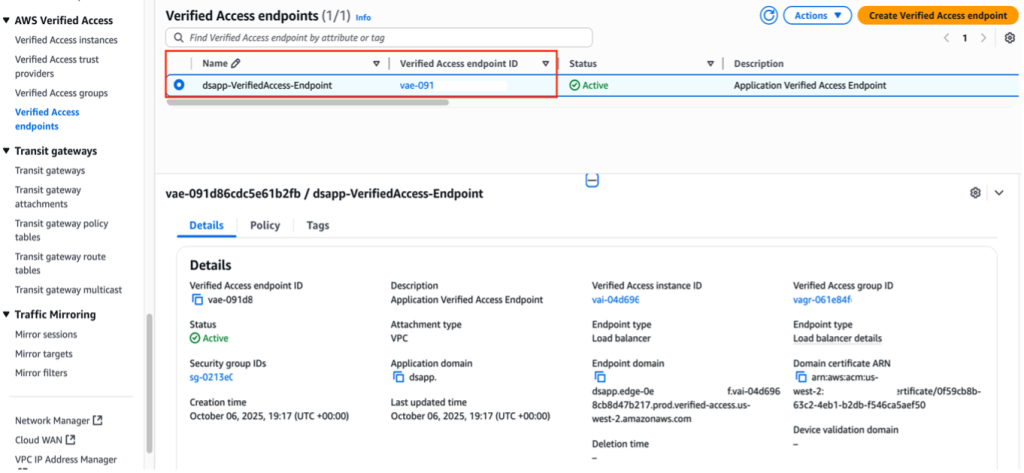
Figure 6: Verified Access Endpoint for Data Science database
Solution testing
Test connectivity to database (non-HTTP AVA endpoint)
To test database connectivity use the following steps:
- Install and configure the Verified Access client following the Verified Access client documentation.
- Authenticate using the “dsuser” credentials when prompted by the connectivity client.
- Retrieve the database endpoint domain from the Verified Access endpoints console in your networking account.
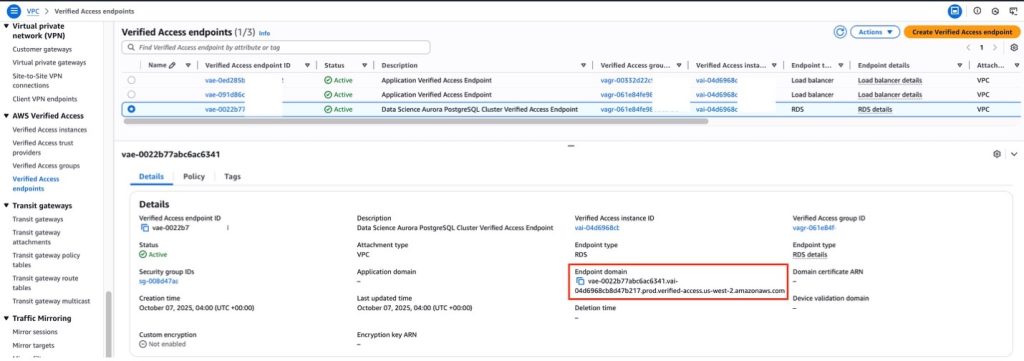
Figure 7: AWS Console showing a Verified Access endpoint domain name and details, used for database connection configuration. - Connect to the Aurora PostgreSQL database using the psql client:
psql -h <AVA Database Endpoint Domain Name> -p 5432 -U postgresFigure 8: PostgreSQL connection command using an AVA endpoint domain name

Figure 9: Database connection test showing successful access by dsuser under AVA policy permissions
Test HR Web Application (HTTP AVA Endpoint)
You can access the HR Web application (HTTP AVA Endpoint) using the browser with the Public DNS name (AppName + TopLevelDomain) provided while provisioning Cloudformation stack for applications.
You need to add CNAME entry in your DNS server for Public DNS Name with target domain name as AVA endpoint domain name. Retrieve the hrapp Verified Access endpoint for DNS CNAME configuration using the following command on the Networking account or on the console by navigating to VPC -> Verified Access Endpoints.
aws ec2 describe-verified-access-endpoints --query "VerifiedAccessEndpoints[?starts_with(EndpointDomain, 'hrapp')].{Id:VerifiedAccessEndpointId,Domain:EndpointDomain}" --output json[{
"Id": "vae-0ed285ba0830e1234",
"Domain": "hrapp.edge-0e0936e537a3d789X.vai-04d6968cb8d47b2XX.prod.verified-access.us-west-2.amazonaws.com"
}]
- Search for the name that you have configured for the Verified Access endpoint.
- Log in through Verified Access with “hruser”, and choose Next.
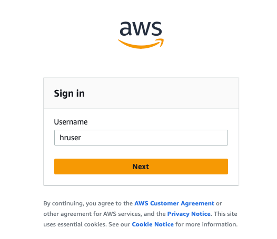
Figure 10: Verified Access Connectivity Application Sign In screen for non-HTTP access - Enter the password for “hruser” and choose Sign In.
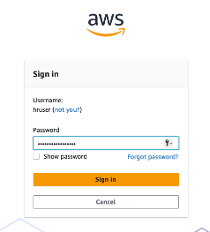
Figure 11: Verified Access Connectivity Application Sign In screen for non-HTTP access - A successful sign in redirects you to “HRApp” Web Application homepage as shown in Figure 12.

Figure 12: HR Application Web Page after successful authentication
Following the same verification process, you can test the “DSApp” web application access using Verified Access endpoint to provide secure authentication and authorized connectivity.
Considerations
Verified Access implementation across multiple accounts needs careful planning of several key elements. Verified Access endpoints operate within VPC subnets and connect directly to same-VPC applications without needing Transit Gateway or VPC peering, with support for shared VPCs through subnet sharing. Before deployment, verify service quotas in target AWS Regions and make sure that applications are configured to accept traffic only from Verified Access endpoint security groups. This prevents connection even if attackers discover application IP addresses. Use Verified Access Group sharing to maintain consistent policies that automatically extend to new accounts in OUs. Monitor performance under expected load conditions and authenticated traffic bursts, keeping in mind the 60 second HTTP idle timeout, to provide an optimal user experience while maintaining zero-trust access control.
Conclusion
AWS Verified Access streamlines secure application management across multiple AWS accounts by centralizing security controls and eliminating the need for separate VPN infrastructure and bastion hosts. Through a dedicated networking account and AWS RAM, organizations can enforce consistent security policies across OUs while streamlining application onboarding. This centralized approach provides unified security visibility, automatic policy inheritance for new accounts, and reduced infrastructure overhead while maintaining zero trust principles. Start your implementation today by reviewing the Verified Access Getting Started Guide.
About the authors

Raj Bagwe
Raj Bagwe is a Senior Solutions Architect at Amazon Web Services, based in San Francisco, California. With over 6 years at AWS, he helps customers navigate complex technological challenges and specializes in Cloud Architecture, Security and Migrations. In his spare time, he coaches a robotics team and plays volleyball. He can be reached at X handle @rajesh_bagwe.

Keith Lee
Keith Lee is a Partners Solutions Architect at Amazon Web Services (AWS). He focuses on growing partnerships and enabling the adoption of new technologies. He works to expand strategic relationships, identify opportunities for partners to leverage AWS solutions, and facilitate the implementation of cutting-edge cloud technologies across various industries.

Anandprasanna Gaitonde
As an AWS Principal Solutions Architect, Anand is responsible for helping customers design and operate Well-Architected solutions to help them adopt the AWS cloud successfully. He focuses on AWS Networking, Resilience architecture patterns and Serverless to build solutions in the cloud across industry verticals. Outside of work he loves traveling, tennis and swimming.