Networking & Content Delivery
Introducing mTLS for Network Load Balancer
Many teams use mutual TLS (mTLS) to verify that only trusted clients reach their applications. To implement it, they build home-grown solutions or run third-party proxies, which are hard to maintain because the X.509 libraries they depend on need frequent updates. Building and running these solutions also consumes developer time and compute resources. Today, we are bringing mTLS to Network Load Balancer (NLB).
NLB operates at Layer 4 (TCP, UDP, and TLS), handles millions of requests per second at ultra-low latency, and terminates TLS for your applications. Now NLB also handles mutual authentication for you, so you no longer need to build, update, or run your own mTLS solution. NLB supports mutual authentication in verify mode. During the TLS handshake, NLB presents its server certificate, which the client verifies. NLB also authenticates clients that present X.509 certificates, checks whether their certificates have been revoked, and can restrict access to specific certificate identities with client certificate filtering. This post explains how the feature works, how to set it up, and what to consider when you design your deployment.
TLS and mTLS
NLB already supports TLS listeners, which terminate TLS connections from clients. With TLS, only the client authenticates the server. With mTLS, the client and the server authenticate each other. The server requests a certificate from the client, and the client sends one and proves it holds the matching private key. The server then validates the client certificate’s chain of trust and expiry. Figure 1 shows the mTLS handshake.
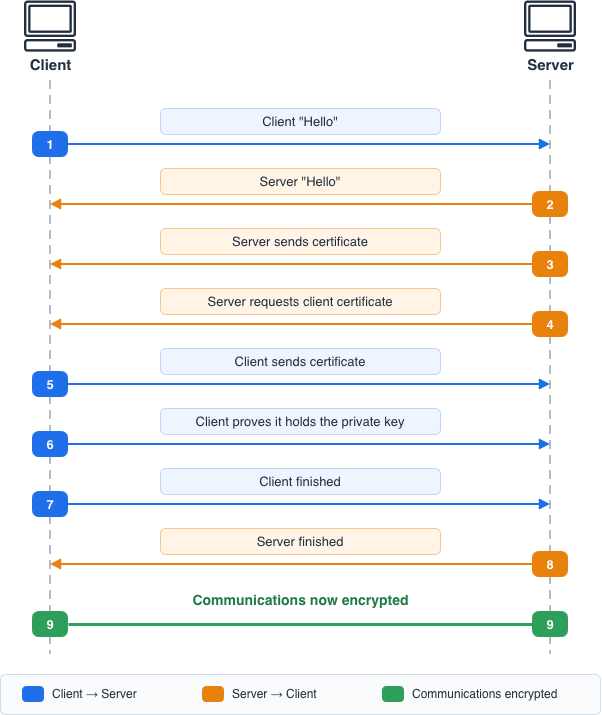
Figure 1: mTLS handshake between a client and a server
Customer use cases
Use mutual authentication on NLB in situations like these:
- Central public key infrastructure (PKI), shared trust: Your central PKI team manages your certificate authorities (CAs) and revocation lists. You use AWS Private Certificate Authority, third-party CAs, or self-signed CAs. Your security team wants every application to authenticate clients against the same trust stores.
- Revocation without replacing the root: You need to invalidate individual client certificates, such as those of retired devices or offboarded partners, to revoke their access while the root CA that signed them stays valid.
- Access control finer than the CA: Your CA issues certificates to production, staging, and corporate environments, but only production clients should reach this service. With client certificate filtering, NLB admits only certificates whose fields match a filter on the listener, such as an Organizational Unit (OU) of Production, a Common Name (CN), or a Secure Production Identity Framework for Everyone (SPIFFE) ID, so you don’t need a separate CA for each access boundary.
- Device fleets over TCP: You run a fleet of Internet of Things (IoT) devices that connect to a TCP service behind NLB. Each device has its own SPIFFE identity, and only your devices should reach the service.
How NLB supports mTLS authentication
You attach a trust store to an NLB TLS listener and set mutual authentication to verify mode. During the handshake, NLB presents its server certificate as it does for any TLS listener, then checks the client certificate against your trust store, any client certificate filters, and any revocation list. Only clients that pass every check reach your targets, and targets receive no client certificate data, so your backends need no certificate inspection logic.
Client certificate filtering, new with NLB mTLS, adds identity-based access control on top of trust validation. A single CA often issues certificates to many environments or teams, so trusting the CA admits all of them. With filtering, you list the identities allowed to connect, such as an Organizational Unit, a Common Name, a DNS name, or a SPIFFE ID, and NLB rejects every other certificate during the handshake. Because NLB doesn’t pass certificate fields to your targets, filtering is how you enforce client identity without adding that logic to each backend.
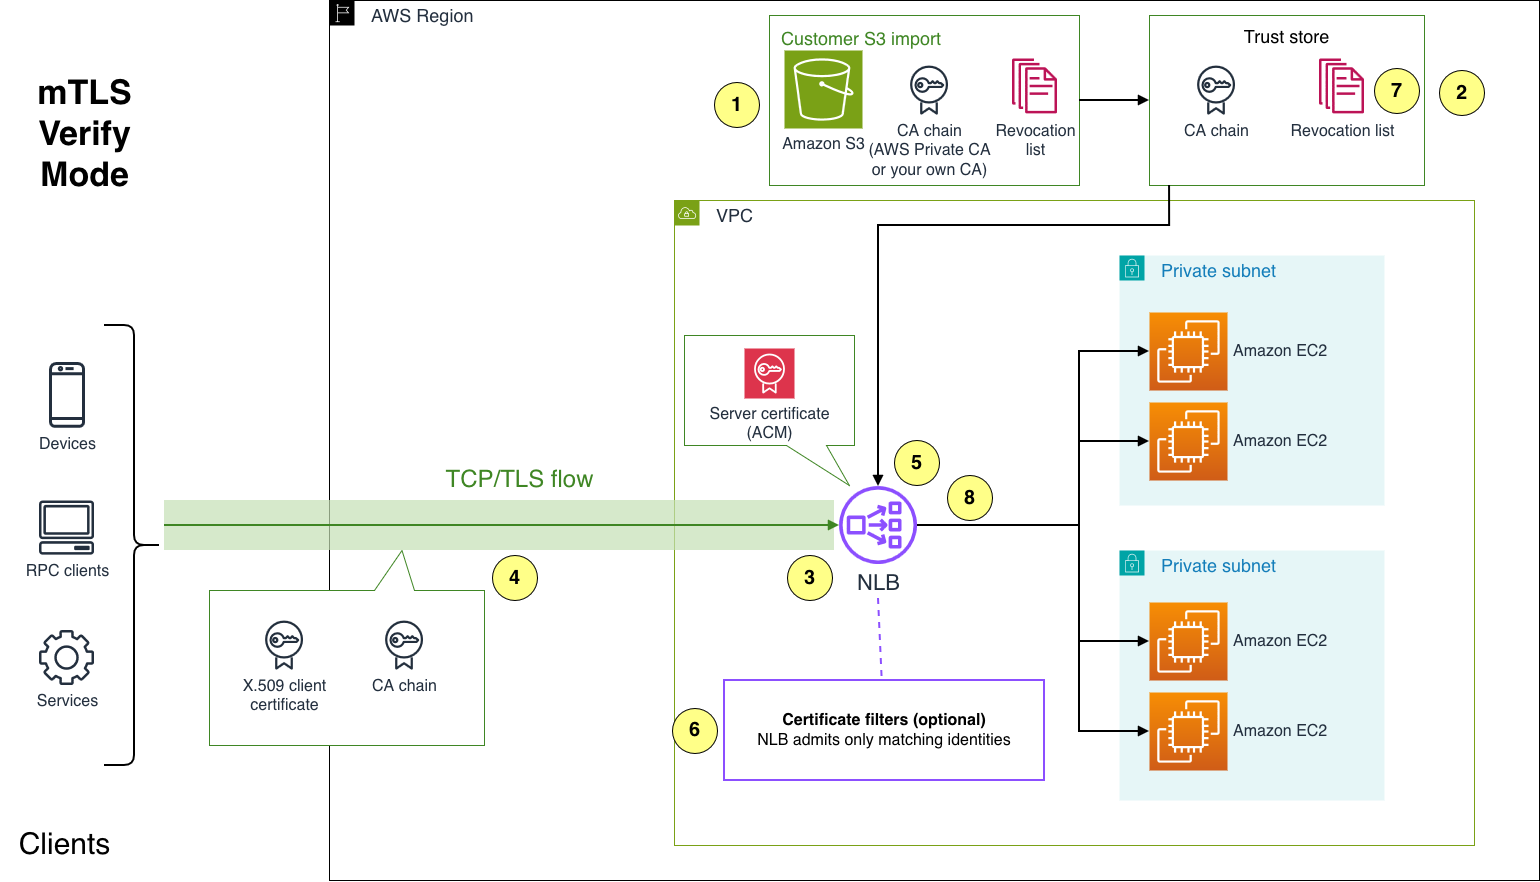
Figure 2: NLB mTLS verify mode architecture
Figure 2 shows the end-to-end flow.
- Upload your certificate authority (CA) certificate bundle and, optionally, a certificate revocation list (CRL) to Amazon Simple Storage Service (Amazon S3).
- Create a trust store from the CA bundle and optionally add the CRL to it.
- Configure a TLS listener with mutual authentication in verify mode that uses the trust store. Optionally, configure client certificate filtering.
- A client opens a TLS connection. NLB sends its server certificate and requests the client’s certificate.
- NLB validates the client certificate. It checks the chain of trust to a root in the trust store and the expiry of every certificate in the chain. It also checks for the clientAuth purpose in the Extended Key Usage (EKU) extension. If you allow expired client certificates, NLB accepts an expired client certificate that otherwise chains to a trusted CA.
- If you configured client certificate filtering, NLB compares your filters with fields in the client certificate.
- If the trust store includes a CRL, NLB checks the client certificate against it.
- If every check passes, NLB accepts the connection and forwards traffic to the targets. If any check in steps 5–7 fails, NLB closes the connection and records the failure in its access logs. For the full list of failure scenarios, see Mutual authentication in the User Guide for NLB.
How NLB evaluates client certificate filters
You can filter on four fields: Subject.CN (Common Name), Subject.OU (Organizational Unit), SAN.DNS (DNS names in the Subject Alternative Name), and SAN.URI (URIs in the Subject Alternative Name, including SPIFFE IDs). Each filter uses one of two match types:
EXACTmatches when the certificate field value is identical to the configured value.PREFIXmatches when the certificate field value starts with the configured value. This suits hierarchical identities such as SPIFFE URIs and domain name prefixes.
For the Subject.CN, Subject.OU, and SAN.DNS fields, matching is case-insensitive. For the SAN.URI field, the scheme and host are matched case-insensitively, and the rest of the URI, such as the path, is matched case-sensitively. For example, a filter value of SPIFFE://EXAMPLE.COM/workload matches spiffe://example.com/workload, but does not match spiffe://example.com/Workload.
NLB evaluates filters with these rules:
- After cryptographic checks. The order is trust chain validation, then filtering, then the CRL check. NLB never inspects the fields of an untrusted certificate.
- OR logic, fail-closed. One matching filter is enough to pass filtering. If filters are configured and none match, NLB rejects the connection.
- Multiple values. When a field has several values, such as multiple OUs or DNS names, a filter matches if any one value matches.
- Missing fields. If a certificate lacks the field a filter references, that filter does not match.
- Per listener. Filters belong to a listener, so listeners that share a trust store can enforce different policies.
Filtering is optional. Without filters, NLB accepts every connection that passes trust chain validation and revocation checks. Certificate filtering is included with NLB mutual authentication at no additional cost.
Prerequisites
Have the following in place, all in the same AWS Region:
- A virtual private cloud (VPC) with at least two subnets in different Availability Zones.
- A security group for the load balancer that allows TCP 443 from your clients, and a backend security group that allows the listener’s target port from the load balancer.
- A TCP target group with a healthy backend.
- A server certificate for the TLS listener in AWS Certificate Manager (ACM).
- AWS Command Line Interface (AWS CLI).
- OpenSSL, to create the test certificates.
- A private Amazon S3 bucket in the same Region, to hold the CA certificate bundle.
Set up mTLS on NLB
In this walkthrough, you use OpenSSL and the Amazon Elastic Compute Cloud (Amazon EC2) console to create test certificates, set up an NLB with mTLS in verify mode, and test it with trusted and untrusted clients. You then add client certificate filtering to admit only specific identities.
Step 1: Create test certificates and upload the CA bundle
In this step, you create a test CA and two client certificates with OpenSSL, then upload the CA certificate to Amazon S3 so NLB can build a trust store from it. client1 is signed by your CA, so NLB accepts it. bad-client is self-signed, so NLB rejects it. If a client certificate includes an Extended Key Usage (EKU) extension, that extension must contain clientAuth, or NLB rejects the certificate. If you already have a CA, upload its certificate bundle instead and issue client certificates from it.
Upload the CA certificate to a private Amazon S3 bucket in the same Region:
Step 2: Create the Network Load Balancer and configure the TLS listener
In this step, you create an internet-facing Network Load Balancer in your VPC from the Amazon EC2 console (Figure 3). Choose two subnets in different Availability Zones for high availability, and attach the load balancer security group from the prerequisites (Figure 4).
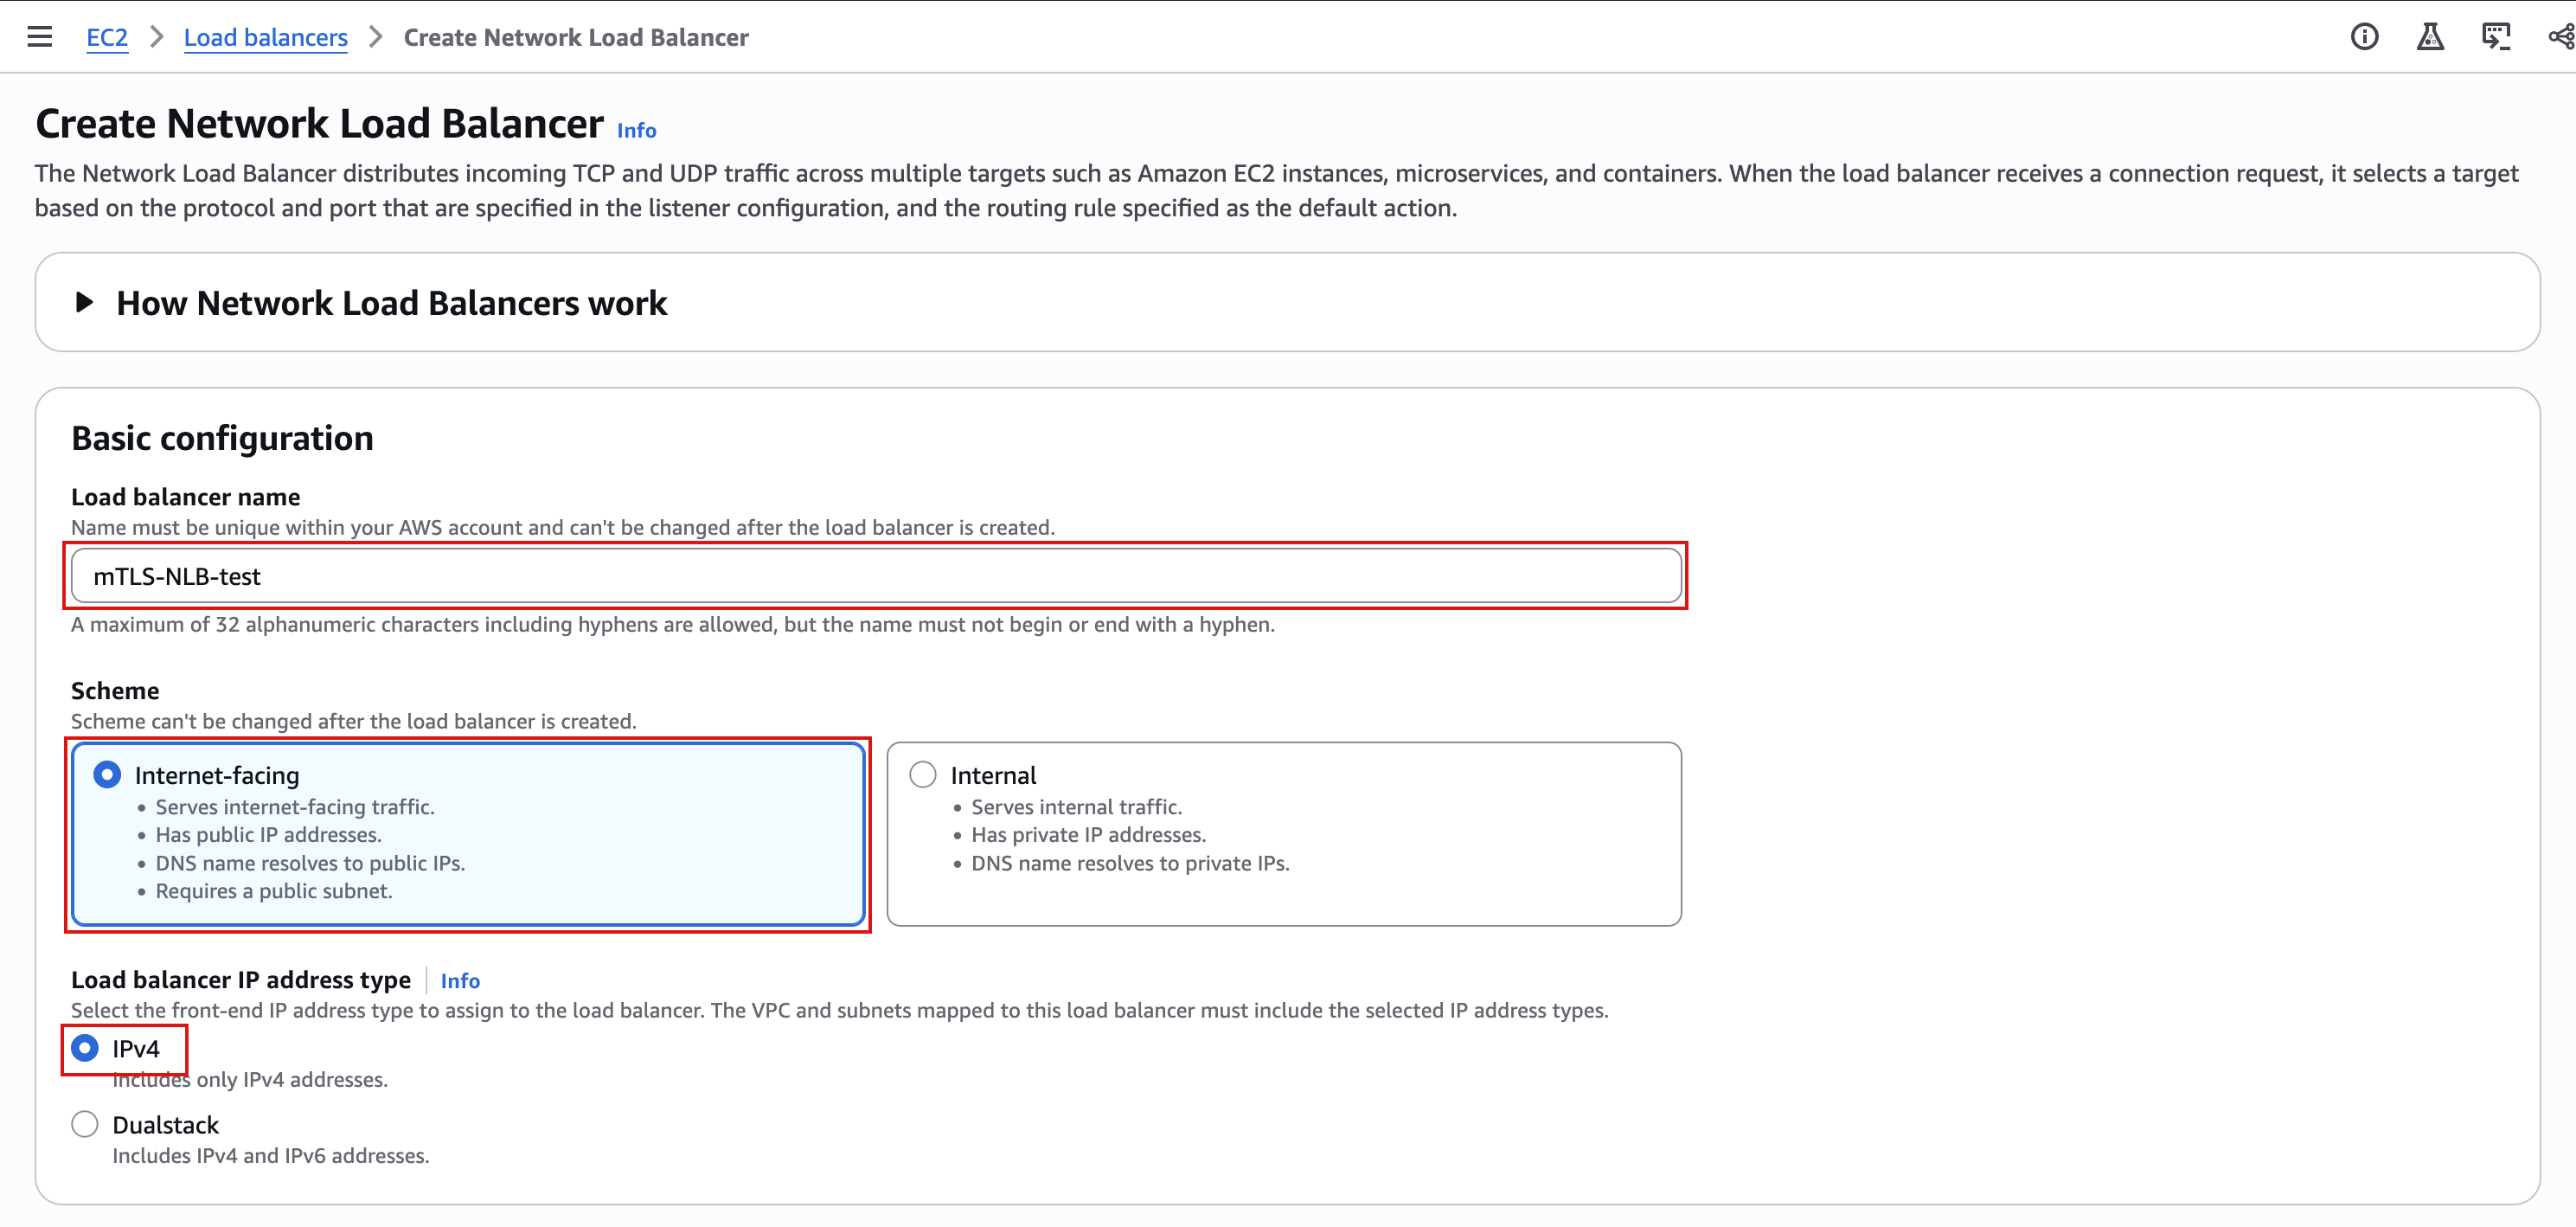
Figure 3: Basic configuration
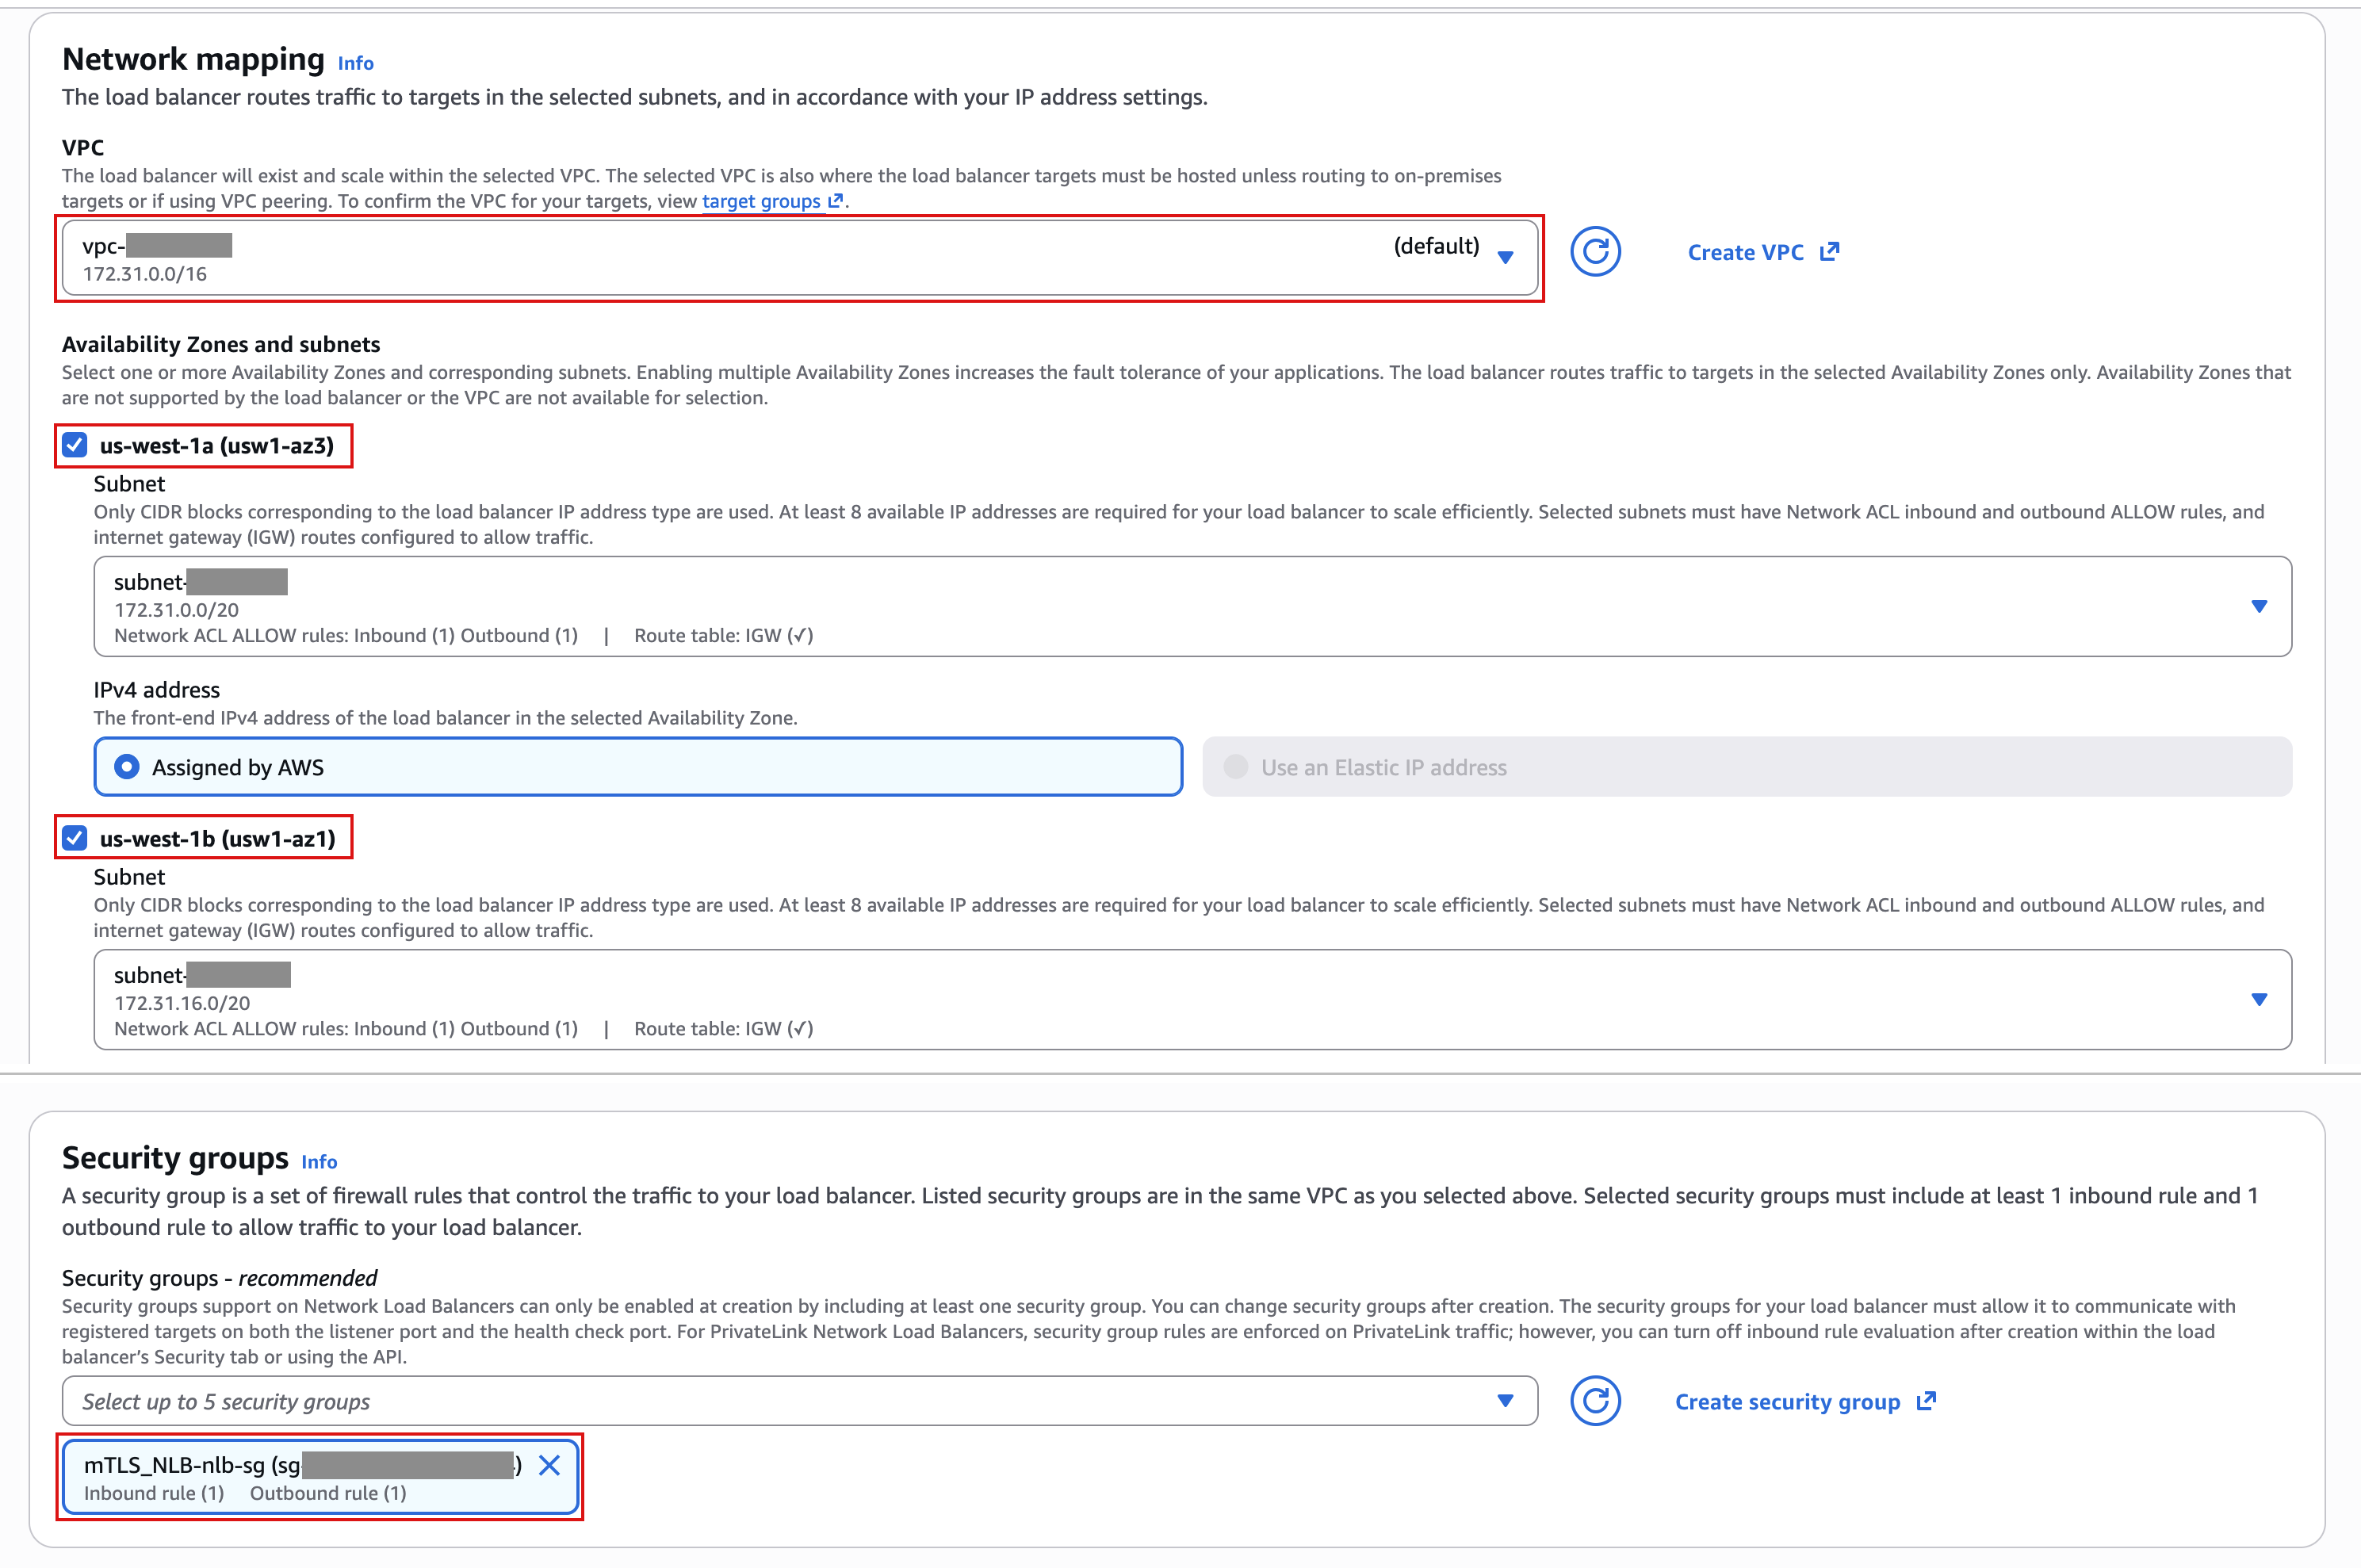
Figure 4: Network mapping and security groups
Next, configure a TLS listener on port 443 that forwards to your target group. Keep the recommended security policy, and choose your server certificate from ACM (Figure 5).
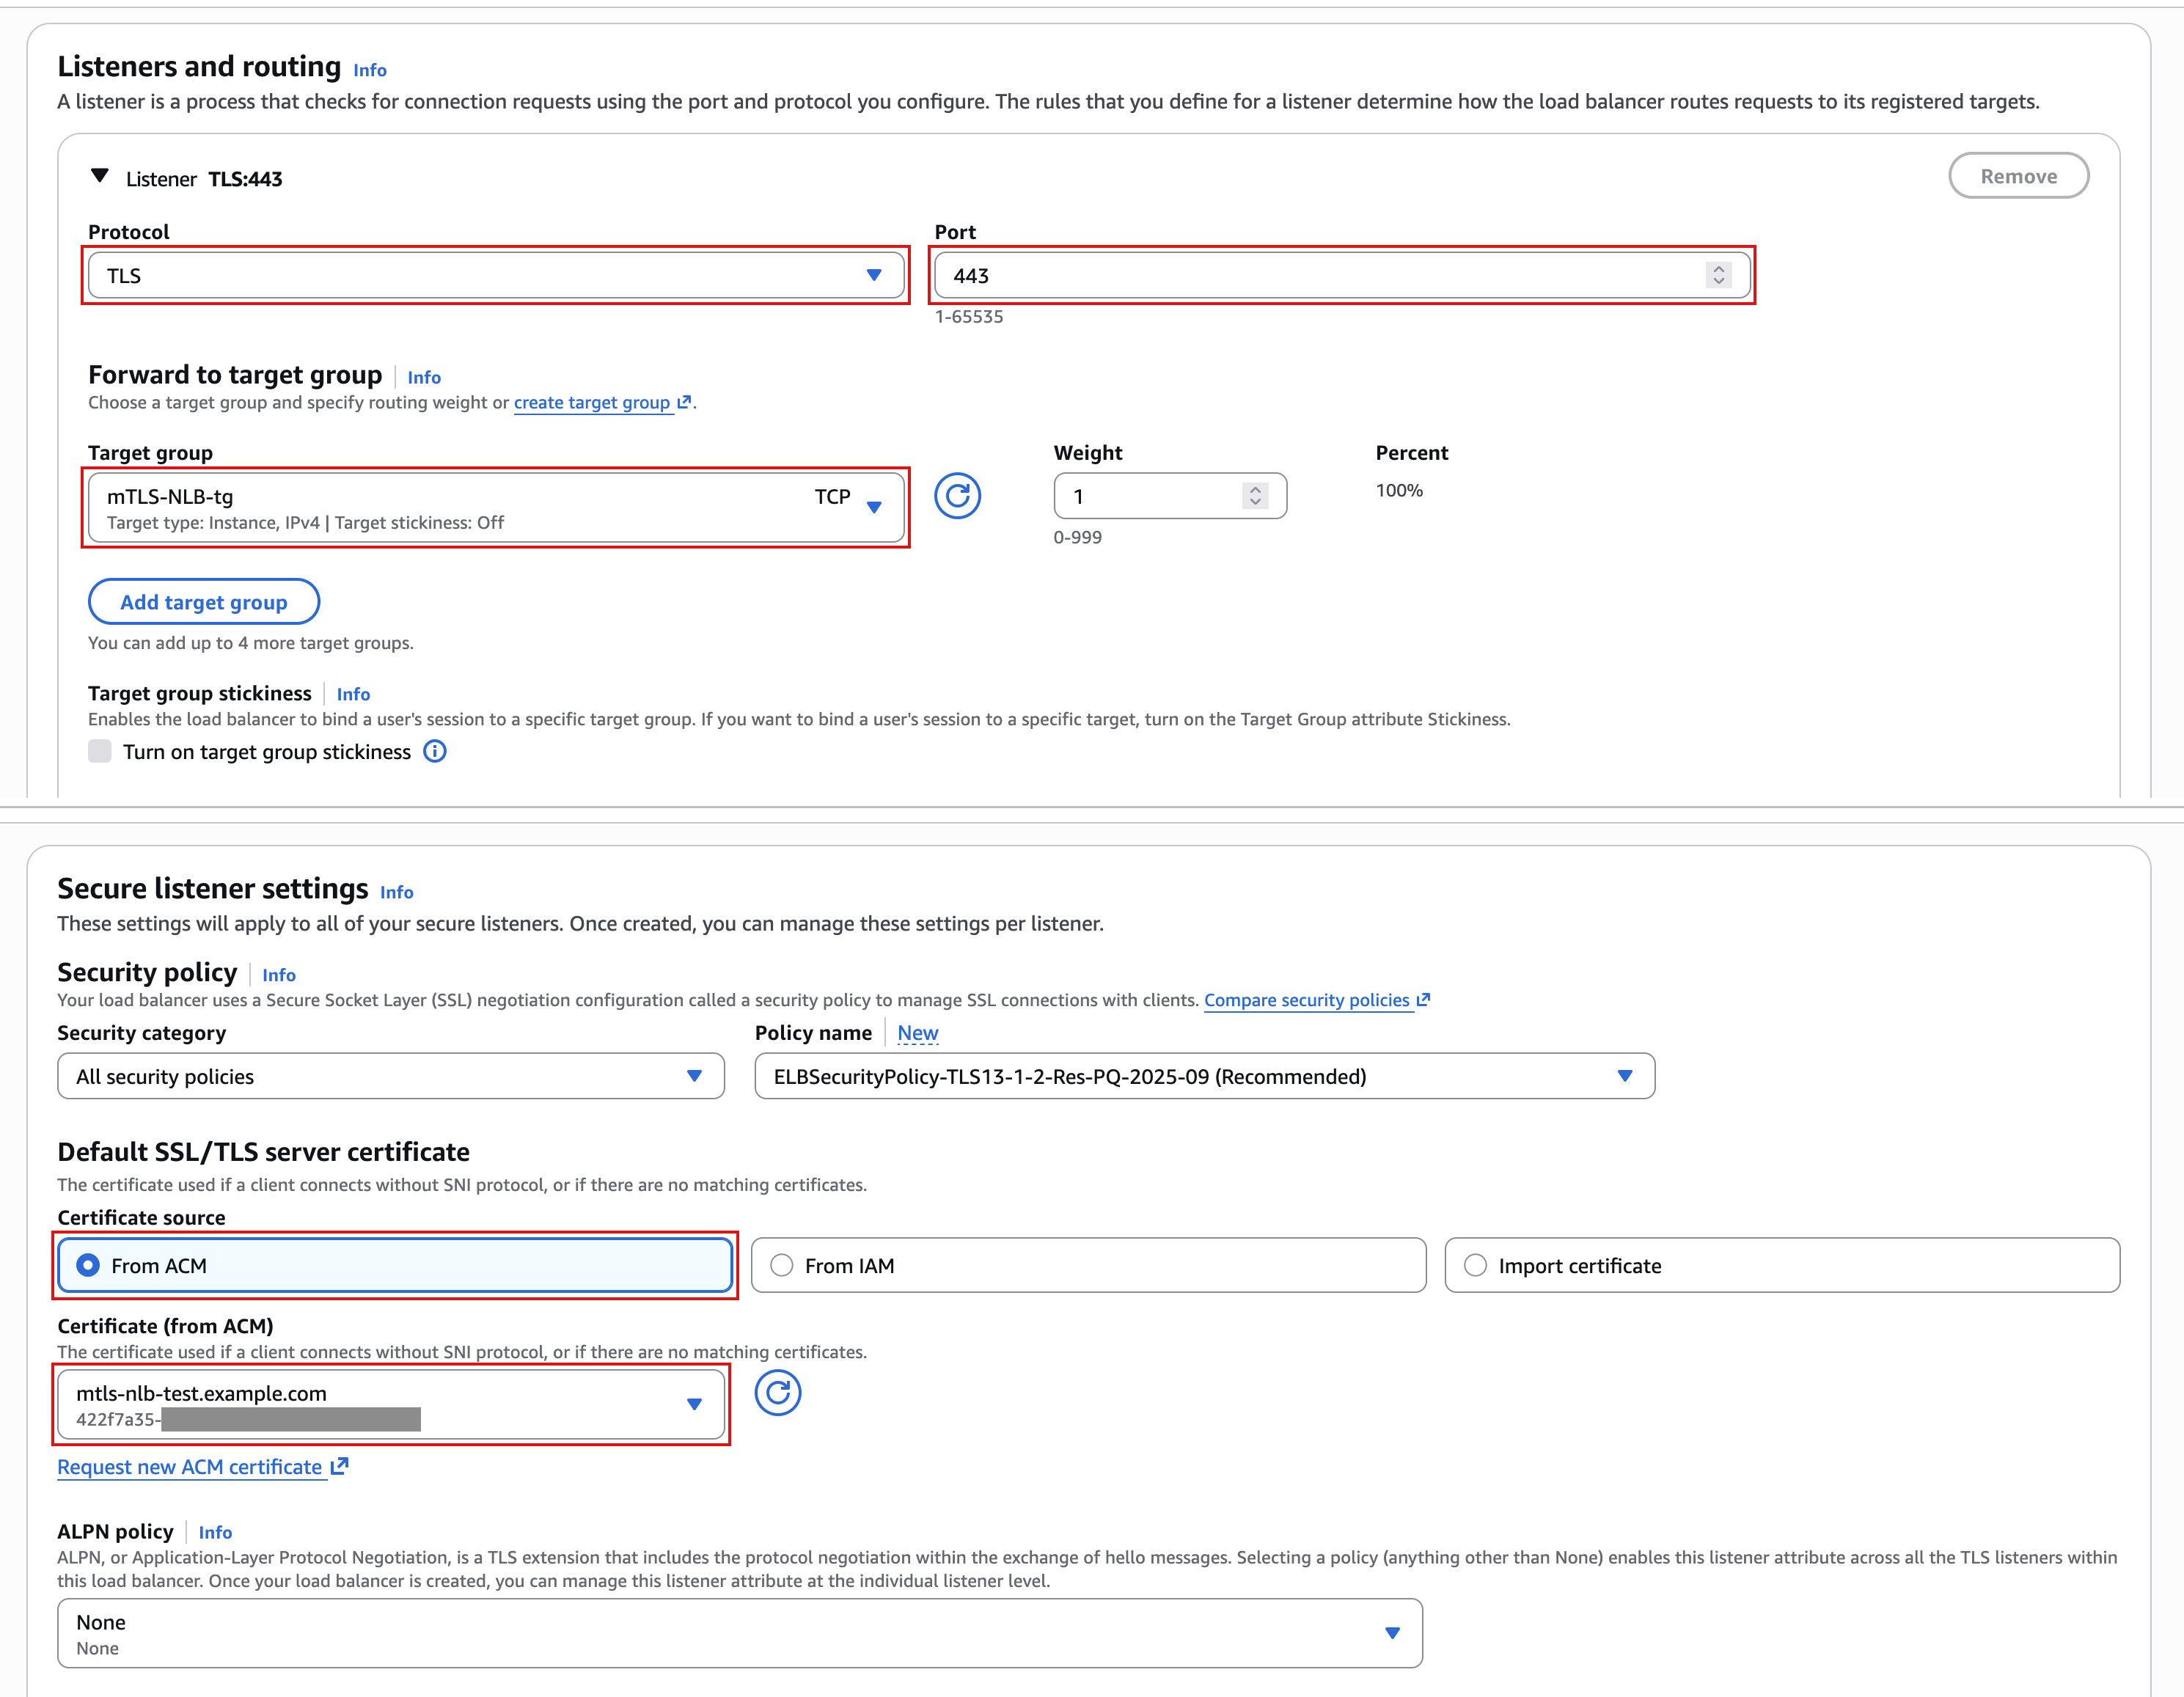
Figure 5: TLS listener and server certificate
Step 3: Turn on mTLS and create a trust store
In this step, you turn on mutual authentication for the listener and create a trust store from the CA bundle you uploaded in Step 1 (Figure 6). A certificate revocation list is optional, and you can add one now or after the trust store is created. The console creates the trust store together with the load balancer.
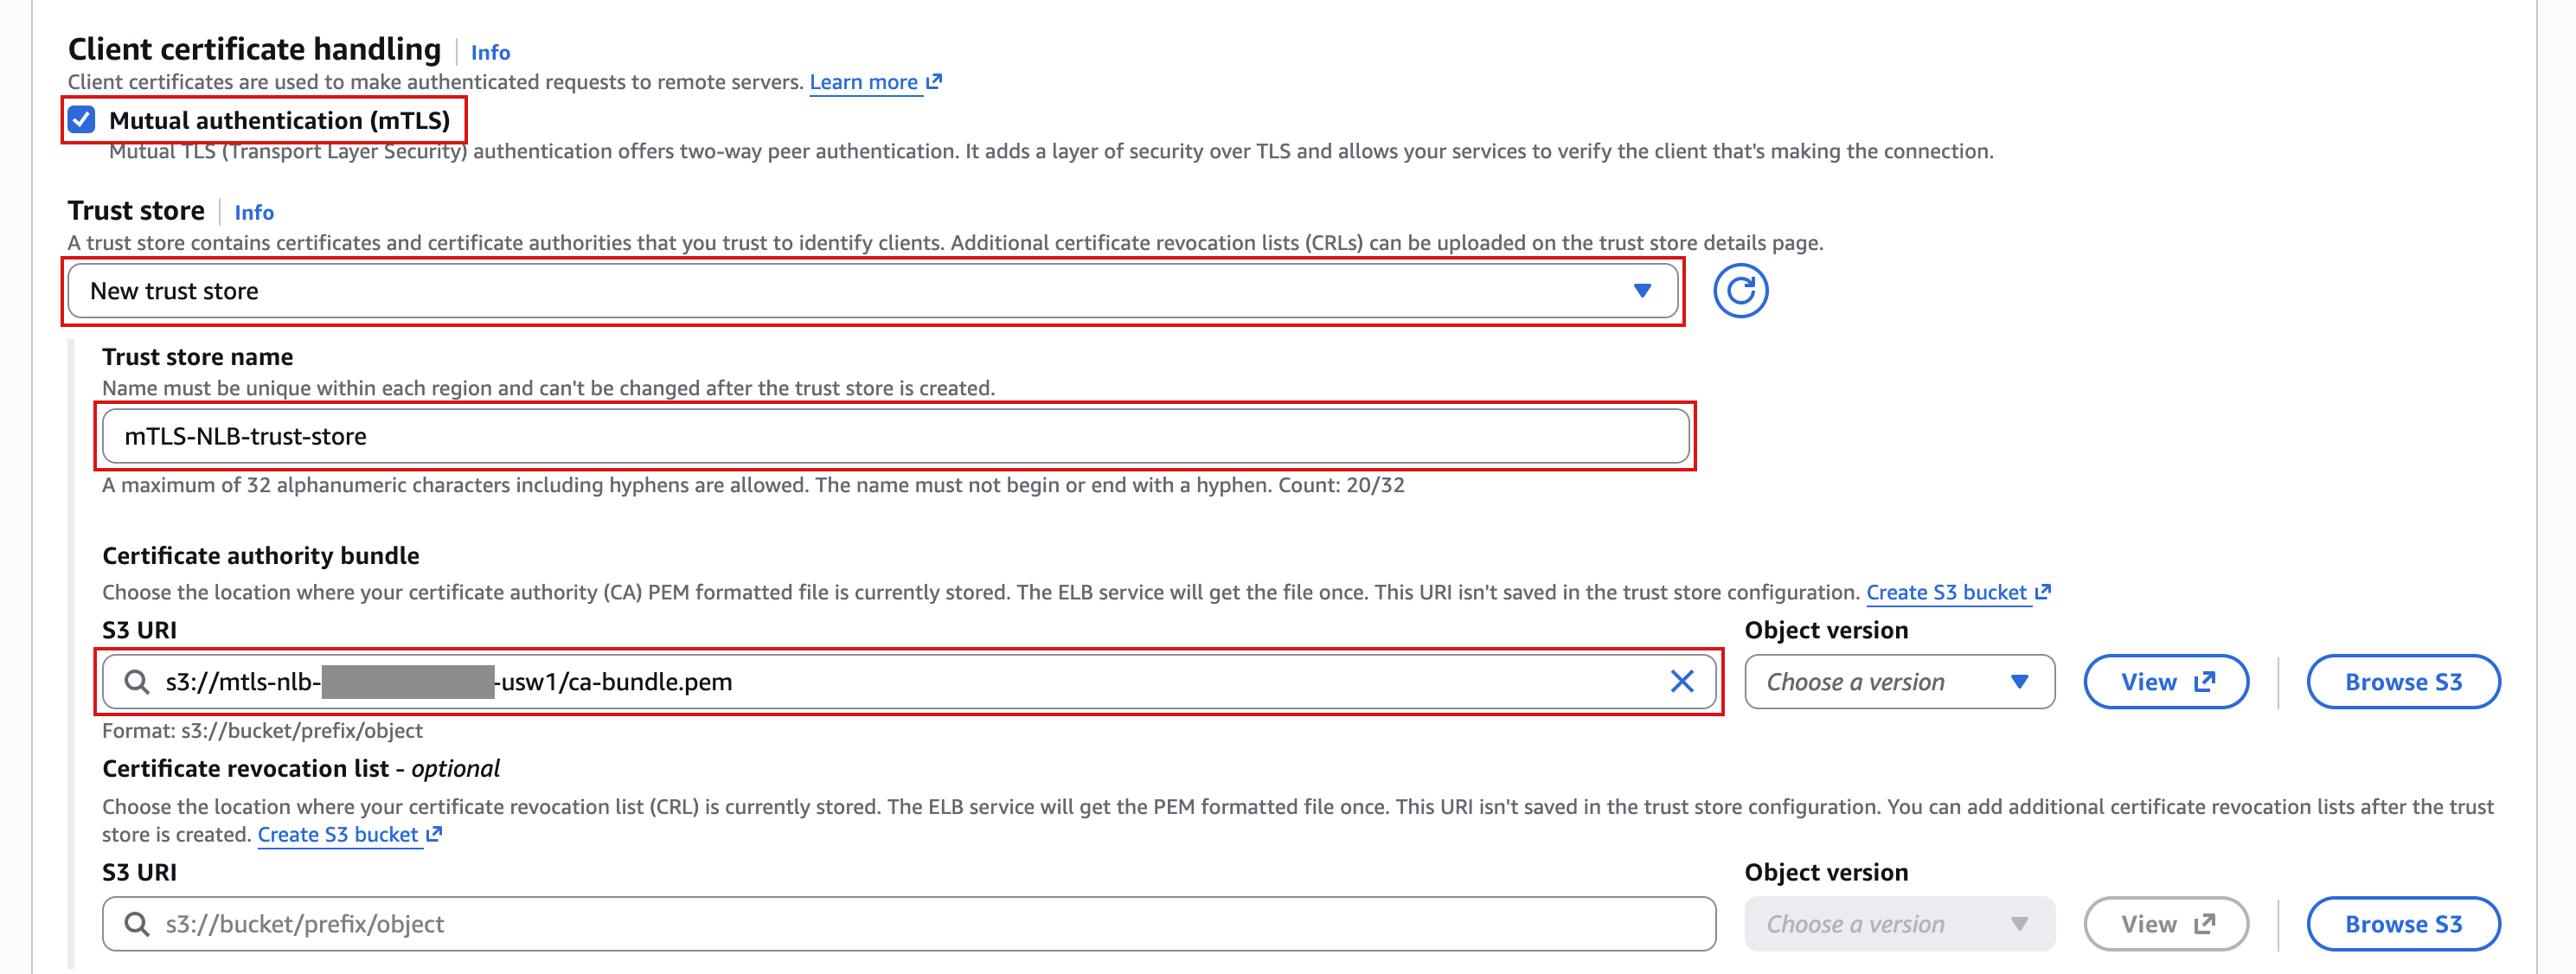
Figure 6: Turning on mTLS and creating a trust store
Keep the default advanced mTLS settings: NLB rejects expired client certificates and doesn’t advertise your trust store’s CA names to clients (Figure 7). Turn on CA name advertising if your clients hold several certificates, such as smart cards, so each can pick one your trust store accepts. Any connecting client can then see which CAs you trust. Leave Client certificate identity filters empty for now. You configure client certificate filtering in Step 5.
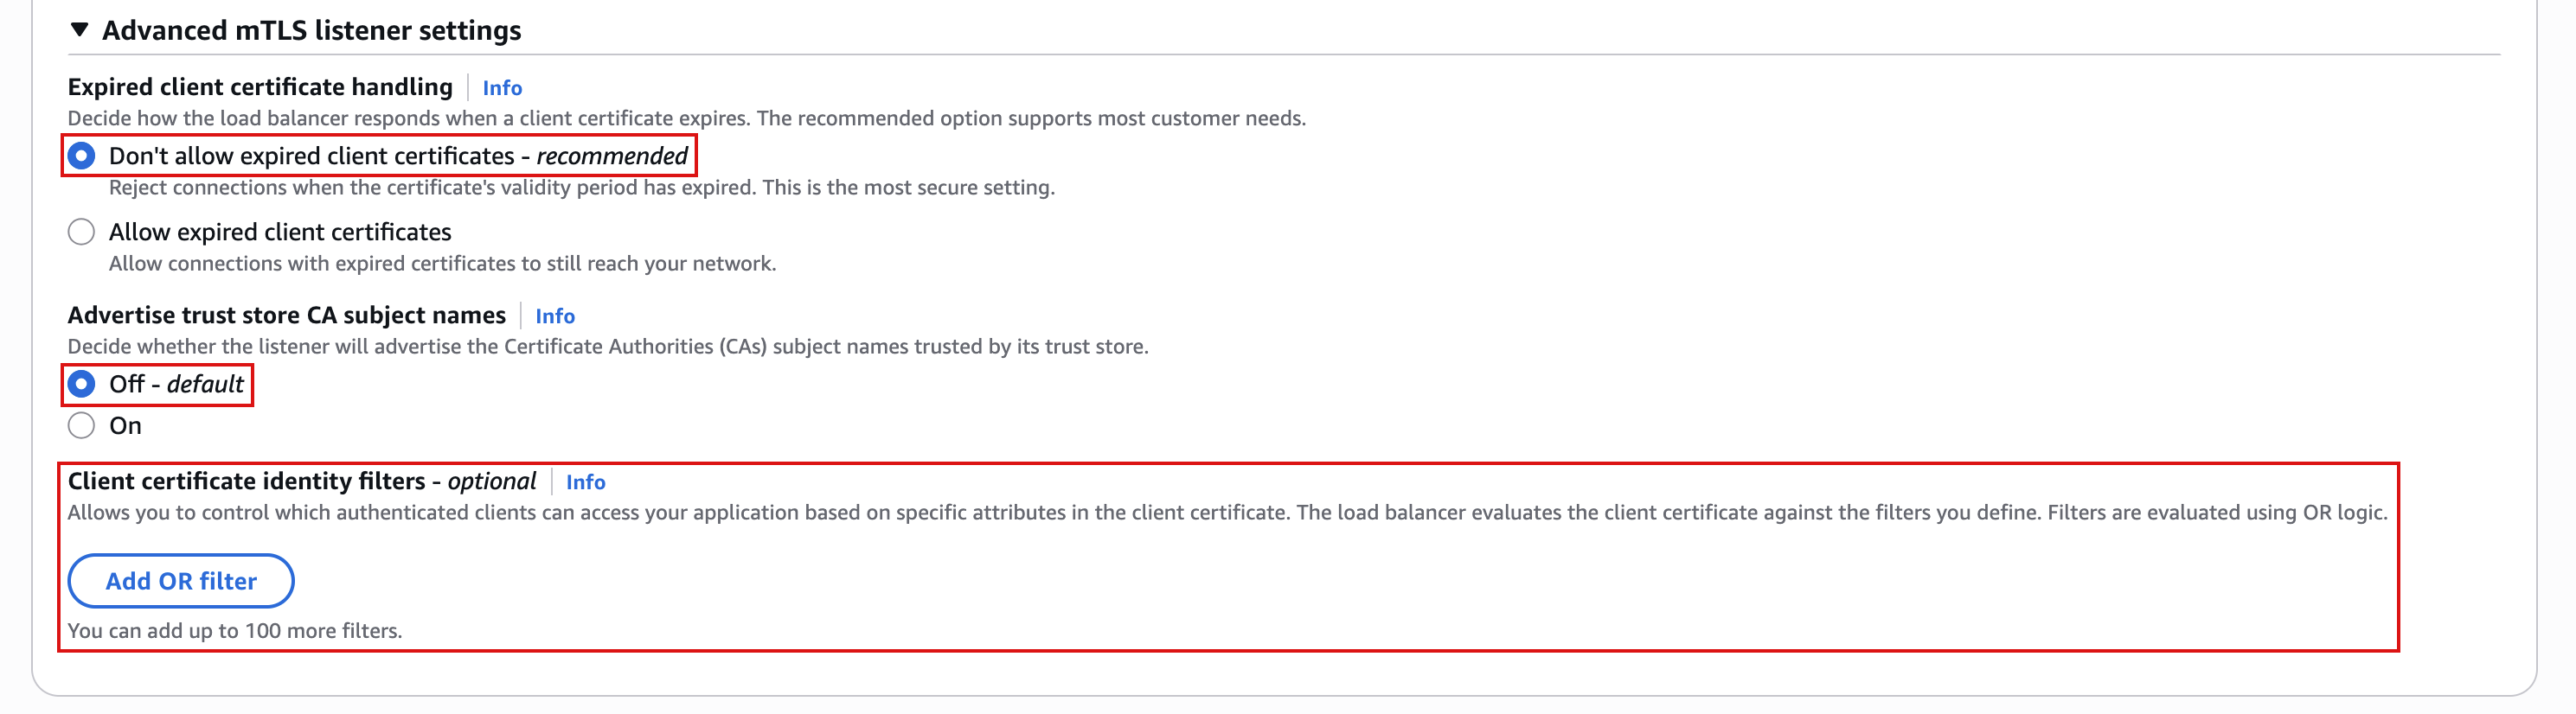
Figure 7: Advanced mTLS listener settings
Step 4: Review, create, and test
In this step, you review your settings, create the load balancer, and confirm that NLB accepts only trusted clients. After the load balancer’s status changes to Active, copy its DNS name. The listener’s mTLS column shows Verify with trust store (Figure 8).
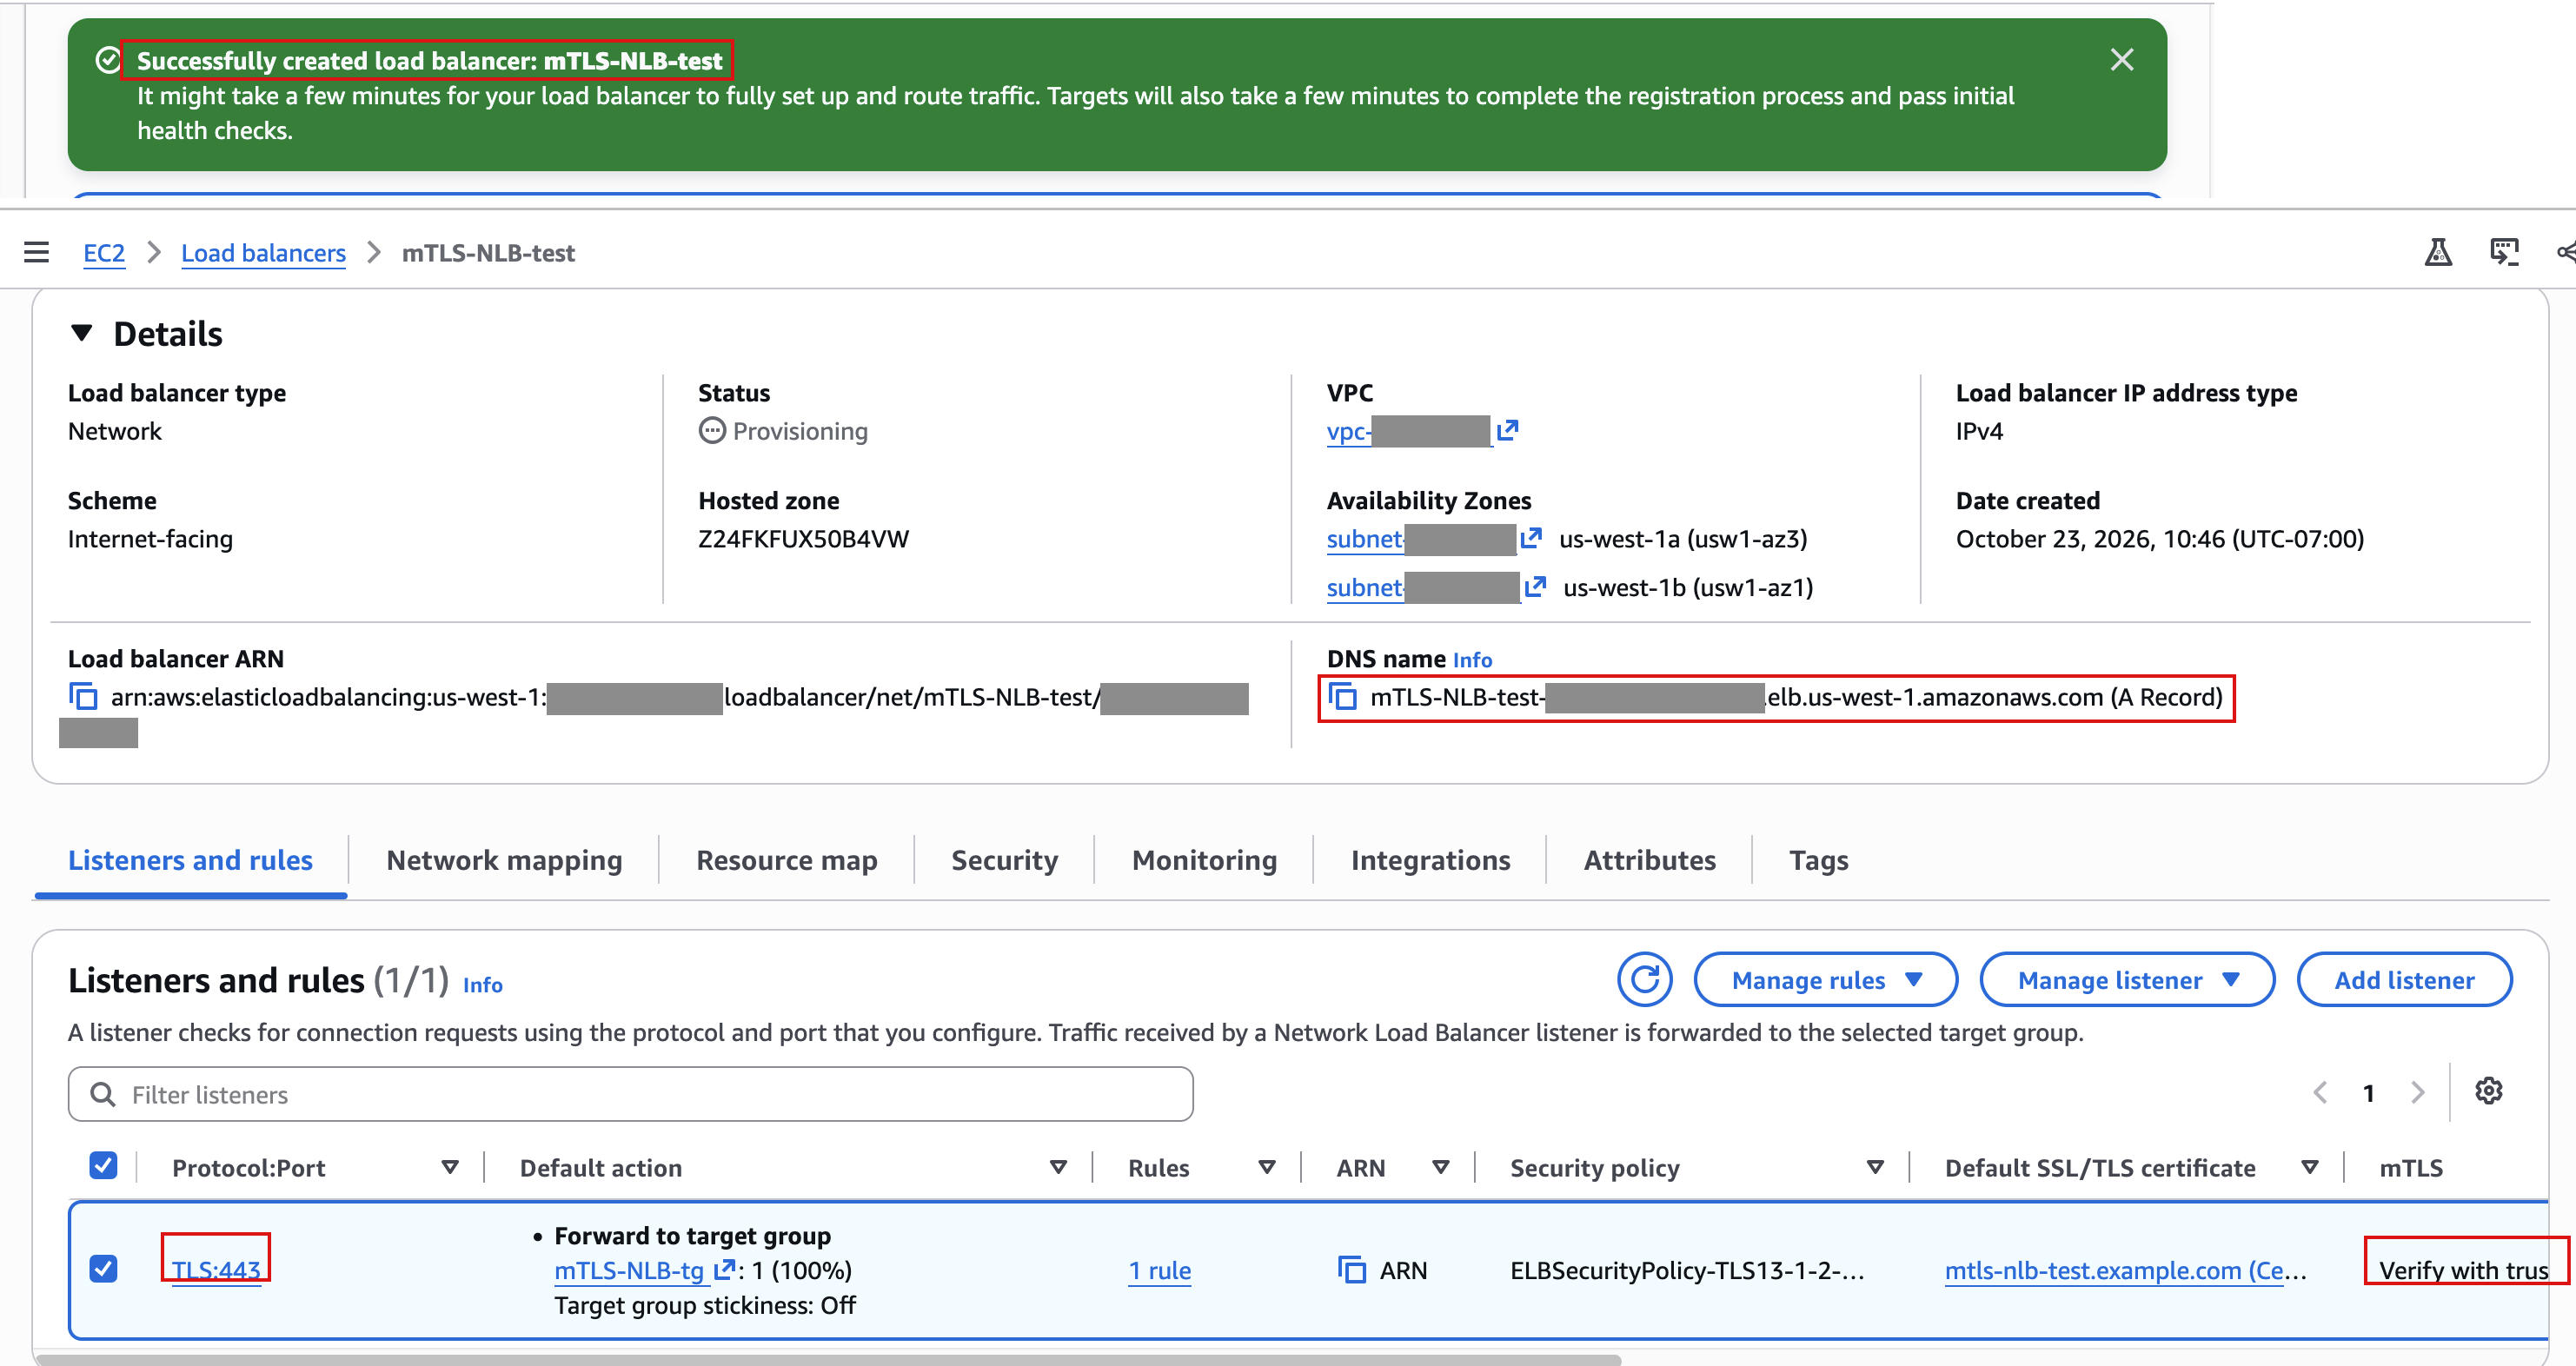
Figure 8: The load balancer with mTLS in verify mode
Test with curl. The load balancer’s DNS name doesn’t match the domain name on your ACM server certificate, so the commands use the -k flag to skip server certificate verification. The flag doesn’t affect client authentication. A request with client1, which your CA signed, reaches the backend:
A request with no client certificate is rejected:
A request with bad-client, which isn’t signed by a CA in your trust store, is also rejected:
What to look for: A rejected client gets a connection reset and no HTTP response. With TLS 1.3, the client finishes its side of the handshake before NLB rejects the certificate, so the rejection appears as a reset on the first request rather than as a handshake error. The exact curl error code and message depend on your curl and OpenSSL versions.
Step 5: Configure client certificate filtering
In this step, you edit the listener to add client certificate filtering, so NLB admits only specific trusted clients. Under Client certificate identity filters, add one filter for each identity you want to allow (Figure 9). This example uses two filters:
| Action | Field | Match type | Value |
| Accept | Subject Organizational Unit (Subject.OU) | Exact | Production |
| Accept | URI Subject Alternative Name (SAN.URI) | Prefix | spiffe://example.com/ns/prod/ |
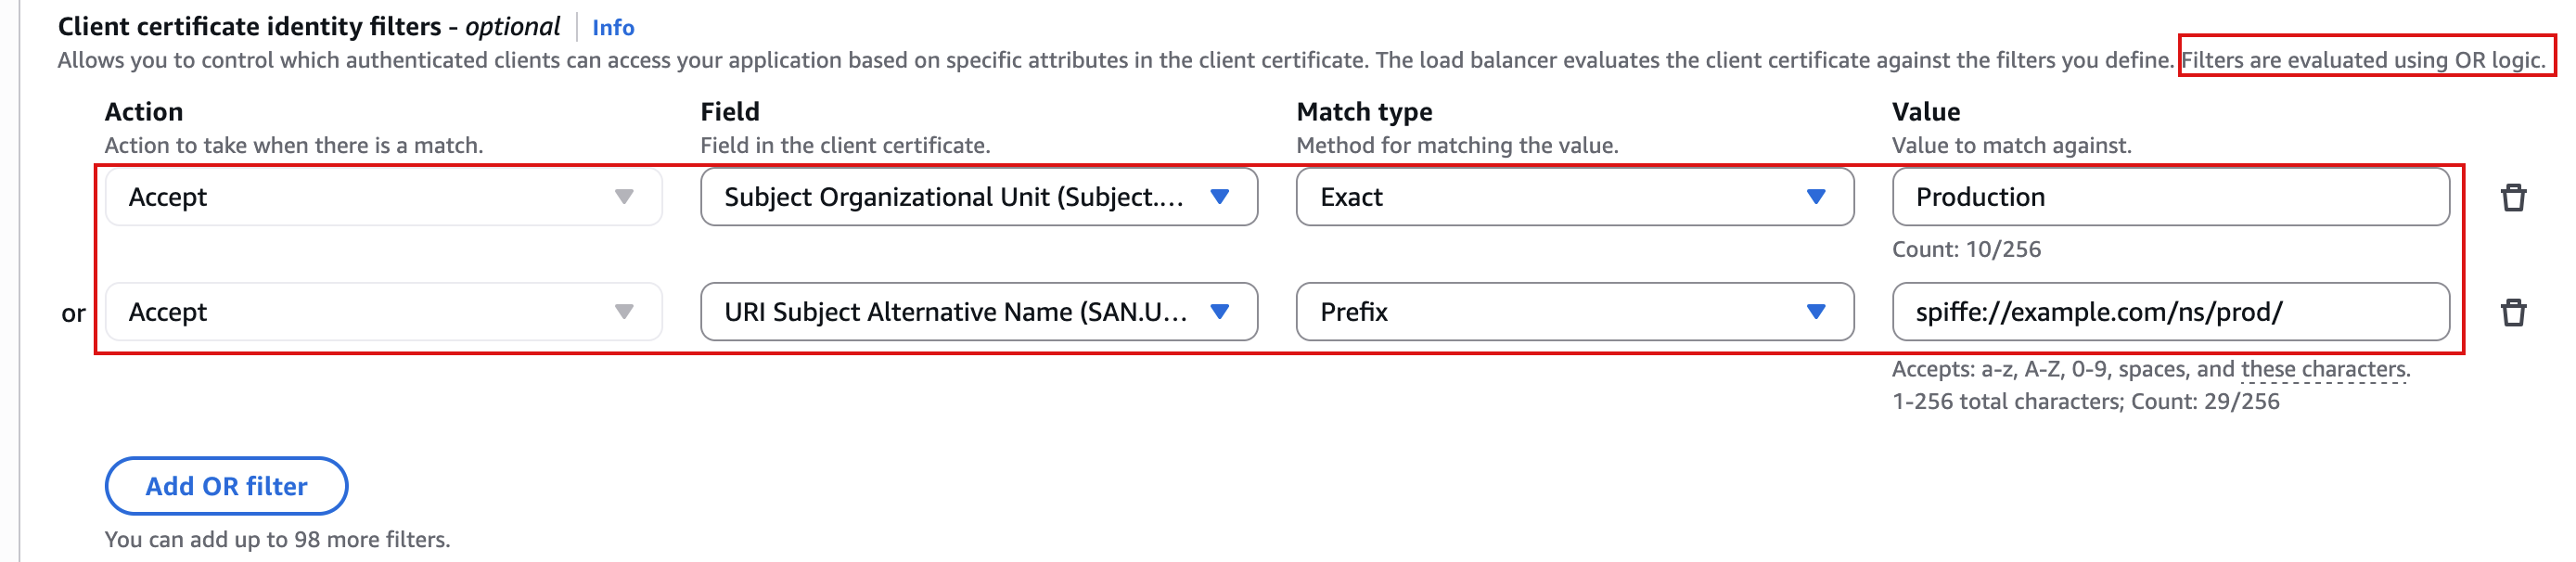
Figure 9: Client certificate identity filters
Filters are combined with OR, and Accept is the only action, so a trusted certificate that matches no filter is rejected.
To test the filters, issue two more client certificates from your CA, both with the clientAuth extended key usage, then compare your results with the table that follows the commands. NLB matches the SAN URI as a string and doesn’t check which system issued the certificate, so any certificate signed by a CA in your trust store with the right URI works. In production, these IDs typically come from a SPIFFE implementation such as SPIRE. For this test, OpenSSL is enough.
With the filters in place, send a request with each certificate:
| Client certificate | Result |
| client1 (OU=Engineering), before filters | Accepted |
| No certificate, or bad-client (untrusted CA) | Rejected |
| client1 (OU=Engineering, no SAN URI), with filters | Rejected: matches no filter |
| client2 (OU=Production and a prod SAN URI) | Accepted: matches both filters |
| client3 (OU=Engineering and a prod SAN URI) | Accepted: matches the SAN URI filter (OR logic) |
Figure 10 shows how NLB evaluates a client certificate in this example and where each test certificate is accepted or rejected.
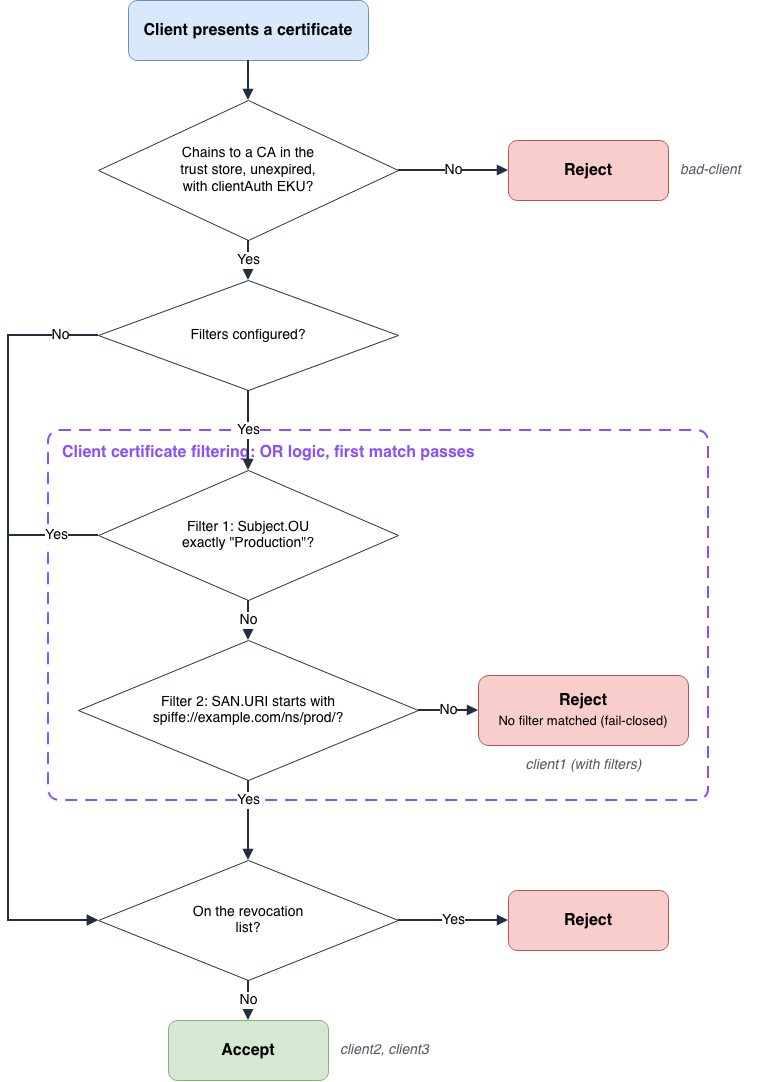
Figure 10: How NLB evaluates a client certificate against trust, revocation, and filters
Design considerations
Plan for the following when you design your trust stores:
- Your existing CA or AWS Private CA: If you already have a PKI solution or vendor, upload your root CAs to the trust store. AWS Private Certificate Authority works the same way: In both cases, you upload the CA certificates as a PEM file.
- Size limits: Trust stores, certificate chains, client certificate filters, and revocation lists have size limits. See Quotas for your Network Load Balancers.
- Trust store sharing: You can manage client trust from one central account and share trust stores with other accounts, or across your organization in AWS Organizations, through AWS Resource Access Manager (AWS RAM).
- Certificate purpose: If a client certificate includes an Extended Key Usage (EKU) extension, it must contain clientAuth. If it includes a Key Usage (KU) extension, that extension must assert digitalSignature or keyAgreement. These checks apply whether or not you configure client certificate filtering, and a certificate that omits an extension passes that check.
- TLS policies and tooling: Mutual authentication works with all generally available TLS security policies, and you can configure it with AWS CloudFormation and the AWS Load Balancer Controller.
- Health checks: They work as before. NLB does not use client certificate information for health checks, so turning on mutual authentication requires no extra setup.
- Monitoring: NLB publishes Amazon CloudWatch metrics for mutual authentication, including handshake counts, error counts, handshake latency, and client certificate expiration. Use them with access logs to spot rising rejection rates or certificates that are close to expiring.
- Troubleshooting: NLB access logs record whether each client passed or failed mutual authentication and why. To turn them on, see Enable access logs.
Revoke client certificates
To revoke access for a client certificate before it expires, upload a CRL to Amazon S3, then add it on the trust store’s details page in the Amazon EC2 console. NLB imports the CRL when you add it and doesn’t read it from Amazon S3 on each connection. When your list changes, add the updated CRL to the trust store again.
Clean up
To avoid ongoing charges, delete the resources you created in this walkthrough:
- In the Amazon EC2 console, under Load Balancing, choose Load Balancers. Select your Network Load Balancer and choose Actions, Delete load balancer. This also deletes its listeners.
- Under Load Balancing, choose Trust Stores. Select your trust store and choose Actions, Delete.
- Under Load Balancing, choose Target Groups. Select your target group and choose Actions, Delete. Then terminate the backend instances and delete the security groups if you created them for this walkthrough.
- In the Amazon S3 console, delete
ca-bundle.pemand any CRL file from your bucket. Delete the bucket if you created it for this walkthrough. - On your computer, delete the test certificates and private keys you created with OpenSSL.
Conclusion
With mTLS on NLB, only clients you trust reach your TCP and TLS applications, and you no longer run proxies or update X.509 libraries to get there. Your PKI team keeps one source of trust, and you can revoke a client without replacing its CA. Each listener admits only the identities it should serve, with no changes to your backend code.
mTLS for NLB is available in all AWS Regions where NLB is available. You can configure mutual authentication through the AWS Management Console, AWS CLI, AWS SDKs, or AWS CloudFormation, and troubleshoot it with access logs. For setup details and limits, see Mutual authentication in the User Guide for NLB.