Networking & Content Delivery
Running multicast-enabled containers on AWS
Introduction
Multicast is a popular IP-based communication mechanism that is actively employed in many industry verticals, including finance, media, telco, transportation, and others.
This post describes how to enable multicast in container environments orchestrated by Amazon Elastic Container Service (ECS). Although Amazon ECS is a fully managed container orchestration service, some additional steps must be taken to enable Multicast in an ECS deployment. By implementing multicast with ECS, you can leverage modern container-based application development patterns while relying on proven multicast networking technology for application discovery and data distribution.
AWS Transit Gateway is the foundational building block of the solution. Transit Gateway natively supports multicast and Internet Group Management Protocol (IGMP), facilitating one-to-many communication in an Amazon Virtual Private Cloud (VPC).
Readers might want to start by reviewing this foundational post to become familiar with multicast service discovery in Amazon Elastic Compute Cloud (EC2) setup. In this post, we’re building on top of Amazon EC2 multicast capabilities while addressing additional container-specific configuration requirements.
Solution Overview
ECS is a fully managed container orchestration service that makes it easy for you to deploy, manage, and scale containerized applications. ECS can leverage AWS Fargate or EC2 technologies as compute capacity providers. At the time of writing, only EC2 Linux deployment mode supports multicast.
The main elements of the architecture are depicted in the following diagram, and they consist of Transit Gateway, ECS cluster with EC2 worker nodes, and Containers deployed with awsvpc networking support.
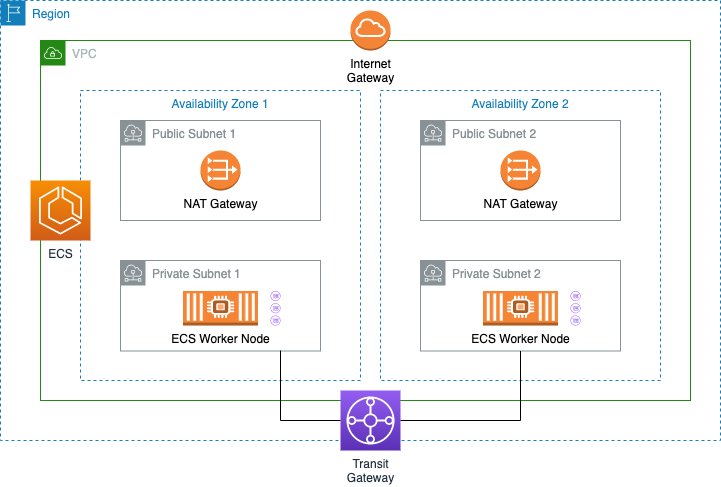
Figure 1: Multicast-enabled ECS cluster
The task networking features enabled by the awsvpc network mode provide ECS tasks with the same networking properties as EC2 instances. This permits task-to-task and task-to-EC2-instance multicast communication. Note that the optional awsvpcTrunking mode hasn’t been validated to support multicast.
Requirements
The following are required to enable multicast in container environments orchestrated by ECS:
- A VPC, with a pair of public and private subnets spread across two Availability Zones
- An Internet Gateway and NAT gateways
- A Transit Gateway with VPC attachments
- A Multicast Domain with subnet associations
- ECS Cluster
- EC2-based container instances configured to support IGMP version 2
- Container images capable of sending and receiving multicast
Deployment Walkthrough
To build the solution, you can launch an AWS CloudFormation stack. The stack creates the required resources listed above.
This stack creates the following AWS resources:
- A VPC, with a pair of public subnets spread across two Availability Zones
- CloudWatch group secured by a AWS Key Management Service (KMS) Customer Managed Key for VPC flow logs
- An Internet Gateway, with a default route in the public subnets
- A Transit Gateway with VPC attachments
- A Multicast Domain with subnet associations
- Highly available ECS cluster using an AutoScaling Group, with two ECS container instances distributed across two Availability Zones. EC2-based container instances are configured to support IGMP version 2 to match with Transit Gateway’s IGMP capabilities.
After the VPC, Transit Gateway, and ECS deployments are completed, you can run your own multicast-enabled containers. We also provide sample Docker files for you to build multicast-enabled containers.
Clone the GitHub Repository
The AWS CloudFormation templates and dockerfile examples for this blog post can be found here: https://github.com/aws-samples/amazon-ecs-multicast-sample.
Before you get started, you need to clone the repository using the following command:
git clone https://github.com/aws-samples/amazon-ecs-multicast-sample
This will create a new folder, amazon-ecs-multicast-sample, with the files inside.
Launching the CloudFormation stack to deploy VPC, Transit Gateway, ECS cluster with workers
To launch the stack:
- Sign in to the AWS Management Console and open the CloudFormation console.
- Make sure that you select an AWS Region that currently supports multicast with IGMP – see AWS Transit Gateway FAQ for the list of available regions.
- Choose Create Stack. In the Specify Template pane, select Upload a template file, and upload the CloudFormation template file 1_multicast_ecs_vpc.yaml from the repository you cloned with Choose file. Choose Next.
- On the next page, specify stack details, give the stack a name, and in the Parameters section enter a CIDR block for the stack’s VPC, as well as Subnet CIDR ranges. An example of how this page might look is shown in the following figure. Choose Next.
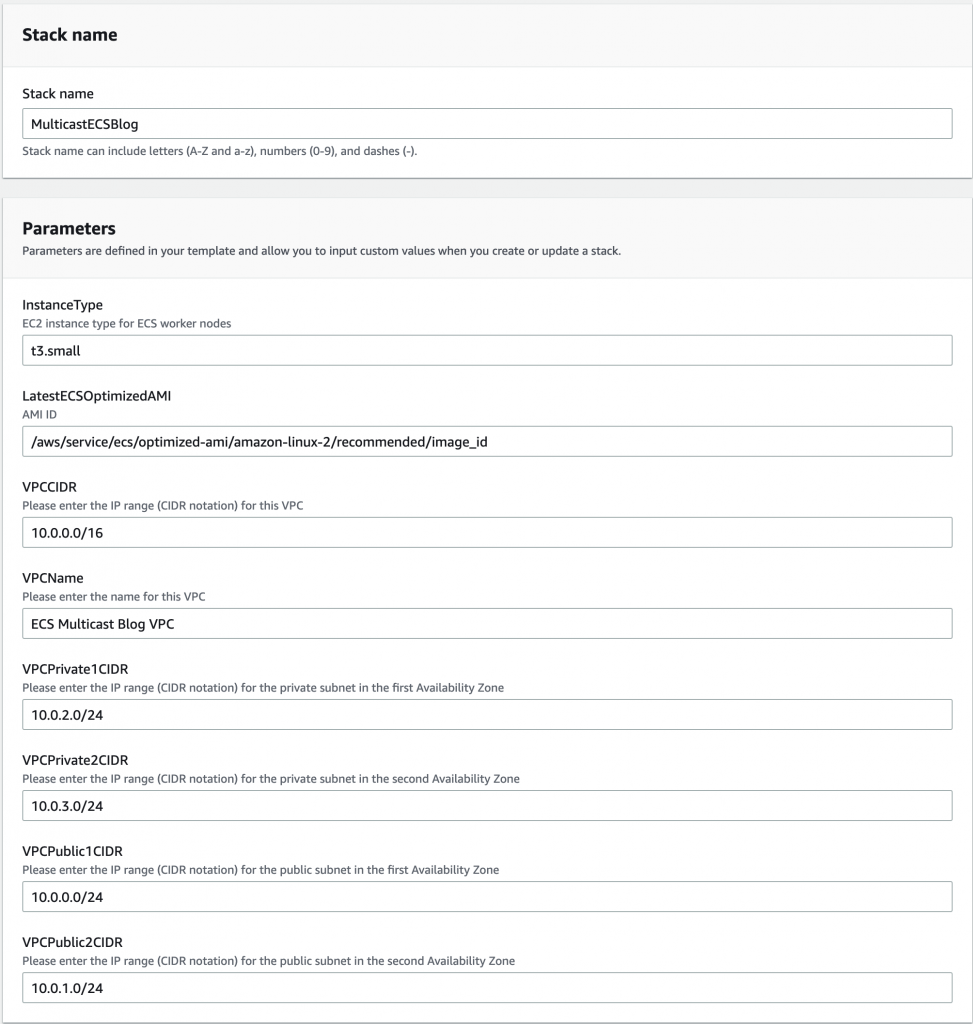
Figure 2: Configuration parameters of the first CloudFormation stack
- No inputs are required on the Configure stack options page. Choose Next.
- On the Review page, under the Capabilities section, choose the checkbox to acknowledge the creation of IAM resources. Choose Create stack.
- Creation of the resources will now begin, and it will typically take 5–10 minutes. Once the stack reaches the status CREATE_COMPLETE, you can proceed to the next section.
- Navigate to the Outputs section of the stack. Copy ECS Cluster ID, VPC ID, and Subnets to a notepad. You’ll need this information for the next section.
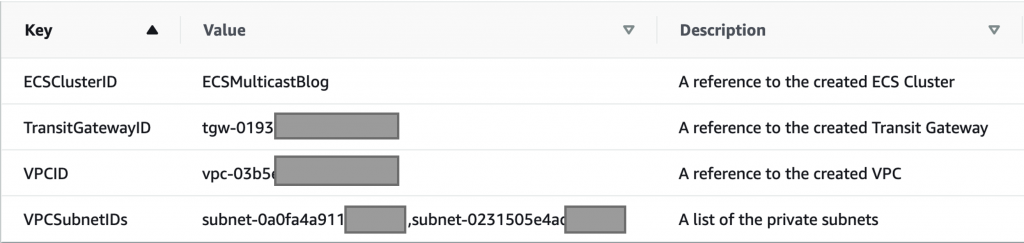
Figure 3: Output values of the first CloudFormation stack
Deploy multicast-enabled workloads
At this point, you have a fully operational VPC, Transit Gateway with Multicast domain, and ECS cluster with two worker nodes deployed in your AWS account.
If you already have multicast-enabled container images, then you can deploy those on your own.
For the purposes of the demo, you can build a multicast sender and a multicast receiver using the following docker file instructions and push the image to a registry. You can use Amazon Elastic Container Registry (ECR) or other container registries of your choice. For more information on how to push a docker image to Amazon ECR refer to the following documentation page: https://docs.aws.amazon.com/AmazonECR/latest/userguide/docker-push-ecr-image.html
Dockerfile to create a multicast receiver container:
FROM ubuntu
RUN apt-get update
RUN apt-get install -y tcpdump
RUN apt-get install -y iperf
ENTRYPOINT ["/usr/bin/iperf", "-s", "-u", "-B", "233.252.0.5", "-i", "1"]
Dockerfile to create a multicast sender container:
FROM ubuntu
RUN apt-get update
RUN apt-get install -y tcpdump
RUN apt-get install -y iperf
ENTRYPOINT ["/usr/bin/iperf", "-c", "233.252.0.5", "-u", "-b", "10k", "-t", "86400"]
The receiver container joins multicast group 233.252.0.5 and accepts traffic destined to this group.
The sender container sends UDP traffic at a rate of 10 Kb/sec to 233.252.0.5 group for one day (86,400 seconds). For information on iperf configuration flags, refer to iperf’s documentation: https://iperf.fr/iperf-doc.php
We’ll show the output of the iperf test later in the Deployment Monitoring section.
After building containers and pushing them to a container registry, you can use the second CloudFormation stack that creates the following AWS resources:
- A security group permitting UDP and IGMP traffic
- Multicast receiver and sender ECS task definitions
- Multicast receiver and sender services with a desired container count
- A CloudWatch group secured by an AWS KMS Customer Managed Key for container logs
To launch the stack:
- Sign in to the Management Console and open the AWS CloudFormation console . Use the same region as in the previous deployment.
- Choose Create Stack. In the Specify Template pane, select Upload a template file, and upload the CloudFormation template file 2_multicast_ecs_tasks.yaml from the repository you cloned with Choose file. Choose Next.
- On the next page, specify stack details, give the stack a name, and in the Parameters section enter the information that you copied from the Outputs section of the previous stack. Update the ContainersDefinition Image key with the value of your registry. An example of how this page might look is shown in the following figure. Choose Next.
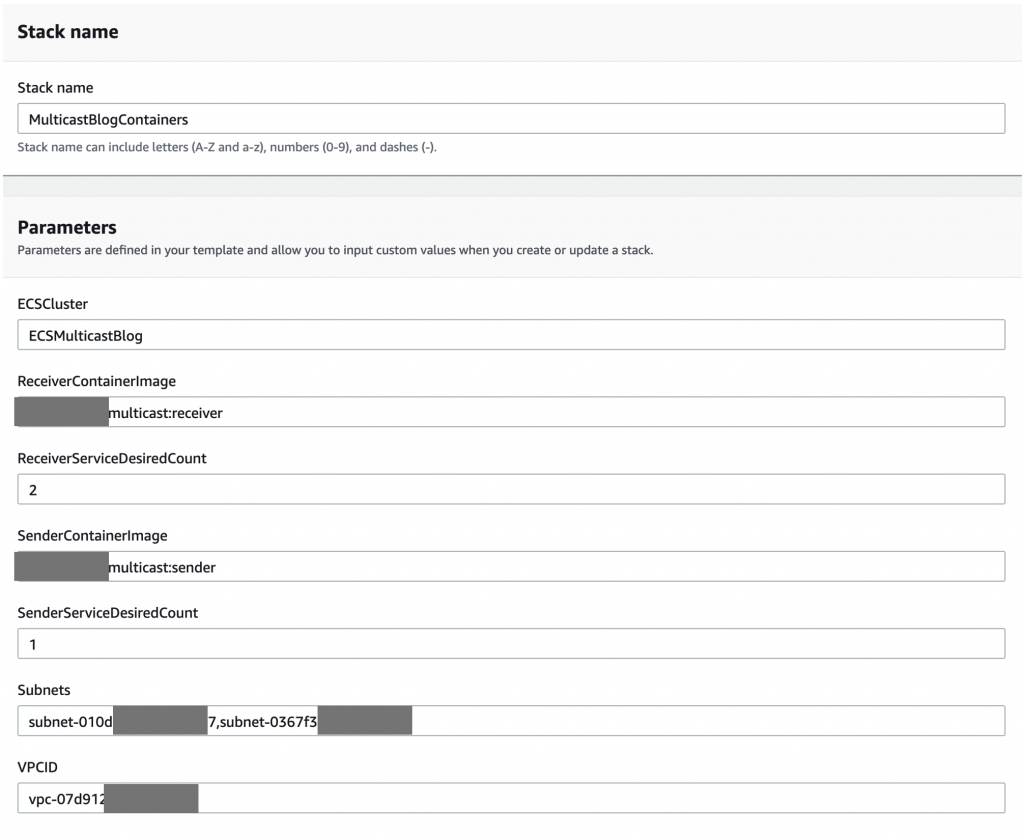
Figure 4: Configuration parameters of the second CloudFormation stack
- No inputs are required on the Configure stack options page. Choose Next.
- No inputs are required on the on the Review page, choose Create stack.
- Creation of the resources will now begin, and it will typically take 2–5 minutes. Once the stack reaches the status CREATE_COMPLETE, you can proceed to the next section.
Note that the number of Receiver and Sender tasks shouldn’t exceed the number of ENIs available for task allocations, otherwise some tasks will fail to create and the stack will remain in CREATE_IN_PROGRESS state.
Important: Sender container generates a 10 Kb/sec data stream, and there will be an associated traffic charge.
Deployment Monitoring
In this section, we highlight key resources associated with the deployment.
Transit Gateway Multicast Domain
A Transit Gateway Multicast Domain is the core building block of this solution, and we suggest that you familiarize yourself with its configuration.
Navigate to Amazon VPC Console in the region where you deployed CloudFormation stacks, and choose Transit Gateway Multicast in the left panel. Select the ECSMulticastBlog domain.
Navigate to Details, Associations tabs of the multicast domain. You should observe that the Multicast domain is configured with IGMPv2 support. Two subnets are associated with the VPC.
If you deployed sender and receiver containers via the provided CloudFormation template, then you will see four Group IP addresses in the Groups tab:
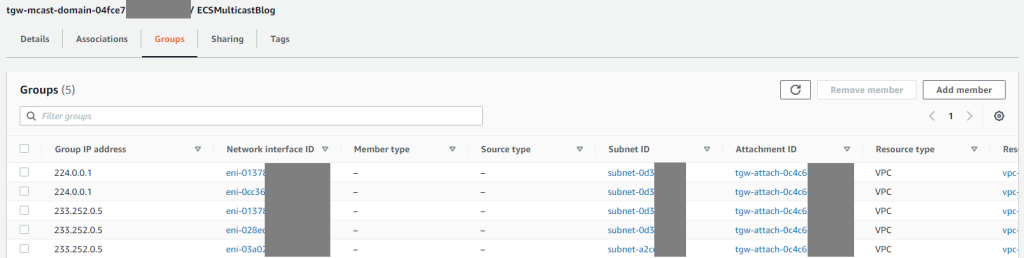
Figure 5: Transit Gateway Multicast Groups
A pair of multicast groups (224.0.0.1 and 233.252.0.5) is associated with each receiver container. 224.0.0.1 is a well-known reserved multicast address associated with the IGMP process. 233.252.0.5 is the multicast group that our receiver container joins.
Note that the sender container doesn’t participate in IGMP and won’t be shown on the transit gateway.
ECS Cluster
Navigate to ECS Cluster console in the region where you deployed CloudFormation stacks, and choose the ECSMulticastBlog cluster that was created.
In the ECS Instances tab, you should see two EC2 Container Instances. During the deployment, these instances were modified to support IGMP version 2. Connect to one of the instances via SSH, EC2 Instance Connect, or AWS Systems Manager Session Manager.
Execute the “cat /proc/net/igmp” command to validate the IGMP version number on the network interfaces. You should see V2 on all of the interfaces, including veth interfaces that act as tunnels:
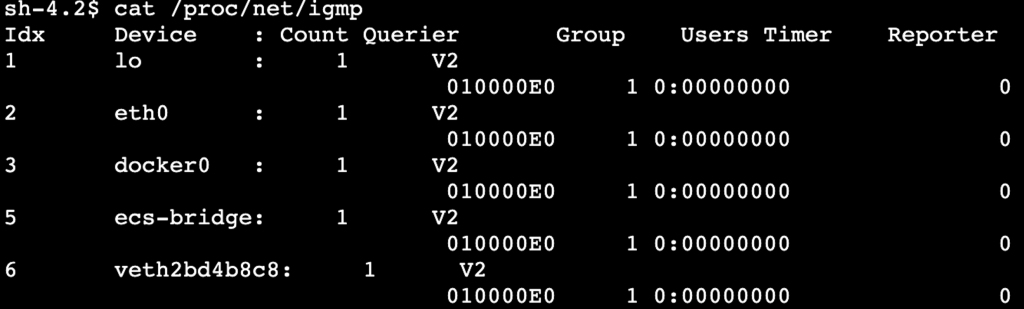
Figure 6: IGMPv2 configuration on a worker node
If you deployed one sender and two receiver containers via the CloudFormation template that we provided, then you will observe three RUNNING tasks:

Figure 7: ECS running tasks
Amazon CloudWatch Logs
Amazon CloudWatch is a monitoring service for AWS cloud resources and the applications that you run on AWS. You can use Amazon CloudWatch to collect and track metrics, collect and monitor log files, and set alarms.
Our CloudFormation containers deployment creates ECSMulticastBlogLogGroup log group that you can access by navigating to the CloudWatch console in the region where you deployed the stacks. Under this log group, you will see log streams for the sender and receivers that contain the output of iperf console logs.
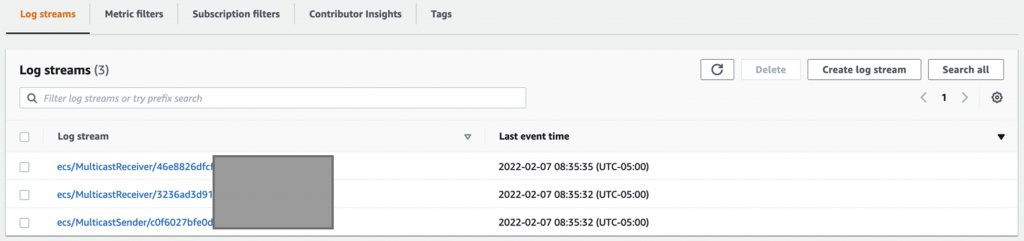
Figure 8: CloudWatch log streams
In turn, selecting each of the log streams lets us verify that Multicast UDP is being sent and received.
In the sender task, we can observe that it is sending datagrams of 1470 bytes.
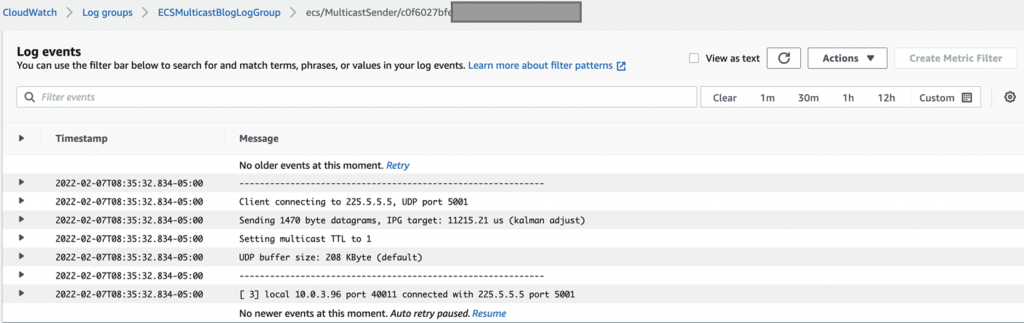
Figure 9: Sender task logs
In the receiver task, we observe that it is receiving datagrams of 1470 bytes at an approximate rate of 10 Kb/sec.
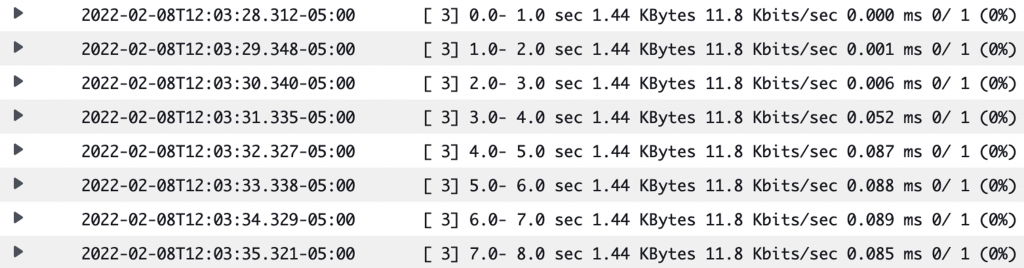
Figure 10: Receiver task logs
Clean-up
If you’re done with your testing, then you can remove the deployments by simply deleting the CloudFormation stacks. Start with the second stack to delete ECS services, tasks, the security group, and the CloudWatch log group. After that, delete the first stack to remove the ECS cluster and the associated networking infrastructure. Note that the custom managed KMS key will remain in the pending deletion state for the rest of the key retention period.
If you created containers in a container registry, then you might want to delete those as well.
Conclusion
In this post, we demonstrated how to create a Multicast-enabled environment using Amazon VPC, AWS Transit Gateway, and Amazon ECS. We created container-based multicast sender and container-based multicast receivers allowing one-to-many communication.
This solution can either be deployed on its own or it can integrate with multicast-enabled EC2 workloads or external multicast-enabled domains.
About the Authors

Yuri Gordienko
Yuri Gordienko is a Solutions Architect at AWS Canada, focusing on the telecom vertical. Prior to joining AWS, Yuri worked at AT&T Canada, Cisco and Juniper Networks. When not busy with work, Yuri loves biking, camping and playing chess with his son Andrew!

Dwayne Crearer
Dwayne Crearer is a Solutions Architect at AWS. For about 20 years he has worked in the Media and Entertainment industry focusing on live production and file based workflow. He has been working on containers since 2019 and that is Dwayne’s current area of focus.