Networking & Content Delivery
Automating service discovery using AWS Transit Gateway Multicast with IGMP
This post will describe how to use multicast and Internet Group Management Protocol (IGMP), two of the newer features of AWS Transit Gateway, to enable applications and services to discover each other automatically when running in Amazon Virtual Private Cloud (Amazon VPC) environments.
Service discovery means that a service client, such as a network file system browser, does not need to have explicit, configured, knowledge of the hostnames or IP addresses of servers offering that service — file servers in this example. This is convenient, because it eliminates an administrative task, and it also lends itself well to highly dynamic environments where servers may start and stop frequently, perhaps as a result of auto-scaling or other automated provisioning actions.
Traditional local area networks, such as Ethernet, allow IP packets not only to be sent to a single destination (unicast), but also to be sent to many or all destinations on the network (multicast and broadcast). This capability is used by multicast-based protocols like DNS-SD or Apple’s Bonjour, to enable service discovery. For desktop environments, such automatic service discovery enables network file system browsing and discovery of networked print services amongst other things. For backend environments, multicast is used to discover neighboring service nodes, form resilient distributed clusters, and send heartbeat messages; examples include Hazelcast and Veritas.
In order to support multicast and broadcast, the network has to create additional copies of non-unicast packets. An Ethernet switch, for instance, receiving a broadcast frame on one of its ports will send copies of that frame on all of its other ports. Multicast is handled similarly, but more efficiently, by replicating frames potentially only to a subset of ports. This flooding behavior is the key principle which enables service discovery, because it allows both ‘announcement’ and ‘query’ type traffic to permeate the entire network.
In the Amazon VPC environment, AWS Transit Gateway can perform this task of selectively flooding multicast traffic to multiple destinations. AWS Transit Gateway acts as a virtual routing appliance and can flexibly connect Amazon VPCs with no single point of failure and the ability to scale to thousands of VPC interconnections. Connected VPCs can all be in the same AWS account, or in many separate accounts. However, the solution described in this post also works when multicast support is desired just for a single subnet within one isolated VPC.
Overview of solution
For this example, I will show you how to build the simple scenario shown below (Figure 1). Within the single VPC, there are two private subnets, both containing Amazon Elastic Compute Cloud (Amazon EC2) instances. Applications on one instance will be able to discover services on all the other instances with no prior configuration. I will show you how to advertise a web service from one instance, which can then be discovered by browsing on another instance.
This is a simple example, but illustrates all the fundamental principles required for more complex situations.
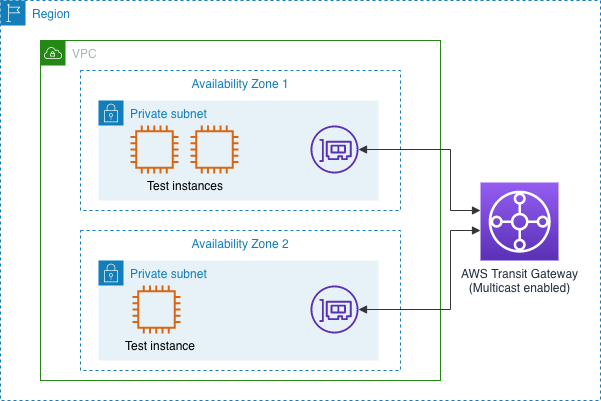
Figure 1: Simple scenario to illustrate multicast
Walkthrough
To build the solution, you will launch an AWS CloudFormation stack and then undertake a simple manual procedure either using the AWS Command Line Interface (AWS CLI), or in the AWS Management Console. This is necessary because these steps cannot yet (as of June 2021) be automated using CloudFormation.
Once the manual steps have been completed, you will log into one of the instances and advertise a service. Then you will log into another instance (optionally in a different subnet) and discover that service, with the second instance having zero configured knowledge of the first. The CloudFormation stack is hosted on GitHub and can be downloaded here.
Prerequisites
For this walkthrough, you should have the following prerequisites:
- An AWS account
- (to use the CLI commands below) An IAM user with programmatic access to the account
Please note that at the time of writing, June 2021, support for multicast with IGMP is available in AWS commercial Regions, including opt-in Regions and China Regions. For current details of regional availability, please see the AWS Transit Gateway FAQ. A maximum of 5 Transit Gateways per Region can be created per account, so the account used to launch the stack must contain 4 or fewer Transit Gateways in the relevant Region at the outset.
You can learn more about multicast on Transit Gateways, including several important considerations, by checking the appropriate section of this documentation about multicast on AWS Transit Gateway. In particular, please note that only AWS Nitro System-based instance types can be multicast senders. This example uses the T3 instance type.
Transit Gateways support IGMP version 2 and not the later version 3. Therefore, it is critical that any systems which are expected to receive multicast traffic are configured to use IGMPv2. For Linux, as used in this example, this can be achieved as follows:
sudo sysctl -w net.ipv4.conf.eth0.force_igmp_version=2
The Linux kernel, rather than any user-space process, is responsible for sending IGMP messages, and therefore this command suffices to alter the behavior for all processes running on a host. Please note, changing the setting as above is not automatically persistent, and this command or similar must therefore be run each boot time. For this example, the instance user data persists these settings to /etc/sysctl.d/99-igmpv2.conf. If you wish to verify the necessity of forcing the IGMP version, you can comment out the lines in this file on one of the instances and reboot it.
Launching the CloudFormation stack
This step programmatically builds the majority of the solution, up to and including attaching the Transit Gateway to the VPC.
To launch the stack:
- Download and save the latest version of the CloudFormation stack,
multicast.yaml, from the GitHub repository. - Sign in to the AWS Management Console and open the AWS CloudFormation console at https://console.aws.amazon.com/cloudformation.
- Be sure to select an AWS Region that currently supports multicast with IGMP — see the Prerequisites section above.
- Choose Create Stack.
- n the Specify Template pane, select Upload a template file and upload the CloudFormation template file from step 1 with Choose file.
- Choose Next.
- On the next page, Specify stack details, give the stack a name and in the Parameters section enter a CIDR block for the stack’s VPC. If you intend to connect other VPCs to the Transit Gateway created here, you should take care that this CIDR does not overlap any address range in the other VPCs. An example of how this page might look is shown below in Figure 2. Choose Next.

Figure 2: Example details for the CloudFormation stack
- No inputs are required on the Configure stack options page. Choose Next.
- On the Review page, Capabilities section, choose the checkbox to acknowledge the creation of IAM resources. Choose Create stack.
Creation of the resources will now begin, and will typically take two to three minutes. Once the stack reaches the status CREATE_COMPLETE, you can proceed to the next section.
Creating an IGMPv2-enabled multicast domain and associating it with the instance subnets
This step cannot yet be automated by CloudFormation, so here I will show you how to do it using the CLI. Alternatively, creating a multicast domain and associating it using the console is shown in this previous post. If you use the console, be sure to select the IGMPv2 support checkbox when creating the multicast domain, because the setting cannot subsequently be edited:
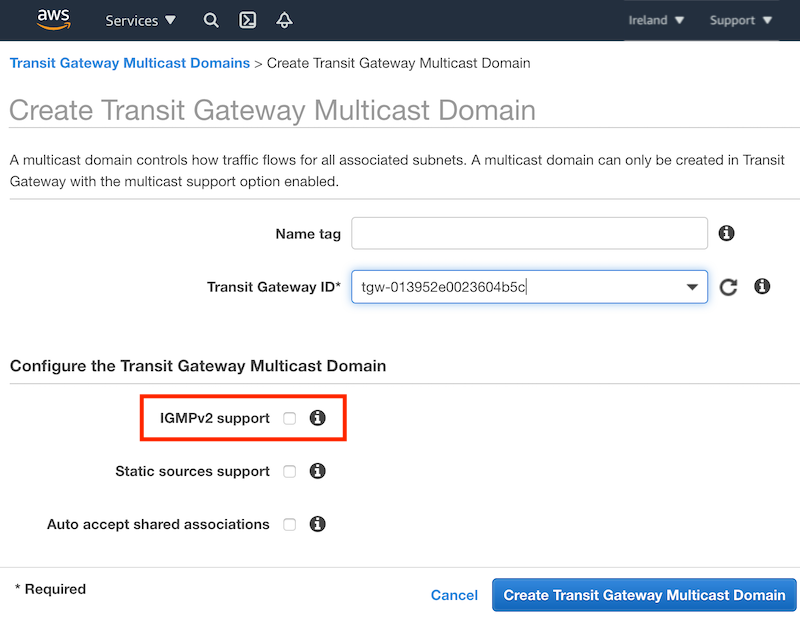
Figure 3: The IGMPv2 support checkbox in the AWS Transit Gateway console
To create a multicast domain (using the CLI):
- Find the identity of the Transit Gateway created by the CloudFormation stack by running
aws ec2 describe-transit-gateways. In the output, note the TransitGatewayId of the Transit Gateway tagged with the name Multicast test Transit Gateway. For instance:{ "TransitGateways": [ { "TransitGatewayId": "tgw-013952e0023604b5c", "TransitGatewayArn": "arn:aws:ec2:eu-west-1:NNNNNNNNNNNN:transit-gateway/tgw-07c56f430d8724f90", "State": "available", "OwnerId": "NNNNNNNNNNNN", "CreationTime": "2021-01-15T15:22:30+00:00", "Options": { "AmazonSideAsn": 64512, "AutoAcceptSharedAttachments": "disable", "DefaultRouteTableAssociation": "enable", "AssociationDefaultRouteTableId": "tgw-rtb-055fa33185bf63d77", "DefaultRouteTablePropagation": "enable", "PropagationDefaultRouteTableId": "tgw-rtb-055fa33185bf63d77", "VpnEcmpSupport": "enable", "DnsSupport": "enable", "MulticastSupport": "enable" }, "Tags": [ { "Key": "Name", "Value": "Multicast test Transit Gateway" } ] }, { "TransitGatewayId": "tgw-0d0d92061337f3a4c", "TransitGatewayArn": "arn:aws:ec2:eu-west-1:NNNNNNNNNNNN:transit-gateway/tgw-0d0d92061337f3a4c", [...] - Create a multicast domain on this specific Transit Gateway by running
aws ec2 create-transit-gateway-multicast-domain --transit-gateway-id tgw-013952e0023604b5c --options Igmpv2Support=enableand note its identity as given by the TransitGatewayMulticastDomainId:{ "TransitGatewayMulticastDomain": { "TransitGatewayMulticastDomainId": "tgw-mcast-domain-09d7ff668c24beba4", "TransitGatewayId": "tgw-013952e0023604b5c", "TransitGatewayMulticastDomainArn": "arn:aws:ec2:eu-west-1:NNNNNNNNNNNN:transit-gateway-multicast-domain/tgw-mcast-domain-0018278c5ad50612c", "OwnerId": "NNNNNNNNNNNN", "Options": { "Igmpv2Support": "enable", "StaticSourcesSupport": "disable", "AutoAcceptSharedAssociations": "disable" }, "State": "pending", "CreationTime": "2021-01-16T10:03:22+00:00" } }Please note that if IGMP support is not available in your chosen Region, at this point you will see an error message similar to this:
An error occurred (InvalidParameterValue) when calling the CreateTransitGatewayMulticastDomain operation: Igmpv2Support parameter is not available in af-south-1 region. - You need to wait for the domain to be available before proceeding to step 5. Check that the command
aws ec2 describe-transit-gateway-multicast-domainsshows the state of this domain as“State”: “available”. It may take a few seconds to reach this state. - Now you are going to associate this newly-created multicast domain with the subnets created earlier by the CloudFormation template. First you need to gather some information. Find the Transit Gateway attachment ID and the related VPC ID for the Transit Gateway you are using by running
aws ec2 describe-transit-gateway-vpc-attachments --filters Name=transit-gateway-id,Values=tgw-013952e0023604b5c{ "TransitGatewayVpcAttachments": [ { "TransitGatewayAttachmentId": "tgw-attach-034400bbe818f1af0", "TransitGatewayId": "tgw-013952e0023604b5c", "VpcId": "vpc-0970d554da2b2f3c1", [...] - List the subnets in this VPC (there will only be two, as shown in the architecture diagram earlier) and take note of their subnet IDs. Do this by running
aws ec2 describe-subnets --filter Name=vpc-id,Values=vpc-0970d554da2b2f3c1{ "Subnets": [ { "AvailabilityZone": "eu-west-1a", "AvailabilityZoneId": "euw1-az3", "AvailableIpAddressCount": 5, "CidrBlock": "10.0.65.16/28", "DefaultForAz": false, "MapPublicIpOnLaunch": false, "MapCustomerOwnedIpOnLaunch": false, "State": "available", "SubnetId": "subnet-009de6d86b8737df2", "VpcId": "vpc-0970d554da2b2f3c1", "OwnerId": "NNNNNNNNNNNN", "AssignIpv6AddressOnCreation": false, "Ipv6CidrBlockAssociationSet": [], "Tags": [ { "Key": "aws:cloudformation:logical-id", "Value": "MCastSubnetPrivateA" }, { "Key": "Name", "Value": "Multicast test private subnet A" }, { "Key": "aws:cloudformation:stack-id", "Value": "arn:aws:cloudformation:eu-west-1:NNNNNNNNNNNN:stack/testmcast/da6d2ea0-58b7-11eb-9f22-02a3ab0eb3e5" }, { "Key": "aws:cloudformation:stack-name", "Value": "testmcast" } ], "SubnetArn": "arn:aws:ec2:eu-west-1:NNNNNNNNNNNN:subnet/subnet-009de6d86b8737df2" }, { "AvailabilityZone": "eu-west-1b", "AvailabilityZoneId": "euw1-az1", "AvailableIpAddressCount": 6, "CidrBlock": "10.0.65.32/28", "DefaultForAz": false, "MapPublicIpOnLaunch": false, "MapCustomerOwnedIpOnLaunch": false, "State": "available", "SubnetId": "subnet-0f5658a9dc2d2e293", "VpcId": "vpc-0970d554da2b2f3c1", "OwnerId": "NNNNNNNNNNNN", "AssignIpv6AddressOnCreation": false, "Ipv6CidrBlockAssociationSet": [], "Tags": [ { "Key": "aws:cloudformation:logical-id", "Value": "MCastSubnetPrivateB" }, { "Key": "Name", "Value": "Multicast test private subnet B" }, { "Key": "aws:cloudformation:stack-name", "Value": "testmcast" }, { "Key": "aws:cloudformation:stack-id", "Value": "arn:aws:cloudformation:eu-west-1:NNNNNNNNNNNN:stack/testmcast/da6d2ea0-58b7-11eb-9f22-02a3ab0eb3e5" } ], "SubnetArn": "arn:aws:ec2:eu-west-1:NNNNNNNNNNNN:subnet/subnet-0f5658a9dc2d2e293" } ] } - Now associate the Transit Gateway multicast domain with these two subnets in this associated VPC by running
aws ec2 associate-transit-gateway-multicast-domain --transit-gateway-multicast-domain-id tgw-mcast-domain-09d7ff668c24beba4 --transit-gateway-attachment-id tgw-attach-034400bbe818f1af0 --subnet-ids subnet-009de6d86b8737df2 subnet-0f5658a9dc2d2e293{ "Associations": { "TransitGatewayMulticastDomainId": "tgw-mcast-domain-09d7ff668c24beba4", "TransitGatewayAttachmentId": "tgw-attach-034400bbe818f1af0", "ResourceId": "vpc-0970d554da2b2f3c1", "ResourceType": "vpc", "ResourceOwnerId": "NNNNNNNNNNNN", "Subnets": [ { "SubnetId": "subnet-009de6d86b8737df2", "State": "associating" }, { "SubnetId": "subnet-0f5658a9dc2d2e293", "State": "associating" } ] } } - Wait for these associations to reach the state
associated. You can check by runningaws ec2 get-transit-gateway-multicast-domain-associations --transit-gateway-multicast-domain-id tgw-mcast-domain-09d7ff668c24beba4
At this point, the multicast domain is operational and associated with your two subnets, and you can proceed to the next section.
Demonstrating multicast operation
Now you can log in to one of the instances via the AWS console and see DNS-SD using multicast in action. I will make use of the standard Avahi tools which ship with most Linux distributions, and which are installed on the demo instances at initialization.
Note that the instances provisioned do not have ssh keys, so you must log in via Session Manager in the AWS console as described here.
To advertise a service:
- Open the EC2 console at https://console.aws.amazon.com/ec2/v2/home in your browser.
- Select Instances from the left-hand pane. In addition to any instances you already had running in this account, you should see a group of three instances named ‘Multicast test instance 1/2/3’.
- Select just one of these instances (it doesn’t matter which one), and choose the Connect button.
- On the Connect to instance page that appears, choose the Session Manager tab and then choose Connect. A new browser tab opens with a shell session onto the instance you selected.
- Suppose you have a web-based service that you want to advertise. In the shell session you just opened, you can do this as follows. The commands create a static ‘service file’ and then start the DNS-SD daemon to advertise this service.
cat <<EOF | sudo tee /etc/avahi/services/great.service
<?xml version="1.0" standalone='no'?>
<!DOCTYPE service-group SYSTEM "avahi-service.dtd">
<service-group>
  <name replace-wildcards="yes">My great service on %h</name>
  <service>
    <type>_https._tcp</type>
    <port>8000</port>
    <txt-record>path=/path/to/my/application</txt-record>
  </service>
</service-group>
EOF
sudo avahi-daemon -D
To browse for services:
- In another browser tab, open the EC2 console again, and connect to another one of the instances following the procedure above. It doesn’t matter whether it’s in the same subnet or the other subnet for the purposes of service discovery, because you placed both subnets in the same multicast domain.
- Run the command
avahi-browse -a. You should see output similar to this:+ eth0 IPv4 ip-10-0-65-24 [12:bd:e0:e2:71:99] Workstation local + eth0 IPv4 ip-10-0-65-43 [0a:de:10:9e:ea:2d] Workstation local + eth0 IPv4 My great service on ip-10-0-65-43 Secure Web Site localNote, it can take a few moments for all the lines to appear. These are the services that have been discovered by using DNS-SD in the local domain. You can see that two instances are visible as ‘Workstation’, and the custom web service you created on the other host has also been discovered. The ‘Workstation’ entries are created automatically by the DNS-SD daemon without the need for any service file.
If you now connect to the third instance and start the DNS-SD daemon there (
sudo avahi-daemon -D), you should see a third ‘Workstation’ be added to this list. Browsing for services (avahi-browse -a) on any of the instances will show a similar list, because the multicast service advertisements have been replicated to all parts of the network connected to the Transit Gateway multicast domain.
Cleaning up
To avoid incurring future charges, delete the resources you have created. Before deleting the CloudFormation stack, you need to undertake a couple of manual steps to delete the multicast domain associations, and then the multicast domain itself:
- Disassociate the multicast domain from the two subnets by running
aws ec2 disassociate-transit-gateway-multicast-domain --transit-gateway-multicast-domain-id tgw-mcast-domain-09d7ff668c24beba4 --transit-gateway-attachment-id tgw-attach-034400bbe818f1af0 --subnet-ids subnet-009de6d86b8737df2 subnet-0f5658a9dc2d2e293{ "Associations": { "TransitGatewayMulticastDomainId": "tgw-mcast-domain-09d7ff668c24beba4", "TransitGatewayAttachmentId": "tgw-attach-034400bbe818f1af0", "ResourceId": "vpc-0970d554da2b2f3c1", "ResourceType": "vpc", "ResourceOwnerId": "NNNNNNNNNNNN", "Subnets": [ { "SubnetId": "subnet-009de6d86b8737df2", "State": "disassociating" }, { "SubnetId": "subnet-0f5658a9dc2d2e293", "State": "disassociating" } ] } } - Delete the multicast domain itself by running
aws ec2 delete-transit-gateway-multicast-domain --transit-gateway-multicast-domain-id tgw-mcast-domain-09d7ff668c24beba4{ "TransitGatewayMulticastDomain": { "TransitGatewayMulticastDomainId": "tgw-mcast-domain-09d7ff668c24beba4", "TransitGatewayId": "tgw-013952e0023604b5c", "TransitGatewayMulticastDomainArn": "arn:aws:ec2:eu-west-1:NNNNNNNNNNNN:transit-gateway-multicast-domain/tgw-mcast-domain-09d7ff668c24beba4", "OwnerId": "NNNNNNNNNNNN", "Options": { "Igmpv2Support": "enable", "StaticSourcesSupport": "disable", "AutoAcceptSharedAssociations": "disable" }, "State": "deleting", "CreationTime": "2021-01-17T14:47:14+00:00" } } - Open the CloudFormation console and select Stacks from the left-hand pane. Locate the stack you launched earlier, select it and choose Delete.
Conclusion
In this post, I showed you how you can use AWS Transit Gateway with multicast and IGMP support to automate service discovery. Automatically-managed multicast group membership, enabled by IGMP, can also simplify other multicast use cases such as streaming multimedia content delivery.
You can give it a try right away on the AWS Management Console, or read in more detail about all the features of Transit Gateway.

John Naylon
John Naylon is a Principal Solutions Architect at AWS, in the Telecom IBU. Before joining AWS, John founded two disruptive startups in the fixed wireless access (FWA) space. When he is not helping AWS customers to redefine the field of telecoms, John likes to design and build treehouses.