
Each year, US federal, state, and local government agencies spend a significant part of their budgets on various social and safety net programs. For example, in fiscal year (FY) 2022, the federal spend on all these programs is estimated to be about $3.26 trillion. These programs include Social Security, Medicare, Medicaid, Supplemental Nutrition Assistance Program (SNAP), and others. Tens of millions of residents apply for these benefits every year. In these applications, documents—in various sources, formats, and layouts—are the primary tools for application assessment. Processing these documents manually or by using legacy optical character recognition (OCR) systems is time-consuming and prone to error. In most cases, applicants must wait several weeks before their cases are adjudicated due to the high-volume of benefits applications. Plus, agencies require a large workforce to review and process these applications, which are submitted online or via mail-in paper forms. Using artificial intelligence (AI) technology to extract and understand the data from benefit application documents can accelerate and simplify the application review process, improving both the case worker and applicant experience.
In this blog post, we demonstrate how public sector agencies can leverage AI offerings from Amazon Web Services (AWS), like Amazon Textract and Amazon Comprehend, to process multiple documents in benefit application use cases. These AWS services allow you to add AI to your applications processing workflow with ease without having any machine learning (ML) knowledge. We walk through a general intelligent document processing (IDP) workflow, and explore how each step in the workflow involves part of the benefit application process for public sector agencies.
Intelligent document processing workflow and solution overview
A general IDP workflow (Figure 1) includes steps of data capture, document classification, information extraction and enrichment, review and validation, and consumption.

Figure 1. General IDP workflow for a benefits application processing solution.
More specifically, when using AWS services to represent the general workflow into an architecture, the following architecture diagram (Figure 2) shows the different AWS services used during the phases of the IDP workflow according to different stages of a benefit application.
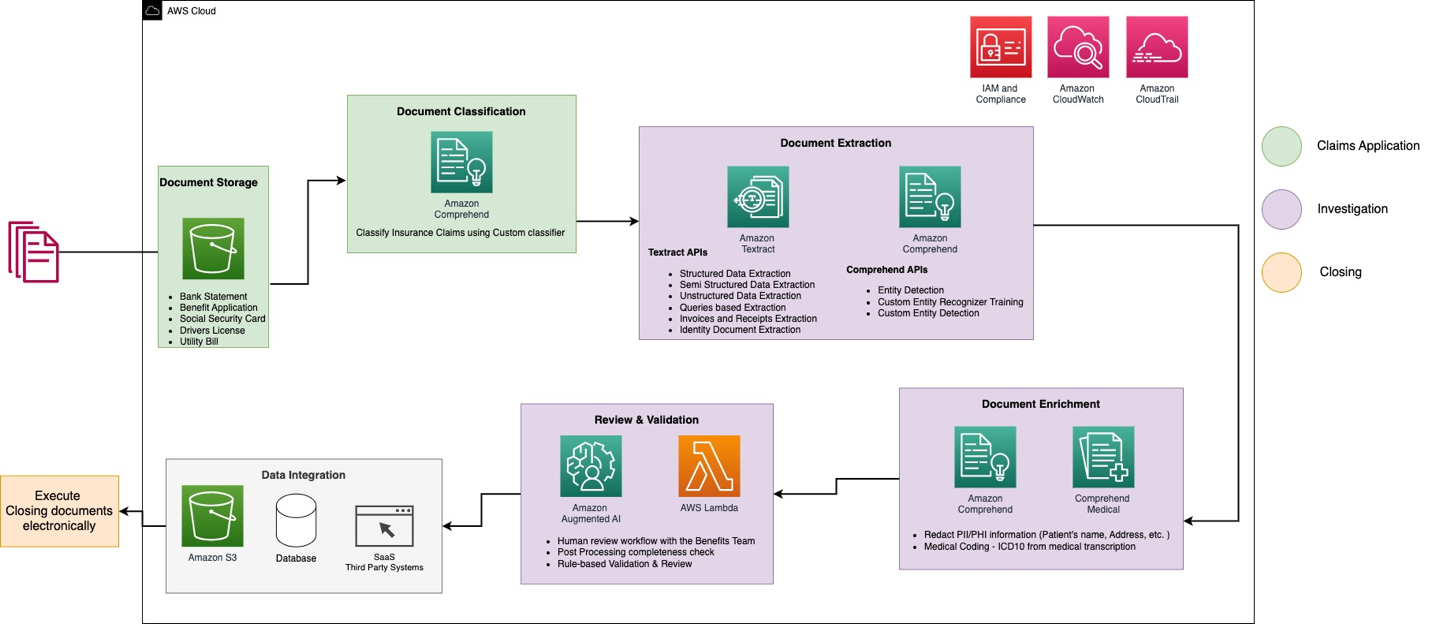
Figure 2. IDP workflow with AWS services, explained in more detail in the following section.
The solution uses the following key services:
Amazon Textract is an ML service that automatically extracts text, handwriting, and data from scanned documents. It goes beyond simple OCR to identify, understand, and extract data from forms and tables. Amazon Textract uses ML to read and process any type of document, accurately extracting text, handwriting, tables, and other data with no manual effort.
Amazon Comprehend is a natural language processing (NLP) service that uses ML to extract insights from text. Amazon Comprehend can detect entities such as person, location, date, quantity, and more. It can also detect the dominant language, personally identifiable information (PII) information, and classify documents into their relevant class.
Amazon Augmented AI (Amazon A2I) is an ML service that makes it simple to build the workflows required for human review. Amazon A2I brings human review to all developers, removing the undifferentiated heavy lifting associated with building human review systems or managing large numbers of human reviewers. Amazon A2I is natively integrated into some AI services such as Amazon Textract’s APIs, but also can be triggered by other services like Amazon Comprehend via AWS Lambda to provide the ability to introduce human review or validation within the IDP workflow.
In a benefit application use case, at the start of the process, an application package including several documents is uploaded to an Amazon Simple Storage Service (Amazon S3) bucket. Amazon Comprehend initiates a document classification process to categorize the documents into known categories. After the documents are categorized, the next step is to extract key information from these documents by using Amazon Textract and Amazon Comprehend. An additional option is to perform document enrichment for select documents, such as personally identifiable information (PII) redaction, document tagging, metadata updates, and more. Amazon A2I then validates the data extracted in previous phases to support completeness of a benefit application. Validation is usually based upon business rule settings. Those rules can be validation rules within a document and/or cross documents. The confidence scores of the extracted information can also be compared to a set threshold, and automatically routed to a human reviewer through Amazon A2I if the threshold isn’t met. In the final phase of the process, the extracted and validated data is sent to downstream systems for further storage, processing, or data analytics.
Storing benefit application documents
In the solution workflow, the benefit application and its supporting documents can come through various channels, such as fax, email, an admin portal, and more. You can store these documents in highly scalable and durable storage like Amazon S3. These documents can be of various types, such as PDF, JPEG, PNG, TIFF, etc; and can come in various formats and layouts from different channels to the data store.
For our public sector benefit application example use case, we use the following example documents:
- Benefit application form
- Bank statements
- Utility bill
- Driver’s license
- Social security number (SSN)
Section 1: Document classification
Amazon Comprehend custom classification helps classify documents into multiple categories such as bank statement, application form, utility bill, invoice, etc. Once the type of a document is identified, customers can use this classification information for further processing. In this walkthrough for this example use case, we use Amazon Comprehend custom classification to categorize our example documents for a benefit application use case. Amazon Comprehend custom classification uses a four-step process:
- To train a custom classifier, first prepare a two-column .CSV file with document categories in the first column and their sample texts in the second column. An example of such .CSV file is in this GitHub Repo.
- The custom classifier training process begins by specifying some simple parameters.
- After the custom classifier is trained, it can be used synchronously or asynchronously. In this walkthrough, we deploy it as an endpoint for real-time document classification.
- Finally, users send a document file directly or the text extracted from the document by Amazon Textract to the endpoint for real-time classification.
The following code snippets illustrate how the entire process works. All code snippets in this blog post are in Python3.8 using boto3 library running in any Python IDE with correctly configured aws configure and service access permission.
Once a .CSV file is prepared, upload the .CSV to Amazon S3 and launch the Amazon Comprehend custom classification model training by creating a document classifier via AWS console.
# Create a document classifier
account_id = boto3.client('sts').get_caller_identity().get('Account')
id = str(datetime.datetime.now().strftime("%s"))

document_classifier_name = 'Sample-Doc-Classifier-IDP-Demo'
document_classifier_version = 'v1'
document_classifier_arn = ''
response = None
comprehend_data_access_role='arn:aws:iam::<your-account-number>:role/idp-demo-comprehend-Executionrole'
try:
    create_response = comprehend.create_document_classifier(
        InputDataConfig={
            'DataFormat': 'COMPREHEND_CSV',
            'S3Uri': f's3://<data_bucket>/<key>'
        },
        DataAccessRoleArn=comprehend_data_access_role,
        DocumentClassifierName=document_classifier_name,
        VersionName=document_classifier_version,
        LanguageCode='en',
        Mode='MULTI_CLASS'
    )

    document_classifier_arn = create_response['DocumentClassifierArn']

    print(f"Comprehend Custom Classifier created with ARN: {document_classifier_arn}")
except Exception as error:
    if error.response['Error']['Code'] == 'ResourceInUseException':
        print(f'A classifier with the name "{document_classifier_name}" already exists.')
    else:
        print(error)
When training completes, for this walkthrough, we deploy the custom classifier as a real-time endpoint:
#create comprehend endpoint
model_arn = document_classifier_arn
ep_name = 'idp-endpoint-v1'

try:
    endpoint_response = comprehend.create_endpoint(
        EndpointName=ep_name,
        ModelArn=model_arn,
        DesiredInferenceUnits=1,
        DataAccessRoleArn=role
    )
    ENDPOINT_ARN=endpoint_response['EndpointArn']
    print(f'Endpoint created with ARN: {ENDPOINT_ARN}')
except Exception as error:
    if error.response['Error']['Code'] == 'ResourceInUseException':
        print(f'An endpoint with the name "{ep_name}" already exists.')
        ENDPOINT_ARN = f'arn:aws:comprehend:{region}:{account_id}:document-classifier-endpoint/{ep_name}'
        print(f'The classifier endpoint ARN is: "{ENDPOINT_ARN}"')
        %store ENDPOINT_ARN
    else:
        print(error)
We then use the above endpoint in downstream processing for classifying and routing documents.
# This function makes an API call to classify documents using the endpoint created above.

import time
from datetime import datetime

def classify_doc(document):
    now = datetime.now()
    current_time = now.strftime("%H:%M:%S")
    print(f'{current_time} : Processing')
    time.sleep(10)   #to avoid Comprehend API throttling
    try:
        response = comprehend.classify_document(
            EndpointArn=ENDPOINT_ARN,
            Bytes=b'<file_name>',
            DocumentReaderConfig={
                'DocumentReadAction': 'TEXTRACT_DETECT_DOCUMENT_TEXT',
                'DocumentReadMode': 'SERVICE_DEFAULT',
            }
        )
        response_df = pd.DataFrame(response['Classes'])
        result = response_df.iloc[response_df['Score'].idxmax()]
        # choose the class with highest score
        return result.Name, result.Score

    except Exception as e:
        print(e)
        return 'error'
For non-real-time use cases, it is preferable to replace real-time endpoints with asynchronous API calls for cost savings. Examples of such calls are StartDocumentClassificationJob and StartEntitiesDetectionJob, which are used for custom classification and custom entity recognition respectively.
Section 2: Document extraction
We use Amazon Textract to extract data from documents. Data structure of documents can be diverse. In the following sections, we walk through the sample documents in a benefit application to extract information from them. For each of these examples, a code snippet and a short sample output is provided. All code examples use amazon-textract-response-parser Python package to parse the result and improve the output readiness and are written in Python3.8.
Extract data from the benefit application form
A benefit application form is a fairly complex document that contains detailed information about the applicant, household members, assistance program selection, household incomes, and expenses. The following is a sample of a Health and Human Services (HHS) financial aid form for children and family. Our intention is to extract information from the first page of this structured document, while the code example is ready to analyze multiple pages. For this, we use the Amazon Textract StartDocumentAnalysis API while specifying FORM in the FeatureTypes parameter. The Amazon Textract StartDocumentAnalysis API asynchronously processes a document stored in an Amazon S3 bucket you specify.

Figure 3. Amazon Textract processed benefit application form.
The following code snippet extracts FORM information from multiple pages and concatenate the result together. The helper function is_job_complete tracks the StartDocumentAnalysis job status. When the job is completed, it calls the get_job_results function that integrates with the amazon-textract-textractor Python library to display the output in key-value pair format. Optionally, you can publish a job completion alert to an Amazon Simple Notification Service (Amazon SNS) topic you specify in the configuration.
import boto3
import time
from trp import Document

# Set up client and environment variables
region = boto3.session.Session().region_name
account_id = boto3.client("sts").get_caller_identity().get("Account")
data_bucket = "<your-bucket>"
s3 = boto3.client("s3")
textract = boto3.client("textract", region_name=region)


def start_analyze_job(data_bucket, key_name):
    response = None
    response = textract.start_document_analysis(
        DocumentLocation={"S3Object": {"Bucket": data_bucket, "Name": key_name}},
        FeatureTypes=["FORMS"],
        OutputConfig={
            "S3Bucket": data_bucket,
            "S3Prefix": "textract-output/benefit-app",
        },
    )

    return response["JobId"]


def is_job_complete(jobId):
    response = textract.get_document_analysis(JobId=jobId)
    status = response["JobStatus"]
    print("Job status: {}".format(status))

    while status == "IN_PROGRESS":
        time.sleep(5)
        response = textract.get_document_analysis(JobId=jobId)
        status = response["JobStatus"]
        print("Job status: {}".format(status))

    return status


def get_job_results(jobId):
    pages = []
    response = textract.get_document_analysis(JobId=jobId)
    pages.append(response)
    print("Result page recieved: {}".format(len(pages)))
    nextToken = None
    if "NextToken" in response:
        nextToken = response["NextToken"]

    while nextToken:
        response = textract.get_document_analysis(JobId=jobId, NextToken=nextToken)

        pages.append(response)
        print("Result page recieved: {}".format(len(pages)))
        nextToken = None
        if "NextToken" in response:
            nextToken = response["NextToken"]

    return pages


# Define document location in S3
key = "textract/Benefit_Application_Form_John_Doe.pdf"
job_id = start_analyze_job(data_bucket, key)
print("Started analyze job with id: {}, document is: {}".format(job_id, key))
if is_job_complete(job_id):
    benefit_application_response = get_job_results(job_id)
doc = Document(benefit_application_response)
print("Result Fields:")
for field in doc.pages[0].form.fields:
    print("Key: {}, Value: {}".format(field.key, field.value))
This yields the following result fields:
Key: Street Address Where You Live, Value: 123 Main St
Key: First Name, Value: John
Key: State, Value: NY
Key: Middle Initial, Value: None
Key: Last Name, Value: Doe
Key: Zip Code, Value: 12018
Key: Refugee Cash Assistance The Refugee Cash Assistance program provides financial assistance to refugee households who are not eligible for the TANF program. The term refugee includes refugees, Cuban/Haitian Entrants, victims of human trafficking, Amerasians, and unaccompanied refugee minors., Value: NOT_SELECTED
Key: Apt, Value: None
Key: No, Value: None
Key: Grandparents Raising Grandchildren (GRG) Grandparents Raising Grandchildren (GRG) will provide additional cash payments so that children can be cared for in the homes of their grandparents. Applicants must apply for TANF to be eligible for GRG., Value: NOT_SELECTED
Key: City, Value: Averill Park
Extract data from bank statement
The bank statement shows information regarding account number, account name, account activities, and balances. It contains both forms and tables. To extract its information, we use similar code as explained previously but pass an additional specification of TABLE in the FeatureTypes parameter to the StartDocumentAnalysis API to indicate that we need both FORM and TABLE data extracted from the document.
import boto3
import time
from trp import Document

# Set up client and environment variables
region = boto3.session.Session().region_name
account_id = boto3.client("sts").get_caller_identity().get("Account")
data_bucket = "<your-bucket>"
s3 = boto3.client("s3")
textract = boto3.client("textract", region_name=region)


def start_analyze_job(data_bucket, key_name):
    response = None
    response = textract.start_document_analysis(
        DocumentLocation={"S3Object": {"Bucket": data_bucket, "Name": key_name}},
        FeatureTypes=["FORMS", "TABLES"],
        OutputConfig={
            "S3Bucket": data_bucket,
            "S3Prefix": "textract-output/bank-statement",
        },
    )

    return response["JobId"]


def is_job_complete(jobId):
    response = textract.get_document_analysis(JobId=jobId)
    status = response["JobStatus"]
    print("Job status: {}".format(status))

    while status == "IN_PROGRESS":
        time.sleep(5)
        response = textract.get_document_analysis(JobId=jobId)
        status = response["JobStatus"]
        print("Job status: {}".format(status))

    return status


def get_job_results(jobId):
    pages = []
    response = textract.get_document_analysis(JobId=jobId)
    pages.append(response)
    print("Result page recieved: {}".format(len(pages)))
    nextToken = None
    if "NextToken" in response:
        nextToken = response["NextToken"]

    while nextToken:
        response = textract.get_document_analysis(JobId=jobId, NextToken=nextToken)

        pages.append(response)
        print("Result page recieved: {}".format(len(pages)))
        nextToken = None
        if "NextToken" in response:
            nextToken = response["NextToken"]

    return pages


key = "textract/Bank_Statement_John_Doe.png"
job_id = start_analyze_job(data_bucket, key)
print("Started analyze job with id: {}, document is: {}".format(job_id, key))
if is_job_complete(job_id):
    bank_statement_response = get_job_results(job_id)
doc = Document(bank_statement_response)
print("Result Table:")
for page in doc.pages:
    for table in page.tables:
        for r, row in enumerate(table.rows):
            for c, cell in enumerate(row.cells):
                print("Table[{}][{}] = {}-{}".format(r, c, cell.text, cell.confidence))
Result table:
Table[0][0] = ACCOUNT NAME -90.5226058959961
Table[0][1] = ACCOUNT NUMBER -87.98987579345703
Table[0][2] = BALANCE ($) -91.82344818115234
Table[0][3] = DETAILS ON -88.92097473144531
Table[1][0] = CHECKING -87.62581634521484
Table[1][1] = 003525801543 -85.17413330078125
Table[1][2] = 5,657.47 -88.88502502441406
Table[1][3] = page 1 -86.075439453125
The table information contains cell position (e.g., row 0, column 0) and corresponding text within each cell. We use Textract-PrettyPrinter helper function to format the output received from Amazon Textract. This method can transform the table data into a simple grid view:
from textractprettyprinter.t_pretty_print import (
    Textract_Pretty_Print,
    get_string,
    Pretty_Print_Table_Format,
)

print(
    get_string(
        textract_json=bank_statement_response,
        table_format=Pretty_Print_Table_Format.grid,
        output_type=[Textract_Pretty_Print.TABLES],
    )
)
Here is the formatted output:
+---------------------------------+------------------+-------------+------------+
| ACCOUNT NAME                    | ACCOUNT NUMBER   | BALANCE ($) | DETAILS ON |
+---------------------------------+------------------+-------------+------------+
| CHECKING                        | 003525801543     | 5,657.47    | page 1     |
+---------------------------------+------------------+-------------+------------+
| Total checking and money market | savings accounts | $5,657.47   |            |
+---------------------------------+------------------+-------------+------------+
| SAVINGS                         | 352580154336     | 53,578.24   | page 3     |
+---------------------------------+------------------+-------------+------------+
| Total savings accounts          |                  | $53,578.24  |            |
+---------------------------------+------------------+-------------+------------+

+-----------------------------------------------+-------------+
| Your previous balance as of 04/04/2022        | $41,982.42  |
+-----------------------------------------------+-------------+
| Checks                                        | 1,177.33    |
+-----------------------------------------------+-------------+
| Other withdrawals, debits and service charges | - 567.18    |
+-----------------------------------------------+-------------+
| Deposits, credits and interest                | + 3,124.75  |
+-----------------------------------------------+-------------+
| Your new balance as of 06/17/2020             | = $5,657.47 |
+-----------------------------------------------+-------------+

+-------+---------+------------+
| DATE  | CHECK # | AMOUNT ($) |
+-------+---------+------------+
| 06/09 | 985026  | 150.00     |
+-------+---------+------------+
| Total | checks  | = $701.39  |
+-------+---------+------------+

+-------+---------+------------+
| DATE  | CHECK # | AMOUNT ($) |
+-------+---------+------------+
| 05/26 | 1401    | 450.00     |
+-------+---------+------------+

+-------+---------+------------+
| DATE  | CHECK # | AMOUNT ($) |
+-------+---------+------------+
| 06/05 | *965025 | 101.39     |
+-------+---------+------------+
Extract data from utility bill
Utility bills are a common proof of residency. An electricity bill, water bill, telephone bill, and internet invoice are examples of utility bills. Most utility bills do not have a fixed set of fields or a fixed format; they contain both structured and unstructured documents with high variance in layout. To quickly extract the necessary information that we need without knowing the data structure, the following code snippet uses the AnalyzeExpense API from Amazon Textract on the example utility bill document. In this walkthrough, we show a synchronized way to process the utility bill. It is worth noting that the process can also be done in an asynchronized way by calling StartExpenseAnalysis API.
In the following code example, we demonstrate how to extract data from a one-page utility bill document, including steps of making an API call, printing out the detection result from label and value, and subsequently drawing the bounding box around the detected result.
import boto3
import io
from PIL import Image, ImageDraw


def draw_bounding_box(key, val, width, height, draw):
    # If a key is Geometry, draw the bounding box info in it
    if "Geometry" in key:
        # Draw bounding box information
        box = val["BoundingBox"]
        left = width * box['Left']
        top = height * box['Top']
        draw.rectangle([left, top, left + (width * box['Width']), top + (height * box['Height'])],
                       outline='black')


def print_labels_and_values(field):
    # Only if labels are detected and returned
    if "LabelDetection" in field and "ValueDetection" in field:
        print(
            "Label Detection - Confidence: {}".format(
                str(field.get("LabelDetection")["Confidence"])
            )
            + ", "
            + "Summary Values: {}".format(str(field.get("LabelDetection")["Text"]))
            + "\n"
            + "Value Detection - Confidence: {}".format(
                str(field.get("ValueDetection")["Confidence"])
            )
            + ", "
            + "Summary Values: {}".format(str(field.get("ValueDetection")["Text"]))
            + "\n"
        )


def process_expense_analysis(bucket, document, region):
    # Get the document from S3
    s3_connection = boto3.resource('s3')
    s3_object = s3_connection.Object(bucket, document)
    s3_response = s3_object.get()

    # opening binary stream using an in-memory bytes buffer
    stream = io.BytesIO(s3_response['Body'].read())

    # loading stream into image
    image = Image.open(stream)

    # Detect text in the document
    client = boto3.client('textract', region_name=region)

    # process using S3 object
    response = client.analyze_expense(
        Document={'S3Object': {'Bucket': bucket, 'Name': document}})

    # Set width and height to display image and draw bounding boxes
    # Create drawing object
    width, height = image.size
    draw = ImageDraw.Draw(image)

    for expense_doc in response["ExpenseDocuments"]:
        for line_item_group in expense_doc["LineItemGroups"]:
            for line_items in line_item_group["LineItems"]:
                for expense_fields in line_items["LineItemExpenseFields"]:
                    print_labels_and_values(expense_fields)

        print("Summary:")
        for summary_field in expense_doc["SummaryFields"]:
            print_labels_and_values(summary_field)

        #For draw bounding boxes
        for line_item_group in expense_doc["LineItemGroups"]:
            for line_items in line_item_group["LineItems"]:
                for expense_fields in line_items["LineItemExpenseFields"]:
                    for key, val in expense_fields["ValueDetection"].items():
                        if "Geometry" in key:
                            draw_bounding_box(key, val, width, height, draw)

        for label in expense_doc["SummaryFields"]:
            if "LabelDetection" in label:
                for key, val in label["LabelDetection"].items():
                    draw_bounding_box(key, val, width, height, draw)

    # Display the image
    image.show()


# Set up environment variables
region = boto3.session.Session().region_name
account_id = boto3.client("sts").get_caller_identity().get("Account")
s3_bucket = "<your-bucket>"
document = "textract/Utility_Bill_John_Doe.png"
process_expense_analysis(s3_bucket, document, region)
We get the following output:
Summary:
Label Detection - Confidence: 99.525634765625, Summary Values: Service Address:
Value Detection - Confidence: 95.42406463623047, Summary Values: 123 MAIN ST, AVERILL PARK, NY 12018

Label Detection - Confidence: 99.76644897460938, Summary Values: Account Number
Value Detection - Confidence: 99.78838348388672, Summary Values: 12345678912

Label Detection - Confidence: 97.76393127441406, Summary Values: Payments received as of 12/27/21
Value Detection - Confidence: 97.66374206542969, Summary Values: -101.03

Label Detection - Confidence: 99.81817626953125, Summary Values: Statement Date:
Value Detection - Confidence: 99.46695709228516, Summary Values: December 28, 2021

Label Detection - Confidence: 64.6274185180664, Summary Values: Previous invoice
Value Detection - Confidence: 64.61885833740234, Summary Values: $101.03

Label Detection - Confidence: 99.89702606201172, Summary Values: Amount Due:
Value Detection - Confidence: 99.88894653320312, Summary Values: $385.63

Figure 4. Amazon Textract AnalyzeExpense API processed utility bill document.
Extract data from a driver’s license
Amazon Textract AnalyzeID can offer specialized capabilities to extract data from identity documents issued by the US Government, such as a driver’s license and passport. The AnalyzeID API is able to detect and extract implied fields like name and address, as well as explicit fields like Date of Birth, Date of Issue, Date of Expiry, ID Number, ID Type, and more in the form of key-value pairs.

Figure 5. An example of a driver’s license.
In this section, we use similar code from the blog post, “Process mortgage documents with intelligent document processing using Amazon Textract and Amazon Comprehend.” The method named call_textract_analyzeid, calls the AnalyzeID API internally. We then iterate over the response to obtain the detected key-value pairs from the driving license. The python code snippet below shows in benefit application use case, how we detect key-value pairs from the example of driving license:
from textractcaller import call_textract_analyzeid
import trp.trp2_analyzeid as t2id

response_driver_license = call_textract_analyzeid(
    document_pages=["s3://<your-bucket>/textract/drivers-license.png"]
)
doc_driver_license: t2id.TAnalyzeIdDocument = t2id.TAnalyzeIdDocumentSchema().load(
    response_driver_license
)

for id_docs in response_driver_license["IdentityDocuments"]:
    id_doc_kvs = {}
    for field in id_docs["IdentityDocumentFields"]:
        if field["ValueDetection"]["Text"]:
            id_doc_kvs[field["Type"]["Text"]] = field["ValueDetection"]["Text"]
print(id_doc_kvs)
The AnalyzeID returns information in a JSON output, which contains AnalyzeIDModelVersion, DocumentMetadata, and IdentityDocuments. Each IdentityDocument item contains IdentityDocumentFields. The data in the IdentityDocumentFields consists of Type and ValueDetection.
{
   "IdentityDocuments":[
      {
         "DocumentIndex":1,
         "IdentityDocumentFields":[
            {
               "Type":{
                  "Text":"FIRST_NAME"
               },
               "ValueDetection":{
                  "Text":"JOHN",
                  "Confidence":98.22643280029297
               }
            },
            {
               "Type":{
                  "Text":"LAST_NAME"
               },
               "ValueDetection":{
                  "Text":"DOE",
                  "Confidence":98.02102661132812
               }
            },
       ...]
]}
From the sample driver’s license, we get the following information:
{
    "FIRST_NAME": "JOHN",
    "LAST_NAME": "DOE",
    "CITY_IN_ADDRESS": "ANY CITY",
    "ZIP_CODE_IN_ADDRESS": "92127",
    "STATE_IN_ADDRESS": "CA",
    "STATE_NAME": "UNITED STATES OF STATE",
    "DOCUMENT_NUMBER": "6383736743891101",
    "EXPIRATION_DATE": "09/21/2034",
    "DATE_OF_BIRTH": "09/21/1970",
    "ID_TYPE": "DRIVER LICENSE FRONT",
    "ENDORSEMENTS": "NONE",
    "CLASS": "C",
    "ADDRESS": "123 ANY STREET"
}
In this use case, AnalyzeID API detected 13 normalized keys and their corresponding value in IdentityDocumentFields. For example, in the following output, FIRST_NAME is a normalized key and the value is JOHN. In the sample driver’s license image, the field for the first name is labeled as “FN”, however, AnalyzeID was able to normalize that into the key name FIRST_NAME. For a list of supported normalized fields, refer to Identity Documentation Response Objects.
Section 3: Document enrichment for sensitive information
Document enrichment is an optional stage in the general IDP workflow. In this stage, documents can be enriched by redacting personally identifiable information (PII) data, extracting custom business terms, and more. Our sample document is an SSN card containing a personal social security number that we want to redact.
Amazon Comprehend is a commonly used AI service to do document enrichment. It has various capabilities in natural language processing such as PII detection via DetectPIIEntities API. In this walkthrough, due to the simplicity of the SSN card, we show a different way that uses Amazon Textract StartDocumentAnalysis API with FeatureTypes parameter as QUERIES followed by GetDocumentAnalysis API, to extract the SSN number for redaction. Amazon Textract Queries allows you to extract specific information of your interest from the document by providing natural language questions. The following code snippet shows how this feature works:
import boto3
import time
from tabulate import tabulate
from trp import Document
import trp.trp2 as t2


def start_analyze_job(data_bucket, key_name):
    response = None
    response = textract.start_document_analysis(
    DocumentLocation={
        'S3Object': {
            'Bucket': data_bucket,
            'Name': key_name
        }
    },
    FeatureTypes=['QUERIES'],
    QueriesConfig={
        "Queries": [
        {
            "Text": "What is SSN number?",
            "Alias": "SSN_NUMBER"
        },
        {
            "Text": "What is the name on SSN?",
            "Alias": "SSN_OWNER_NAME"
        }
      ]},
    OutputConfig={
        'S3Bucket': data_bucket,
        'S3Prefix': 'textract-output/ssn'
    })

    return response["JobId"]


def is_job_complete(jobId):
    response = textract.get_document_analysis(JobId=jobId)
    status = response["JobStatus"]
    print("Job status: {}".format(status))

    while(status == "IN_PROGRESS"):
        time.sleep(5)
        response = textract.get_document_analysis(JobId=jobId)
        status = response["JobStatus"]
        print("Job status: {}".format(status))

    return status


def get_job_results(jobId):
    pages = []
    response = textract.get_document_analysis(JobId=jobId)

    pages.append(response)
    print("Result page recieved: {}".format(len(pages)))
    nextToken = None
    if('NextToken' in response):
        nextToken = response['NextToken']

    while(nextToken):
        response = textract.get_document_analysis(JobId=jobId, NextToken=nextToken)
        pages.append(response)
        print("Result page recieved: {}".format(len(pages)))
        nextToken = None
        if('NextToken' in response):
            nextToken = response['NextToken']

    return pages


def print_result_in_document(response):
    doc = t2.TDocumentSchema().load(response[0])
    page = doc.pages[0]
    doc_query_answers = doc.get_query_answers(page=page)
    print(tabulate(doc_query_answers, tablefmt="github"))


# Set up client and environment variables
region = boto3.session.Session().region_name
account_id = boto3.client('sts').get_caller_identity().get('Account')
s3=boto3.client('s3')
textract = boto3.client('textract', region_name=region)
key = "textract/SSN_John_Doe.jpg"
data_bucket = "<your-bucket>"

job_id = start_analyze_job(data_bucket, key)
print("Started analyze job with id: {}, document is: {}".format(job_id, key))
if(is_job_complete(job_id)):
    ssn_response = get_job_results(job_id)
print_result_in_document(ssn_response)
Based on the bounding box dimensions and coordinates returned by Amazon Textract, the enrichment process adds redaction boxes on the document. The code snippet is as follows:
import s3fs
from PIL import Image, ImageDraw


def get_job_results(jobId):
    pages = []
    response = textract.get_document_analysis(JobId=jobId)

    pages.append(response)
    print("Result page recieved: {}".format(len(pages)))
    nextToken = None
    if "NextToken" in response:
        nextToken = response["NextToken"]

    while nextToken:
        response = textract.get_document_analysis(JobId=jobId, NextToken=nextToken)

        pages.append(response)
        print("Result page recieved: {}".format(len(pages)))
        nextToken = None
        if "NextToken" in response:
            nextToken = response["NextToken"]
    return pages


def check_ssn(value):
    return any([char.isdigit() for char in value])


def ssn_redaction(response):
    fs = s3fs.S3FileSystem(anon=False)
    file_path = "s3://" + data_bucket + "/" + key
    with fs.open(file_path) as f:
        img = Image.open(f)
        width, height = img.size
        print("Redacting SSN Image => ")

        # Add redaction to SSN based on geometry information
        for item in response[0]["Blocks"]:
            if item["BlockType"] == "QUERY_RESULT":
                result = check_ssn(item["Text"])
                if result:
                    x1 = item["Geometry"]["BoundingBox"]["Left"] * width
                    y1 = item["Geometry"]["BoundingBox"]["Top"] * height - 2
                    x2 = x1 + (item["Geometry"]["BoundingBox"]["Width"] * width) + 5
                    y2 = y1 + (item["Geometry"]["BoundingBox"]["Height"] * height) + 2

                    draw = ImageDraw.Draw(img)
                    draw.rectangle([x1, y1, x2, y2], fill="Black")
                    img.show()


response = get_job_results("<your-job-id>")
ssn_redaction(response)
Figure 6 illustrates the redaction result:

Figure 6. An example social security card with the generated redaction boxes on sensitive information.
Section 4: Review, validation, and integration
Before we send information or a decision to downstream databases or applications, organizations usually validate extracted information based on predefined business rules. Such business rules can be rules made for one document and/or rules made across documents. As an example, for benefit applications, a within-document rule can be that the amount of cash in bank statement should be lower than a certain amount; a cross-document rule can be that the name appearing on the driver’s license should match the name on the benefit application form. These business rules are used by the system to generate a decision of an application. Human-in-the-loop, or the process of integrating human reviews for additional validation, can also be integrated into the document process workflow by using the Amazon A2I service. Typically, a case worker will receive an alert in case any discrepancies are identified by the automated document processing workflow; for example, if there is a field with a low confidence score, or a violation of a business rule. The case worker can then review the application and make a correction or decision afterwards.
Conclusion
In this walkthrough, we discussed how each phase in a general IDP workflow applies to each stage in a public sector benefit application using commonly required sample documents for such an application. We demonstrated how AI services from AWS can power an IDP workflow, and automate benefit applications from end to end to reduce processing time, cost, and case workers’ effort, as well as improve decision making, accuracy, and the applicants’ experience.
As next step, try some code samples in the IDP GitHub repo. To learn more about how IDP can help your document processing workloads, visit Automate data processing from documents.
Learn more about how organizations deliver on their missions with data and AI in the new eBook, The machine learning journey. This eBook explores and outlines six steps that public sector organizations can take to establish and begin their ML journey. Learn how Fannie Mae, Mary Washington Healthcare (MWHC), and the National Archives and Records Administration (NARA) in the United States, Jacaranda Health in Kenya, and the Driver and Vehicle Safety Agency (DVSA) in the United Kingdom—as well as how Amazon leaders—use machine learning in their various organizations.
Plus, learn from leading AWS experts working with government agencies and nonprofits in every stage of the ML process in the AWS machine learning webinar series.
Subscribe to the AWS Public Sector Blog newsletter to get the latest in AWS tools, solutions, and innovations from the public sector delivered to your inbox, or contact us.
Please take a few minutes to share insights regarding your experience with the AWS Public Sector Blog in this survey, and we’ll use feedback from the survey to create more content aligned with the preferences of our readers.