AWS Security Blog
Automate IAM Identity Center governance with continuous discovery and reporting
AWS IAM Identity Center integrates with external identity provider (IdP) to provide customers with a centralized authentication and authorization solution for AWS resources across AWS Organizations. AWS continues to invest into IAM Identity Center with a growing number of AWS services that natively integrate with IAM Identity Center. As your AWS organization scales, maintaining visibility into who has access to which applications and enforcing governance policies across accounts and Regions becomes increasingly complex. Identity Center helps address this by centralizing authentication and authorization for AWS resources across your organization, integrating with your external identity provider and a growing number of AWS services. However, as adoption scales, tracking access assignments and enforcing governance policies consistently becomes its own challenge.
This blog post focuses on planning your integration between an identity provider and IAM Identity Center for managed applications in your organization. We also walk through deploying and using an automated Identity Center discovery and reporting sample solution to help answer the governance and security questions:
- Which users or groups have access to which AWS applications?
- Who last accessed a specific AWS application and when?
- Which users and groups are assigned to which IAM Identity Center applications across organization and AWS Regions?
- How can you quickly generate reports to assist with compliance audits or security reviews?
The sample solution will identify associated AWS applications and the corresponding user and group assignments for the IAM Identity Center instances within your organization. The output is stored in a queryable format and generates CSV files for downstream analysis or reporting.
Plan identity governance for Identity Center application assignments
There are four key areas to start on when planning how to manage delegation and provisioning access across IAM Identity Center managed AWS applications. Bring together key stakeholders across security, governance, application, and business teams to make sure the implementation and integration will fit into the overall identity governance strategy.
- Who can provision managed AWS applications: You can implement the IAM restrictions for creation of new AWS resources within AWS accounts in your organization. For example, if you restrict provisioning into a production AWS account to only infrastructure as code (IaC) IAM roles, you would continue implementing restrictions using AWS identity policies, service control policies (SCP), resource control policies (RCP), or IaC policy evaluation tools like Open Policy Agent (OPA) or Checkov.
- Who manages user and group assignments: The managed application administrator handles authorization to managed applications within an AWS account. It’s recommended to clearly define roles and responsibilities across the workflow. You would have an IaC pipeline manage the integrated AWS resource provisioning with IAM Identity Center, then another workflow to allow requests to manage user and group membership for the managed application.
- How authentication flows from the IdP to AWS resources: Users will authenticate into Identity Center, then be authorized to access AWS managed applications. From there, they will be authorized to access the associated AWS service and resources tied to the managed application. Depending on the AWS service, the associated downstream resources might have their own IAM principals that the users can access.
- Mapping IdP identities to AWS resource access: There needs to be a link for workforce users and groups in your IdP, to Identity Center managed applications, and to downstream resources and permissions. Identifying the relationship will help you understand access within your AWS environment. Trusted identity propagation (TIP) is an additional feature of Identity Center that provides an end to end trail of the identity to the downstream service.
Create and manage an Identity Center application assignment lifeycle
As a security best practice, you should enable delegated administration when managing Identity Center within an AWS organization instances.
After you have IAM Identity Center set up within an organization instance, your member AWS accounts can start creating associated AWS resources. Within each member AWS account, the IAM principals that provision AWS resources will need two types of service-specific IAM permissions:
- The first type of IAM permissions will be specific to the AWS service you want to provision. For example, to create an Amazon SageMaker AI domain, you would need the same IAM permissions to create the SageMaker AI domain and the downstream AWS resources SageMaker AI might use.
- The second type of IAM permissions is specific to IAM Identity Center. The IAM principal used to create the resource, in this example SageMaker AI, will also need permissions to manage applications within the Identity Center instance.
IAM Identity Center application Amazon Resource Names (ARNs) follow a different standard naming convention that isn’t based on the original resource name that was provided during resource creation. For example, when a user creates an Amazon Simple Storage Service (Amazon S3) bucket and sets a specific bucket name, that bucket name is included in the ARN: arn:[partition]:s3:::[bucket-name]. Identity Center application ARNs use unique identifiers (GUIDs) generated at creation time.
Manage access for an Identity Center application
After the IAM Identity Center application is created, you will need to manage access to the Identity Center application and associated AWS resources. To continue with the SageMaker AI domain example, after the domain is created, an authorized IAM principal will need to assign Identity Center users or groups from the Identity Center instance to the domain. For Identity Center, you will need two types of Identity Center IAM permissions.
The first type of IAM permissions is used to list IAM Identity Center users and groups within the Identity Center instance. This is needed to read and select specific IAM users or groups to assign to an Identity Center application.
Although IAM Identity Center users and groups have a GUID, the GUIDs aren’t clearly linked to the resource friendly names. For example, a group name could be Read-Only and the resource GUID could be 1234567890-abcdef12-3456-7890-abcd-ef1234567890 in the identity store. Additionally, the IAM actions to list users or groups require the AllUsers or AllGroups parameter. Because List actions require access to users and groups, a restrictive IAM policy can’t be used to prevent IAM principals from seeing a subset of users or groups within the identity store. The second type of IAM permission is used to create and manage application assignments for the Identity Center application within the Identity Center instance.
Because the IAM Identity Center application ARN is created using a unique application ID during creation, it’s not recommended to implement an IAM policy restricting authorized IAM principals to manage specific Identity Center applications. For example, to limit the application assignments to only a specific set of applications, you would need to:
- Create the AWS resource with IAM Identity Center as the authentication mechanism
- Query the Identity Center application ARN for the associated AWS resource
- Identify the IAM principal that will be used for application assignments
- Create or update an IAM policy associated to that IAM principal to allow application assignments for that specific application
- Create or update an SCP to restrict application assignment to that specific IAM principal
In lieu of implementing resource restrictions within identity policies, you should limit management of IAM Identity Center application and application assignments to a limited number of authorized IAM principals. In addition, it is recommended to implement detective and reactive capabilities to manage Identity Center application assignments.
Plan your naming conventions and automation strategy
IAM Identity Center provides several APIs to capture information about your AWS organization instances, applications, and assignments. Before implementing automation or guardrails, you should develop a methodical approach and understand what outcome you’re working backwards from. Start by defining naming conventions and deciding what parts of the workflow you want to centralize.
- Determine a naming convention for groups within your IdP: For example:
AWS_<ACCT#>_<AWS_Service>_<LOB>_<ENV>_<AppName>. The IdP group name would look like:AWS_123412341234_SageMaker_Data_PROD_GTLabel. - Define the naming convention for AWS resources for your Identity Center integrated applications: For example:
<AWS_Service>_<LOB>_<AppName>. The AWS resource name would look like:SageMaker_Data_GTLabel. - Define the naming convention for Identity Center application names: For example:
<AWS_Service>_<LOB>_<ENV>_<AppName>. The Identity Center application name would look like:SageMaker_Data_PROD_GTLabel. - Decide on the restrictions that you want to implement within your AWS environment. Depending on your enterprise’s security standard, you can implement specific restrictions based on mapping of a similar combination of ENV (environment), AWS service, LOB (line of business), or application name.
- Choose the portions of the application workflow that you want to centralize. This could include creating the application, making application assignments, or remediating issues.
As more configurations and permissions are centralized, additional overhead and bottlenecks can be introduced. It’s important to find the right balance for your enterprise. For example, if you centralize application assignments, each application team will need to submit a request to modify assignments that will be reviewed by a centralized team and could result in a delayed response. Conversely, if each application team handles their own assignments, there’s a risk that application assignments won’t align to enterprise security standards.
By understanding your goals and how you want to reach them, you can tailor the sample solution accordingly. Getting alignment on this requires planning and coordination across multiple teams within your organization. When thinking about more customized authorization logic—such as using provisioned AWS resource metadata—you should review how the specific AWS service integrates with IAM Identity Center managed applications. For example, if you want to find the Identity Center application ARN for a specific AWS resource, such as a SageMaker AI domain, use the following approach. A reverse lookup is necessary because AWS services create Identity Center applications with GUID-based ARNs that aren’t easily discoverable.
IAM Identity Center automation sample solutions
The sample-iam-idc-application-discovery-reporting solution hosted on GitHub consists of two separate AWS CDK stacks:
- IAM Identity Center governance reporting stack (
/identity-center-reportingdirectory) – Provides automated discovery and report generation (using CSV files) - IAM Identity Center remediation stack (
/identity-center-remediationdirectory) – Provides real-time enforcement and notifications
The recommendation is to deploy the reporting stack first to establish baseline visibility, then deploy the remediation stack for enforcement.
The following diagram depicts that IAM Identity Center governance architecture.
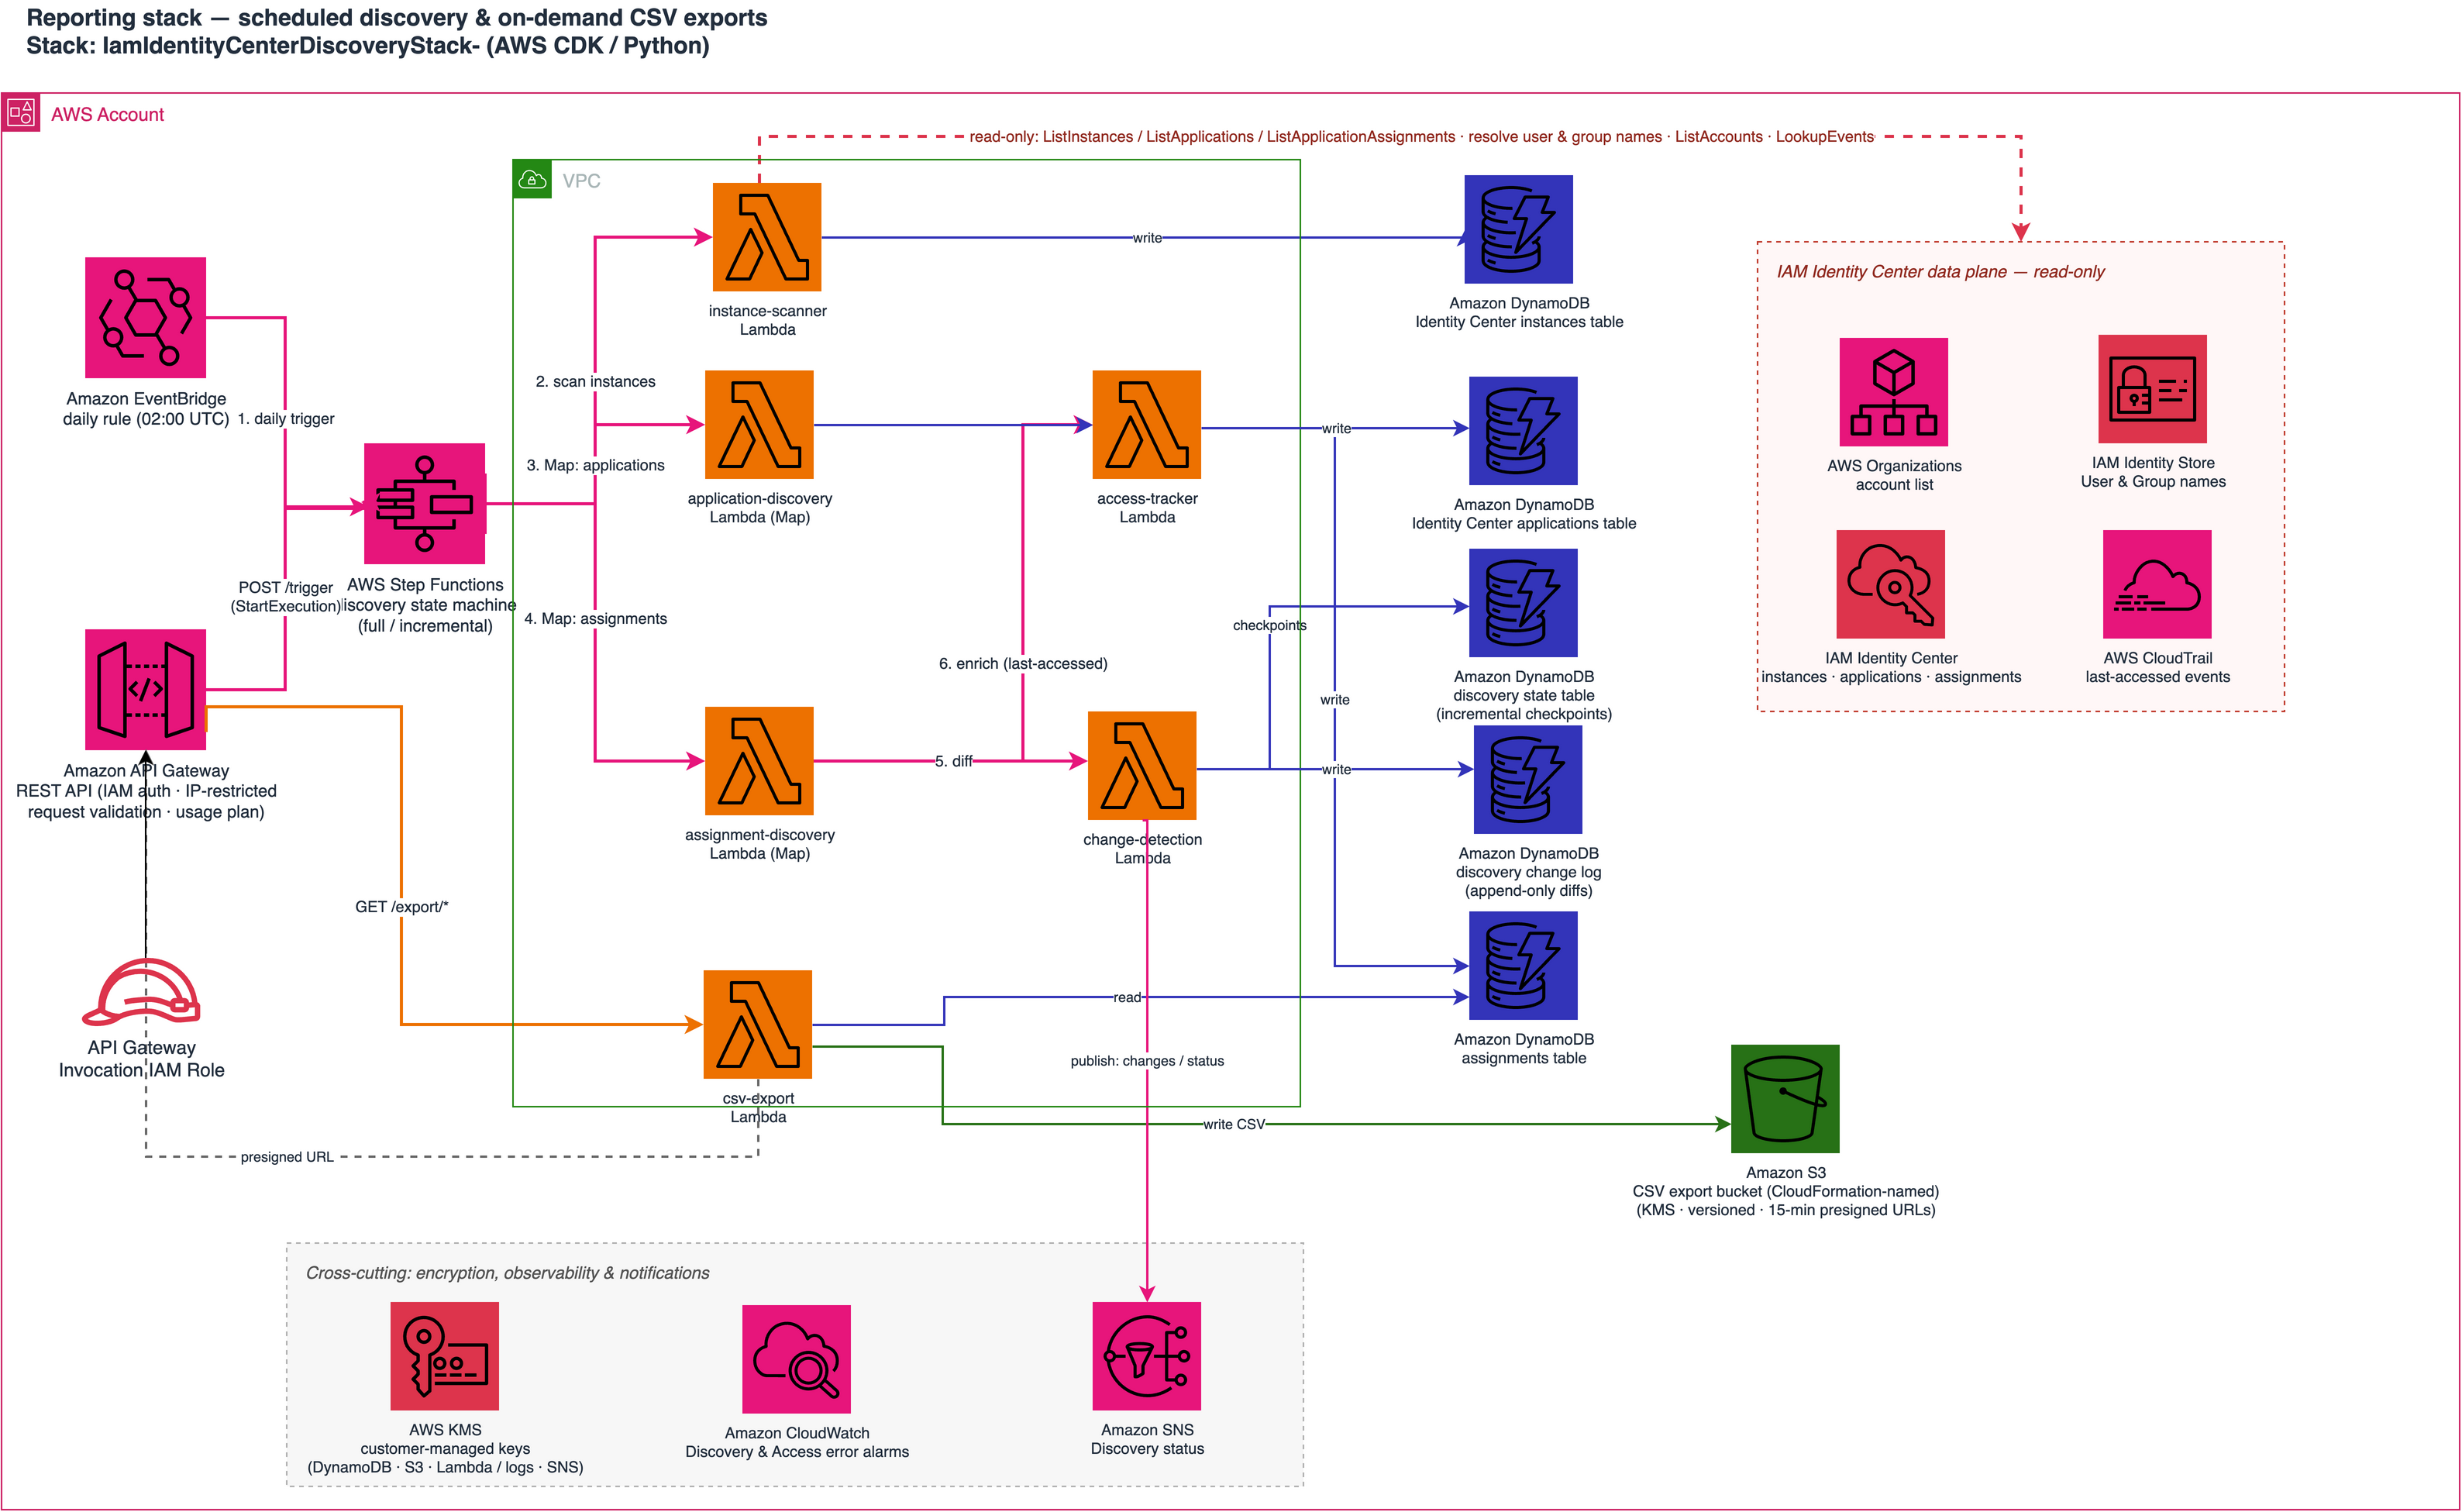
The reporting sample deploys the following resources:
- Amazon EventBridge – Rule invokes the discovery workflow daily at 2:00 AM UTC (configurable)
- AWS Step Functions – Orchestrates the multi-stage discovery workflow across instances, applications,and assignments
- AWS Lambda – Takes the following actions:
- Discovers IAM Identity Center instances across the organization and member accounts
- Application discovery that enumerates the applications configured in each Identity Center instance
- Assignment discovery maps users and groups to applications, resolving friendly names from the Identity Store
- Amazon DynamoDB – Stores the discovered instances, applications, and assignments, encrypted with an AWS Key Management Service (AWS KMS) customer-managed key
- Amazon API Gateway – Provides an IAM-authenticated REST API for a Lambda function to generate and export reports as CSV files
- Amazon S3 – Stores the encrypted CSV file exports, with lifecycle policies and time-limited Amazon S3 presigned download URLs
Deploy the IAM Identity Center reporting sample
The following procedure deploys the automated discovery and reporting infrastructure using AWS Cloud Development Kit (AWS CDK). Make sure you have the following prerequisites in place, then continue with the steps to set up the solution.
Prerequisites
You need to have the following to test the solution in this post.
- An AWS organization with an IAM Identity Center organization instance with delegated administrator access configured
- IAM Identity Center configured with at least one instance
- AWS Command Line Interface (AWS CLI) configured with appropriate credentials
- Python 3.12 & Node.js 18 or later installed for CDK deployment
To deploy the IAM Identity Center reporting solution, run the following commands:
- Clone the solution repository:
- Install dependencies:
- Bootstrap the CDK (if not already done):
- Deploy the sample solution:
Note:
AllowedIPRangeis optional but recommended as a security best practice. The parameter will add a network restriction to download the Amazon S3 presigned URL export. - Optional: For AWS account-level Identity Center instance discovery, a cross-account IAM role is required.
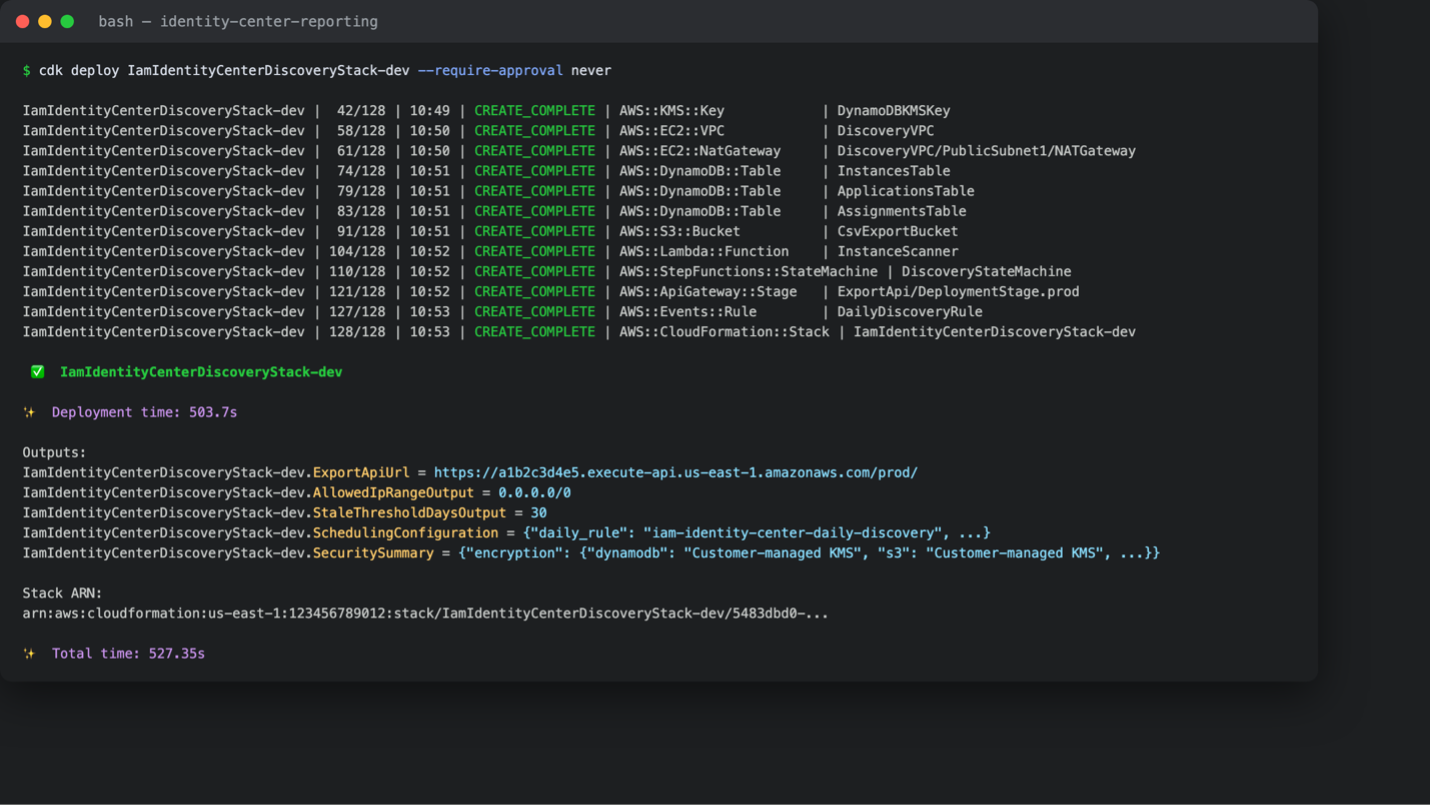
Figure 2: Successful AWS CDK deployment of the reporting stack
After the stack is successfully deployed, obtain the CDK output values for the API Gateway URL and S3 bucket name. If using a command line to deploy, these values will be displayed after the stack successfully deploys. It can also be found in the AWS Management Console as AWS CloudFormation stack output. The output will be used for generating reports in the following sections.
Note that this stack is for the reporting stack only. Reactive monitoring and deployment are described in the next section.
After the reporting stack is successfully deployed, the automation will run on a daily schedule. The first discovery run executes immediately after deployment. You can monitor discovery execution history and detailed logs through the the AWS Step Functions console. Review the detailed Lambda function logs in Amazon CloudWatch Logs. Query discovered instances, applications, and assignments through the DynamoDB console for one-time analysis.
Generate reports for Identity Center application assignments
To generate on-demand reports as CSV files from the REST API:
- Set
envvariables for Sigv4 authentication - Export applications
- Export assignments with user and group names
- The API returns a JSON response with a presigned Amazon S3 URL that’s valid for 15 minutes:
The generated CSV files include enriched data with friendly names:
| Instance ARN | Account ID | Application name | Principal type | Principal name | Status |
| arn:aws:sso:::instance/… | 123456789012 | SageMaker_PROD | GROUP | Engineering-Team-Dev | ACTIVE |
| arn:aws:sso:::instance/… | 123456789012 | OpenSearch_PROD | USER | jane.doe@example.com | ACTIVE |
You can use the generated CSV files to help identify anomalies or non-compliant assignments, such as:
- Each PROD application should only have GROUP assignments.
OpenSearch_PRODhas a USER principal type and so is non-compliant. - Each PROD application should only allow PROD groups assigned.
SageMaker_PRODhas a DEV group name (Engineering-Team-Dev) assigned and so is non-compliant.
Based on the testing and analysis of the output from the IAM Identity Center governance reporting sample solution, it’s important to start thinking about what restrictions to put in place for application assignments. It’s also important to conduct this exercise before taking action within the Identity Center remediation sample solution in the next section.
IAM Identity Center remediation
The following diagram shows the IAM Identity Center remediation architecture.
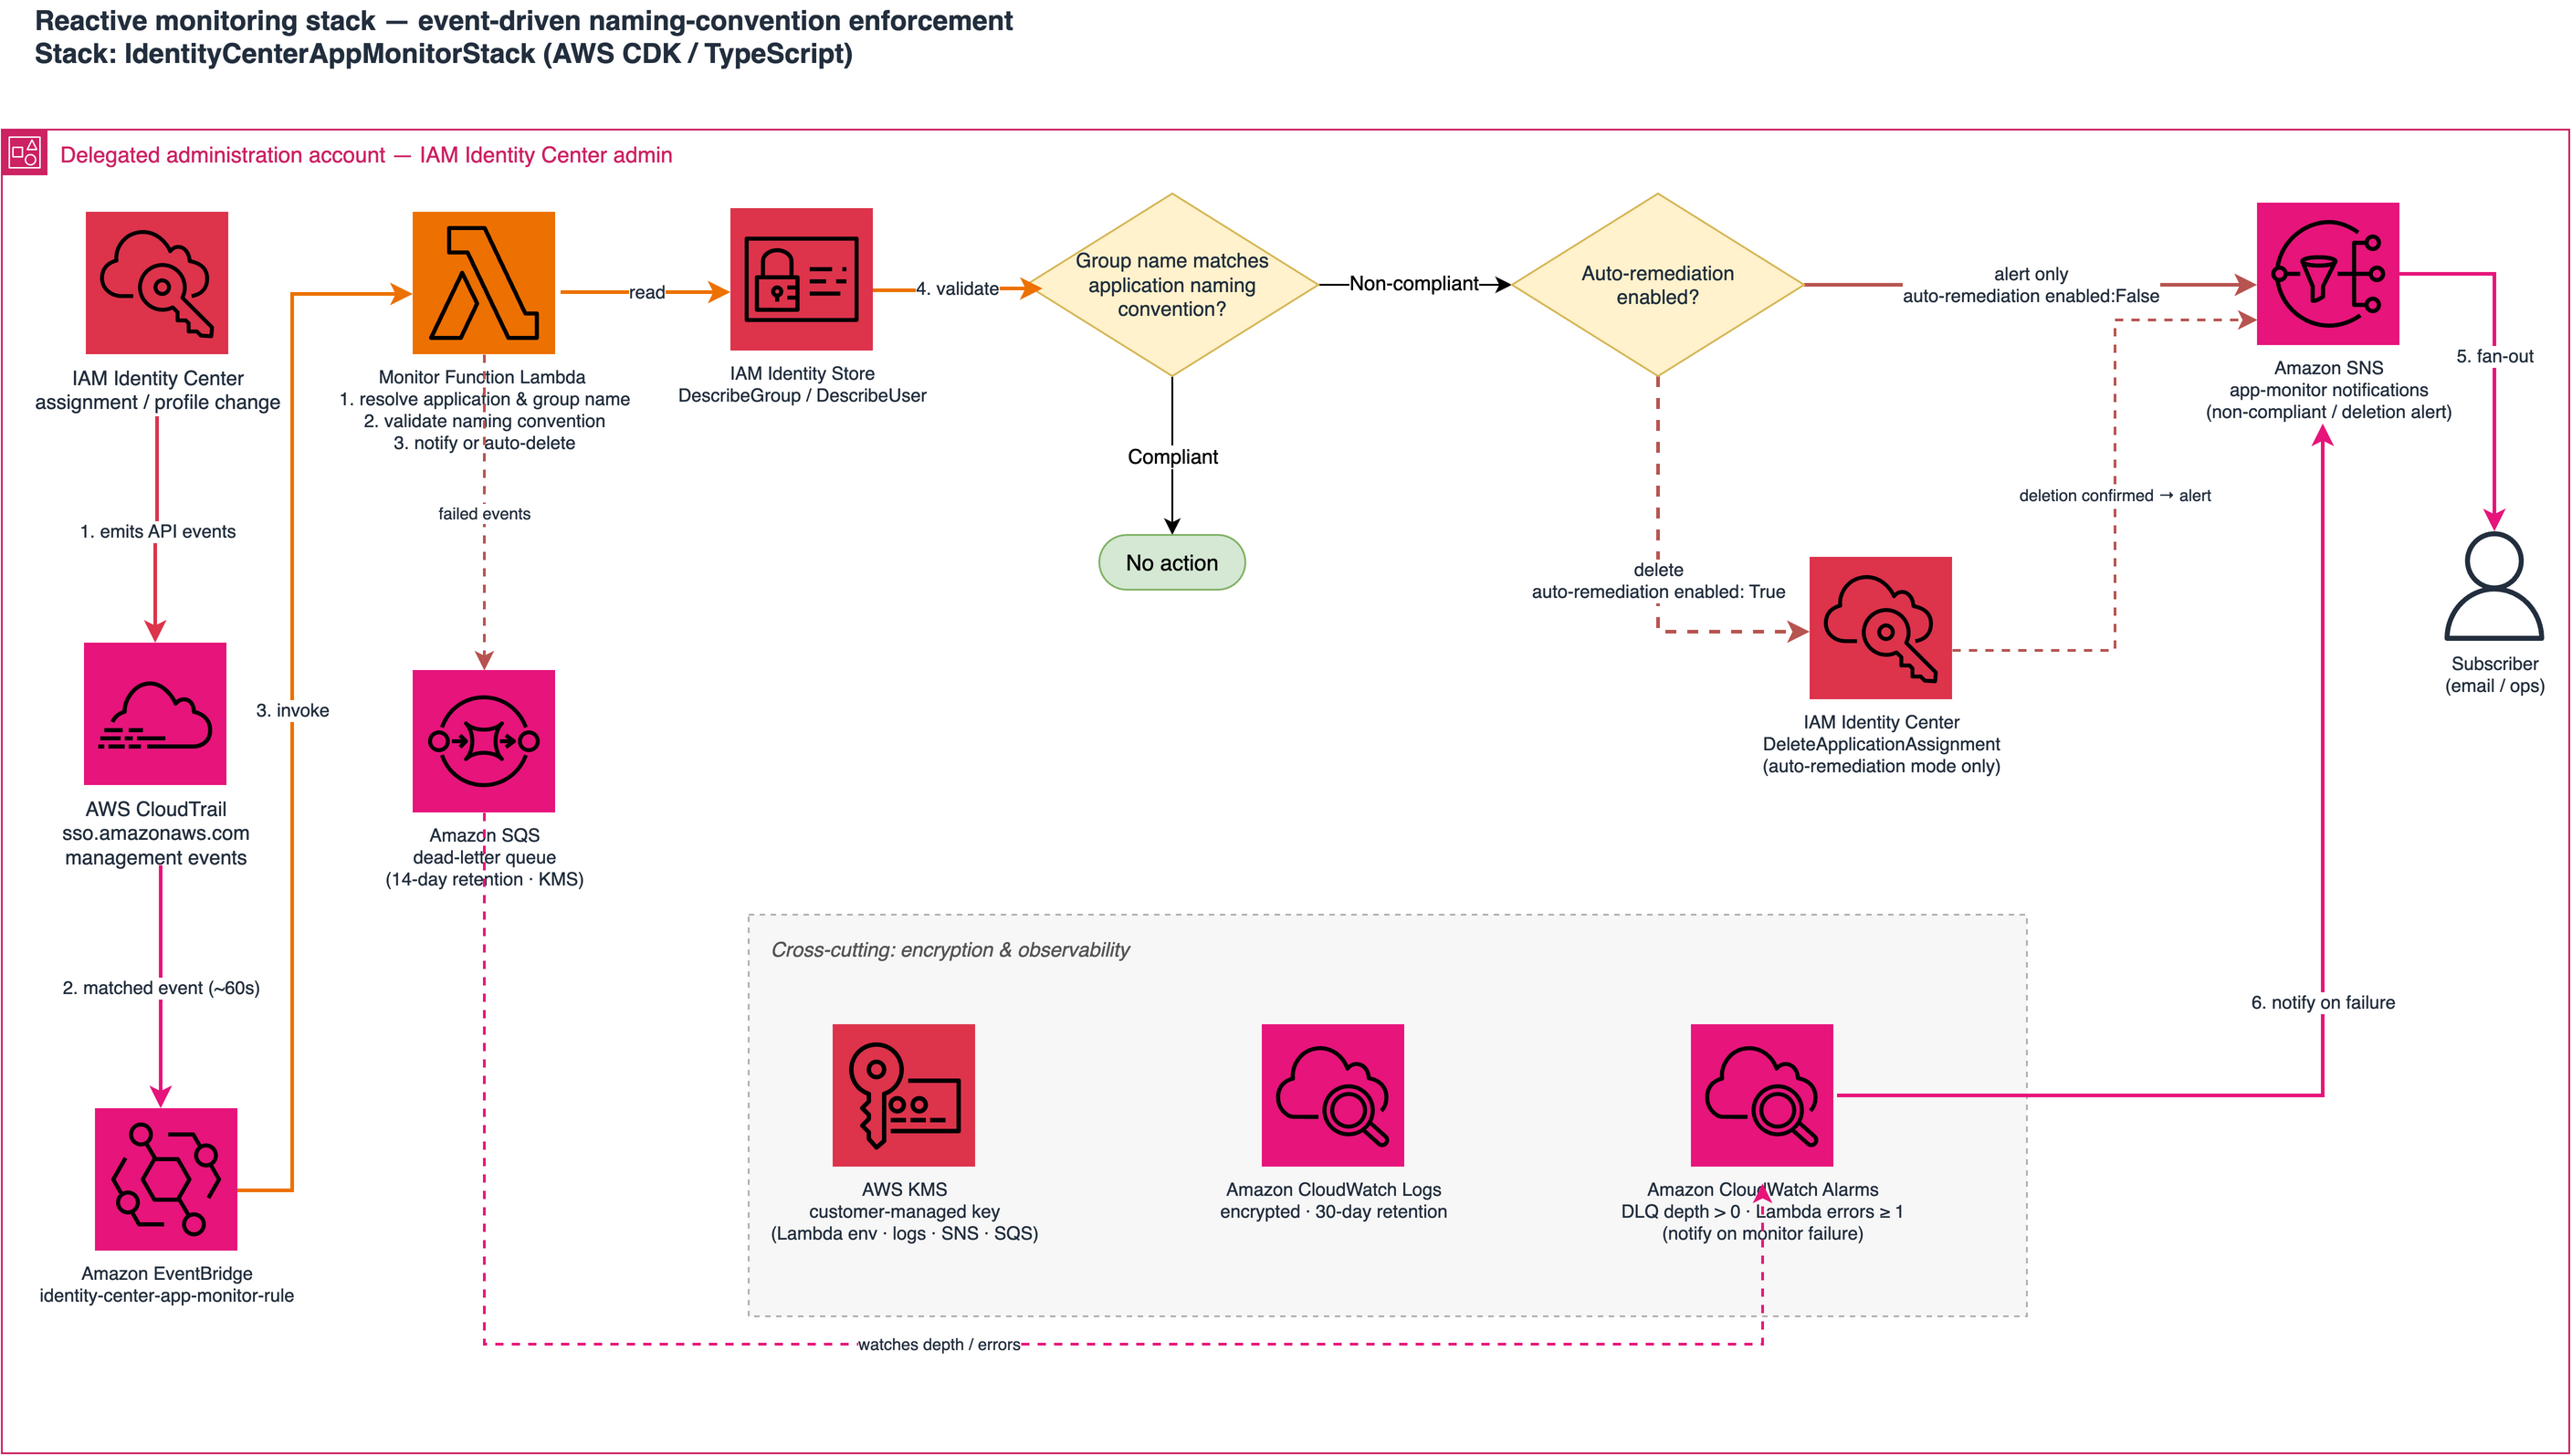
The IAM Identity Center remediation sample solution deploys the following resources:
- Amazon EventBridge – Matches IAM Identity Center assignment and profile events from CloudTrail (sso.amazonaws.com) and invokes the monitor function across the following IAM actions:
CreateApplicationAssignmentDeleteApplicationAssignmentPutApplicationAssignmentConfigurationAssociateProfileDisassociateProfileCreateProfileUpdateProfileDeleteProfile
- Lambda – Resolves the application and group names, validates the assignment against your naming convention, and notifies or remediates based on the configured mode
- Amazon Simple Notification Service (Amazon SNS) – Publishes alerts for non-compliant assignments to subscribers (for example, email)
- Amazon Simple Queue Service (Amazon SQS) – Captures events the Lambda function fails to process for later inspection
- AWS KMS – Customer-managed key to encrypt the Lambda environment variables, CloudWatch logs, SNS topic, and dead-letter queue
- Amazon CloudWatch – Log group stores the function’s structured, encrypted logs as an audit trail
Flexible naming policies support regex-based pattern matching for specific organizational requirements. The automation actions are logged to CloudWatch with structured JSON for additional analysis and reporting.
The following procedure deploys the remediation infrastructure using AWS Cloud Development Kit (AWS CDK). Make sure you have the following prerequisites in place, then continue with the steps to set up the solution.
Prerequisites
You need the following to run the remediation solution:
- An AWS organization with an IAM Identity Center organization instance with delegated administrator access configured
- IAM Identity Center configured with at least one instance and an IdP
- Access to create groups within the integrated IdP
- AWS Command Line Interface (AWS CLI) configured with appropriate credentials
- Python 3.12 & Node.js 18 or later installed for CDK deployment
Provide your IAM instance ARN and the account ID where IAM Identity Center is administered:
Note: If you don’t pass a parameter for
GroupNameRegex, the default action of the sample solution is to verify the group name appears as a whole word in the application name: Case-insensitive, splitting on-, _,and spaces, soReadOnlymatchessagemaker_readonlybutreaddoes not. If different validation is needed, the sample can be deployed with the regex value forGroupNameRegex.
After the solution is deployed, we will walk through testing both a compliant and non-compliant application assignment.
Gather Identity Center and application information
For this blog, we have already created two groups within the IdP that is integrated into an IAM Identity Center instance. We also already created two applications within Identity Center instance to use. Next, we’ll need to gather information specific to the environment to run through each example.
- Obtain the IAM Identity Center instance ARN and set the value.
- Obtain the IAM Identity Center identity store ID
- Get existing groups in IAM Identity Center
- Get existing enabled applications in IAM Identity Center
After you have the output for IAM Identity Center groups and applications, select two groups and one application that you want to test with. You will need to set additional variables for each group GUID and application ARN. In this example, I select the following two groups (ReadOnly and Developer) for testing and set the environment variables using export:
- Group #1 Name:
ReadOnly- Group #2 Name:
Developer - Application Name:
sagemaker_readonly
- Group #2 Name:
As part of this validation, the sample solution verifies the group name appears as a whole word in the application name: Case-insensitive, splitting on the -, _, characters and spaces, so ReadOnly matches sagemaker_readonly but read does not. For different use-cases, The GroupNameRegex parameter can be used during deployment.
Test compliant and non-compliant assignments
Run the following command to add the ReadOnly group assignment to the sagemaker_readonly application:
The group assignment request meets the validation criteria because the application name sagemaker_readonly contains the group name ReadOnly. The output logs for this validation exist within the associated lambda function CloudWatch log group /aws/lambda/identity-center-app-monitor”.
In this example, the logs will show:
✓ COMPLIANT - Group name found in application name
applicationName="sagemaker_readonly” groupName="ReadOnly”
Remediation action determined: NONE
Run the following command to try to add the Developer group assignment to the sagemaker_readonly application:
The group assignment request doesn’t meet the validation criteria because the application name sagemaker_readonly doesn’t contain the group name Developer. The output logs for this validation exists within the associated lambda function CloudWatch log group /aws/lambda/identity-center-app-monitor. Note that the remediation action listed shows NOTIFICATION_ONLY, meaning it only sent a notification to the configured SNS topic and did not take action. If you want the group assignment to be deleted, the value should be set to enableAutoDeletion=true.
In this example, the logs will show:
✗ NON-COMPLIANT - Group name not found in application name
applicationName="sagemaker_readonly” groupName="Developer”
Remediation action determined: NOTIFICATION_ONLY
SNS notification sent successfully
The SNS message will look like:
Scheduled reporting gives baseline visibility into IAM Identity Center managed applications. Event-driven monitoring can provide near real-time notification or enforcement. Together, these sample solutions can help align and scale Identity Center with your governance and security standards through both historical analysis and immediate response.
Clean up
For each deployed CDK stack, run the following commands in the AWS account where it was deployed.
To delete the remediation stack, run the following commands:
To delete the reporting stack, run the following commands:
IAM governance automation at scale
Achieving effective IAM Identity Center governance at scale requires moving beyond manual processes to automated, continuous monitoring and reporting. The following high-level steps can provide an Identity center governance framework:
- Deploy the sample automation with an IAM principal that has access in your delegated administrator account.
- Establish a baseline by running your first discovery and reviewing the generated reports.
- Configure naming policies to match your organization’s security conventions.
- Deploy the event-driven monitoring capabilities to enable real-time policy enforcement and automated response based on the security policies.
- Start in notification mode to establish a baseline before enabling auto-remediation.
- Integrate with your governance tools by connecting the API endpoints to your compliance dashboards or ITSM tools.
- Move to auto-remediation once you have validated policies are working as expected.
Conclusion
Managing AWS IAM Identity Center at scale doesn’t have to be a manual, time-consuming process. By implementing automated discovery and reporting combined with real-time event-driven monitoring, you can maintain continuous visibility into your organization’s identity and access landscape, respond immediately to policy violations, and enforce governance policies consistently across your organization. Automation reduces operational work, strengthens security, speeds up incident response, and maintains compliance. Start by deploying these solutions to gain visibility and enable real-time enforcement.
If you have feedback about this post, submit comments in the Comments section below. If you have questions about this post, start a new thread on AWS re:Post or contact AWS Support.