AWS Security Blog
How to accelerate security finding reviews using automated business context validation in AWS Security Hub CSPM
October 1, 2025: This post was updated to reflect the new name of Security Hub, which is AWS Security Hub CSPM (Cloud Security Posture Management).
Security teams must efficiently validate and document exceptions to AWS Security Hub (Cloud Security Posture Management, previously known as Security Hub) findings, while maintaining proper governance. Enterprise security teams need to make sure that exceptions to security best practices are properly validated and documented, while development teams need a streamlined process for implementing and verifying compensating controls.
In this blog post, we show you an automated solution that’s ideal for organizations using AWS Security Hub CSPM that need to manage security exceptions at scale while maintaining governance controls. It’s particularly valuable for enterprises that have complex compliance requirements and multiple development teams. By implementing this solution, you can accelerate the Security Hub CSPM findings review process while maintaining proper security governance and providing clear business context for security exceptions.
Note: The solution in this post is provided as a reference architecture and should not be implemented as-is in production environments. Organizations must thoroughly review, customize, and enhance this solution to align with their specific security requirements, compliance frameworks, governance policies, and risk tolerance. Engage with your security, compliance, and legal teams before deploying this automated security validation solution.
The challenge
Security Hub CSPM provides a comprehensive view of your AWS security posture across AWS accounts. However, in real-world scenarios, you’ll encounter legitimate business reasons for exceptions to security best practices. For example:
- Amazon GuardDuty not enabled: Because of an alternative monitoring solution, an organization has deferred the implementation of Amazon GuardDuty but requires compensating controls such as Amazon Virtual Private Cloud (VPC) Flow logs, Amazon CloudWatch alarms, and organization-specific incident response procedures.
- Amazon S3 Block Public Access not enabled: A marketing team might need a public Amazon Simple Storage Service (Amazon S3) bucket for website assets, but should implement the following compensating controls:
-
- Amazon CloudFront distributions in front of Amazon S3
- Server-side encryption with AWS KMS keys (SSE-KMS) enabled on the S3 bucket
- Enable Amazon S3 bucket logging
- Enable Amazon S3 bucket versioning
- Amazon CloudWatch alarms for suspicious access patterns and comprehensive access logging
Managing exceptions to security best practices can be challenging and typically involve multiple steps. Security teams spend significant time reviewing exception requests and defining and validating compensating controls, and developers must then implement and validate those controls. Multiple teams must be included to create and manage documentation for compliance and audit purposes. Overall, this process, if done manually, is time intensive, error-prone (with a risk of missing implementation issues), and has a risk of poor visibility because of limited or missing documentation of the business context in the security findings.
Solution prerequisites
For this solution, you must have the following elements in place:
- An AWS account with appropriate service quotas for Amazon DynamoDB, AWS Lambda, and Amazon Simple Queue Service (Amazon SQS)
- Required AWS Identity and Access Management (IAM) permissions for deployment of various AWS resources including:
- IAM create-role and IAM put-role-policy permission (to create the security team role and developer role)
- AWS CloudFormation stack management
- DynamoDB table creation and management
- Amazon SQS
- AWS Lambda event source mapping with Amazon SQS
- Amazon SQS policy
- Lambda function deployment and configuration
- Lambda execution role
- Amazon EventBridge rule configuration
- Amazon S3 bucket operations for deployment artifacts
- AWS Command Line Interface (AWS CLI) version 2.17.44 or later
- Python version 3.12 or later
- jq JSON processing utility for script operations
- Security Hub CSPM enabled in your target AWS Region
aws securityhub enable-security-hub
- AWS Config is recommended for enhanced validation capabilities
Automated validation
The solution includes a pre-deployment validation script (validate-environment.sh) that automatically verifies the following:
- Tool versions and installations
- AWS service enablement status
- Resource conflicts
This validation runs automatically during deployment (Integrated in deploy.sh script) to help make sure that required prerequisites are met before infrastructure creation begins.
Additional resources
See the Cost Estimation Guide for a detailed pricing breakdown of prerequisites and the Troubleshooting Guide for common setup issues and solutions.
Solution overview
This solution provides sample code and CloudFormation templates that organizations can deploy to automate the validation of compensating controls for suppressed Security Hub CSPM findings while maintaining proper segregation of duties between the security and development teams.
Architecture
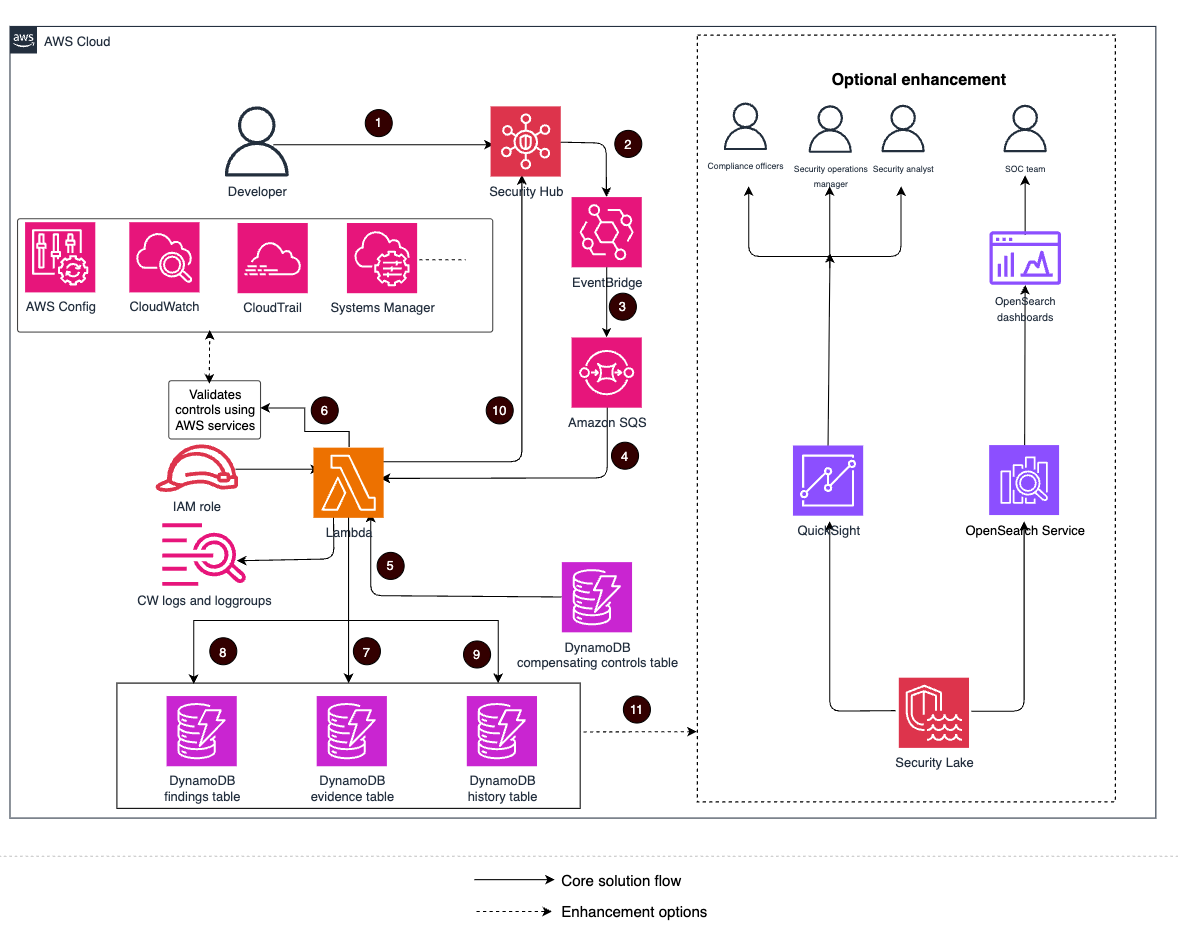
Figure 1: Solution architecture diagram
Figure 1 illustrates the solution workflow that’s initiated when a developer changes a Security Hub CSPM finding’s workflow status to SUPPRESSED to request a business-justified security exception. The process concludes with the solution adding validation results as notes to the respective Security Hub CSPM finding, maintaining a complete audit trail of the exception request and validation outcome.
Note: Before initiating this workflow, developers must first consult with their organization’s security team to explain their business justification for the exception. During this initial consultation, the security team defines required compensating controls for the finding type. The security team uses the
add-controls-role-based.shscript to add controls to DynamoDB. A developer enables the required compensating controls before proceeding with the workflow status change.
The workflow shown in Figure 1 includes the following steps:
- A developer changes the Security Hub CSPM finding status to
SUPPRESSED. - EventBridge detects the status change to
SUPPRESSED. - An EventBridge rule sends an event to the Amazon SQS queue.
- A Lambda function retrieves messages from the Amazon SQS queue.
- The Lambda function fetches compensating controls from the DynamoDB compensating controls table.
- The Lambda function validates each control using the appropriate AWS services APIs.
- Evidence is collected for each validation and stored in DynamoDB.
- Findings validation results and timestamps are stored in the DynamoDB
Findingstable. - A versioned history of finding validation attempts is stored in the DynamoDB
Historytable. - If the security team provided controls pass validation, the finding remains
SUPPRESSED, and a note is added in the respective Security Hub finding with adjusted severity information (the original severity assigned by Security Hub isn’t changed by this solution). If one of these control fails validation, finding status is changed toNOTIFIED, and a note is added in the respective Security Hub finding of failed controls (the original severity assigned by Security Hub CSPM isn’t changed by this solution). - OPTIONAL: Extend the solution with Amazon OpenSearch for SOC teams to perform advanced search, correlation, and visualization of validation evidence across findings, and historical trend analysis of compensating control effectiveness. Use Amazon QuickSight for visualization of compliance metrics, and AWS Security Lake to centralize validation data across multiple accounts and Regions, standardizing it in OCSF format for comprehensive cross-account analysis and long-term compliance reporting.
Note: This solution should be deployed in accordance with your organization’s security policies and the AWS Shared Responsibility Model. Review and test security controls before deploying in production environments.
How it works
This solution is designed exclusively for deployment and management by organizational security teams. Only security teams should have permissions to deploy the AWS CloudFormation stack, modify Lambda validation code, add/modify compensating controls, or access the four DynamoDB tables (Controls, Findings, History, Evidence).
Developers are restricted to two specific actions: suppressing Security Hub CSPM findings and reading compensating control requirements. This strict role separation facilitates proper governance and helps prevent bypass of security validation logic. Organizations must implement appropriate IAM policies to enforce these access restrictions in production environments.
Here’s how the solution works:
- The security team defines controls: A Security team establishes compensating controls for specific Security Hub finding types and stores them in a DynamoDB table. This helps make sure that approved exceptions follow security-approved guidelines and maintain compliance standards.
- Key files for security teams:
- Supported validation Types: The solution supports 13 validation methods to accommodate diverse security requirements:
File Purpose Utility script for adding compensating controls Example compensating controls for reference Guide for defining controls Validation type Description Example use case Validates using AWS Config rules For GuardDuty not enabled finding: vpc-flow-logs-enabledConfig rule helps make sure that network traffic is monitoredValidates using direct AWS API calls For Amazon S3 public access finding: API call to verify CloudFront distribution exists in front of the S3 bucket Validates using Security Hub control status For GuardDuty not enabled finding: CloudTrail.1control passing confirms comprehensive API loggingValidates using CloudWatch alarms For GuardDuty not enabled finding: Alarms monitoring for suspicious API calls and network traffic patterns Validates CloudTrail configuration For GuardDuty not enabled finding: Multi-Region CloudTrail with log validation and CloudWatch integration Validates using Systems Manager parameters For GuardDuty not enabled finding: Parameter confirming custom threat detection solution is enabled Validates process-based controls For GuardDuty not enabled finding: Documented incident response process for network security events Validates Amazon Inspector configuration For vulnerability finding: Inspector EC2 scanning enabled with zero critical findings allowed Validates AWS IAM Access Analyzer For IAM permission finding: IAM Access Analyzer enabled with zero active findings allowed Validates Amazon Macie configuration For data protection finding: Macie enabled with sensitive data discovery and zero sensitive buckets allowed Validates AWS Audit Manager frameworks For compliance finding: Custom security framework active with required control sets Validates EventBridge rules For GuardDuty not enabled finding: Rules monitoring AWS CloudTrail events with Lambda targets for automated response Validates AWS Trusted Advisor checks For security best practice finding: S3 bucket permissions check passing with zero warnings or error resources Note: Only security team members have access to add or modify compensating controls. The solution enforces this through IAM permissions and runtime checks to maintain proper governance.
Approved security exceptions must have an expiration date to facilitate periodic review. The solution automatically enforces these time limits based on the expiration date defined by the security team.
For this post, we provide a utility script (add-controls-role-based.sh) to demonstrate adding compensating controls. However, in a production enterprise environment, organizations should integrate DynamoDB with their existing governance systems (such as Jira, ServiceNow, and so on) to automatically populate controls from authorized security team sources. This solution focuses on validating controls, not prescribing how they’re ingested.
2. Developers implement controls: When Security Hub CSPM findings are suppressed, developers must implement the required compensating controls defined by the security team.
How developers interact with the solution:
- View required controls: The solution provides clear requirements for each finding type.
- Implement compensating controls: Developers should implement the security team provided compensating controls in their AWS environment, referring to the compensating controls defined by Security team. The specific compensating controls depend on the finding type and security team requirements.
- Finding status change: Developers change the Security Hub CSPM finding status to
SUPPRESSEDin Security Hub. - Automatic validation: The solution validates compensating controls when Security Hub CSPM findings workflow status is changed.
- Status updates: Findings remain
SUPPRESSEDif controls pass validation; they change toNOTIFIEDwith failure details if validation fails.
Note: This solution doesn’t modify the original severity of findings in Security Hub CSPM. It adds business context with security-approved adjusted severity to findings based on security-approved compensating controls validation, helping security teams make informed decisions.
For this solution, we’re simulating the developer workflow of addressing Security Hub CSPM findings by implementing and validating compensating controls. In a production environment, developers would receive notifications about findings that require attention, implement the necessary controls according to security team guidance, and use this validation system to verify their implementations. The solution focuses on the validation aspect but assumes organizations will integrate it with their existing developer workflows, ticketing systems, and continuous integration and delivery (CI/CD) pipelines to create a seamless process from finding detection to remediation verification.
Evidence collection and audit trail
The solution automatically captures comprehensive evidence for each validation activity. The key features of the solution are:
- Four-table design: Separate tables for
Controls,Findings,History, andEvidence(shown in Figure 2) provide security through segregation while maintaining a complete audit trail - Detailed evidence: Each validation stores specific evidence based on its type—from AWS Config rule compliance details to API responses and process documentation verification
- Immutable records: Each evidence includes timestamps, validation context, and results that cannot be modified after collection (shown in Figure 3)
- Historical tracking: The solution maintains a complete history of each validation attempt, allowing organizations to demonstrate continuous compliance over time

Figure 2: The four-table design for storing compensating controls, evidence, findings, and history
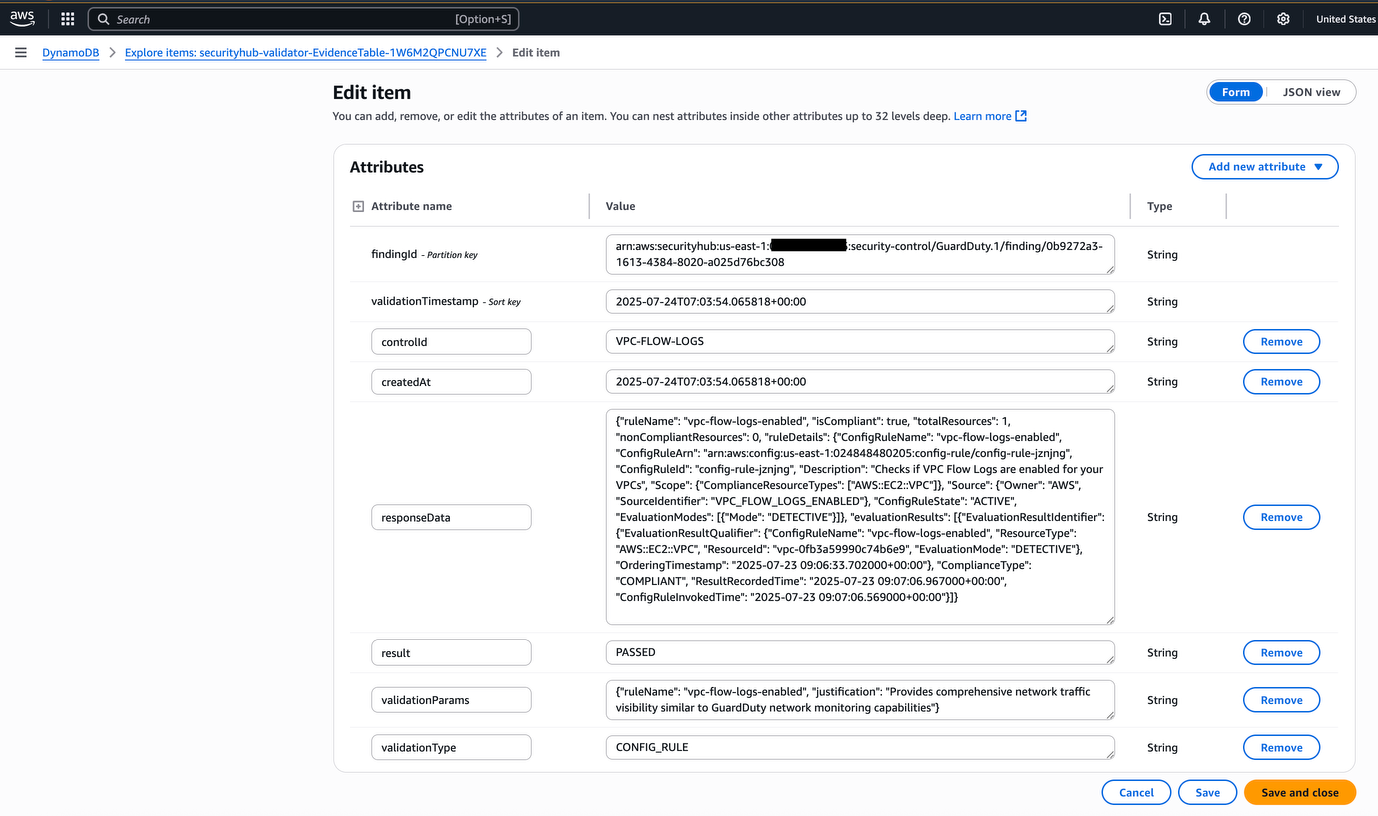
Figure 3: Sample evidence collected for a CONFIG_RULE validation showing PASSED status
Deployment and configuration
You can deploy the solution using the provided scripts.
- Use the following command to clone the repository:
- Use the following command to check service quotas and to create the security team and developer roles:
- Use the following command to assume the security team role:
In the preceding command’s output, note the
AccessKeyId,SecretAccessKey, andSessionToken. The timestamp in the expiration field is in the UTC time zone and shows when the IAM role’s temporary credentials expire. After the temporary credentials expire, the user must assume the role again.Note: For temporary credentials, you can use the
DurationSecondsparameter to increase the maximum session duration for IAM roles.- Create environment variables to assume the security team role and verify user assumed the IAM role:
- Run the following commands to set the environment variables to assume the IAM role:
- Run the
get-caller-identitycommand to verify that the user assumed the IAM role: - Use the following command to deploy the solution:
- You can verify that the stack has been created by going to the AWS Management Console for CloudFormation and using the following steps:
- In the CloudFormation console, choose Stacks and then Stack details in the navigation pane.
- Locate and select the stack securityhub-validator to open its details page.
- On the stack details page, select the Resources tab.
- In the Resources section, you’ll see a list of the resources that are part of the stack.
- DynamoDB tables for controls, findings, history, and evidence
- A Lambda function for validation and Security Hub updates
- An EventBridge rule for capturing finding status changes
- An Amazon SQS queue and dead letter queue (DLQ) for message processing
- IAM roles with least privilege permissions
- Add compensating controls (security team):
- Implement controls (developers).
- Amazon Virtual Private Cloud (Amazon VPC) Flow Logs must be enabled for network monitoring
- CloudWatch alarms are enabled to monitor for suspicious activity
- Navigate to the AWS Security Hub CSPM console and choose Findings in the navigation pane.
- In the Add filter search bar at the top, select Severity label and set the is value to HIGH.
- After applying the filter, select GuardDuty should be enabled in the Finding column to view its details in the righthand pane.
- Choose Actions in the top-right corner and select View JSON.
- In the JSON details window, locate the SecurityControlId field and note the value. You’ll be prompted to enter it by the
add-controls-role-based.sh utilityin the next step. - Use the following command to clone the repository:
- For this demo, you will act as a member of the security team by assuming security team role and use the
add-controls-role-based.shutility to create compensating controls and push them to the compensating control DynamoDB table. - Use the following prompt values in
add-controls-role-based.shto create compensating control table entries using four compensating controls given by the security team for theGuardDuty.1finding type: - When prompted to save to DynamoDB, enter
Y. Compensating controls will be added to the DynamoDB compensating controls table. - For this proof-of-concept demonstration, the compensating controls implementation requires additional AWS permissions beyond what the developer role provides. In a production environment, these controls would typically be implemented by infrastructure teams or through automated deployment pipelines.
- Switch to administrative credentials.
- Implement the required controls
- Now assume the DeveloperRole to suppress the finding:
- Change the workflow status of the Security Hub finding related to GuardDuty from
NEWtoSUPPRESSED. - Go to the Security Hub CSPM console.
- In the navigation pane, choose Findings.
- In the search bar, select Compliance Security Control ID filter and enter the value of Is as
GuardDuty.1. - Select the finding GuardDuty should be enabled and under Workflow status, select SUPPRESSED.
- In the Note field, enter
Implemented compensating controls as per security team requirements. - Choose Set status to save the note.
- After the Workflow status of the finding is
SUPPRESSED, the automated validation process begins and you can see the Lambda function logs in the CloudWatch console related to different validations performed. - Go to the Amazon CloudWatch console.
- In the navigation pane, under Logs, choose Log groups.
- Select the log group with the Lambda function name.
- Select the most recent log stream to view the logs.
- Finding status remains
SUPPRESSED. - A note is added with validation results and adjusted risk level.
- Business context is added to the finding.
- Finding status changes to
NOTIFIED. - A note is added with details about failed controls.
- The security team reviews the changes as part of their standard process.
- Go to the Security Hub CSPM console.
- In the navigation pane, choose Findings.
- In the search bar, select Compliance Security Control ID filter and enter value of Is as
GuardDuty.1. - Select the finding GuardDuty should be enabled and check the Workflow status.
- For Actions, choose Add note.
- Check the Last note added.
Note: Replace the example values with the values that you noted when you assumed the IAM role. For Windows (OS, replace
exportwithset.aws sts get-caller-identityNote: In the preceding command’s output, confirm that the ARN is
arn:aws:sts::ACCOUNT_ID:assumed-role/securityhub-validator-SecurityTeamRole/SecurityTeamSessioninstead ofarn:aws:iam::ACCOUNT_ID:user/username.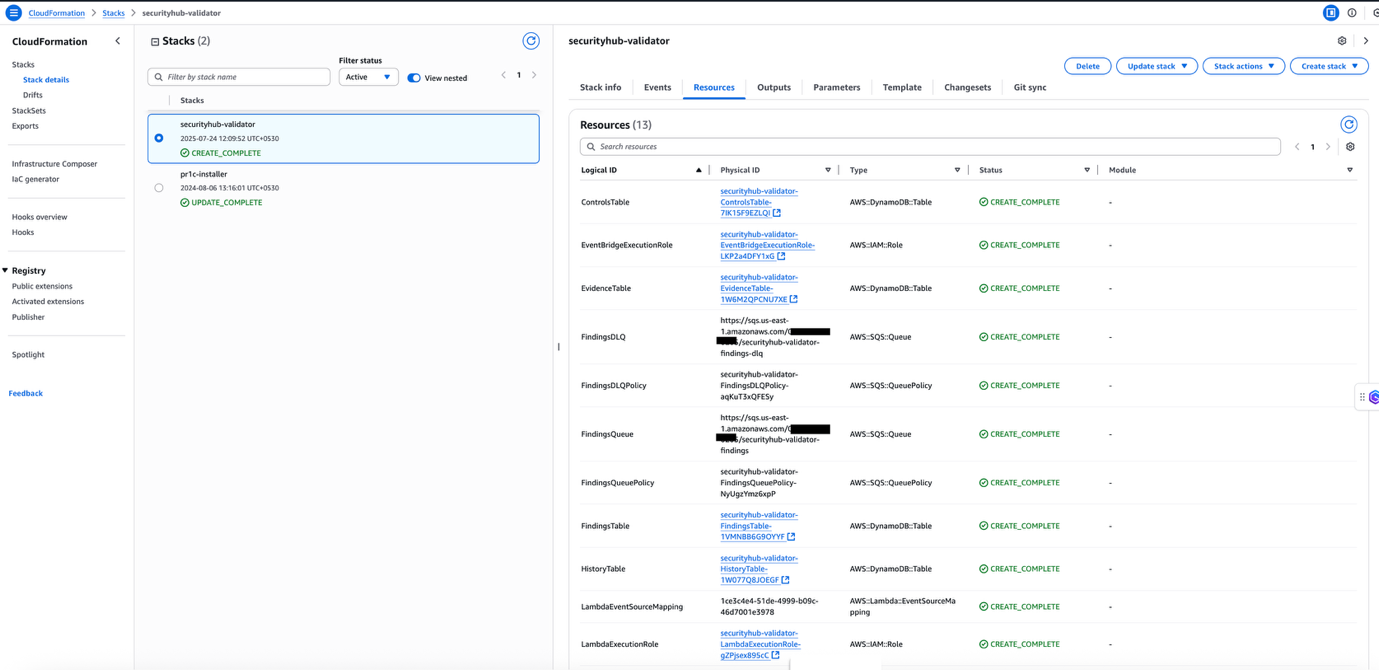
Figure 4: Resources created using the CloudFormation stack
The deployment script creates a CloudFormation stack with the necessary resources:
Now, a developer will assume the developer role and implement the required controls based on the security team’s specifications. The solution automatically validates these implementations when the Security Hub CSPM finding workflow status is changed to
SUPPRESSEDby a developer.For an example implementations of common controls, see the example of compensating controls for GuardDuty.1 finding.
Test the solution
To test the solution, you can validate the compensating controls for a GuardDuty finding using the following example scenario:
A developer wants a security exception for the Security Hub CSPM finding GuardDuty.1: GuardDuty should be enabled, and because of cost constraints, the developer’s organization hasn’t implemented GuardDuty and requested a security exception from their organization’s security team.
Compensating controls provided by the security team include:
Note: To simulate this finding, do not enable GuardDuty so that the GuardDuty should be enabled finding appears in the Security Hub console.
Approximately 20–30 mins after enabling AWS Config and Security Hub CSPM, you can locate the finding in the console using the following steps and then add the compensating controls provided by the security team.
For this use case, we’re using the GuardDuty should be enabled Security Hub CSPM finding:
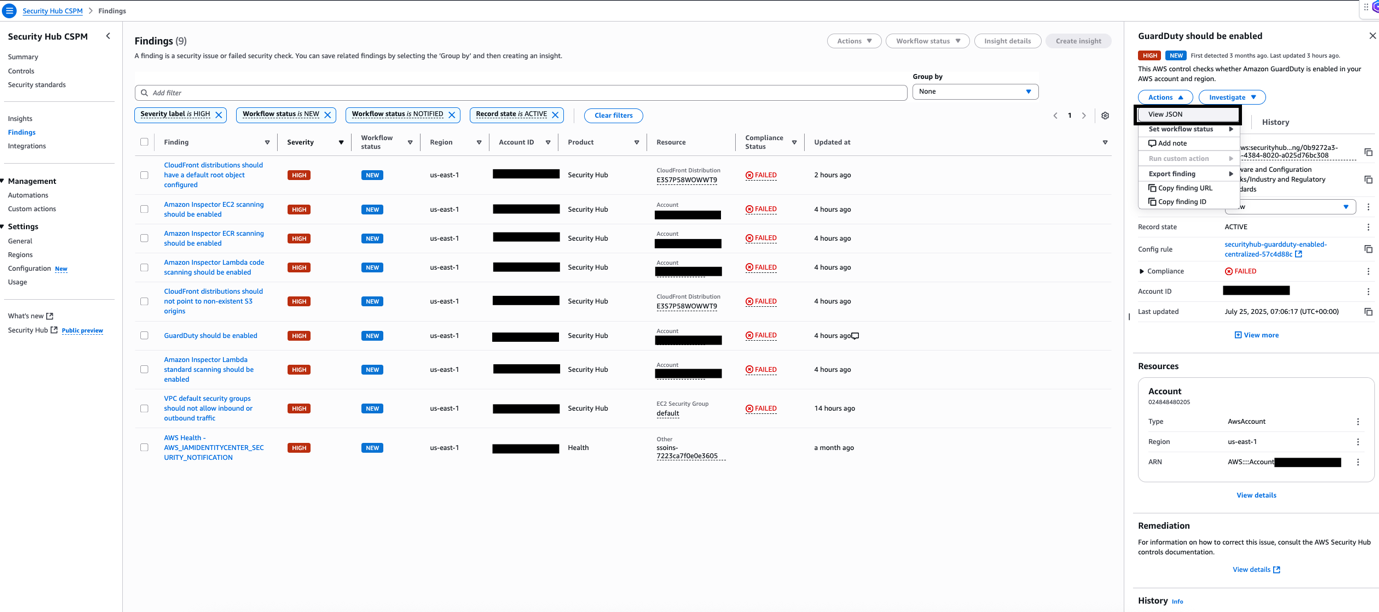
Figure 5: Security Hub CSPM findings
Note: The
SecurityControlIdvalue is required by theadd-controls-role-based.sh utilityto properly associate your compensating control with the correct Security Hub CSPM finding.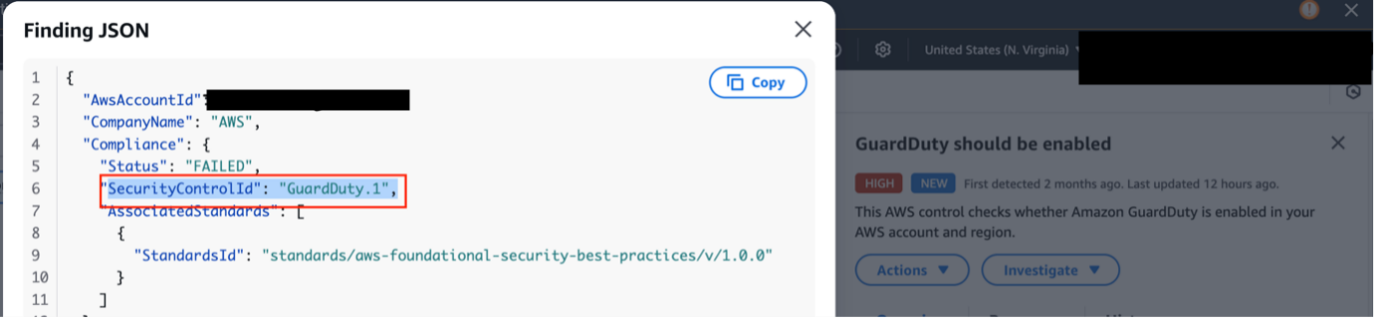
Figure 6: SecurityControlId from the GuardDuty finding
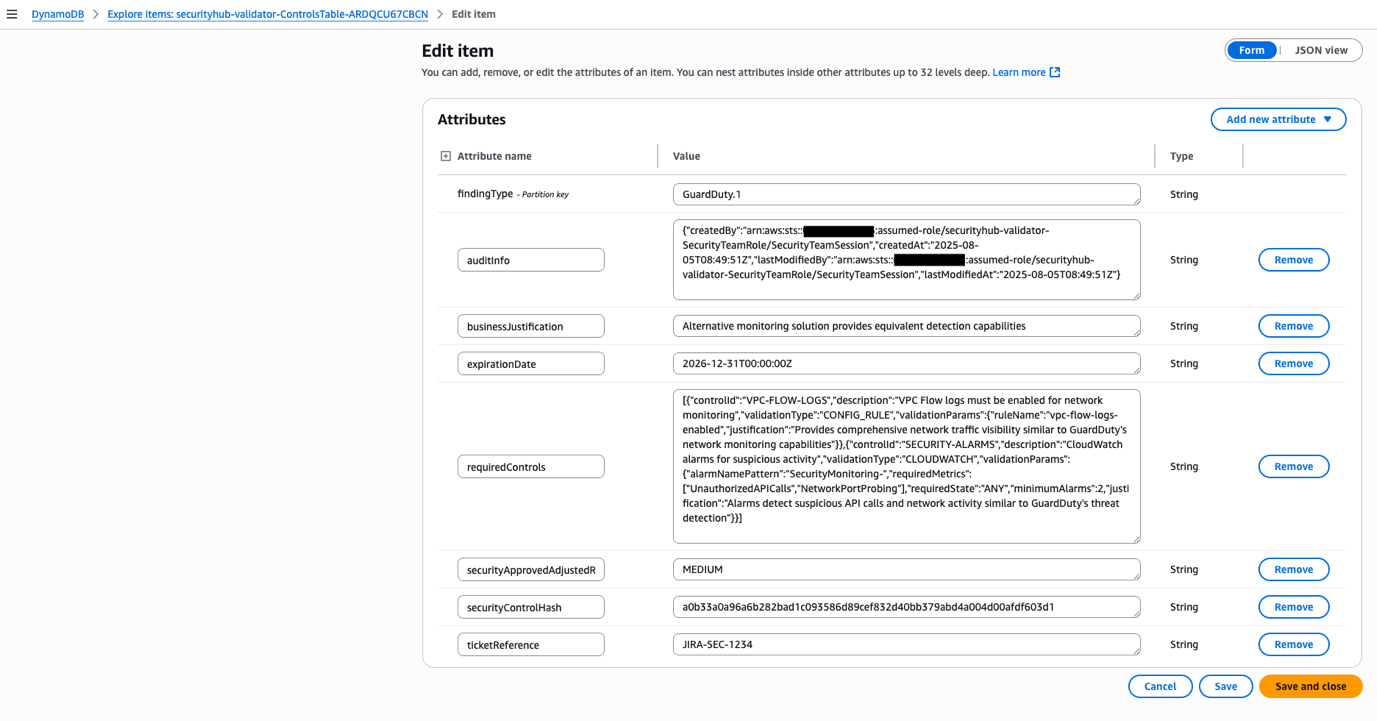
Figure 7: Compensating controls for GuardDuty.1 finding
For the demonstration, temporarily switch back to your administrative AWS credentials (the ones used to create the roles):
Unset the security team role credentials
unset AWS_ACCESS_KEY_ID AWS_SECRET_ACCESS_KEY AWS_SESSION_TOKENControl 1: Enable VPC Flow Logs, starting by getting your VPC ID
VPC_ID=$(aws ec2 describe-vpcs --query 'Vpcs[0].VpcId' --output text)Create flow logs:
Create the AWS Config Rule:
Control 2: Create security monitoring alarms starting with creating metric filters for CloudTrail Logs; start by creating a log group for CloudTrail (if none exists):
aws logs create-log-group --log-group-name CloudTrail/SecurityEventsCreate a metric filter for unauthorized API calls:Create a filter for network port probing:
Create required CloudWatch alarms, starting with Alarm 1 for Unauthorized API calls:
Alarm 2: Network port probing:
Configure the returned credentials:
To change the workflow status using the AWS CLI (developer):
To change the workflow status using the console (developer):
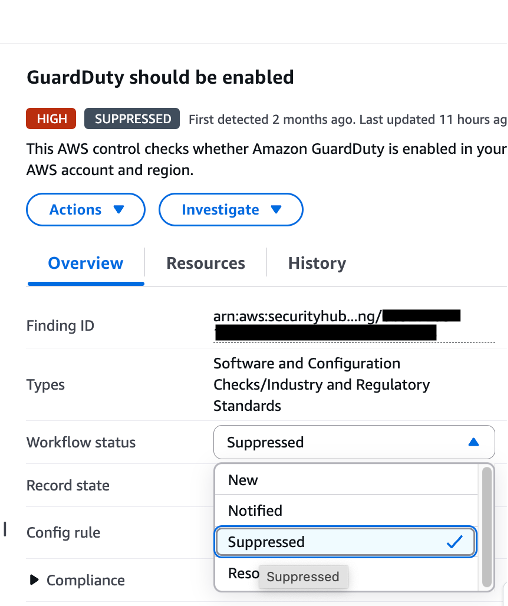
Figure 8: GuardDuty.1 finding workflow status changed from NEW to SUPPRESSED
Note: Only suppress findings after implementing the required compensating controls provided by the security team.
To view Lambda function logs in the CloudWatch console:
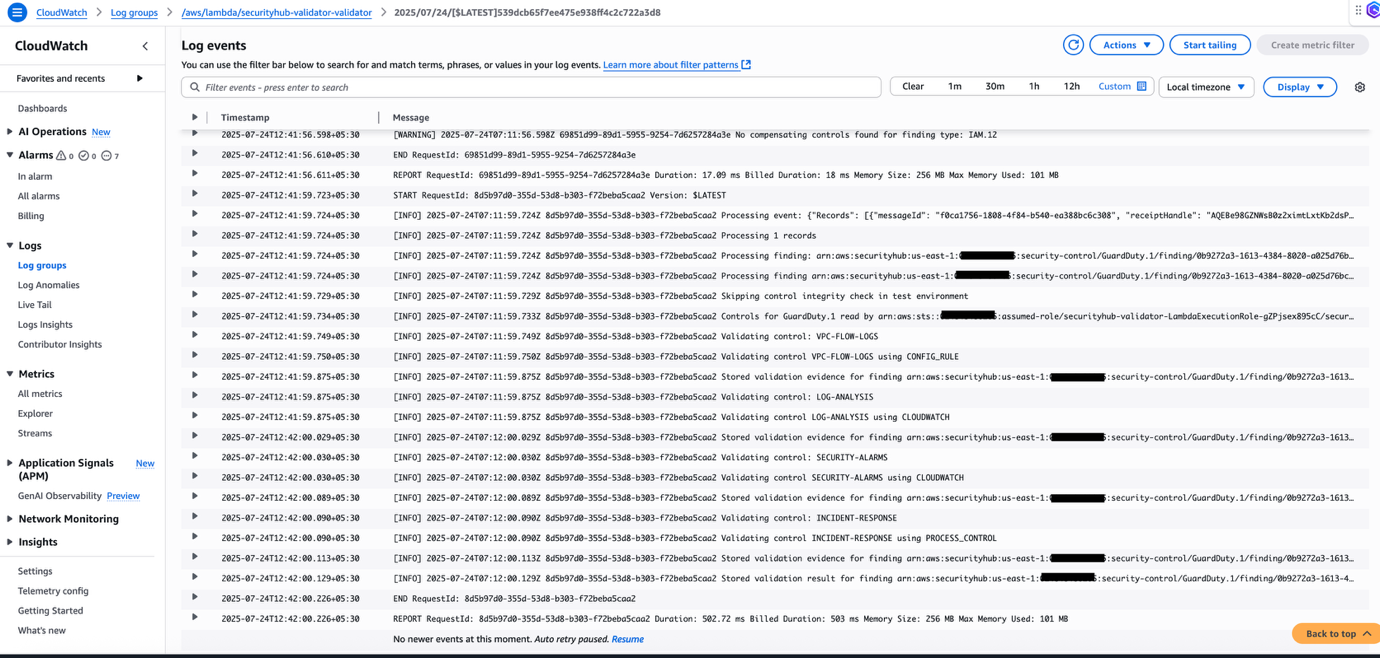
Figure 9: Lambda function CloudWatch logs
The solution updates the note section of the findings in Security Hub CSPM with the validation results:
If all controls pass:
If one of the controls fails:
To view the finding’s workflow status and updated note using the console (developer):
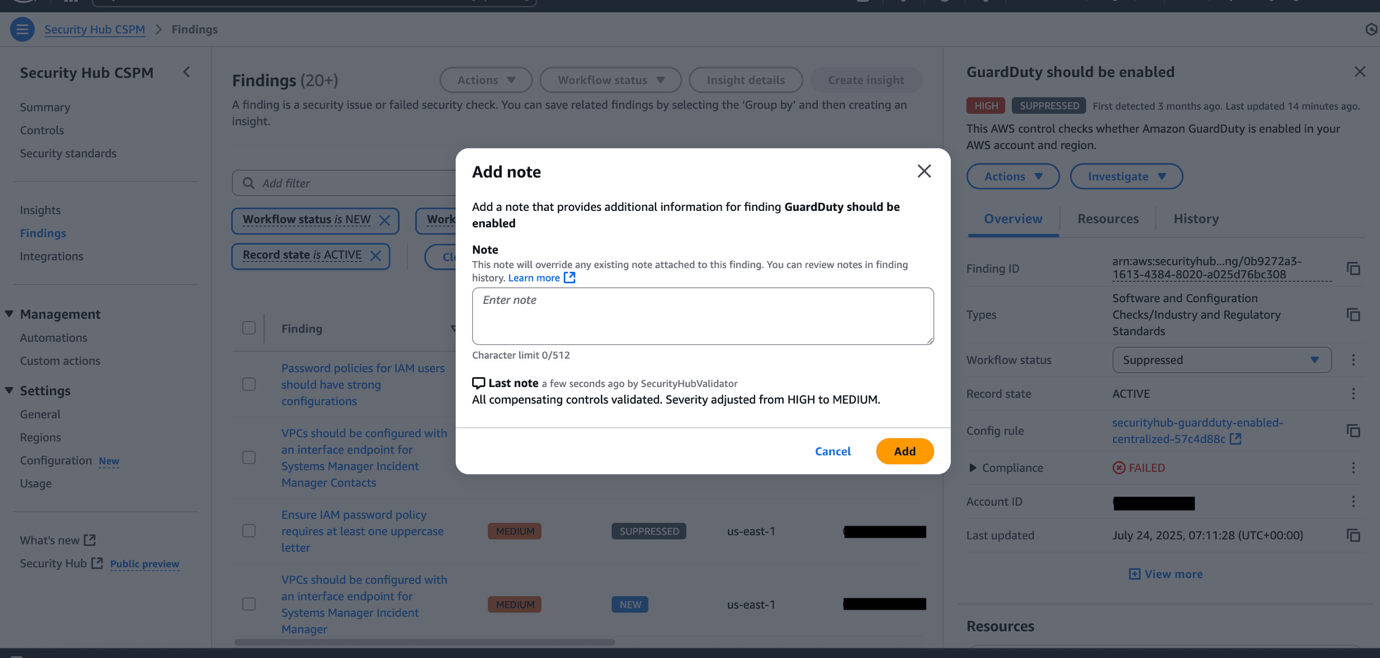
Figure 10: Security Hub CSPM updated finding note
The finding note shows that automated validation has performed checks and documented the results, also note that the original severity of
HIGHthat was assigned by Security Hub CSPM is maintained and the adjusted severity ofMEDIUMthat was provided by the security team is added in the Note section and to the Evidence table, providing transparency and accountability while maintaining the original severity assigned by Security Hub CSPM.Clean up
To avoid incurring ongoing charges, use the following command to clean up resources created for this post.
./cleanup.shThis deployment process is designed to be straightforward and to maintain security best practices such as encryption, least privilege, and segregation of duties.
Conclusion
In this post, we showed you how to implement a solution that security teams can use to define compensating controls for AWS Security Hub CSPM findings and automatically validate their implementation. We walked through the challenges of managing security exceptions and demonstrated how this solution helps to bridge the gap between security requirements and practical implementation.
The solution provides a structured workflow where security teams define acceptable compensating controls, developers implement them, and an automated system validates their effectiveness. With support for 13 different validation types, from AWS Config rules to process documentation, the solution offers comprehensive coverage for various security scenarios.
We also demonstrated the end-to-end process of adding compensating controls for a GuardDuty finding and showed how the solution maintains the original finding severity assigned by Security Hub CSPM while documenting the adjusted risk level approved by the security team. This approach helps maintain transparency and auditability while allowing for necessary exceptions.
Give it a try and share your feedback in the comments section.
Security Implication Disclaimer: The Amazon S3 configurations demonstrated in this post involve public access settings that expose data to the internet and should only be used for demonstration or non-sensitive content. Public S3 buckets carry significant risks including data exposure, unexpected costs from unauthorized usage, compliance violations, and potential security breaches. For production environments, use IAM roles, implement least privilege access policies, enable S3 Block Public Access settings, and consider CloudFront with Origin Access Control for public content delivery. Consult your security team and make sure of compliance with organizational policies before implementing public S3 configurations in production systems.