AWS Security Blog
Temporary elevated access management with IAM Identity Center
AWS recommends using automation where possible to keep people away from systems—yet not every action can be automated in practice, and some operations might require access by human users. Depending on their scope and potential impact, some human operations might require special treatment.
One such treatment is temporary elevated access, also known as just-in-time access. This is a way to request access for a specified time period, validate whether there is a legitimate need, and grant time-bound access. It also allows you to monitor activities performed, and revoke access if conditions change. Temporary elevated access can help you to reduce risks associated with human access without hindering operational capabilities.
In this post, we introduce a temporary elevated access management solution (TEAM) that integrates with AWS IAM Identity Center (successor to AWS Single Sign-On) and allows you to manage temporary elevated access to your multi-account AWS environment. You can download the TEAM solution from AWS Samples, deploy it to your AWS environment, and customize it to meet your needs.
The TEAM solution provides the following features:
- Workflow and approval — TEAM provides a workflow that allows authorized users to request, review, and approve or reject temporary access. If a request is approved, TEAM activates access for the requester with the scope and duration specified in the request.
- Invoke access using IAM Identity Center — When temporary elevated access is active, a requester can use the IAM Identity Center AWS access portal to access the AWS Management Console or retrieve temporary credentials. A requester can also invoke access directly from the command line by configuring AWS Command Line Interface (AWS CLI) to integrate with IAM Identity Center.
- View request details and session activity — Authorized users can view request details and session activity related to current and historical requests from within the application’s web interface.
- Ability to use managed identities and group memberships — You can either sync your existing managed identities and group memberships from an external identity provider into IAM Identity Center, or manage them directly in IAM Identity Center, in order to control user authorization in TEAM. Similarly, users can authenticate directly in IAM Identity Center, or they can federate from an external identity provider into IAM Identity Center, to access TEAM.
- A rich authorization model — TEAM uses group memberships to manage eligibility (authorization to request temporary elevated access with a given scope) and approval (authorization to approve temporary elevated access with a given scope). It also uses group memberships to determine whether users can view historical and current requests and session activity, and whether they can administer the solution. You can manage both eligibility and approval policies at different levels of granularity within your organization in AWS Organizations.
TEAM overview
You can download the TEAM solution and deploy it into the same organization where you enable IAM Identity Center. TEAM consists of a web interface that you access from the IAM Identity Center access portal, a workflow component that manages requests and approvals, an orchestration component that activates temporary elevated access, and additional components involved in security and monitoring.
Figure 1 shows an organization with TEAM deployed alongside IAM Identity Center.

Figure 1: An organization using TEAM alongside IAM Identity Center
Figure 1 shows three main components:
- TEAM — a self-hosted solution that allows users to create, approve, monitor and manage temporary elevated access with a few clicks in a web interface.
- IAM Identity Center — an AWS service which helps you to securely connect your workforce identities and manage their access centrally across accounts.
- AWS target environment — the accounts where you run your workloads, and for which you want to securely manage both persistent access and temporary elevated access.
There are four personas who can use TEAM:
- Requesters — users who request temporary elevated access to perform operational tasks within your AWS target environment.
- Approvers — users who review and approve or reject requests for temporary elevated access.
- Auditors — users with read-only access who can view request details and session activity relating to current and historical requests.
- Admins — users who can manage global settings and define policies for eligibility and approval.
TEAM determines a user’s persona from their group memberships, which can either be managed directly in IAM Identity Center or synced from an external identity provider into IAM Identity Center. This allows you to use your existing access governance processes and tools to manage the groups and thereby control which actions users can perform within TEAM.
The following steps describe how you use TEAM during normal operations to request, approve, and invoke temporary elevated access. The steps correspond to the numbered items in Figure 1:
- Access the AWS access portal in IAM Identity Center (all personas)
- Access the TEAM application (all personas)
- Request elevated access (requester persona)
- Approve elevated access (approver persona)
- Activate elevated access (automatic)
- Invoke elevated access (requester persona)
- Log session activity (automatic)
- End elevated access (automatic; or requester or approver persona)
- View request details and session activity (requester, approver, or auditor persona)
In the TEAM walkthrough section later in this post, we provide details on each of these steps.
Deploy and set up TEAM
Before you can use TEAM, you need to deploy and set up the solution.
Prerequisites
To use TEAM, you first need to have an organization set up in AWS Organizations with IAM Identity Center enabled. If you haven’t done so already, create an organization, and then follow the Getting started steps in the IAM Identity Center User Guide.
Before you deploy TEAM, you need to nominate a member account for delegated administration in IAM Identity Center. This has the additional benefit of reducing the need to use your organization’s management account. We strongly recommend that you use this account only for IAM Identity Center delegated administration, TEAM, and associated services; that you do not deploy any other workloads into this account, and that you carefully manage access to this account using the principle of least privilege.
We recommend that you enforce multi-factor authentication (MFA) for users, either in IAM Identity Center or in your external identity provider. If you want to statically assign access to users or groups (persistent access), you can do that in IAM Identity Center, independently of TEAM, as described in Multi-account permissions.
Deploy TEAM
To deploy TEAM, follow the solution deployment steps in the TEAM documentation. You need to deploy TEAM in the same account that you nominate for IAM Identity Center delegated administration.
Access TEAM
After you deploy TEAM, you can access it through the IAM Identity Center web interface, known as the AWS access portal. You do this using the AWS access portal URL, which is configured when you enable IAM Identity Center. Depending on how you set up IAM Identity Center, you are either prompted to authenticate directly in IAM Identity Center, or you are redirected to an external identity provider to authenticate. After you authenticate, the AWS access portal appears, as shown in Figure 2.
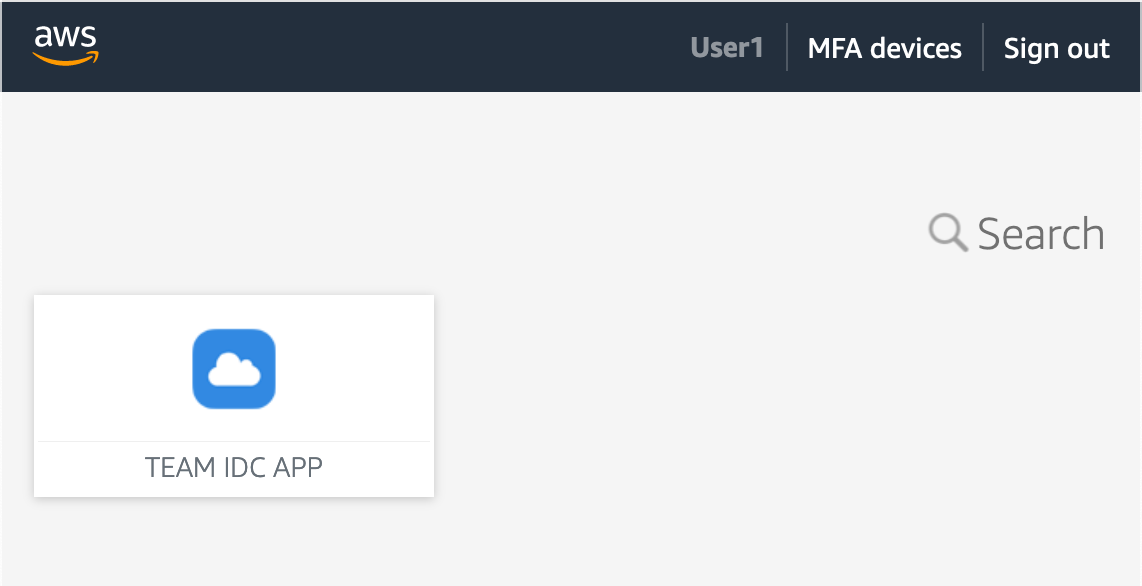
Figure 2: TEAM application icon in the AWS access portal of IAM Identity Center
You configure TEAM as an IAM Identity Center Custom SAML 2.0 application, which means it appears as an icon in the AWS access portal. To access TEAM, choose TEAM IDC APP.
When you first access TEAM, it automatically retrieves your identity and group membership information from IAM Identity Center. It uses this information to determine what actions you can perform and which navigation links are visible.
Set up TEAM
Before users can request temporary elevated access in TEAM, a user with the admin persona needs to set up the application. This includes defining policies for eligibility and approval. A user takes on the admin persona if they are a member of a named IAM Identity Center group that is specified during TEAM deployment.
Manage eligibility policies
Eligibility policies determine who can request temporary elevated access with a given scope. You can define eligibility policies to ensure that people in specific teams can only request the access that you anticipate they’ll need as part of their job function.
- To manage eligibility policies, in the left navigation pane, under Administration, select Eligibility policy. Figure 3 shows this view with three eligibility policies already defined.
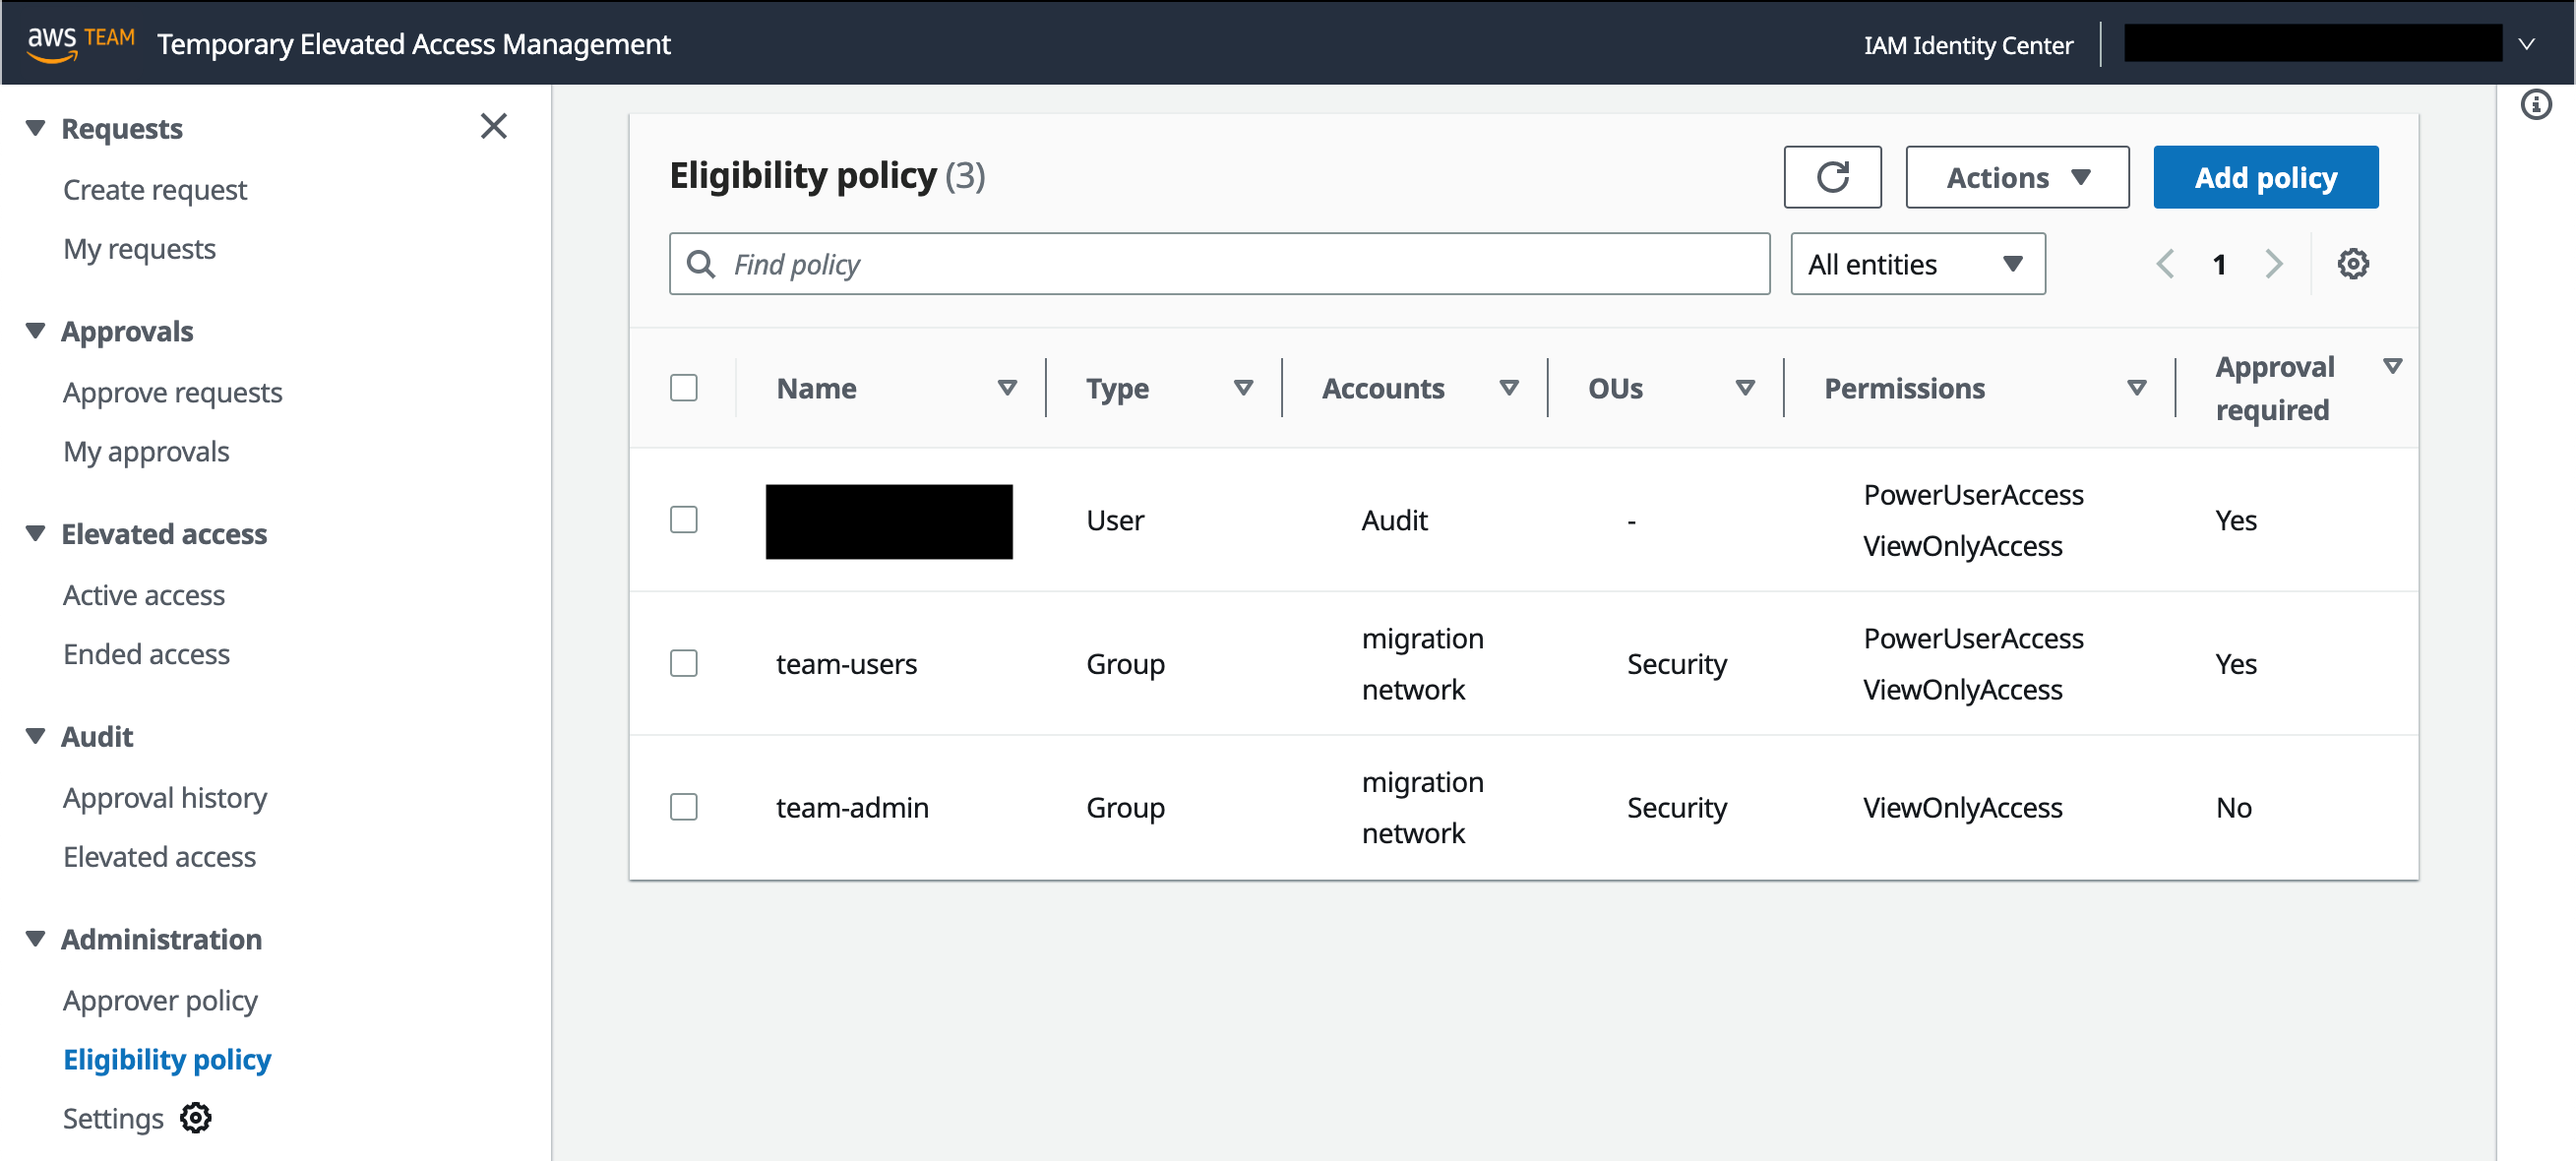
Figure 3: Manage eligibility policies
An eligibility policy has four main parts:
- Name and Type — An IAM Identity Center user or group
- Accounts or OUs — One or more accounts, organizational units (OUs), or both, which belong to your organization
- Permissions — One or more IAM Identity Center permission sets (representing IAM roles)
- Approval required — whether requests for temporary elevated access require approval.
Each eligibility policy allows the specified IAM Identity Center user, or a member of the specified group, to log in to TEAM and request temporary elevated access using the specified permission sets in the specified accounts. When you choose a permission set, you can either use a predefined permission set provided by IAM Identity Center, or you can create your own permission set using custom permissions to provide least-privilege access for particular tasks.
Note: If you specify an OU in an eligibility or approval policy, TEAM includes the accounts directly under that OU, but not those under its child OUs.
Manage approval policies
Approval policies work in a similar way as eligibility policies, except that they authorize users to approve temporary elevated access requests, rather than create them. If a specific account is referenced in an eligibility policy that is configured to require approval, then you need to create a corresponding approval policy for the same account. If there is no corresponding approval policy—or if one exists but its groups have no members — then TEAM won’t allow users to create temporary elevated access requests for that account, because no one would be able to approve them.
- To manage approval policies, in the left navigation pane, under Administration, select Approval policy. Figure 4 shows this view with three approval policies already defined.
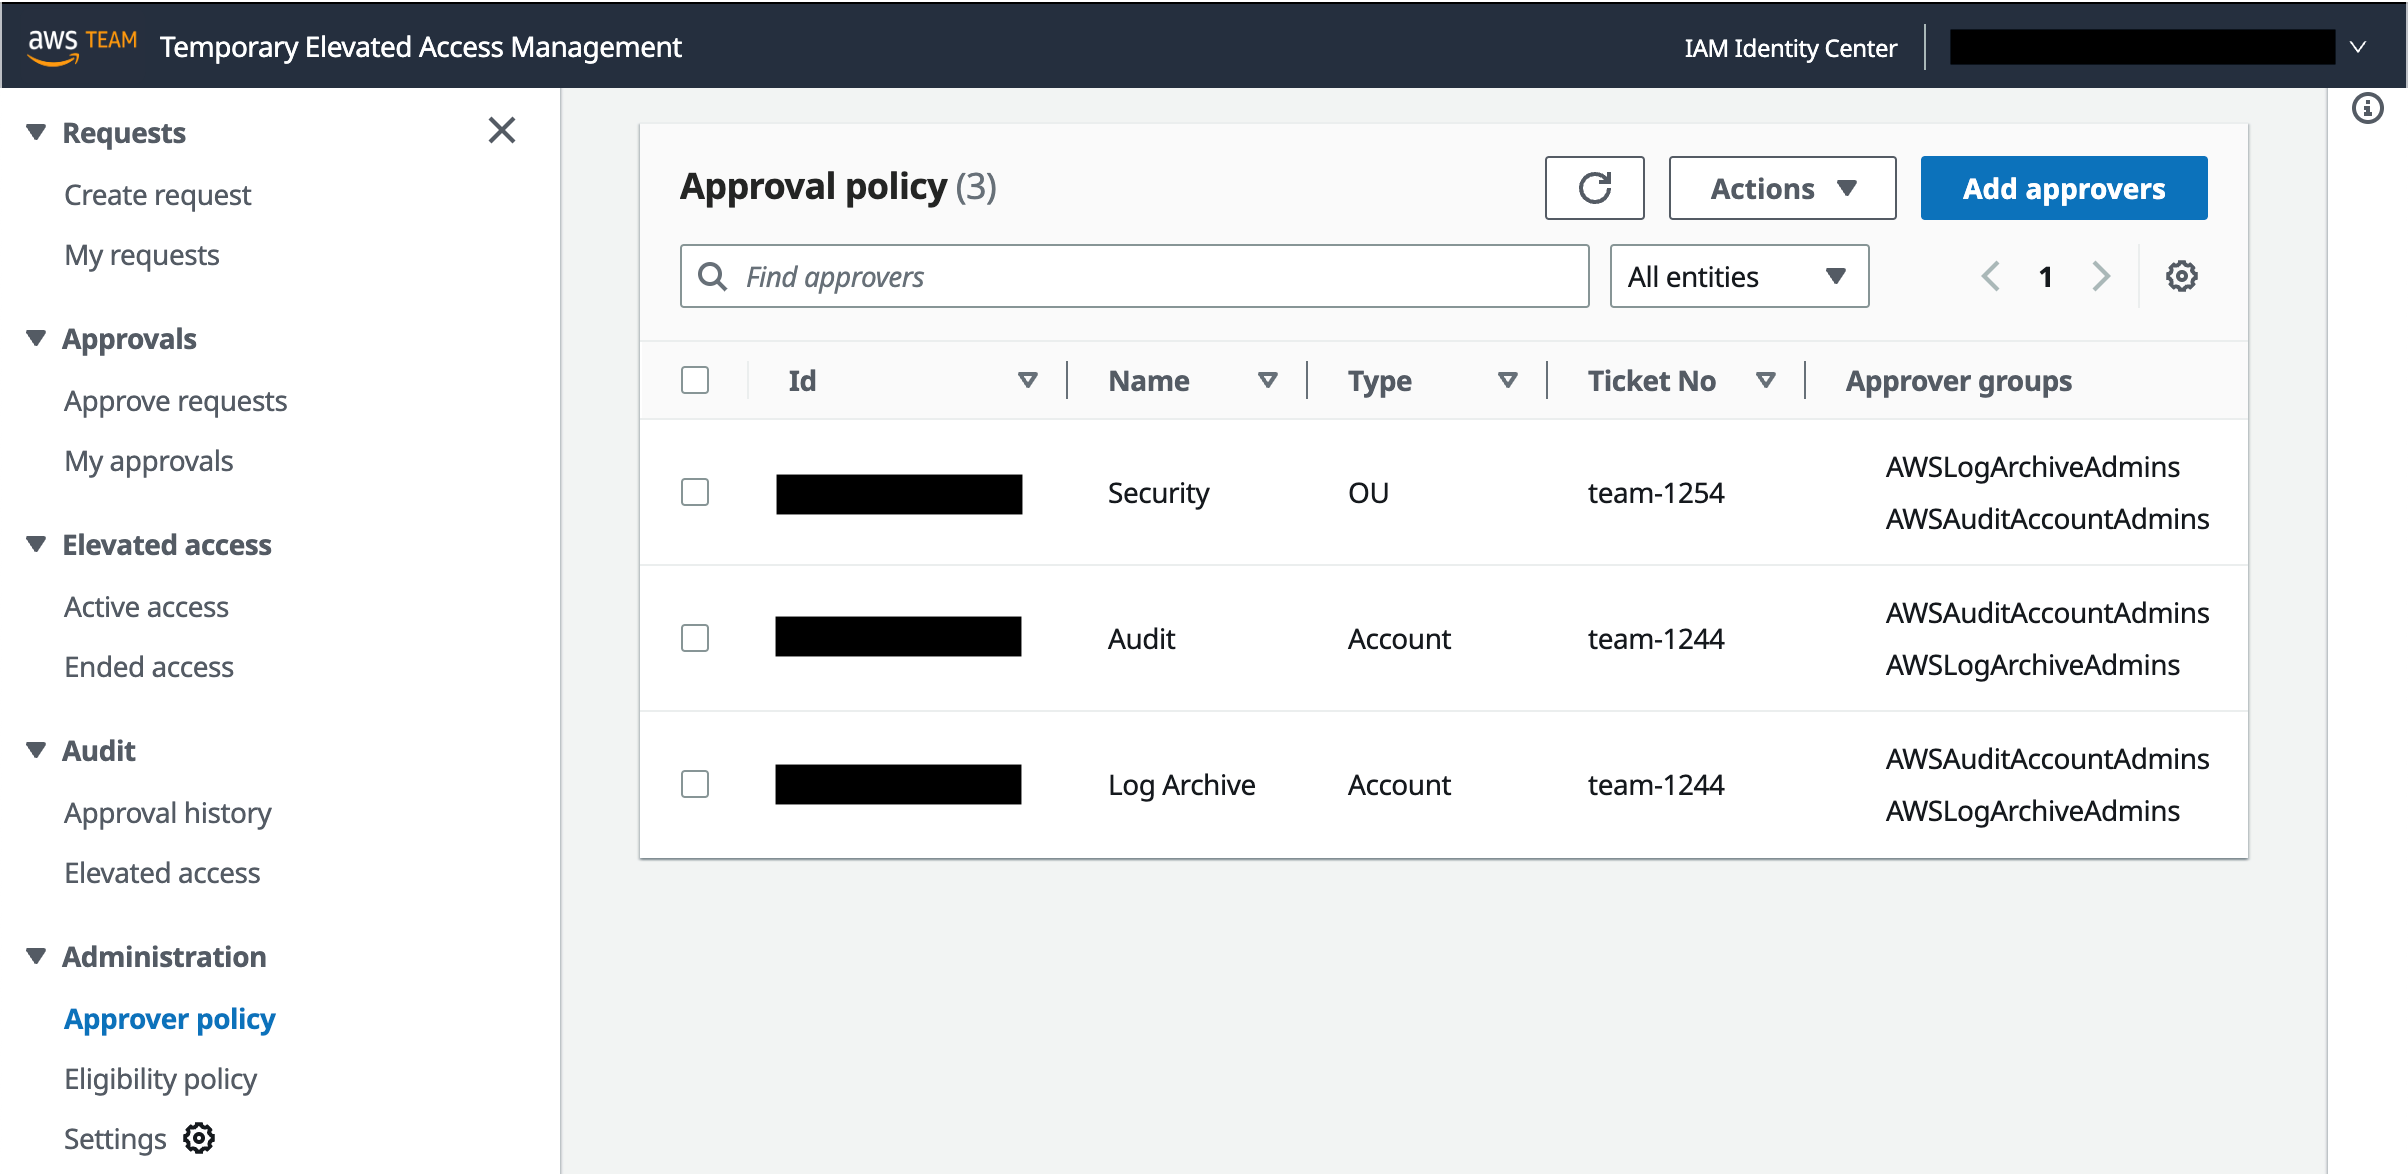
Figure 4: Manage approval policies
An approval policy has two main parts:
- Id, Name, and Type — Identifiers for an account or organizational unit (OU)
- Approver groups — One or more IAM Identity Center groups
Each approval policy allows a member of a specified group to log in to TEAM and approve temporary elevated access requests for the specified account, or all accounts under the specified OU, regardless of permission set.
Note: If you specify the same group for both eligibility and approval in the same account, this means approvers can be in the same team as requesters for that account. This is a valid approach, sometimes known as peer approval. Nevertheless, TEAM does not allow an individual to approve their own request. If you prefer requesters and approvers to be in different teams, specify different groups for eligibility and approval.
TEAM walkthrough
Now that the admin persona has defined eligibility and approval policies, you are ready to use TEAM.
To begin this walkthrough, imagine that you are a requester, and you need to perform an operational task that requires temporary elevated access to your AWS target environment. For example, you might need to fix a broken deployment pipeline or make some changes as part of a deployment. As a requester, you must belong to a group specified in at least one eligibility policy that was defined by the admin persona.
Step 1: Access the AWS access portal in IAM Identity Center
To access the AWS access portal in IAM Identity Center, use the AWS access portal URL, as described in the Access TEAM section earlier in this post.
Step 2: Access the TEAM application
To access the TEAM application, select the TEAM IDC APP icon, as described in the Access TEAM section earlier.
Step 3: Request elevated access
The next step is to create a new elevated access request as follows:
- Under Requests, in the left navigation pane, choose Create request.
- In the Elevated access request section, do the following, as shown in Figure 5:
- Select the account where you need to perform your task.
- For Role, select a permission set that will give you sufficient permissions to perform the task.
- Enter a start date and time, duration, ticket ID (typically representing a change ticket or incident ticket related to your task), and business justification.
- Choose Submit.
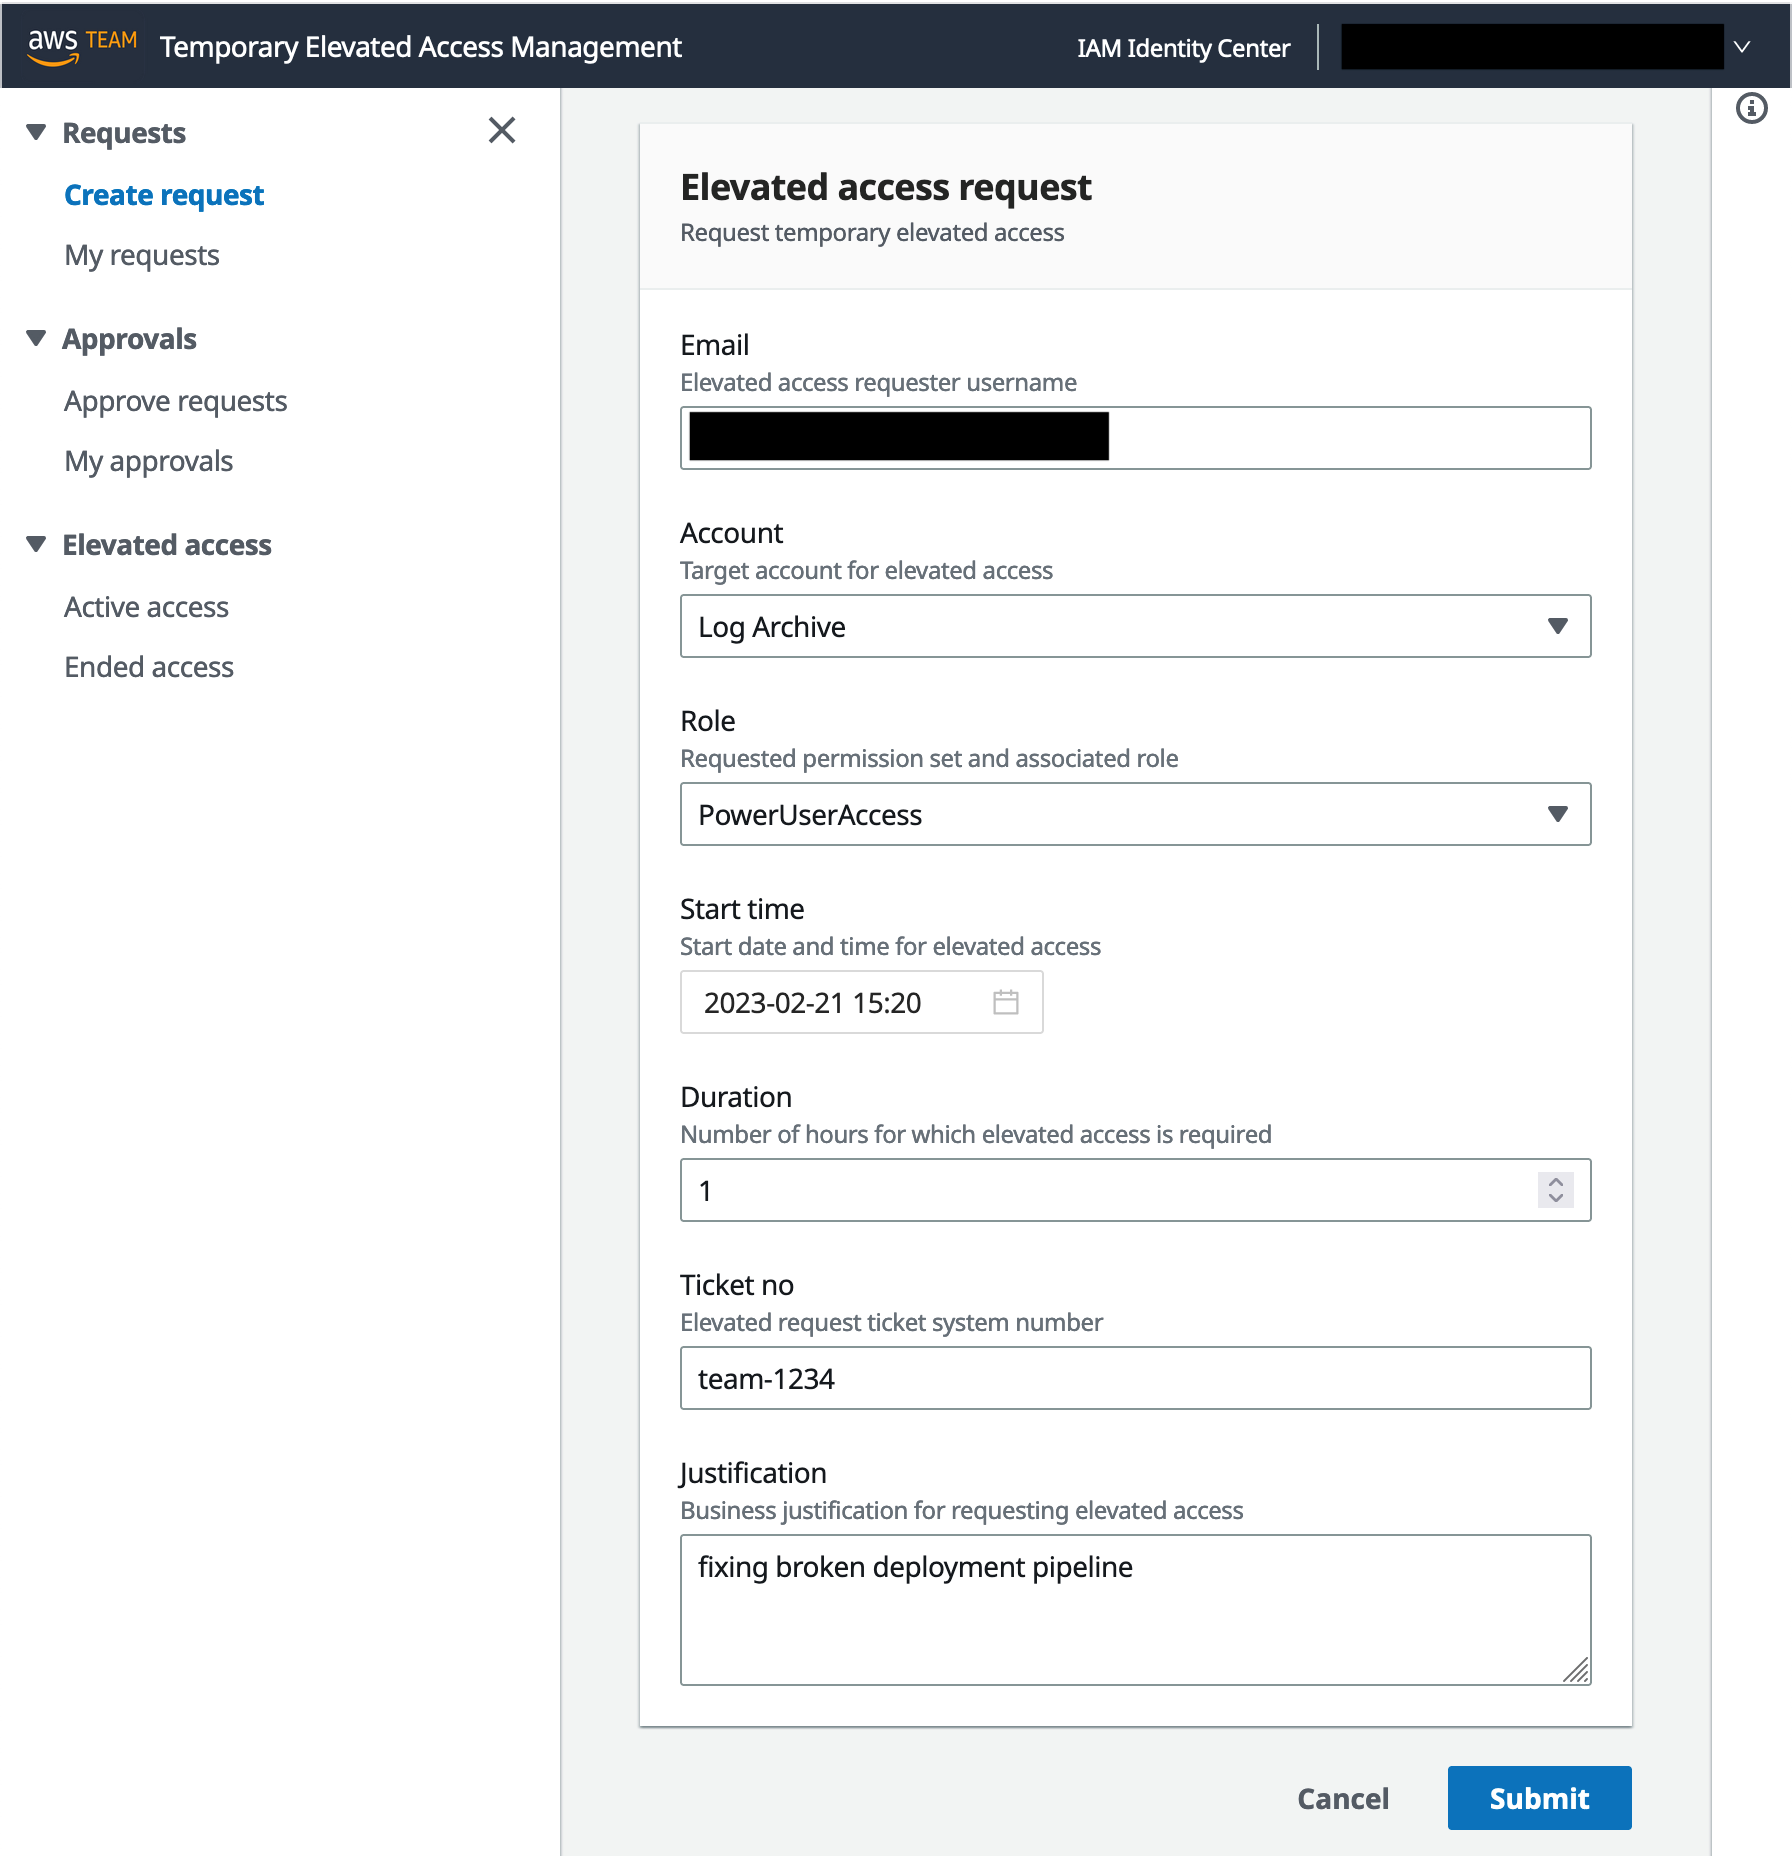
Figure 5: Create a new request
When creating a request, consider the following:
- In each request, you can specify exactly one account and one permission set.
- You can only select an account and permission set combination for which you are eligible based on the eligibility policies defined by the admin persona.
- As a requester, you should apply the principle of least privilege by selecting a permission set with the least privilege, and a time window with the least duration, that will allow you to complete your task safely.
- TEAM captures a ticket identifier for audit purposes only; it does not try to validate it.
- The duration specified in a request determines the time window for which elevated access is active, if your request is approved. During this time window, you can invoke sessions to access the AWS target environment. It doesn’t affect the duration of each session.
- Session duration is configured independently for each permission set by an IAM Identity Center administrator, and determines the time period for which IAM temporary credentials are valid for sessions using that permission set.
- Sessions invoked just before elevated access ends might remain valid beyond the end of the approved elevated access period. If this is a concern, consider minimizing the session duration configured in your permission sets, for example by setting them to 1 hour.
Step 4: Approve elevated access
After you submit your request, approvers are notified by email. Approvers are notified when there are new requests that fall within the scope of what they are authorized to approve, based on the approval policies defined earlier.
For this walkthrough, imagine that you are now the approver. You will perform the following steps to approve the request. As an approver, you must belong to a group specified in an approval policy that the admin persona configured.
- Access the TEAM application in exactly the same way as for the other personas.
- In the left navigation pane, under Approvals, choose Approve requests. TEAM displays requests awaiting your review, as shown in Figure 6.
- To view the information provided by the requester, select a request and then choose View details.

Figure 6: Requests awaiting review
- Select a pending request, and then do one of the following:
- To approve the request, select Actions and then choose Approve.
- To reject the request, select Actions and then choose Reject.
Figure 7 shows what TEAM displays when you approve a request.

Figure 7: Approve a request
- After you approve or reject a request, the original requester is notified by email.
A requester can view the status of their requests in the TEAM application.
- To see the status of your open requests in the TEAM application, in the left navigation pane, under Requests, select My requests. Figure 8 shows this view with one approved request.

Figure 8: Approved request
Step 5: Automatic activation of elevated access
After a request is approved, the TEAM application waits until the start date and time specified in the request and then automatically activates elevated access. To activate access, a TEAM orchestration workflow creates a temporary account assignment, which links the requester’s user identity in IAM Identity Center with the permission set and account in their request. Then TEAM notifies the requester by email that their request is active.
A requester can now view their active request in the TEAM application.
- To see active requests, in the left navigation pane under Elevated access, choose Active access. Figure 9 shows this view with one active request.

Figure 9: Active request
- To see further details for an active request, select a request and then choose View details. Figure 10 shows an example of these details.

Figure 10: Details of an active request
Step 6: Invoke elevated access
During the time period in which elevated access is active, the requester can invoke sessions to access the AWS target environment to complete their task. Each session has the scope (permission set and account) approved in their request. There are three ways to invoke access.
The first two methods involve accessing IAM Identity Center using the AWS access portal URL. Figure 11 shows the AWS access portal while a request is active.
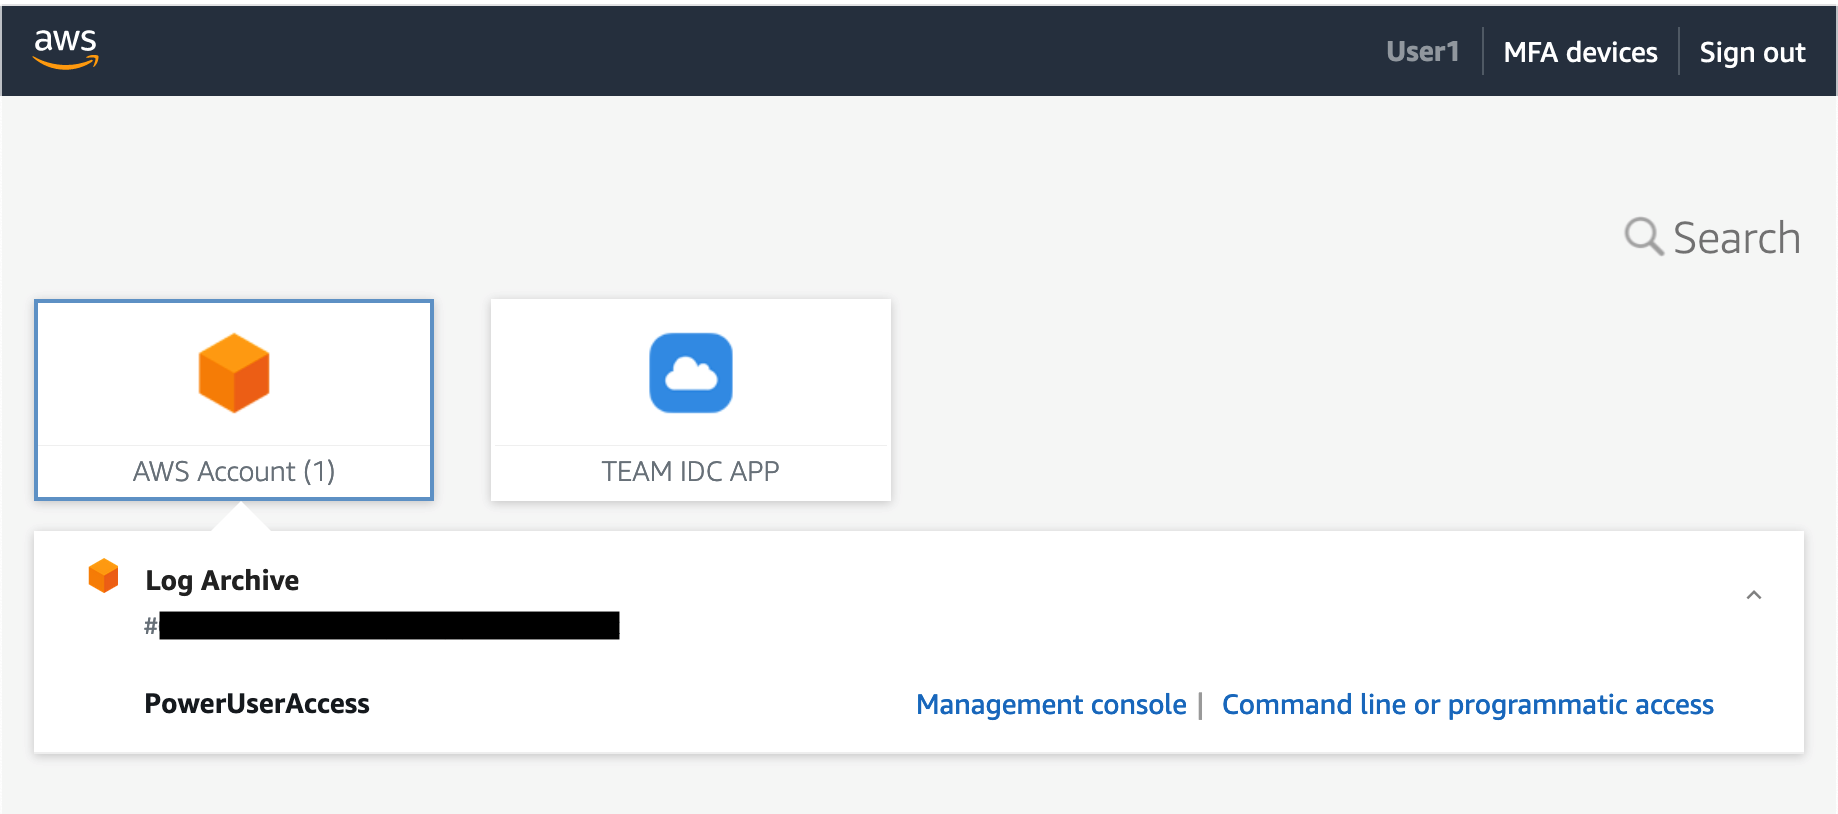
Figure 11: Invoke access from the AWS access portal
From the AWS access portal, you can select an account and permission set that is currently active. You’ll also see the accounts and permission sets that have been statically assigned to you using IAM Identity Center, independently of TEAM. From here, you can do one of the following:
- Choose Management console to federate to the AWS Management Console.
- Choose Command line or programmatic access to copy and paste temporary credentials.
The third method is to initiate access directly from the command line using AWS CLI. To use this method, you first need to configure AWS CLI to integrate with IAM Identity Center. This method provides a smooth user experience for AWS CLI users, since you don’t need to copy and paste temporary credentials to your command line.
Regardless of how you invoke access, IAM Identity Center provides temporary credentials for the IAM role and account specified in your request, which allow you to assume that role in that account. The temporary credentials are valid for the duration specified in the role’s permission set, defined by an IAM Identity Center administrator.
When you invoke access, you can now complete the operational tasks that you need to perform in the AWS target environment. During the period in which your elevated access is active, you can invoke multiple sessions if necessary.
Step 7: Log session activity
When you access the AWS target environment, your activity is logged to AWS CloudTrail. Actions you perform in the AWS control plane are recorded as CloudTrail events.
Note: Each CloudTrail event contains the unique identifier of the user who performed the action, which gives you traceability back to the human individual who requested and invoked temporary elevated access.
Step 8: End elevated access
Elevated access ends when either the requested duration elapses or it is explicitly revoked in the TEAM application. The requester or an approver can revoke elevated access whenever they choose.
When elevated access ends, or is revoked, the TEAM orchestration workflow automatically deletes the temporary account assignment for this request. This unlinks the permission set, the account, and the user in IAM Identity Center. The requester is then notified by email that their elevated access has ended.
Step 9: View request details and session activity
You can view request details and session activity for current and historical requests from within the TEAM application. Each persona can see the following information:
- Requesters can inspect elevated access requested by them.
- Approvers can inspect elevated access that falls within the scope of what they are authorized to approve.
- Auditors can inspect elevated access for all TEAM requests.
Session activity is recorded based on the log delivery times provided by AWS CloudTrail, and you can view session activity while elevated access is in progress or after it has ended. Figure 12 shows activity logs for a session displayed in the TEAM application.

Figure 12: Session activity logs
Security and resiliency considerations
The TEAM application controls access to your AWS environment, and you must manage it with great care to prevent unauthorized access. This solution is built using AWS Amplify to ease the reference deployment. Before operationalizing this solution, consider how to align it with your existing development and security practices.
Further security and resiliency considerations including setting up emergency break-glass access are available in the TEAM documentation.
Additional resources
AWS Security Partners provide temporary elevated access solutions that integrate with IAM Identity Center, and AWS has validated the integration of these partner offerings and assessed their capabilities against a common set of customer requirements. For further information, see temporary elevated access in the IAM Identity Center User Guide.
The blog post Managing temporary elevated access to your AWS environment describes an alternative self-hosted solution for temporary elevated access which integrates directly with an external identity provider using OpenID Connect, and federates users directly into AWS Identity and Access Management (IAM) roles in your accounts. The TEAM solution described in this blog post, on the other hand, integrates with IAM Identity Center, which provides a way to centrally manage user access to accounts across your organization and optionally integrates with an external identity provider.
Conclusion
In this blog post, you learned that your first priority should be to use automation to avoid the need to give human users persistent access to your accounts. You also learned that in the rare cases in which people need access to your accounts, not all access is equal; there are times when you need a process to verify that access is needed, and to provide temporary elevated access.
We introduced you to a temporary elevated access management solution (TEAM) that you can download from AWS Samples and use alongside IAM Identity Center to give your users temporary elevated access. We showed you the TEAM workflow, described the TEAM architecture, and provided links where you can get started by downloading and deploying TEAM.
If you have feedback about this post, submit comments in the Comments section below. If you have questions about this post, start a new thread on AWS IAM Identity Center re:Post or contact AWS Support.
Want more AWS Security news? Follow us on Twitter.