AWS Security Blog
Use AWS Firewall Manager to deploy protection at scale in AWS Organizations
Security teams that are responsible for securing workloads in hundreds of Amazon Web Services (AWS) accounts in different organizational units aim for a consistent approach across AWS Organizations. Key goals include enforcing preventative measures to mitigate known security issues, having a central approach for notifying the SecOps team about potential distributed denial of service (DDoS) attacks, and continuing to maintain compliance obligations. AWS Firewall Manager works at the organizational level to help you achieve your intended security posture while it provides reporting for non-compliant resources in all your AWS accounts. This post provides step-by-step instructions to deploy and manage security policies across your AWS Organizations implementation by using Firewall Manager.
You can use Firewall Manager to centrally manage AWS WAF, AWS Shield Advanced, and Amazon Virtual Private Cloud (Amazon VPC) security groups across all your AWS accounts. Firewall Manager helps to protect resources across different accounts, and it can protect resources with specific tags or resources in a group of AWS accounts that are in specific organizational units (OUs). With AWS Organizations, you can centrally manage policies across multiple AWS accounts without having to use custom scripts and manual processes.
Architecture diagram
Figure 1 shows an example organizational structure in AWS Organizations, with several OUs that we’ll use in the example policy sets in this blog post.
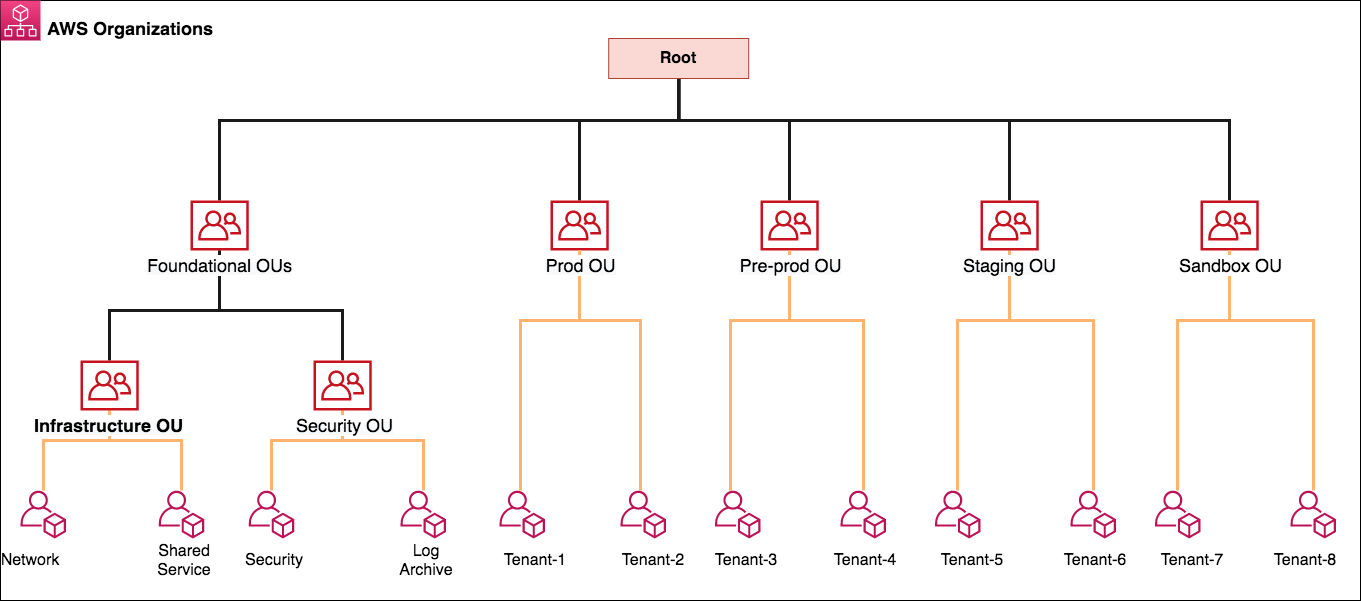
Figure 1: AWS Organizations and OU structure
Firewall Manager can be associated to either the AWS master payer account or one of the member AWS accounts that has appropriate permissions as a delegated administrator. Following the best practices for organizational units, in this post we use a dedicated Security Tooling AWS account (named Security in the diagram) to operate the Firewall Manager administrator deployment under the Security OU. The Security OU is used for hosting security-related access and services. The Security OU, its child OUs, and the associated AWS accounts should be owned and managed by your security organization.
Firewall Manager prerequisites
Firewall Manager has the following prerequisites that you must complete before you create and apply a Firewall Manager policy:
- AWS Organizations: Your organization must be using AWS Organizations to manage your accounts, and All Features must be enabled. For more information, see Creating an organization and Enabling all features in your organization.
- A Firewall Manager administrator account: You must designate one of the AWS accounts in your organization as the Firewall Manager administrator for Firewall Manager. This gives the account permission to deploy security policies across the organization.
- AWS Config: You must enable AWS Config for all of the accounts in your organization so that Firewall Manager can detect newly created resources. To enable AWS Config for all of the accounts in your organization, use the Enable AWS Config template from the StackSets sample templates.
Deployment of security policies
In the following sections, we explain how to create AWS WAF rules, Shield Advanced protections, and Amazon VPC security groups by using Firewall Manager. We further explain how you can deploy these different policy types to protect resources across your accounts in AWS Organizations. Each Firewall Manager policy is specific to an individual resource type. If you want to enforce multiple policy types across accounts, you should create multiple policies. You can create more than one policy for each type. If you add a new account to an organization that you created with AWS Organizations, Firewall Manager automatically applies the policy to the resources in that account that are within scope of the policy. This is a scalable approach to assist you in deploying the necessary configuration when developers create resources. For instance, you can create an AWS WAF policy that will result in a known set of AWS WAF rules being deployed whenever someone creates an Amazon CloudFront distribution.
Policy 1: Create and manage security groups
You can use Firewall Manager to centrally configure and manage Amazon VPC security groups across all your AWS accounts in AWS Organizations. A previous AWS Security blog post walks you through how to apply common security group rules, audit your security groups, and detect unused and redundant rules in your security groups across your AWS environment.
Firewall Manager automatically audits new resources and rules as customers add resources or security group rules to their accounts. You can audit overly permissive security group rules, such as rules with a wide range of ports or Classless Inter-Domain Routing (CIDR) ranges, or rules that have enabled all protocols to access resources. To audit security group policies, you can use application and protocol lists to specify what’s allowed and what’s denied by the policy.
In this blog post, we use a security policy to audit the security groups for overly permissive rules and high-risk applications that are allowed to open to local CIDR ranges (for example, 10.0.0.0/8, 192.168.0.0/16, 172.16.0.0/12). We created a custom application list named Bastion Host for port 22 and a custom protocol list named Allowed Protocol that allows the child account to create rules only on TCP protocols. Refer link for how to create a custom managed application and protocol list.
To create audit security group policies
- Sign in to the Firewall Manager delegated administrator account. Navigate to the Firewall Manager console. In the left navigation pane, under AWS Firewall Manager, select Security policies.
- For Region, select the AWS Region where you would like to protect the resources. FMS region selection is on the service page drop down tab. In this example, we selected the Sydney (ap-southeast-2) Region because we have all of our resources in the Sydney Region.
- Create the policy, and in Policy details, choose Security group. For Region, select a Region (we selected Sydney (ap-southeast-2)), and then choose Next.
- For Security group policy type, choose Auditing and enforcement of security group rules, and then choose Next.
- Enter a policy name. We named our policy AWS_FMS_Audit_SecurityGroup.
- For Policy rule options, for this example, we chose Configure managed audit policy rules.
- Under Policy rules, choose the following:
- For Security group rules to audit, choose Inbound Rules.
- For Rules, select the following:
- Select Audit over permissive security group rules.
- For Allowed security group rules, choose Add Protocol list and select the custom protocol list Allowed Protocols that we created earlier.
- For Denied security group rules, select Deny rules with the allow ‘ALL’ protocol.
- Select Audit high risk applications.
- Choose Applications that can only access local CIDR ranges. Then choose Add application list and select the custom application list Bastion host that we created earlier.
- Select Audit over permissive security group rules.
- For Policy action, for the example in this post, we chose Auto remediate any noncompliant resources. Choose Next.

Figure 2: Policy rules for the security group audit policy
- For Policy scope, choose the following options for this example:
- For AWS accounts this policy applies to, choose Include only the specified accounts and organizational unit. For Included Organizational units, select OU (example – Non-Prod Accounts).
- For Resource type, select EC2 Instance, Security Group, and Elastic Network Interface.
- For Resources, choose Include all resources that match the selected resource type.
- You can create tags for the security policy. In the example in this post, Tag Key is set to Firewall_Manager and Tag Value is set to Audit_Security_group.
Important: Migrating AWS accounts from one organizational unit to another won’t remove or detach the existing security group policy applied by Firewall Manager. For example, in the reference architecture in Figure 1 we have the AWS account Tenant-5 under the Staging OU. We’ve created a different Firewall Manager security group policy for the Pre-Prod OU and Prod OU. If you move the Tenant-5 account to Prod OU from Staging OU, the resources associated with Tenant-5 will continue to have the security group policies that are defined for both Prod and Staging OU unless you select otherwise before relocating the AWS account. Firewall Manager supports the detach option in case of policy deletion, because moving accounts across the OU may have unintended impacts such as loss of connectivity or protection, and therefore Firewall Manager won’t remove the security group.
Policy 2: Managing AWS WAF v2 policy
A Firewall Manager AWS WAF policy contains the rule groups that you want to apply to your resources. When you apply the policy, Firewall Manager creates a Firewall Manager web access control list (web ACL) in each account that’s within the policy scope.
Note: Creating Amazon Kinesis Data Firehose delivery stream is a prerequisite to manage the WAF ACL logging at Step 8 in us-east-1. (example – aws-waf-logs-lab-waf-logs)
To create a Firewall Manager – AWS WAF v2 policy
- Sign in to the Firewall Manager delegated administrator account. Navigate to the Firewall Manager console. In the left navigation pane, under AWS Firewall Manager, choose Security policies.
- For Region, select a Region. FMS region selection is on the service page drop down tab. For this example, we selected the Region as Global, since the policy is to protect CloudFront resources.
- Create the policy. Under Policy details, choose AWS WAF and for Region, choose Global. Then choose Next.
- Enter a policy name. We named our policy AWS_FMS_WAF_Rule.
- On the Policy rule page, under Web ACL configuration, add rule groups. AWS WAF supports custom rule groups (the customer creates the rules), AWS Managed Rules rule groups (AWS manages the rules), and AWS Marketplace managed rule groups. For this example, we chose AWS Managed Rules rule groups.
- For this example, for First rule groups, we chose the AWS Managed Rules rule group, AWS Core rule set. For Last rule groups, we chose the AWS Managed Rules rule group, Amazon IP reputation list.
- For Default web ACL action for requests that don’t match any rules in the web ACL, choose a default action. We chose Allow.
- Firewall Manager enables logging for a specific web ACL. This logging is applied to all the in-scope accounts and delivers the logs to a centralized single account. To enable centralized logging of AWS WAF logs:
- For Logging configuration status, choose Enabled.
- For IAM role, Firewall Manager creates an AWS WAF service-role for logging. Your security account should have the necessary IAM permissions. Learn more about access requirements for logging.
- Select Kinesis stream created earlier called aws-waf-logs-lab-waf-logs in us-east-1 as we’re using Cloudfront as a resource in the policy.
- For Redacted fields, for this example select HTTP method, Query String, URI, and Header. You can also add a new header. For more information, see Configure logging for an AWS Firewall Manager AWS WAF policy.
- For Policy action, for this example, we chose Auto remediate any noncompliant resources. To replace the existing web ACL that is currently associated with the resource, select Replace web ACLs that are currently associated with in-scope resources with the web ACLs created by this policy. Choose Next.
Note: If a resource has an association with another web ACL that is managed by a different active Firewall Manager, it doesn’t affect that resource.

Figure 3: Policy rules for the AWS WAF security policy
- For Policy scope, choose the following options for this example:
- For AWS accounts this policy applies to, choose Include only the specified accounts and organizational unit. For Included organizational units, select OU (example – Pre-Prod Accounts).
- For Resource type, choose CloudFront distribution.
- For Resources, choose Include all resources that match the selected resource type.
- You can create tags for the security policy. For the example in this post, Tag Key is set to Firewall_Manager and Tag Value is set to WAF_Policy.
- Review the security policy, and then choose Create Policy.
Note: For the AWS WAF v2 policy, the web ACL pushed by the Firewall Manager can’t be modified on the individual account. The account owner can only add a new rule group.
- In the policy’s first and last rule groups sets, you can add additional rule groups at the linked AWS account level to provide additional security based on application requirements. You can use managed rule groups, which AWS Managed Rules and AWS Marketplace sellers create and maintain for you. For example, you can use the WordPress application rule group, which contains rules that block request patterns associated with the exploitation of vulnerabilities specific to a WordPress site. You can also manage and use your own rule groups.For more information about all of these options, see Rule groups. Another example could be using a rate-based rule that tracks the rate of requests for each originating IP address, and triggers the rule action on IPs with rates that go over a limit. Learn more about rate-based rules.
Policy 3: Managing AWS Shield Advanced policy
AWS Shield Advanced is a paid service that provides additional protections for internet facing applications. If you have Business or Enterprise support, you can engage the 24X7 AWS DDoS Response Team (DRT), who can write rules on your behalf to mitigate Layer 7 DDoS attacks. Please refer Shield Advanced pricing for more info before proceeding with Shield FMS Policy.
After you complete the prerequisites that were outlined in the prerequisites section, we’ll create Shield Advanced policy which contains the accounts and resources that you want to protect with Shield Advanced. Purpose of this policy is to activate the AWS Shield Advanced in the Accounts in OU’s scope and add the selected resources under Shield Advanced protection list.
To create a Firewall Manager – Shield Advanced policy
- Sign in to the Firewall Manager delegated administrator account. Navigate to the Firewall Manager console. In the left navigation pane, under AWS Firewall Manager, choose Security policies.
- For Region, select the AWS Region where you would like to protect the resources. FMS region selection is on the service page drop down tab. In this post, we’ve selected the Sydney (ap-southeast-2) Region because all of our resources are in the Sydney Region.
Note: To protect CloudFront resources, select the Global option.
- Create the policy, and in Policy details, choose AWS Shield Advanced. For Region, select a Region (example – ap-southeast-2), and then choose Next.
- Enter a policy name. We named our policy AWS_FMS_ShieldAdvanced Rule.
- For Policy action, for the example in this post, we chose Auto remediate any non-compliant resources. Alternatively, if you choose Create but do not apply this policy to existing or new resources, Firewall Manager doesn’t apply Shield Advanced protection to any resources. You must apply the policy to resources later. Choose Next.
- For Policy scope, this example uses the OU structure as the container of multiple accounts with similar requirements:
- For AWS accounts this policy applies to, choose Include only the specified accounts and organizational units. For Included organizational units, select OU (example – Staging Accounts OU).
- For Resource type, select Application Load Balancer and Elastic IP.
- For Resources, choose Include all resources that match the selected resource type.

Figure 4: Policy scope page for creating the Shield Advanced security policy
Note: If you want to protect only the resources with specific tags, or alternatively exclude resources with specific tags, choose Use tags to include/exclude resources, enter the tags, and then choose either Include or Exclude. Tags enable you to categorize AWS resources in different ways, for example by indicating an environment, owner, or team to include or exclude in Firewall Manager policy. Firewall Manager combines the tags with “AND” so that, if you add more than one tag to a policy scope, a resource must have all the specified tags to be included or excluded.
Important: Shield Advanced supports protection for Amazon Route 53 and AWS Global Accelerator. However, protection for these resources cannot be deployed with the help of Firewall Manager security policy at this time. If you need to protect these resources with Shield Advanced, you should use individual AWS account access through the API or console to activate Shield Advanced protection for the intended resources.
- You can create tags for the security policy. In the example in this post, Tag Key is set to Firewall_Manager and Tag Value is set to Shield_Advanced_Policy. You can use the tags in the Resource element of IAM permission policy statements to either allow or deny users to make changes to security policy.
- Review the security policy, and then choose Create Policy.
Now you’ve successfully created a Firewall Manager security policy. Using the organizational units in AWS Organizations as a method to deploy the Firewall Manager security policy, when you add an account to the OU or to any of its child OUs, Firewall Manager automatically applies the policy to the new account.
Important: You don’t need to manually subscribe Shield Advanced on the member accounts. Firewall Manager subscribes Shield Advanced on the member accounts as part of creating the policy.
Operational visibility and compliance report
Firewall Manager offers a centralized incident notification for DDoS incidents that are reported by Shield Advanced. You can create an Amazon SNS topic to monitor the protected resources for potential DDoS activities and send notifications accordingly. Learn how to create an SNS topic. If you have resources in different Regions, the SNS topic needs to be created in the intended Region. You must perform this step from the Firewall Manager delegated AWS account (for example, Security Tooling) to receive alerts across your AWS accounts in that organization.
As a best practice, you should set up notifications for all the Regions where you have a production workload under Shield Advanced protection.
To create an SNS topic in the Firewall Manager administrative console
- In the AWS Management Console, sign in to the Security Tooling account or the AWS Firewall Manager delegated administrator account. In the left navigation pane, under AWS Firewall Manager, choose Settings.
- Select the SNS topic that you created earlier to be used for the Firewall Manager central notification mechanism. For this example, we created a new SNS topic in the Sydney Region (ap-southeast-2) named SNS_Topic_Syd.
- For Recipient email address, enter the email address that the SNS topic will be sent to. Choose Configure SNS configuration.
After you create the SNS configuration, you can see the SNS topic in the appropriate Region, as in the following example.
Figure 5: An SNS topic for centralized incident notification
AWS Shield Advanced records metrics in Amazon CloudWatch to monitor the protected resources and can also create Amazon CloudWatch alarms. For the simplicity purpose we took the email notification route for this example. In security operations environment, you should integrate the SNS notification to your existing ticketing system or pager duty for Realtime response.
Important: You can also use the CloudWatch dashboard to monitor potential DDoS activity. It collects and processes raw data from Shield Advanced into readable, near real-time metrics.
You can automatically enforce policies on AWS resources that currently exist or are created in the future, in order to promote compliance with firewall rules across the organization. For all policies, you can view the compliance status for in-scope accounts and resources by using the API or AWS Command Line Interface (AWS CLI) method. For content audit security group policies, you can also view detailed violation information for in-scope resources. This information can help you to better understand and manage your security risk.
View all the policies in the Firewall Manager administrative account
For our example, we created three security policies in the Firewall Manager delegated administrator account. We can check policy compliance status for all three policies by using the AWS Management Console, AWS CLI, or API methods. The AWS CLI example that follows can be further extended to build an automation for notifying the non-compliant resource owners.
To list all the policies in FMS
Now, we got the policy id to check the compliance status
For the preceding policy, member account 444444444444 associated to the policy is compliant. The following example shows the status for the second policy.
For the preceding policy, member account 555555555555 associated to the policy is non-compliant.
To provide detailed compliance information about the specified member account, the output includes resources that are in and out of compliance with the specified policy, as shown in the following example.
In the preceding example, two Application Load Balancers (ALBs) are not associated with a web ACL. You can further introduce automation by using AWS Lambda functions to isolate the non-compliant resources or trigger an alert for the account owner to launch manual remediation.
Resource Clean up
You can delete a Firewall Manager policy by performing the following steps.
To delete a policy (console)
- In the navigation pane, choose Security policies.
- Choose the option next to the policy that you want to delete. We created 3 policies which needs to be removed one by one.
- Choose Delete.
Important: When you delete a Firewall Manager Shield Advanced policy, the policy is deleted, but your accounts remain subscribed to Shield Advanced.
Conclusion
In this post, you learned how you can use Firewall Manager to enforce required preventative policies from a central delegated AWS account managed by your security team. You can extend this strategy to all AWS OUs to meet your future needs as new AWS accounts or resources get added to AWS Organizations. A central notification delivery to your Security Operations team is crucial from a visibility perspective, and with the help of Firewall Manager you can build a scalable approach to stay protected, informed, and compliant. Firewall Manager simplifies your AWS WAF, AWS Shield Advanced, and Amazon VPC security group administration and maintenance tasks across multiple accounts and resources.
For further reading and updates, see the Firewall Manager Developer Guide.
If you have feedback about this post, submit comments in the Comments section below. If you have questions about this post, start a new thread on the AWS Firewall Manager forum or contact AWS Support.
Want more AWS Security how-to content, news, and feature announcements? Follow us on Twitter.