AWS Storage Blog
Deploy Okta as a custom identity provider for AWS Transfer Family
As an organization’s projects and users grow, managing granular access controls for data resources while complying with security regulations becomes crucial. Multi-user environments necessitate delegating appropriate access levels to make sure of data privacy and security. However, managing access controls for shared documents can be complex and time-consuming, especially with increasing users that are spread across multiple identity providers. Organizations need a scalable way to enforce granular access controls, determining which users can access sensitive data and ensure appropriate levels of access to shared files, reducing the risk of unauthorized data access.
AWS Transfer Family is a fully managed service that enables you to transfer files into and out of AWS storage services such as Amazon S3 and Amazon EFS without needing to manage any SFTP servers. The service also allows the integration of identity providers, such as Okta, for managing end users who can exchange files through the AWS managed SFTP server.
In a prior Storage blog post, we introduced the AWS Transfer Family Custom IdP solution, which aims to provide reusable components and examples to streamline setting up Transfer Family for common scenarios and how to use it for Microsoft Active Directory authentication.
In this post, we walk through deploying a custom Identity provider (IdP) solution with Okta, enabling organizations to use Okta authentication for their Transfer Family servers. You can use the built-in features of the custom IdP solution, such as per-user permissions.
Solution architecture
The proposed architecture provides a reusable foundation and demonstrates best practices for implementing custom IdPs while allowing for fine-grained control over session configurations on a per-user basis, as shown in the following figure. This modular architecture promotes code reusability, maintainability, and extensibility. This makes it easier to adapt to changing requirements or integrate with other systems. As part of the standards, it provides the following:
- A standard Amazon DynamoDB schema to store metadata about identity providers, associated settings, user login information, and user session settings such as HomeDirectoryDetails, Role, and Policy.
- Support for multiple IdPs connected to a single Transfer Family server.
- Support multiple Transfer Family servers using the same instantiation of this solution.
- Support the following identity providers: Okta, LDAP (including Microsoft Active Directory), Entra ID, Argon2, Cognito, Public and Private Key, and AWS Secrets Manager.
- Per user IP allow-listing.
- Standardized best practice logging patterns with configurable log-level and tracing support.
- The ability to deploy an Amazon API Gateway for advanced use cases.
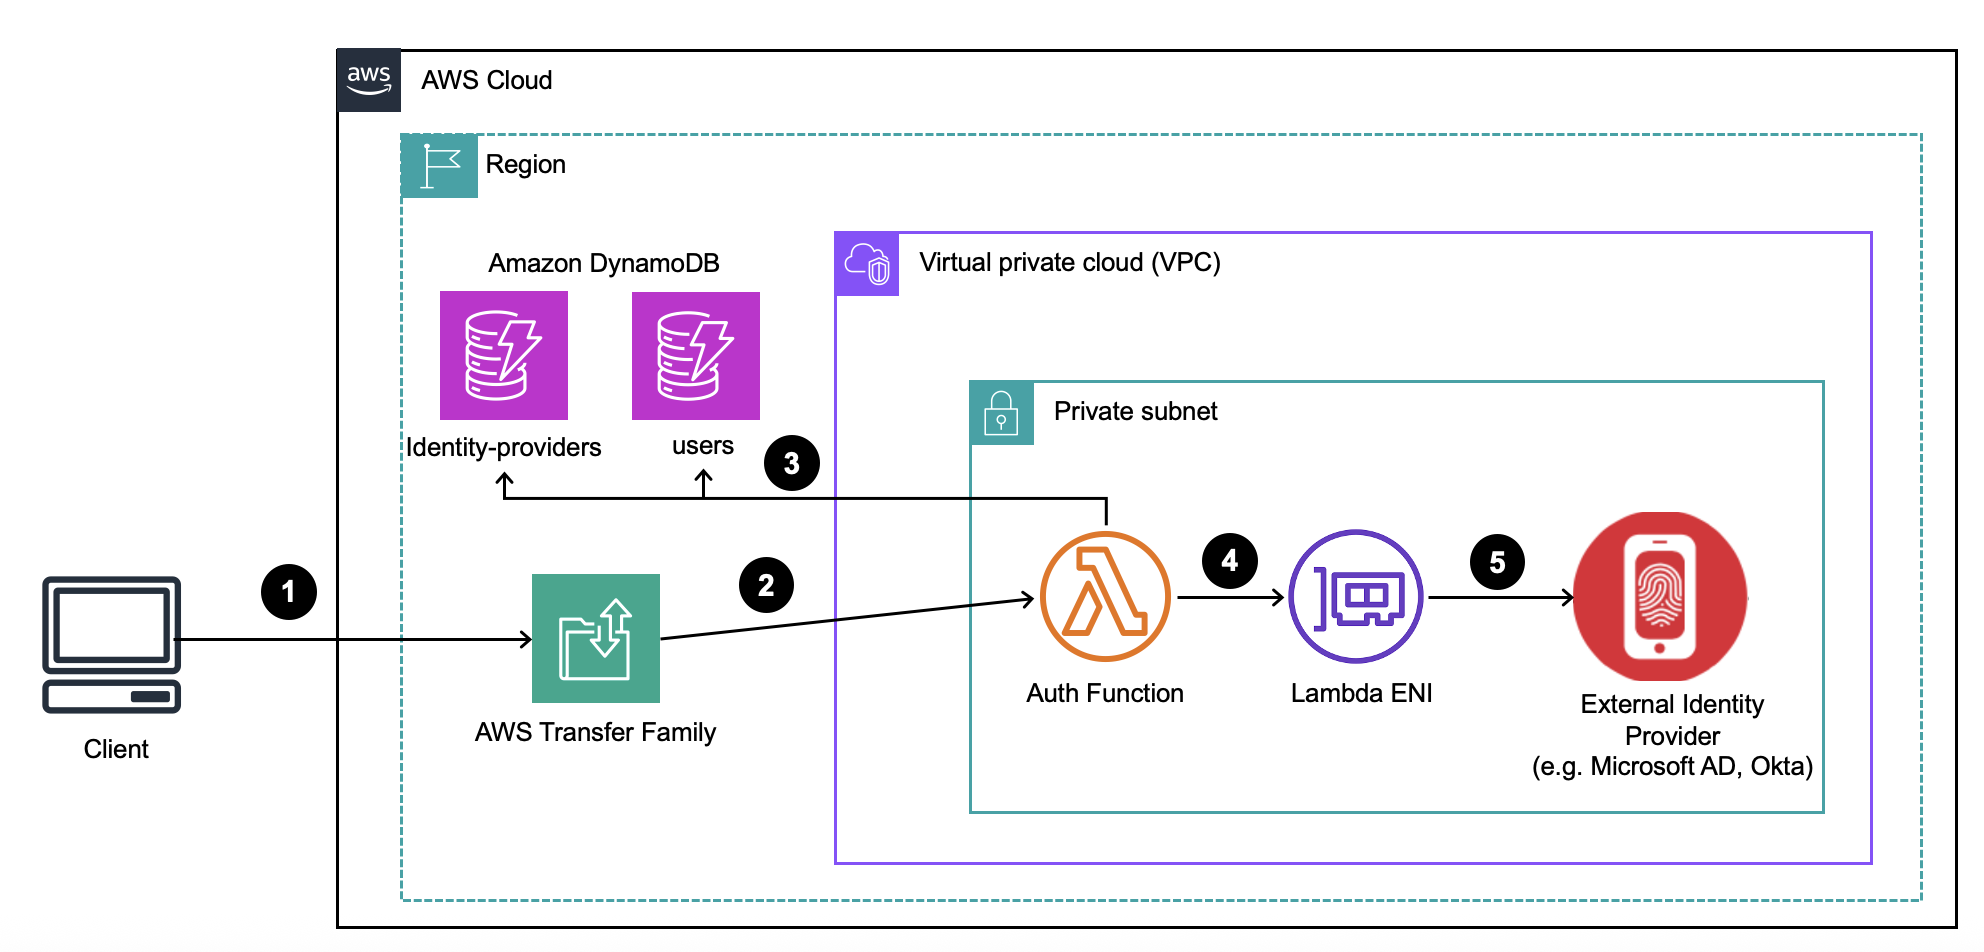
Figure 1: Custom identity provider solution architecture
In this example, we walk through the steps to deploy and configure Okta as a custom IdP for Transfer Family.
Prerequisites
The following prerequisites are necessary to implement this solution:
- An AWS account with access to AWS CloudShell
- Appropriate AWS Identity and Access Management (IAM) permissions to provision the following resources types:
- Create IAM roles
- Create DynamoDB tables
- Create AWS Lambda functions
- Create API Gateway (if enabled)
- An Okta organization
Walkthrough
In this solution we demonstrate a use case where an organization needs Okta authentication with TOTP-based multi-factor authentication (MFA) for their Transfer Family server. The organization needs the flexibility to assign each user unique Transfer Family session settings, such as a Role, HomeDirectoryDetails, and PosixProfile. We cover the following in this walkthrough:
- Setting up Okta configuration:
- Creating new Okta user and group
- Configuring MFA
- Deploying the toolkit:
- Setting up a custom IdP
- Provisioning all the necessary resources needed for this solution
- Defining the IdP and user:
- Configuring the IdP settings
- Managing user records within the IdP
- Testing the IdP:
- Verifying the deployed solution’s functionality
Setting up Okta configuration
In this section, you create a new Okta user and group within the Okta organization, and configure MFA, as shown in the following figure.
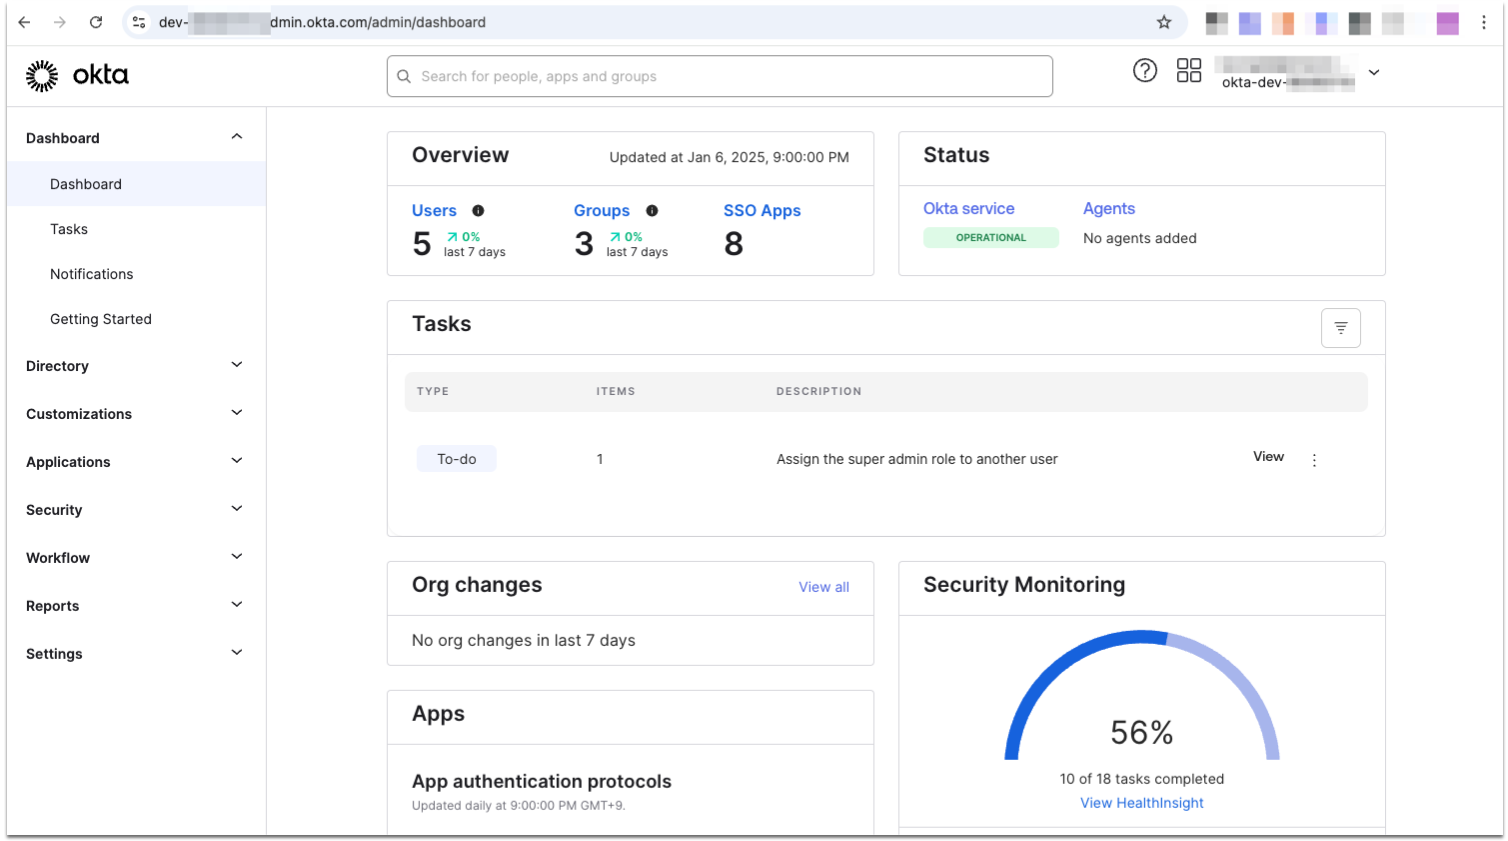
Figure 2: Okta admin console for Okta Identity Engine
These instructions are specific to Okta Identity Engine, and if you are using Okta Classic, then the interface and certain settings are different.
1. Setting up Okta configuration
1. Log in to the Okta organization as an admin using the admin console (for example dev-xxxx-admin.okta.com/admin), as shown in the following figure.
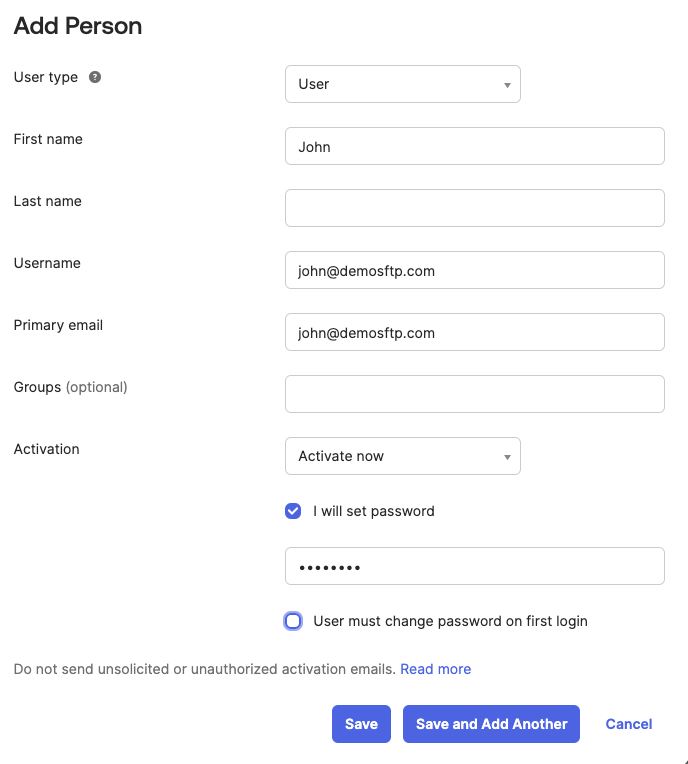
Figure 3: Adding user in Okta admin console
2. Navigate to the Directory on the sidebar, choose People and create an Okta user with the username john@demosftp.com. Set your desired password for this user.
3. Under the same Directory side tab, choose Groups, choose Add group, and create an Okta group with the name sftp.
4. Choose the newly created group, then choose Assign people and add john@demosftp.com by choosing the plus sign (+) next to their name.
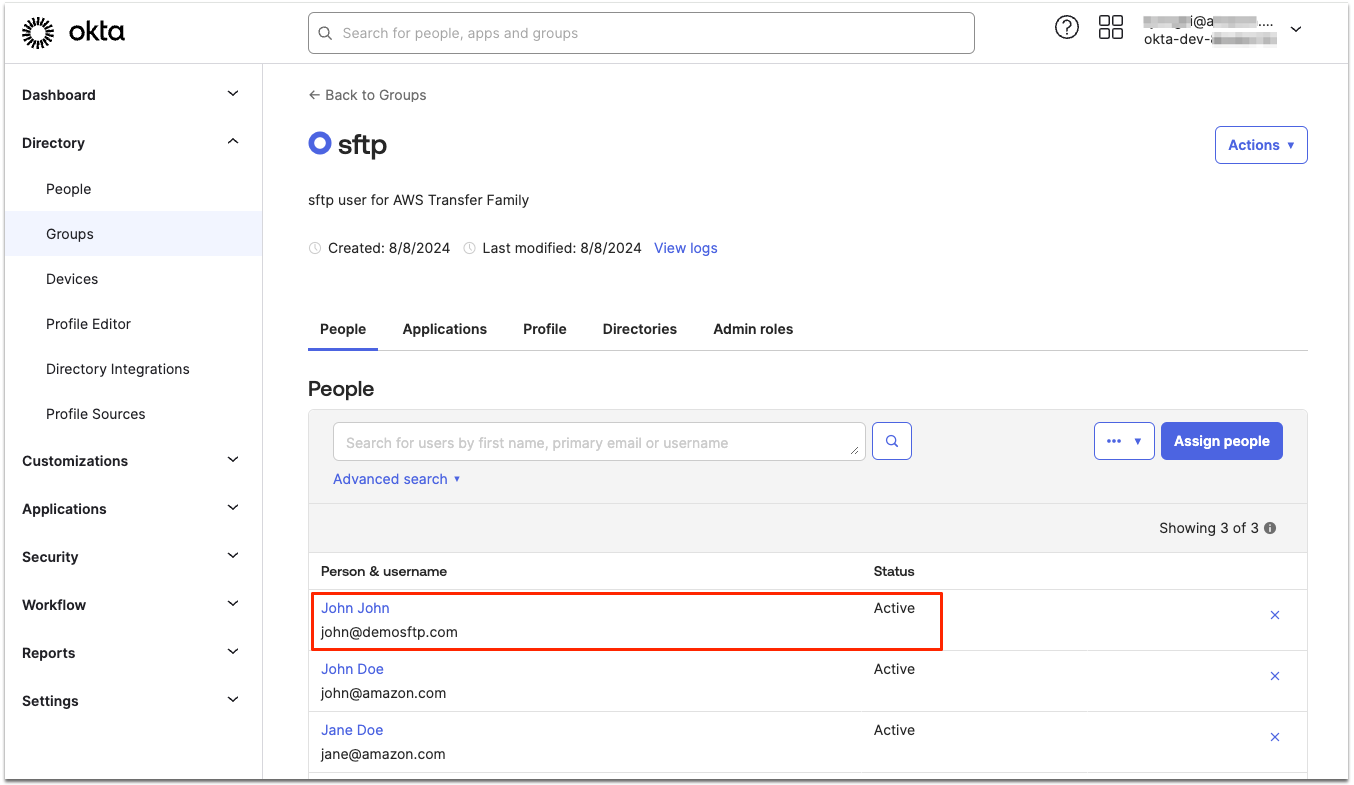
Figure 4: Adding a user to sftp group in Okta admin console
5. Navigate to Security on the sidebar and choose Authenticators. Choose Add authenticator under the Setup tab and choose the TOTP-based authenticator that your organization uses. Only TOTP-based authenticators are supported with Transfer Family, and push-based authenticators can’t be supported at this time. In this use case, you add Google Authenticator as your authenticator.
6. To enforce MFA authentication with Google Authenticator for SFTP users, navigate to the Enrollment tab and choose Add a policy. Enter the following:
Policy name: SFTP Users MFA
Assign to groups: SFTP
Authenticators: Change Google Authenticator to Required. Choose create policy. In the Add Rule dialog that appears, set the Rule name to SFTP Users MFA Enrollment and choose Create rule.
7. To enforce MFA for SFTP user sessions, navigate to Security on the sidebar and go to Global Session Policy. Choose add policy and set the Policy name to sftp policy. Under Assign to groups add sftp, then choose Create policy and add rule.
8. In the Add Rule dialog that appears, set Rule name to sftp rule. Set the Multifactor authentication (MFA) is to Required, then choose Create rule.
9. To finish up setting Google Authenticator for Okta users, access the Okta domain as user john@demosftp.com. Open a private browsing window and navigate to the Okta organization URL (e.g. dev-xxxx.okta.com). At the log in screen, enter john@demosftp.com and the password used when creating the user in Step 1.2. When prompted, choose Set up under Google Authenticator and follow the instructions to complete the Google Authenticator setup. You only need to configure the Google Authenticator method. When this is complete, you can skip other MFA methods and choose Continue to proceed with sign-in, as shown in the following figure.
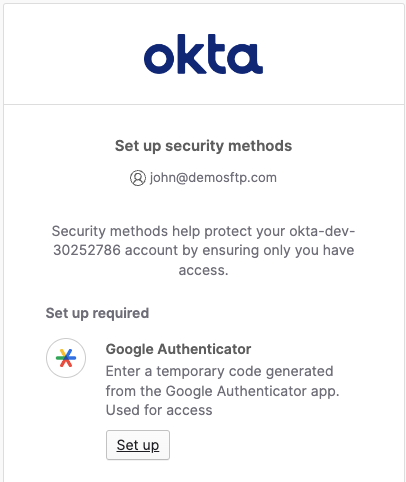
Figure 5: Setting up MFA for an Okta user
You have successfully added an Okta user to your newly created group and also set up MFA for authentication. Before proceeding with the solution, the new Okta user that was created must login to the Okta domain to authenticate and set up a new password.
2. Deploying the toolkit solution
1. Log in to the AWS account in which you want to deploy the solution, switch to the desired AWS Region in which to run Transfer Family, and start a CloudShell session, as shown in the following figure.
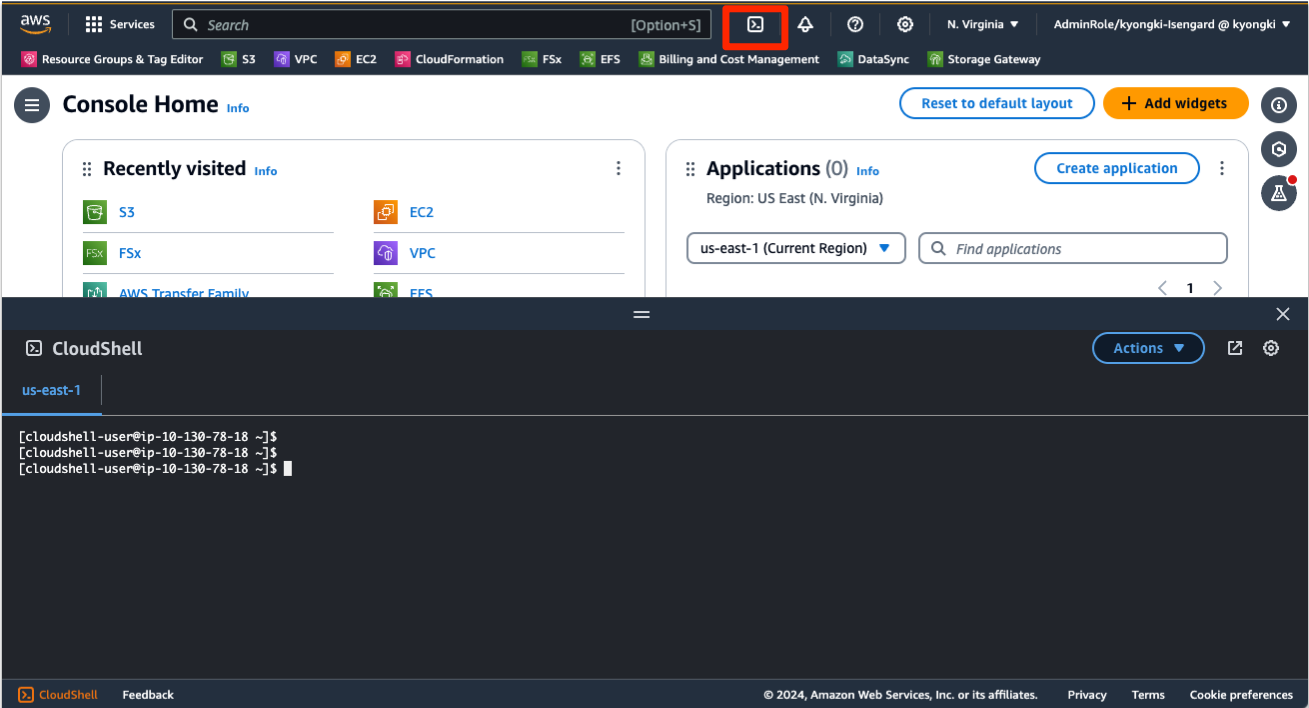
Figure 6: CloudShell in AWS Management Console
2. Run the following command to clone the solution’s repository into your CloudShell environment.
cd ~
git clone https://github.com/aws-samples/toolkit-for-aws-transfer-family.git
3. Run the following command to run the build script, which downloads all package dependencies and generates archives for the Lambda layer and function used in the solution.
cd ~/toolkit-for-aws-transfer-family/solutions/custom-idp
./build.sh
4. Monitor the execution and verify that the script completes successfully.2.4 Begin the SAM deployment by using the following command.
sam deploy --guided --template
./examples/okta/transfer_okta_customIdp_server_template.yaml --
capabilities CAPABILITY_IAM CAPABILITY_AUTO_EXPAND
 CAPABILITY_NAMED_IAM --disable-rollback
When prompted, provide the following information as an example:
- Stack Name:
transferidp - Parameter UserNameDelimiter :
@@ - Parameter LogLevel:
INFO - Parameter ProvisionApi:
false - Parameter EnableTracing:
false - Parameter UsersTableName:
empty - Parameter IdentityProvidersTableName:
empty
For other prompts, provide ‘Y’ to retain the default options, as shown in the following figure.
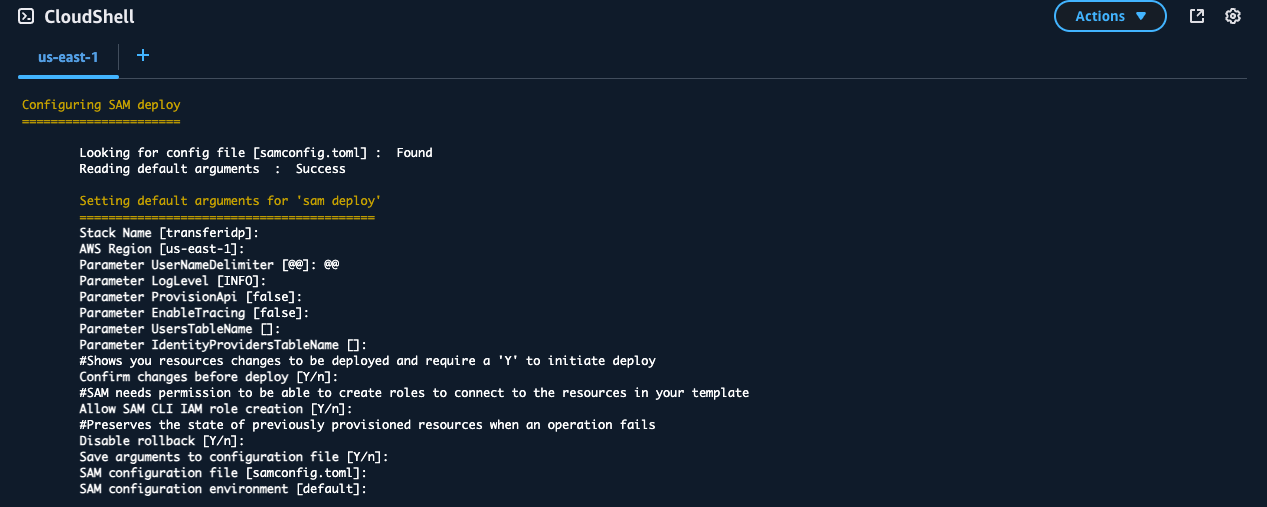
Figure 7: Deploying AWS CloudFormation for custom IdP
5. When the deployment completes successfully, copy/paste the AWS CloudFormation outputs from the deployed stack to a text editor and save them for future use. You need this information in the later configuration steps. You can also open the CloudFormation console in a separate tab to monitor the progress.
The following are descriptions of the outputs:
| Key | Description |
| DDBIdentityProvidersTableName | DDB Identity Providers Table Name |
| DDBUsersTableName | DDB Users Table Name |
| SFTPServerS3Bucket | The name of the S3 bucket created for the backend storage of the Transfer Family server |
| TransferUserRole | The role Amazon Resource Name (ARN) created to map to the user |
| TransferServerEndpoint | The endpoint for the Transfer Family server |
3. Defining IdP
When the Transfer Family custom IdP solution is deployed, you must define one or more IdPs in the identity_providers DynamoDB table. Each record stores an IdP configuration. For complete details on IdP modules, settings, and examples, visit IdP modules.
To use Okta as an IdP on Transfer Family, add Okta properties in the DynamoDB tables that are already provisioned by the CloudFormation template, as shown in the following table.
| Table name | Comment |
[StackName]-CustomIdP-XXXX_identity_providers |
DynamoDB table that contains the details of each Transfer Family custom IdP (for example IdP name, server URL, parameters) that is stored. |
[StackName]-CustomIdP-XXXX_users |
DynamoDB table that contains the details of each Transfer Family user (for example IdP to use, IAM role, logic directory list) that is stored. |
1. In the AWS Management Console, navigate to the DynamoDB Item Explorer and choose the identity_providers table (such as Table name[StackName]-CustomIdP-XXXX_identity_providers) under the select a table dropdown, as shown in the following figure. Choose Create item.
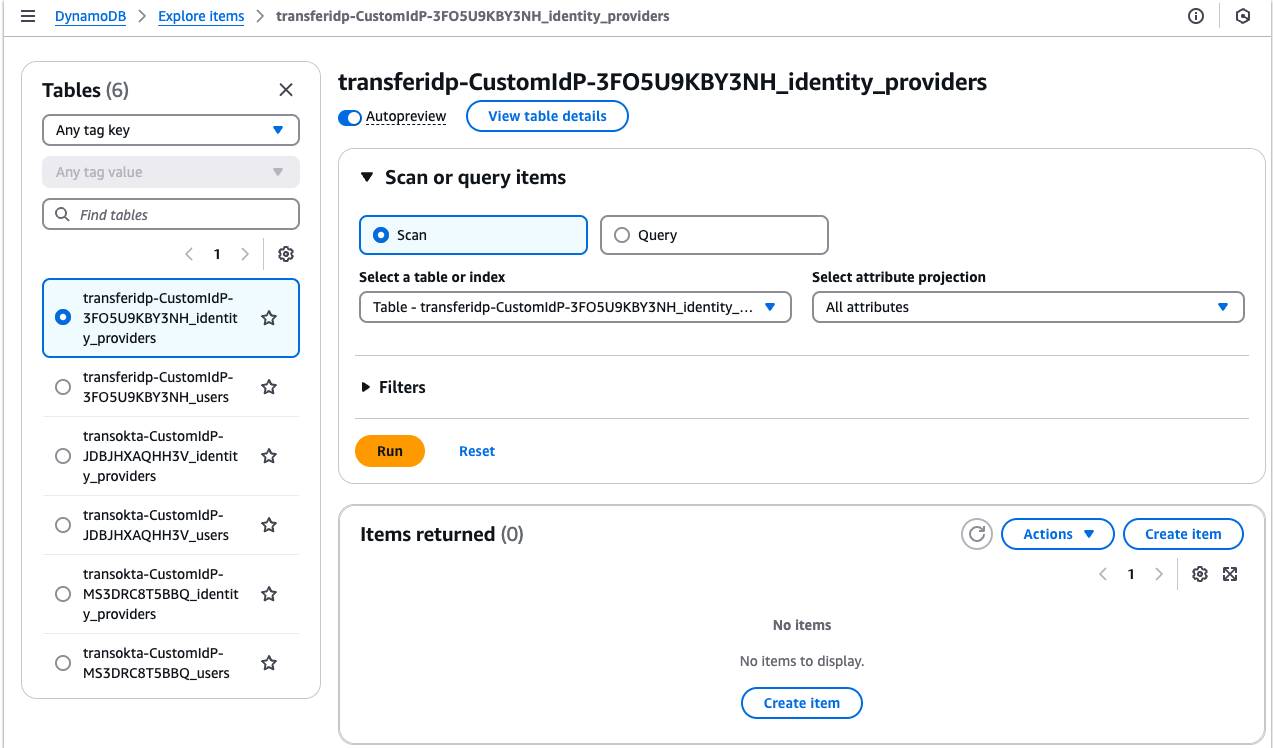
Figure 8: DynamoDB table for the custom IdP
2. In the Create item screen, choose JSON view, and copy and paste the following record:
{
  "provider": {
    "S": "okta"
  },
  "config": {
    "M": {
      "mfa": {
        "BOOL": true
      },
      "okta_domain": {
        "S": "[OKTA DOMAIN]"
      }
    }
  },
  "module": {
    "S": "okta"
  }
}
3. Choose the Form button to switch back to form view. The attributes of the record are displayed as shown in the following screenshot when you expand the config section. In this section, replace the placeholder in the okta_domain field with the domain name of your Okta organization (for example dev-xxxxx.okta.com), as shown in the following figure.
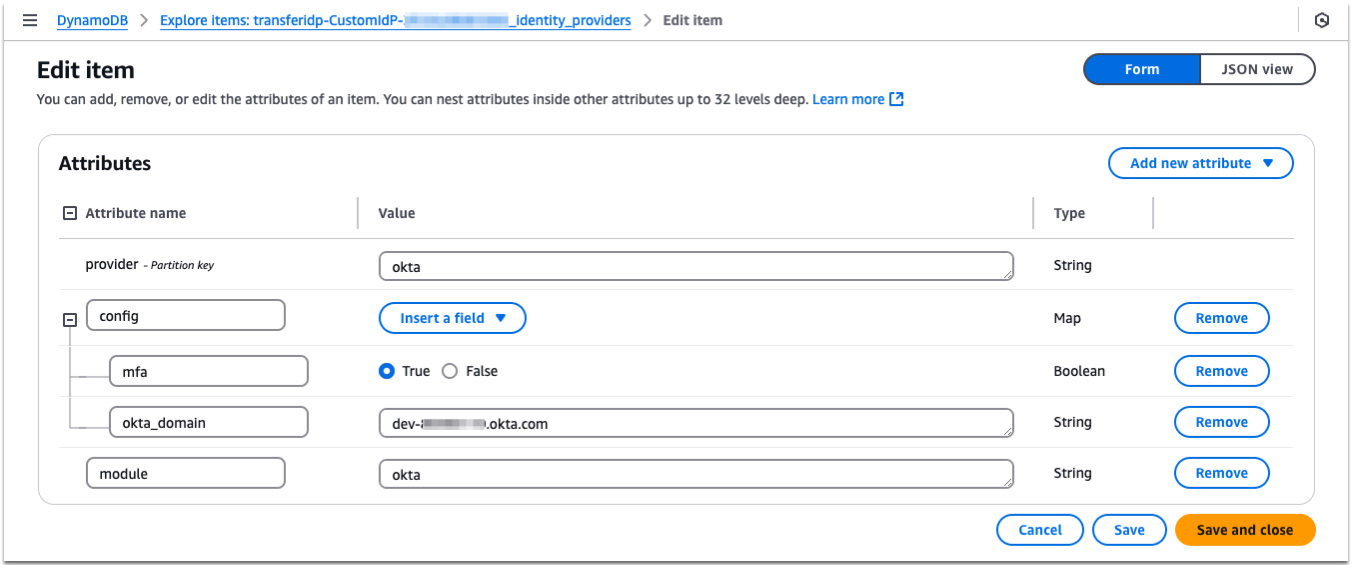
Figure 9: Creating the IdP record in DynamoDB
This IdP definition includes configuration details for your Okta identity provider. The following is more information about key parameters used:
- The provider attribute contains the name of the IdP. In this case, it is okta, but it could be more meaningful, such as your-domain-name or example.com.
- The module attribute contains the name of the IdP module to use, in this case okta.
- The config field is an attribute map that is used for storing IdP configuration details. You can find a description of each parameter in the Okta module documentation. For the Okta module, the okta_domain attribute must be set to your Okta domain.
- The mfa attribute indicates if MFA is enforced. When set to True, it is expected that users enter their password+6 digit TOTP token in the password field when authenticating with an SFTP client.
4. After reviewing the values, choose Create item. The first IdP has now been defined. In the next section you define a user.
4. Define a user
When the IdP is defined, a user must be defined. Each user record contains the settings that are used for a Transfer Family session. Each record also maps the username to a given IdP. In this section, you create a user record and map it to the okta IdP created in the previous section.
1. In the console, navigate to the DynamoDB Item Explorer, and choose the users table (such as Table name [StackName]-CustomIdP-XXXX_users) under the Select a table dropdown. Choose the Create item button, as shown in the following figure.
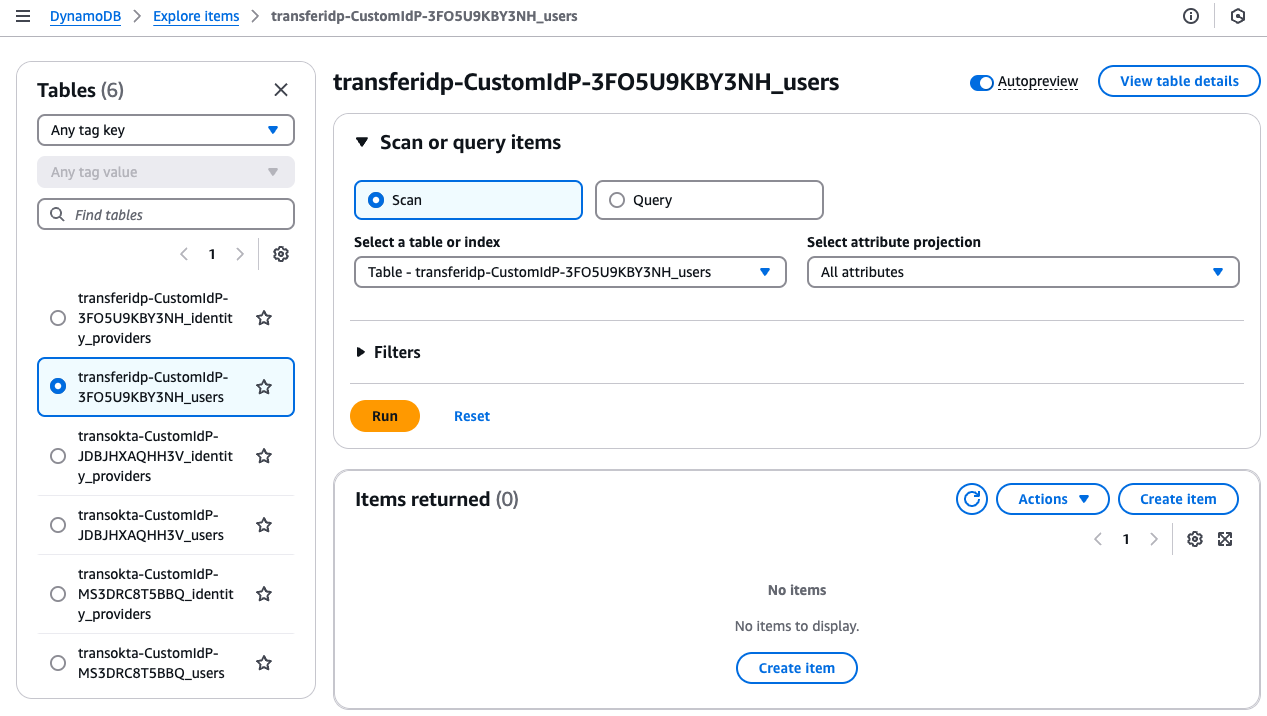
Figure 10: DynamoDB table for the users
2. In the Create item screen, choose JSON view, and copy and paste the following record:
{
  "user": {
    "S": "john@demosftp.com"
  },
  "identity_provider_key": {
    "S": "okta"
  },
  "config": {
    "M": {
      "HomeDirectoryDetails": {
        "L": [
          {
            "M": {
              "Entry": {
                "S": "/"
              },
              "Target": {
                "S": "/[SFTPServerS3Bucket]/${transfer:UserName}"
              }
            }
          }
        ]
      },
      "HomeDirectoryType": {
        "S": "LOGICAL"
      },
      "Role": {
        "S": "[TransferUserRole]"
      }
    }
  }
}
3. Choose the Form button to switch back to Form view and expand the nested attributes, as shown in the following figure. Expand the config Replace [SFTPServerS3Bucket] in HomeDirectoryDetails and [TransferUserRole] with the matching CloudFormation outputs in Step 2.5. The attributes of the record are displayed as shown in the following screenshot.
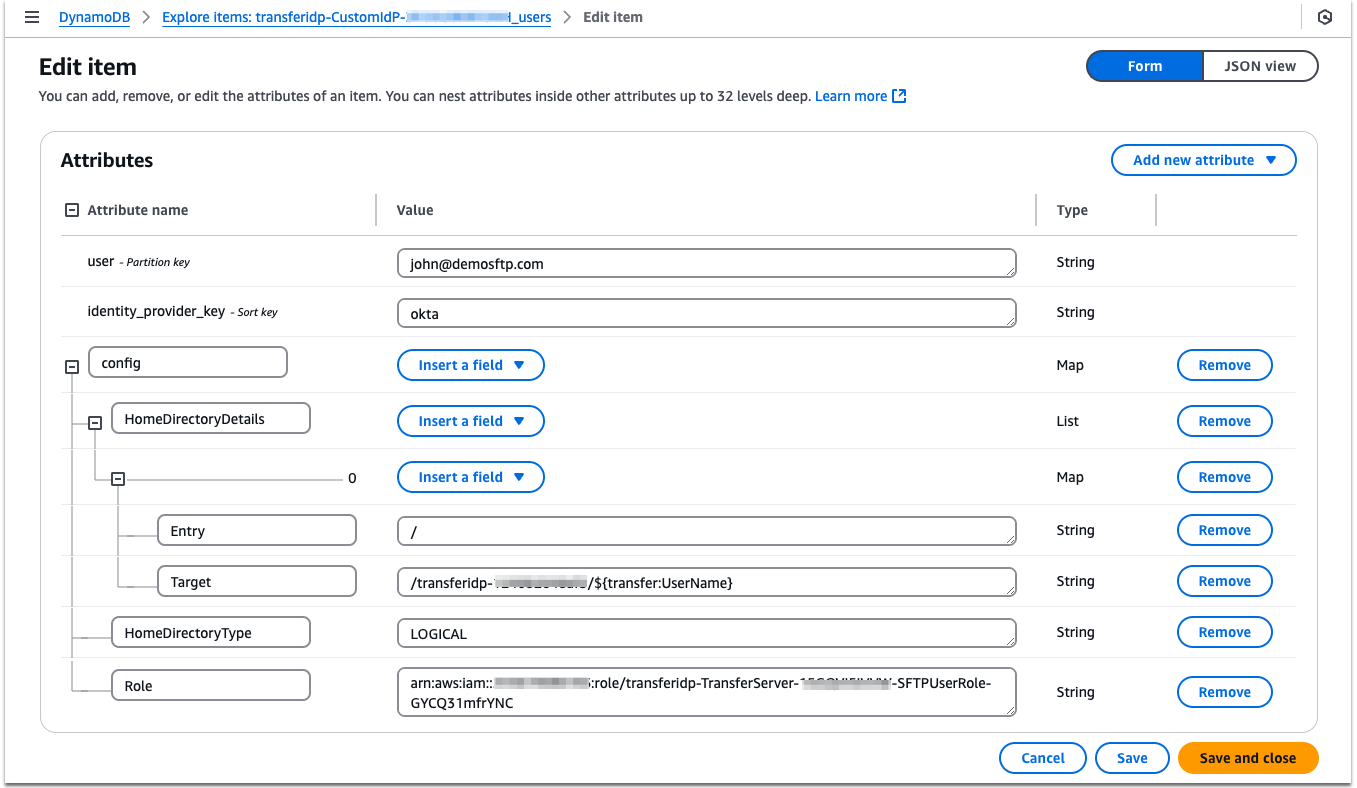
Figure 11: Creating a user record in DynamoDB
The following details are from the various fields:
- The user key contains the username (such as john@demosftp.com) that are passed to Transfer Family during authentication. This username should be registered as an Okta user.
- The identity_provider_key attribute contains the IdP name from the [StackName]_identity_providers table, which you created in the previous section.
- The config attribute is a mapping of the user’s session settings. These values follow a similar structure as those found in the Lambda Values Section of the custom IdP documentation. This includes the HomeDirectoryType, HomeDirectoryDetails (for logical directory mappings), and PosixProfile. HomeDirectoryDetails can have both Amazon S3 and Amazon EFS targets, in the event that you want to connect users to both Amazon S3 and Amazon EFS Transfer Family servers.
4. After reviewing, choose Create item. The first user, john@demosftp.com, has been created and mapped to the Okta identity provider.
5. Test the IdP
Now that you have configured Okta and defined an IdP and user in the custom IdP solution, you can test authentication using the built-in Test feature.
Before performing the test, the newly created Okta user must log in the Okta portal, and complete the initial password change process.
1. Navigate to the AWS Transfer Family console and choose the deployed server. In the upper right corner select Actions, then choose Test from the dropdown menu, as shown in the following figure.

Figure 12: Testing for SFTP access
2. In the IdP testing page, type “john@demosftp.com” for the username. For the password field, type the password, generate a TOTP code with Google Authenticator, and type it immediately after your password.For example, if your password was “TestP@55w0rd” and your generated MFA code was “201483”, then you would enter “TestP@55w0rd201483” in the password field.The Source IP can be set to any value. When ready, choose Test, as shown in the following figure.
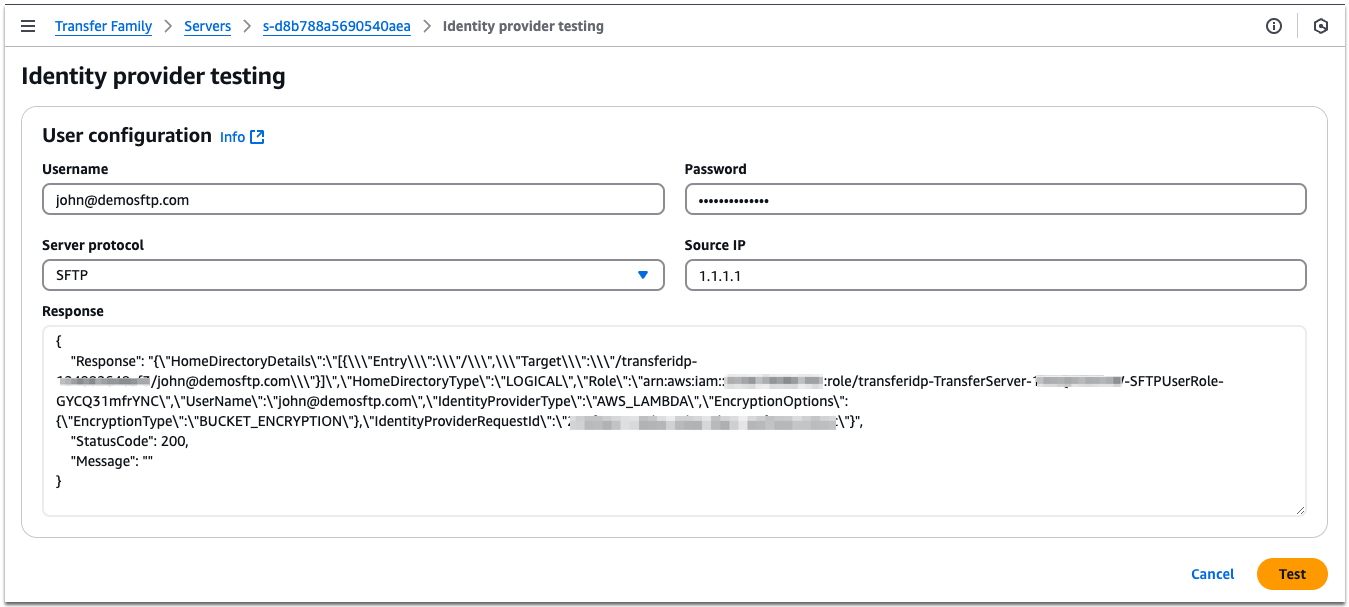
Figure 13: Authentication test with MFA code
3. If authentication is successful, then an HTTP 200 response is returned, along with the user’s session configuration. If it is not successful, then an error message is displayed to assist with troubleshooting. Try re-entering the password and Google Authenticator code again.
After a successful test, connect to the Transfer Family server through an SFTP client using the endpoint of the server.
4. Retrieve the endpoint from the first CloudFormation stack deployed from TransferServerEndpoint.
5. Using the sftp command, the following figure is an example of a successful connection with uploads to the server. With MFA enabled, remember to combine your password with the MFA-generated code, just as you did when testing authentication in Step 5.2.When an email address is used for the username, make sure to enclose it in quotation marks before specifying the server endpoint. For example: “john@demosftp.com”@s-xxxxxx.server.transfer.us-east-1.amazonaws.com
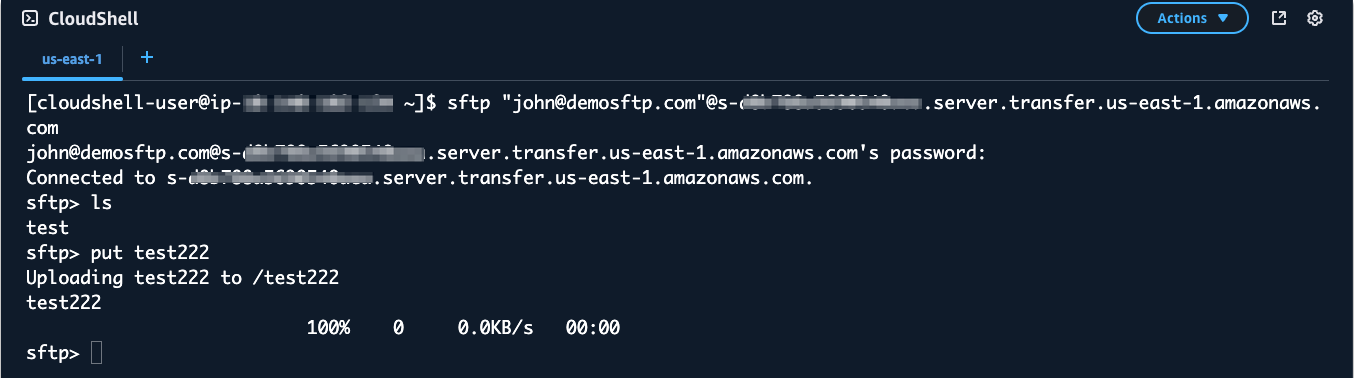
Figure 14: Test with SFTP command
Cleaning up
To clean up the deployment, follow these steps:
1. Run the following command with the stack-name that you used in Step 2.4 to deploy the solution.
sam delete –-stack-name <stack-name>
2. There are three resources that require manual deletion, because by default they are retained to preserve user/provider data that you may have entered.
- Two DynamoDB tables:
<stack-name>-CustomIdp-<xxxxx>_identity_providers<stack-name>-CustomIdp-<xxxxx>_users
To delete these tables, go to the DynamoDB tables console page, select the checkboxes in front of the tables, and then select the Delete button in the upper corner.
- AWS Lambda Layer:
- <stack-name>-CustomIdP-<xxxx>-handler-layer
To delete this layer, go to the Lambda layers console page, select the Lambda layer you want to delete, and then select the Delete button in the upper corner.
Conclusion
When handling multiple custom identity providers with SFTP servers, best practices must be followed for authentication and session configuration to build secure and scalable file transfer systems. Having a reusable framework is also crucial to making sure that duplication of effort is reduced while avoiding spending time on rebuilding core authentication components. In this post, we showed you how to easily deploy Okta as a custom IdP for AWS Transfer Family. If you are using other custom IdPs such as Active Directory, Entra ID, or Amazon Cognito, then we highly encourage you to deploy the other relevant modules available in our GitHub toolkit repository. Furthermore, you can learn more about the solution and its architecture by reviewing the AWS Transfer Family Custom IdP Solution in the new Toolkit for the Transfer Family code repository.
The standardization in deployment across various IdPs improves interoperability and management efficiencies while still allowing for customization to meet specific use cases. The integration of robust logging in this solution also helps track user activities, detect unauthorized access attempts, and ensure compliance with security standards.
Thank you for reading. We hope this was helpful in getting you to think about scalable ways to deploy authentication best practices AWS Transfer Family. To learn more, read about how to use Transfer Family, Lambda, and Amazon S3. If you have feedback or questions about this post, submit them in the Comments section.