AWS Big Data Blog
How to migrate a large data warehouse from IBM Netezza to Amazon Redshift with no downtime
A large EMEA company recently decided to migrate their on-premises IBM Netezza data warehouse to Amazon Redshift. Given the volume of data (270TB uncompressed and more than 27K tables), the number of interconnected systems that made use of this data (more than 4.5K business processes), and the zero downtime requirements, we understood that the project would be a challenge. Since the company planned to decommission the data center where the data warehouse was deployed in less than a year’s time, there were also time constraints in place.
The data warehouse is a central piece for the company; it allows users across units to gather data and generate the daily reports required to run the business. In just a few years, business units accessing the cluster increased almost 3x, with 5x the initial number of users, executing 50x the number of daily queries for which the cluster had been designed. The legacy data warehouse was not able to scale to cover their business needs anymore, resulting in nightly ETL processes running outside of their time boundaries, and live queries taking too long.
The general dissatisfaction among the business users — along with the proximity of the data center decommissioning — moved the company to plan the migration, putting its IT department in charge of the definition of the new architecture, and the execution of the project.
Amazon Redshift, Amazon Web Services’ (AWS) fast, scalable OLAP data warehouse that makes it simple and cost-effective to analyze all your data across your data warehouse and data lake, was the perfect fit to solve their problems. Not only does Amazon Redshift provide full elasticity for future growth, and features such as concurrency scaling to cover high demand peaks, it also offers a whole ecosystem of analytics services to be easily integrated.
In this article, we explain how this customer performed a large-scale data warehouse migration from IBM Netezza to Amazon Redshift without downtime, by following a thoroughly planned migration process, and leveraging AWS Schema Conversion Tool (SCT) and Amazon Redshift best practices.
Preparing the migration
Large enterprise customers typically use data warehouse systems as a central repository for data analytics, aggregating operational data from heterogeneous transactional databases and running analytical workloads to serve analysts teams through business intelligence applications and reports. Using AWS, customers can benefit from the flexibility of having multiple compute resources processing different workloads, each workload scaling as the demand grows.
In this section, we describe the steps that we followed to prepare the migration of this data warehouse from IBM Netezza to Amazon Redshift.
Identifying workloads and dependencies
Customers typically have three different types of workloads running in their data warehouses:
- Batch processes: Long-running processes that require many resources and low concurrency, such as ETL jobs.
- Ad hoc queries: Short queries with high concurrency, such as analysts querying data.
- Business workloads: Typically mixed workloads, such as BI applications, reports, and dashboards.
In this customer’s case, they were building business data marts through complex ETL jobs, running statistical models, generating reports, and allowing analysts to run ad hoc queries. In essence, these applications are divided into two groups of workloads: batch and ad hoc queries. The on-premises platform was always saturated and struggling to deal with the level of concurrency demanded by these workloads while offering acceptable performance.
The following diagram shows the architecture that customer had before the migration:
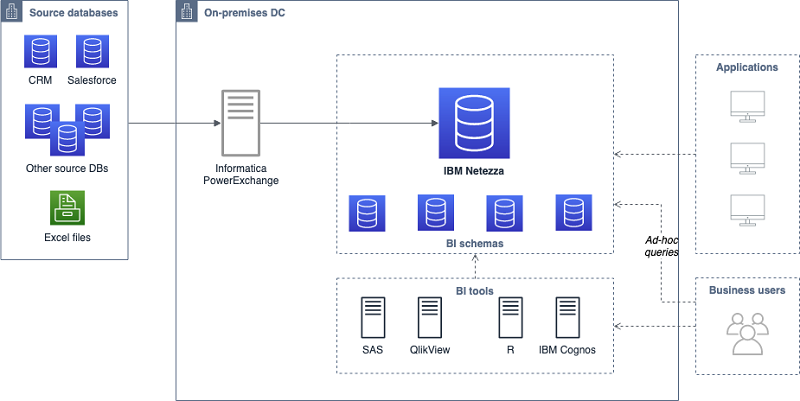
By using Amazon Redshift, the customer is able to fulfill the requirements of every analytical workload. Within the old data warehouse, shown in the above diagram, two different managed service providers managed two sets of independent data and workloads. For the new architecture, the decision was to split the data warehouse into two different Amazon Redshift clusters to serve those different workloads, as described in the following section. Within each of these clusters, the customer is able to manage resources and concurrency for different applications under the same workload by configuring Amazon Redshift Workload Management (WLM). A typical WLM setup is to match every workload with a queue, so in this case, each cluster had two queues configured: batch and ad hoc, each with a different number of slots and assigned memory.
Sizing the target architecture
For heterogeneous migrations, like this one, a comprehensive analysis should be performed on the source database, collecting enough data to design the new architecture that supports both data and applications.
The AWS Schema Conversion Tool was the perfect companion for this project, as the customer was able to automate the reports and generate an assessment that helped estimate the migration complexity for different objects, e.g. data types, UDFs, and stored procedures.
In a typical database migration, customers categorize large tables by number of rows. However, when migrating to columnar databases, such as Amazon Redshift, it is essential to also assess table width (that is, number of columns) from the very beginning. While columnar databases are generally more efficient than row-based databases in storing data, wide tables with few rows may have a negative impact on columnar databases. To estimate the minimum table size required for each table in Amazon Redshift, use this formula from the AWS Knowledge Center.
For this customer, there was a clear separation between core applications, and a large isolated business application with minimum data dependencies and a different set of users. As a result, one of the main architectural decisions was to use two different Amazon Redshift clusters:
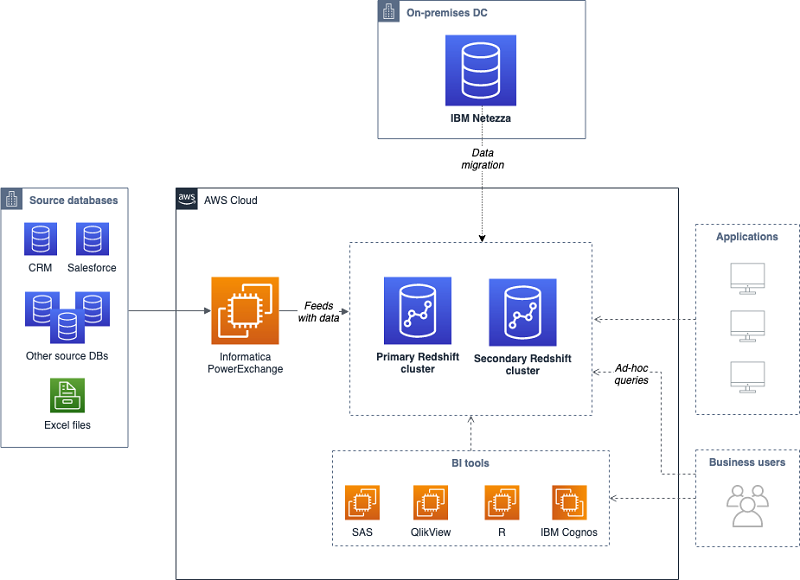
- Primary cluster: Holds the core schemas and most of the data, and serves most of the business applications. Due to high storage requirements and long batch processes that run here, the recommended Amazon Redshift node type for this cluster is the dense storage family.
- Secondary cluster: Purpose built cluster for a single application, demands high I/O. The recommended Amazon Redshift node type for this cluster is the dense compute family.
Planning the migration
There are several approaches when it comes to database migration. A must-have requirement for many migrations is to minimize downtime, which was the main driver for the migration pattern described in this post.
One of the challenges when migrating databases is to keep the data updated in both systems, capturing the changes on the source, and applying them to the destination database during the migration. By definition, data warehouses shouldn’t be used to run transactional (OLTP) workloads, but long-running ETL processes and analytical workloads (OLAP). Usually, those ETL processes update data in batches, typically on a daily basis. This simplifies the migration, because when those ETL processes that load data into the data warehouse are run in parallel against both target systems during the migration, CDC is not required.
The following image summarizes how we planned this migration with the customer, following a parallel approach to minimize downtime on their production data warehouse:
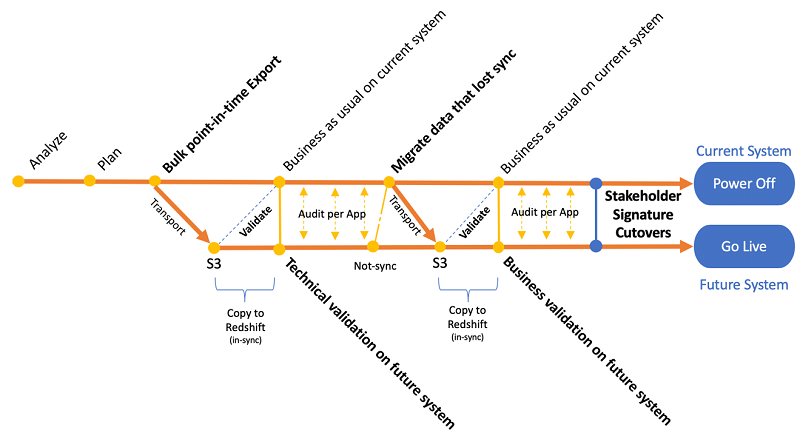
The main steps of this process are (1) data migration, (2) technical validation, (3) data sync, and (4) business validation, as described in the following section.
Running the migration
Full data migration
The initial data migration was the first milestone of the project. The main requirements for this phase were: (1) minimize the impact on the data source, and (2) transfer the data as fast as possible. To do this, AWS offers several options, depending on the size of the database, network performance (AWS Direct Connect or AWS Snowball), and whether the migration is heterogeneous or not (AWS Database Migration Service or AWS Schema Conversion Tool).
For this heterogeneous migration, the customer used the AWS Schema Conversion Tool (SCT). The SCT enabled them to run the data migration, provisioning multiple virtual machines in the same data center where IBM Netezza was installed, each running an AWS SCT Data Extractor agent. These data extractors are Java processes that connect directly to the source database and migrate data in chunks to the target database.
Sizing data extraction agents
To estimate the number of data extractor agents needed for the migration, consider this rule of thumb: One data extractor agent per 1 TB of compressed data on the source. Another recommendation is to install extraction agents on individual computers.
For each agent, consider the following hardware general requirements:
| CPU | 4 | Lots of transformations and a large number of packets to process during data migration |
| RAM | 16 | Data chunks are kept in memory before dumping to disk. |
| Disk | 100 GB / ~500 IOPS | Intermediate results are stored on Disk. |
| Network | At least 1 Gbit (10 Gbit recommended) | While provisioning the resources, it is recommended to reduce the number of network hops from the source to AWS SCT data extraction agents. |
Follow this documentation in order to go through the installation steps for the data extraction agents.
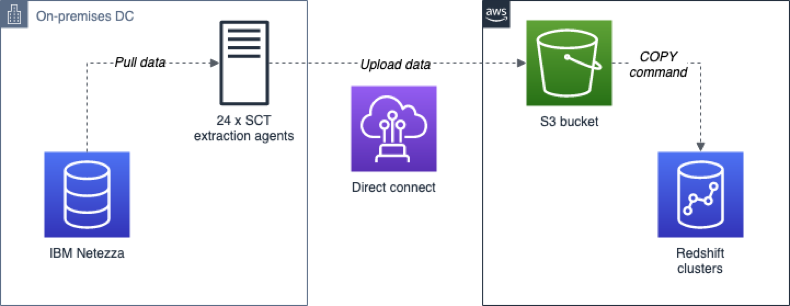
Depending on the size of the data to be migrated and the network speed, you may also run data extractor agents on top of EC2. For large data warehouses and in order to minimize downtime and optimize data transfer, it is recommended to deploy the data extractor agents as close as possible to the source. For example, in this migration project, 24 individual SCT extractor agents were installed in the on-premises data center for concurrent data extraction, and in order to speed up the process. Due to the stress that these operations generate on the data source, every extraction phase was run during weekends and off-hours.
The diagram below depicts the migration architecture deployed during the data migration phases:
Creating data extraction tasks
The source tables were migrated in parallel, on a table-by-table basis, using the deployed SCT extraction agents. These extraction agents authenticate using a valid user on the data source, allowing to adjust the resources available for that user during the extraction. Data was processed locally by SCT agents and uploaded to S3 through the network (via AWS Direct Connect). Note that other migration scenarios might require the use of AWS Snowball devices. Check the Snowball documentation to decide which transfer method is better for your scenario.
As part of the analysis performed while planning the migration, the customer identified large tables, e.g. tables with more than 20 million rows or 1TB size. In order to extract data from those tables, they used the virtual partitioning feature on AWS SCT, creating several sub-tasks and parallelizing the data extraction process for this table. We recommend creating two groups of tasks for each schema that migrates; one for small tables and another one for large tables using virtual partitions.
These tasks can be defined and created before running, so everything is ready for the migration window. Visit the following documentation to create, run, and monitor AWS SCT Data Extraction Tasks.
Technical validation
Once the initial extracted data was loaded to Amazon Redshift, data validation tests were performed in parallel, using validation scripts developed by the partner teams involved in the migration. The goal at this stage is to validate production workloads, comparing IBM Netezza and Amazon Redshift outputs from the same inputs.
Typical activities covered during this phase are the following:
- Count number of objects and rows on each table.
- Compare the same random subset of data in both IBM Netezza and Amazon Redshift for all migrated tables, validating that data is exactly the same row by row.
- Check incorrect column encodings.
- Identify skewed table data.
- Annotate queries not benefiting from sort keys.
- Identify inappropriate join cardinality.
- Deal with tables with large varchar columns.
- Confirm that processes do not crash when connected with target environment.
- Validate daily batch job runs (job duration, number of rows processed).
You’ll find the right techniques to execute most of those activities in Top 10 Performance Tuning Techniques for Amazon Redshift.
Data synchronization
During this phase, the customer again migrated the tables and schemas that lost synchronization with the source during the Technical Validation phase. By using the same mechanism described on the First Full Data Migration section, and as ETL processes that generate the data marts are already running on the future system, data is kept updated after this synchronization phase.
Business validation
After the second data migration was successfully performed and the data movement was technically validated, the last remaining task was to involve the data warehouse users in the final validation. These users from different business units across the company accessed the data warehouse using a variety of tools and methods: JDBC/ODBC clients, Python code, PL/SQL procedures, custom applications, etc. It was central to the migration to make sure that every end user had verified and adapted his processes to work seamlessly with Amazon Redshift before the final cut-over was performed.
This phase took around three months and consisted of several tasks:
- Adapt business users’ tools, applications, and scripts to connect to Amazon Redshift endpoints.
- Modify user’s data load and dump procedures, replacing data movement to / from shared storage via ODBC / JDBC with COPY / UNLOAD operations from / to S3.
- Modify any incompatible query, taking into account Amazon Redshift PostgreSQL implementation nuances.
- Run business processes, both against IBM Netezza and Amazon Redshift, and compare results and execution times, being sure to notify any issue or unexpected result to the team in charge of the migration, so the case can be analyzed in detail.
- Tune query performance, taking into account table sort keys and making extensive use of the EXPLAIN command in order to understand how Amazon Redshift plans and executes queries.
This business validation phase was key to have all end users aligned and ready for the final cut-over. Following Amazon Redshift best practices enabled end users to leverage the capabilities of their new data warehouse.
Soft cut-over
After all the migration and validation tasks had been performed, every ETL, business process, external system, and user tool was successfully connected and tested against Amazon Redshift.
This is when every process can be disconnected from the old data warehouse, which can be safely powered off and decommissioned.
Conclusion
In this blog post, we described the steps taken to perform a successful large-scale data warehouse migration from an on-premises IBM Netezza to Amazon Redshift. These same steps can be extrapolated to any other source data warehouse.
While this article describes a pure lift-and-shift migration, this is just the beginning of a transformation process towards a full-fledged corporate data lake. There are a series of next steps necessary in order to gain full advantage of the powerful analytics tools and services provided by AWS:
- Activate Amazon Redshift’s Concurrency scaling feature on interactive query queues so clusters scale seamlessly on high usage periods without needing to provision the clusters for peak capacity.
- Create a data lake in S3 and offload less accessed data, keeping warm and hot data on the Amazon Redshift clusters for higher performance.
- Leverage Amazon Redshift Spectrum to be able to combine cold and hot data on analytic queries when required by the business needs.
- Use Amazon Athena to be able to query cold data without affecting the data warehouse performance.
It is worth pointing out several takeaways that we feel are central to achieving a successful large-scale migration to Amazon Redshift:
- Start with a PoC to make an accurate initial sizing of the Amazon Redshift cluster.
- Create a detailed migration plan, which includes a clear procedure for every affected system.
- Have end users fully aligned with the migration process, and make sure all their processes are validated before the final cutover is performed.
- Follow Amazon Redshift best practices and techniques to leverage its full capabilities and performance.
- Engage with the AWS account team from early stages and throughout the whole process. They are the point of contact with AWS specialists, Professional Services, and partners in order to bring the migration project to a successful conclusion.
We hope you found this post useful. Please feel free to leave a comment or question.
About the Authors
 Guillermo Menendez Corral is a solutions architect at Amazon Web Services. He has over 12 years of experience designing and building SW applications and currently provides architectural guidance to AWS customers, with a focus on Analytics and Machine Learning.
 Arturo Bayo is a big data consultant at Amazon Web Services. He promotes a data-driven culture in enterprise customers around EMEA, providing specialized guidance on business intelligence and data lake projects while working with AWS customers and partners to build innovative solutions around data and analytics.