AWS Big Data Blog
Visualize data lineage using Amazon SageMaker Catalog for Amazon EMR, AWS Glue, and Amazon Redshift
Amazon SageMaker offers a comprehensive hub that integrates data, analytics, and AI capabilities, providing a unified experience for users to access and work with their data. Through Amazon SageMaker Unified Studio, a single and unified environment, you can use a wide range of tools and features to support your data and AI development needs, including data processing, SQL analytics, model development, training, inference, and generative AI development. This offering is further enhanced by the integration of Amazon Q and Amazon SageMaker Catalog, which provide an embedded generative AI and governance experience, helping users work efficiently and effectively across the entire data and AI lifecycle, from data preparation to model deployment and monitoring.
With the SageMaker Catalog data lineage feature, you can visually track and understand the flow of your data across different systems and teams, gaining a complete picture of your data assets and how they’re connected. As an OpenLineage-compatible feature, it helps you trace data origins, track transformations, and view cross-organizational data consumption, giving you insights into cataloged assets, subscribers, and external activities. By capturing lineage events from OpenLineage-enabled systems or through APIs, you can gain a deeper understanding of your data’s journey, including activities within SageMaker Catalog and beyond, ultimately driving better data governance, quality, and collaboration across your organization.
Additionally, the SageMaker Catalog data lineage feature versions each event, so you can track changes, visualize historical lineage, and compare transformations over time. This provides valuable insights into data evolution, facilitating troubleshooting, auditing, and data integrity by showing exactly how data assets have evolved, and generates trust in data.
In this post, we discuss the visualization of data lineage in SageMaker Catalog and how capture lineage from different AWS analytics services such as AWS Glue, Amazon Redshift, and Amazon EMR Serverless automatically, and visualize it with SageMaker Unified Studio.
Solution overview
The generation of data lineage in SageMaker Catalog operates through an automated system that captures metadata and relationships between different data artifacts for AWS Glue, Amazon EMR, and Amazon Redshift. When data moves through various AWS services, SageMaker automatically tracks these movements, transformations, and dependencies, creating a detailed map of the data’s journey. This tracking includes information about data sources, transformations, processing steps, and final outputs, providing a complete audit trail of data movement and transformation.
The implementation of data lineage in SageMaker Catalog offers several key benefits:
- Compliance and audit support – Organizations can demonstrate compliance with regulatory requirements by showing complete data provenance and transformation history
- Impact analysis – Teams can assess the potential impact of changes to data sources or transformations by understanding dependencies and relationships in the data pipeline
- Troubleshooting and debugging – When issues arise, the lineage system helps identify the root cause by showing the complete path of data transformation and processing
- Data quality management – By tracking transformations and dependencies, organizations can better maintain data quality and understand how data quality issues might propagate through their systems
Lineage capture is automated using several tools in SageMaker Unified Studio. To learn more, refer to Data lineage support matrix.
In the following sections, we show you how to configure your resources and implement the solution. For this post, we create the solution resources in the us-west-2 AWS Region using an AWS CloudFormation template.
Prerequisites
Before getting started, make sure you have the following:
- An active AWS account with billing enabled.
- An AWS Identity and Access Management (IAM) user with administrator access (
AdministratorAccesspolicy) or specific permissions to create and manage resources such as a virtual private cloud (VPC), subnet, security group, IAM roles, NAT gateway, internet gateway, SageMaker Unified Studio, and Amazon Simple Storage Service (Amazon S3) buckets. - An S3 bucket (for this post,
datazone-{account_id}). - Sufficient VPC capacity in your chosen Region.
- AWS IAM Identity Center set up. For instructions, refer to Enable IAM Identity Center and Add users to your Identity Center directory.
Configure SageMaker Unified Studio with AWS CloudFormation
The vpc-analytics-lineage-sus.yaml stack creates a VPC, subnet, security group, IAM roles, NAT gateway, internet gateway, Amazon Elastic Compute Cloud (Amazon EC2) client, S3 buckets, SageMaker Unified Studio domain, and SageMaker Unified Studio project. To create the solution resources, complete the following steps:
- Launch the stack
vpc-analytics-lineage-sususing the CloudFormation template:

- Provide the parameter values as listed in the following table.
Parameters Sample value DatazoneS3Bucket s3://datazone-{account_id}/ DomainName dz-studio EnvironmentName sm-unifiedstudio PrivateSubnet1CIDR 10.192.20.0/24 PrivateSubnet2CIDR 10.192.21.0/24 PrivateSubnet3CIDR 10.192.22.0/24 ProjectName sidproject PublicSubnet1CIDR 10.192.10.0/24 PublicSubnet2CIDR 10.192.11.0/24 PublicSubnet3CIDR 10.192.12.0/24 UsersList analyst VpcCIDR 10.192.0.0/16
The stack creation process can take approximately 20 minutes to complete. You can check the Outputs tab for the stack after the stack is created.
Next, we prepare source data, setup the AWS Glue ETL Job, Amazon EMR Serverless Spark Job and Amazon Redshift Job to generate the lineage and capture lineage from Amazon SageMaker Unified Studio
Prepare data
The following is example data from our CSV files:
attendance.csv
employees.csv
Upload the sample data from attendance.csv and employees.csv to the S3 bucket specified in the previous CloudFormation stack (s3://datazone-{account_id}/csv/).
Ingest employee data in Amazon Relational Database Dervice (Amazon RDS) for MySQL table
On the CloudFormation console, open the stack vpc-analytics-lineage-sus and collect the Amazon RDS for MySQL database endpoint to use in the following commands to create a default employeedb database.
- Connect to Amazon EC2 instance with mysql package installation
- Run the following command to connect to the database
- Run the following command to create an employee table
- Running the following command to insert rows.
Capture lineage from AWS Glue ETL job and notebook
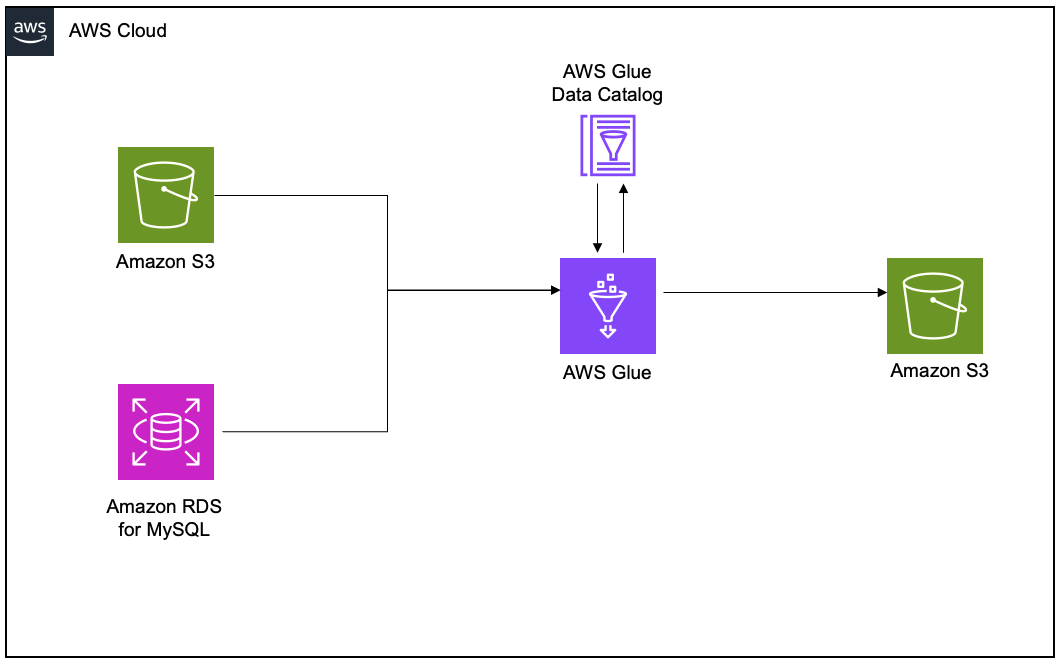
To demonstrate the lineage, we set up an AWS Glue extract, transform, and load (ETL) job to read the employee data from an Amazon RDS for MySQL table and the employee attendance data from Amazon S3, and join both datasets. Finally, we write the data to Amazon S3 and create the attendance_with_emp1 table in the AWS Glue Data Catalog.
Create and configure AWS Glue job for lineage generation
Complete the following steps to create your AWS Glue ETL job:
- On the AWS Glue console, create a new ETL job with AWS Glue version 5.0.
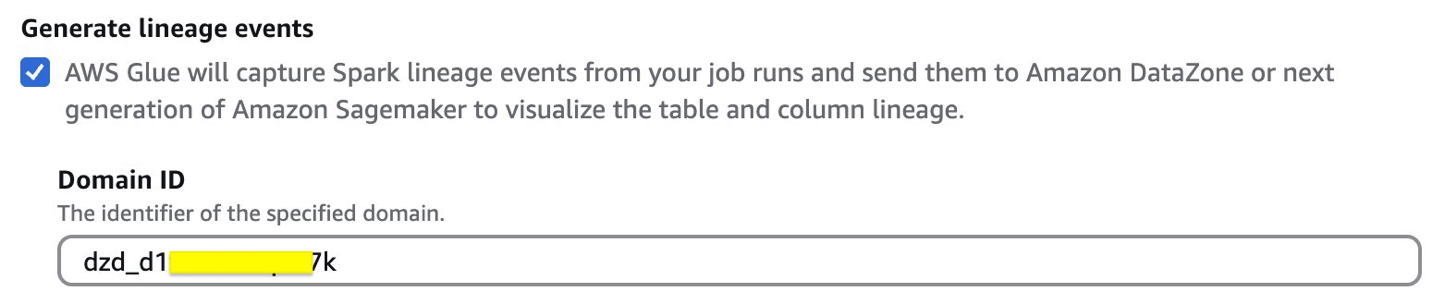
- Enable Generate lineage events and provide the domain ID (retrieve from the CloudFormation template output for
DataZoneDomainid; it will have the formatdzd_xxxxxxxx)
- Use the following code snippet in the AWS Glue ETL job script. Provide the S3 bucket (
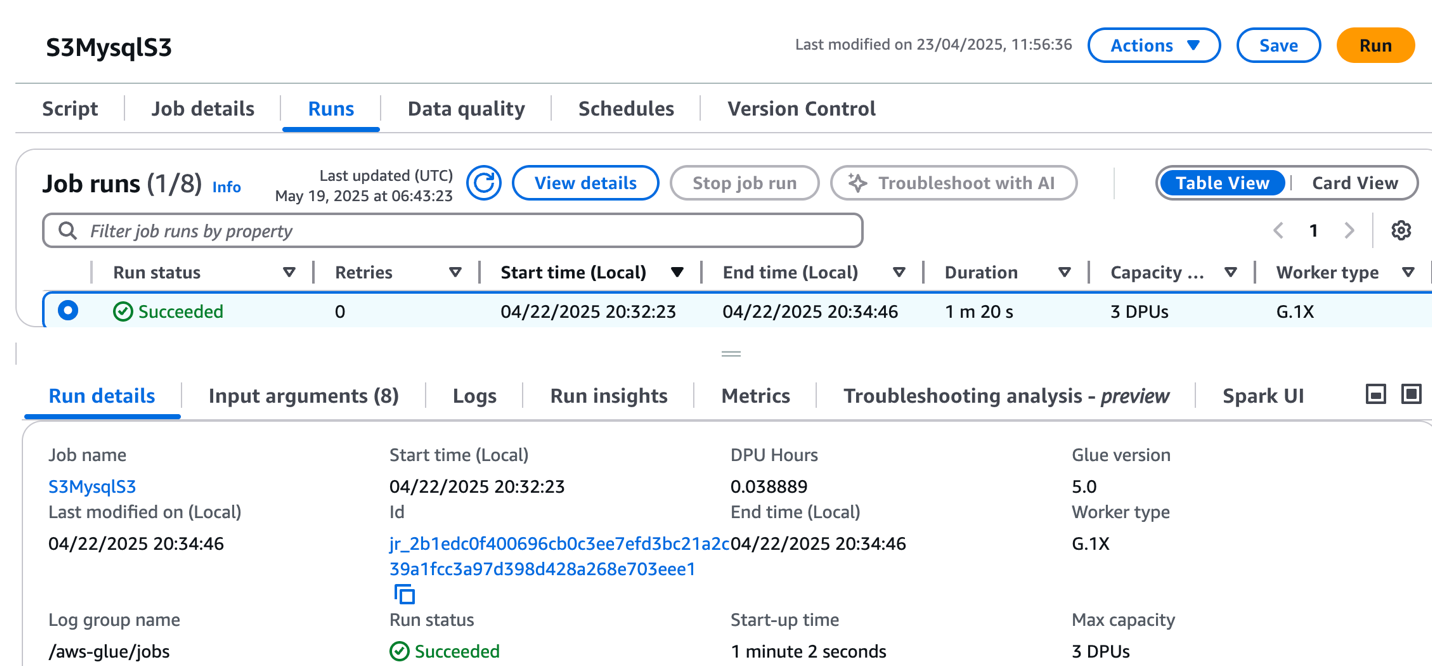
bucketname-{account_id}) used in the preceding CloudFormation stack. - Choose Run to start the job.
- On the Runs tab, confirm the job ran without failure.
- After the job has executed successfully, navigate to the SageMaker Unified Studio domain.
- Choose Project and under Overview, choose Data Sources.
- Select the Data Catalog source (
accountid-AwsDataCatalog-glue_db_suffix-default-datasource). - On the Actions dropdown menu, choose Edit.
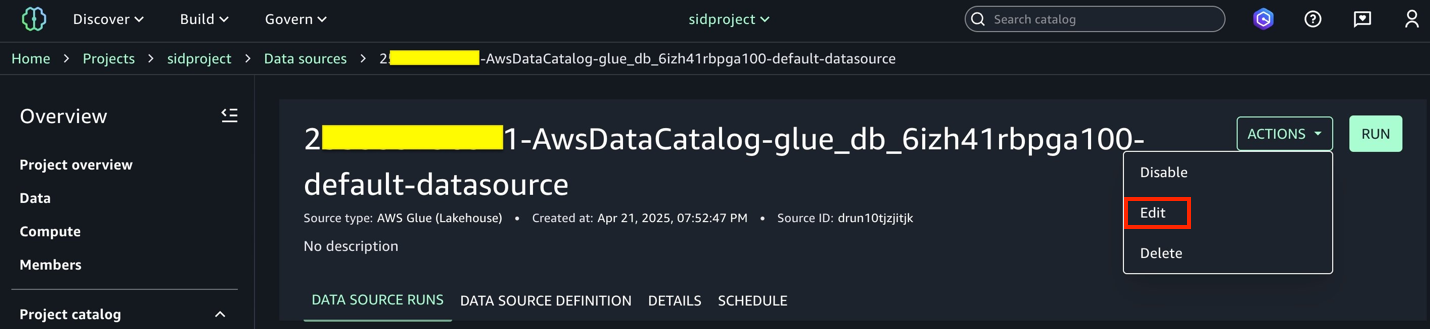
- Under Connection, enable Import data lineage.
- In the Data Selection section, under Table Selection Criteria, provide a table name or use
*to generate lineage. - Update the data source and choose Run to create an asset called
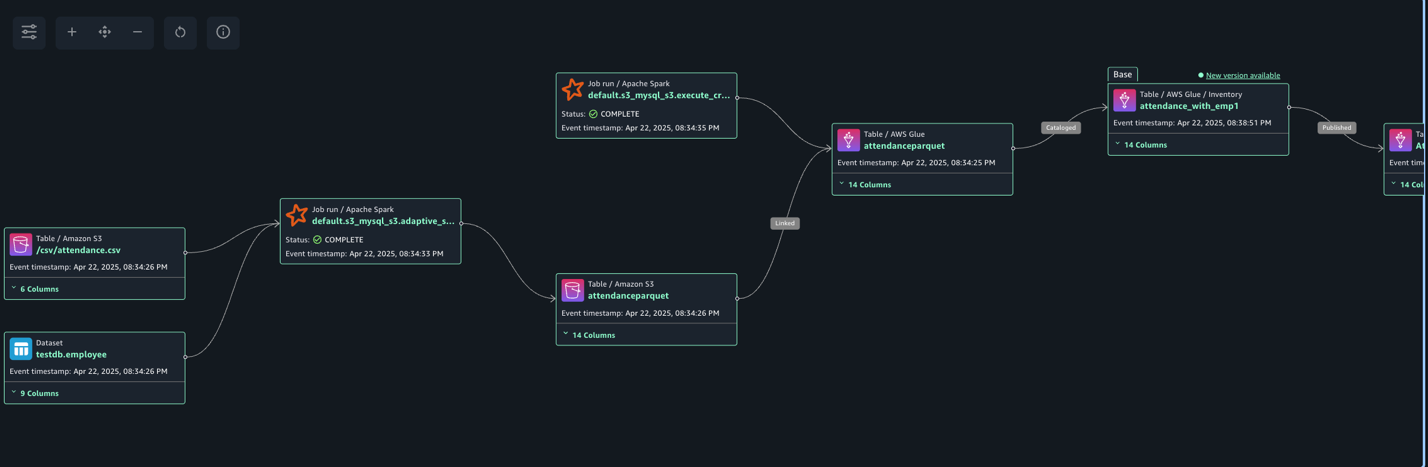
attendance_with_emp1in SageMaker Catalog. - Navigate to Assets, choose the
attendance_with_emp1asset, and navigate to the LINEAGE section.
The following lineage diagram shows an AWS Glue job that integrates data from two sources: employee information stored in Amazon RDS for MySQL and employee absence records stored in Amazon S3. The AWS Glue job combines these datasets through a join operation, then creates a table in the Data Catalog and registers it as an asset in SageMaker Catalog, making the unified data available for further analysis or machine learning purposes.
Create and configure AWS Glue notebook for lineage generation
Complete the following steps to create the AWS Glue notebook:
- On the AWS Glue console, choose Author using an interactive code notebook.
- Under Options, choose Start fresh and choose Create notebook.
- In the notebook, use the following code to generate lineage.
In the following code, we add the required Spark configuration to generate lineage and then read CSV data from Amazon S3 and write in Parquet format to the Data Catalog table. The Spark configuration includes the following parameters:
- spark.extraListeners=io.openlineage.spark.agent.OpenLineageSparkListener – Registers the OpenLineage listener to capture Spark job execution events and metadata for lineage tracking
- spark.openlineage.transport.type=amazon_datazone_api – Specifies Amazon DataZone as the destination service where the lineage data will be sent and stored
- spark.openlineage.transport.domainId=dzd_xxxxxxx – Defines the unique identifier of your Amazon DataZone domain where the lineage data will be associated
- spark.glue.accountId={account_id} – Specifies the AWS account ID where the AWS Glue job is running for proper resource identification and access
- spark.openlineage.facets.custom_environment_variables – Lists the specific environment variables to capture in the lineage data for context about the AWS and AWS Glue environment
- spark.glue.JOB_NAME=lineagenotebook – Sets a unique identifier name for the AWS Glue job that will appear in lineage tracking and logs
See the following code:
- After the notebook has executed successfully, navigate to the SageMaker Unified Studio domain.
- Choose Project and under Overview, choose Data Sources.
- Choose the Data Catalog source (
{account_id}-AwsDataCatalog-glue_db_suffix-default-datasource). - Choose Run to create the asset
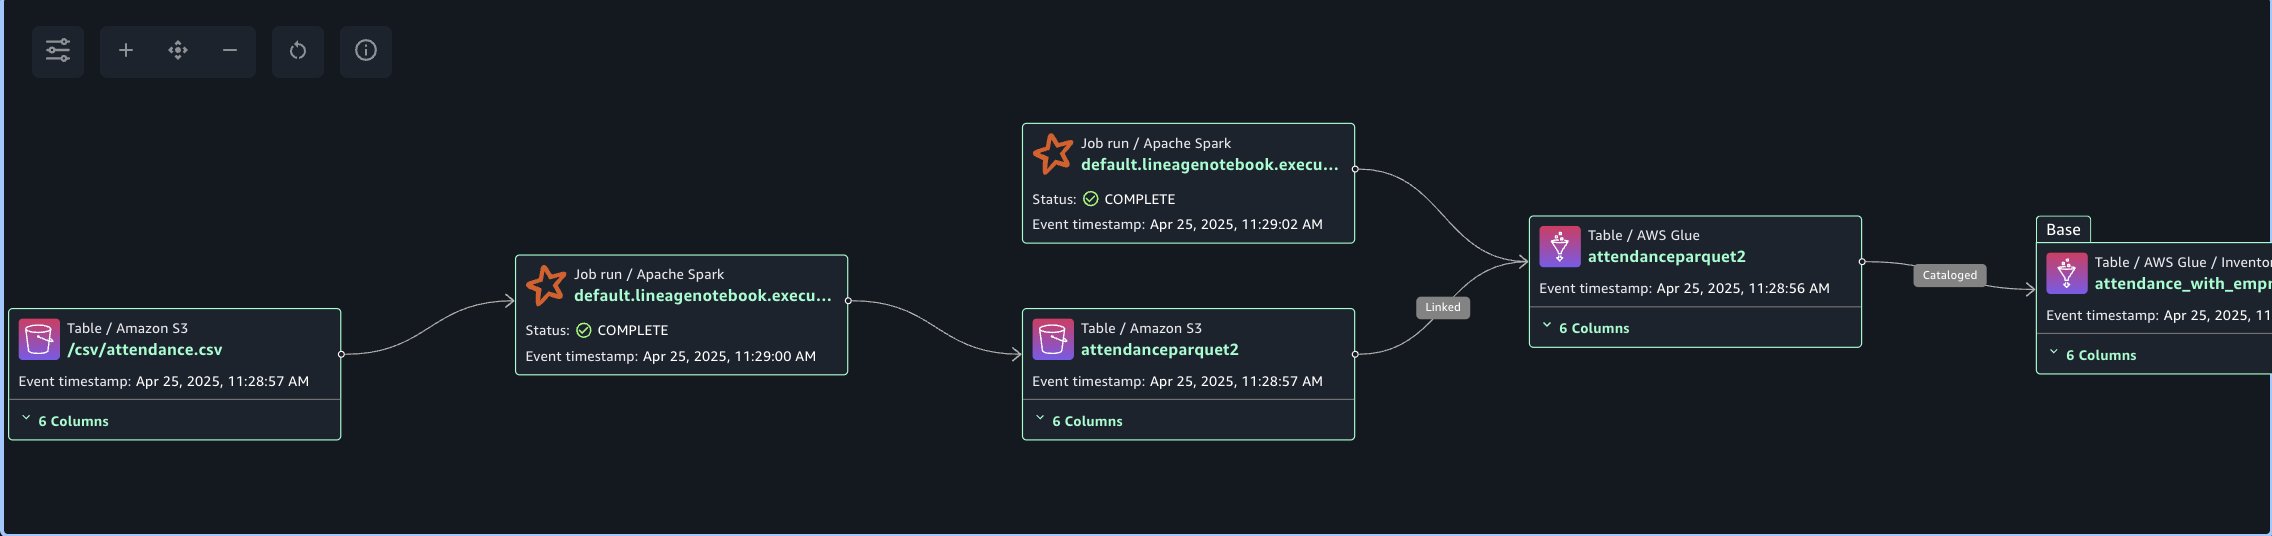
attendance_with_empnotein SageMaker Catalog. - Navigate to Assets, choose the
attendance_with_empnoteasset, and navigate to the LINEAGE section.
The following lineage diagram shows an AWS Glue job that reads data from the employee absence records stored in Amazon S3. The AWS Glue job transform CSV data into Parquet format, then creates a table in the Data Catalog and registers it as an asset in SageMaker Catalog.
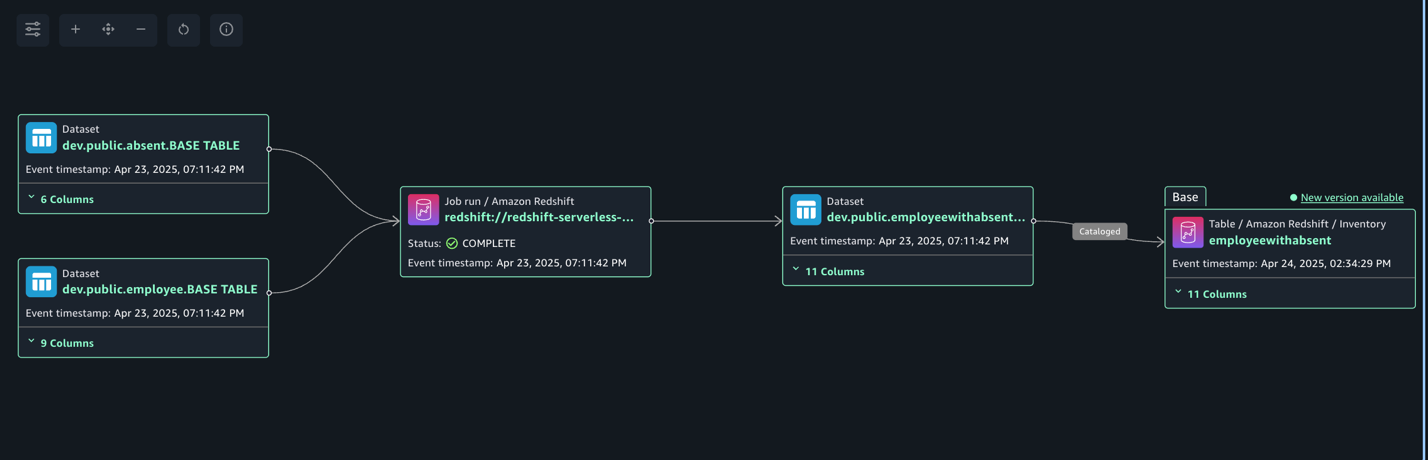
Capture lineage from Amazon Redshift
To demonstrate the lineage, we are creating an employee table and an attendance table and join both datasets. Finally, we create a new table called employeewithabsent in Amazon Redshift. Complete the following steps to create and configure lineage for Amazon Redshift tables:
- In SageMaker Unified Studio, open your domain.
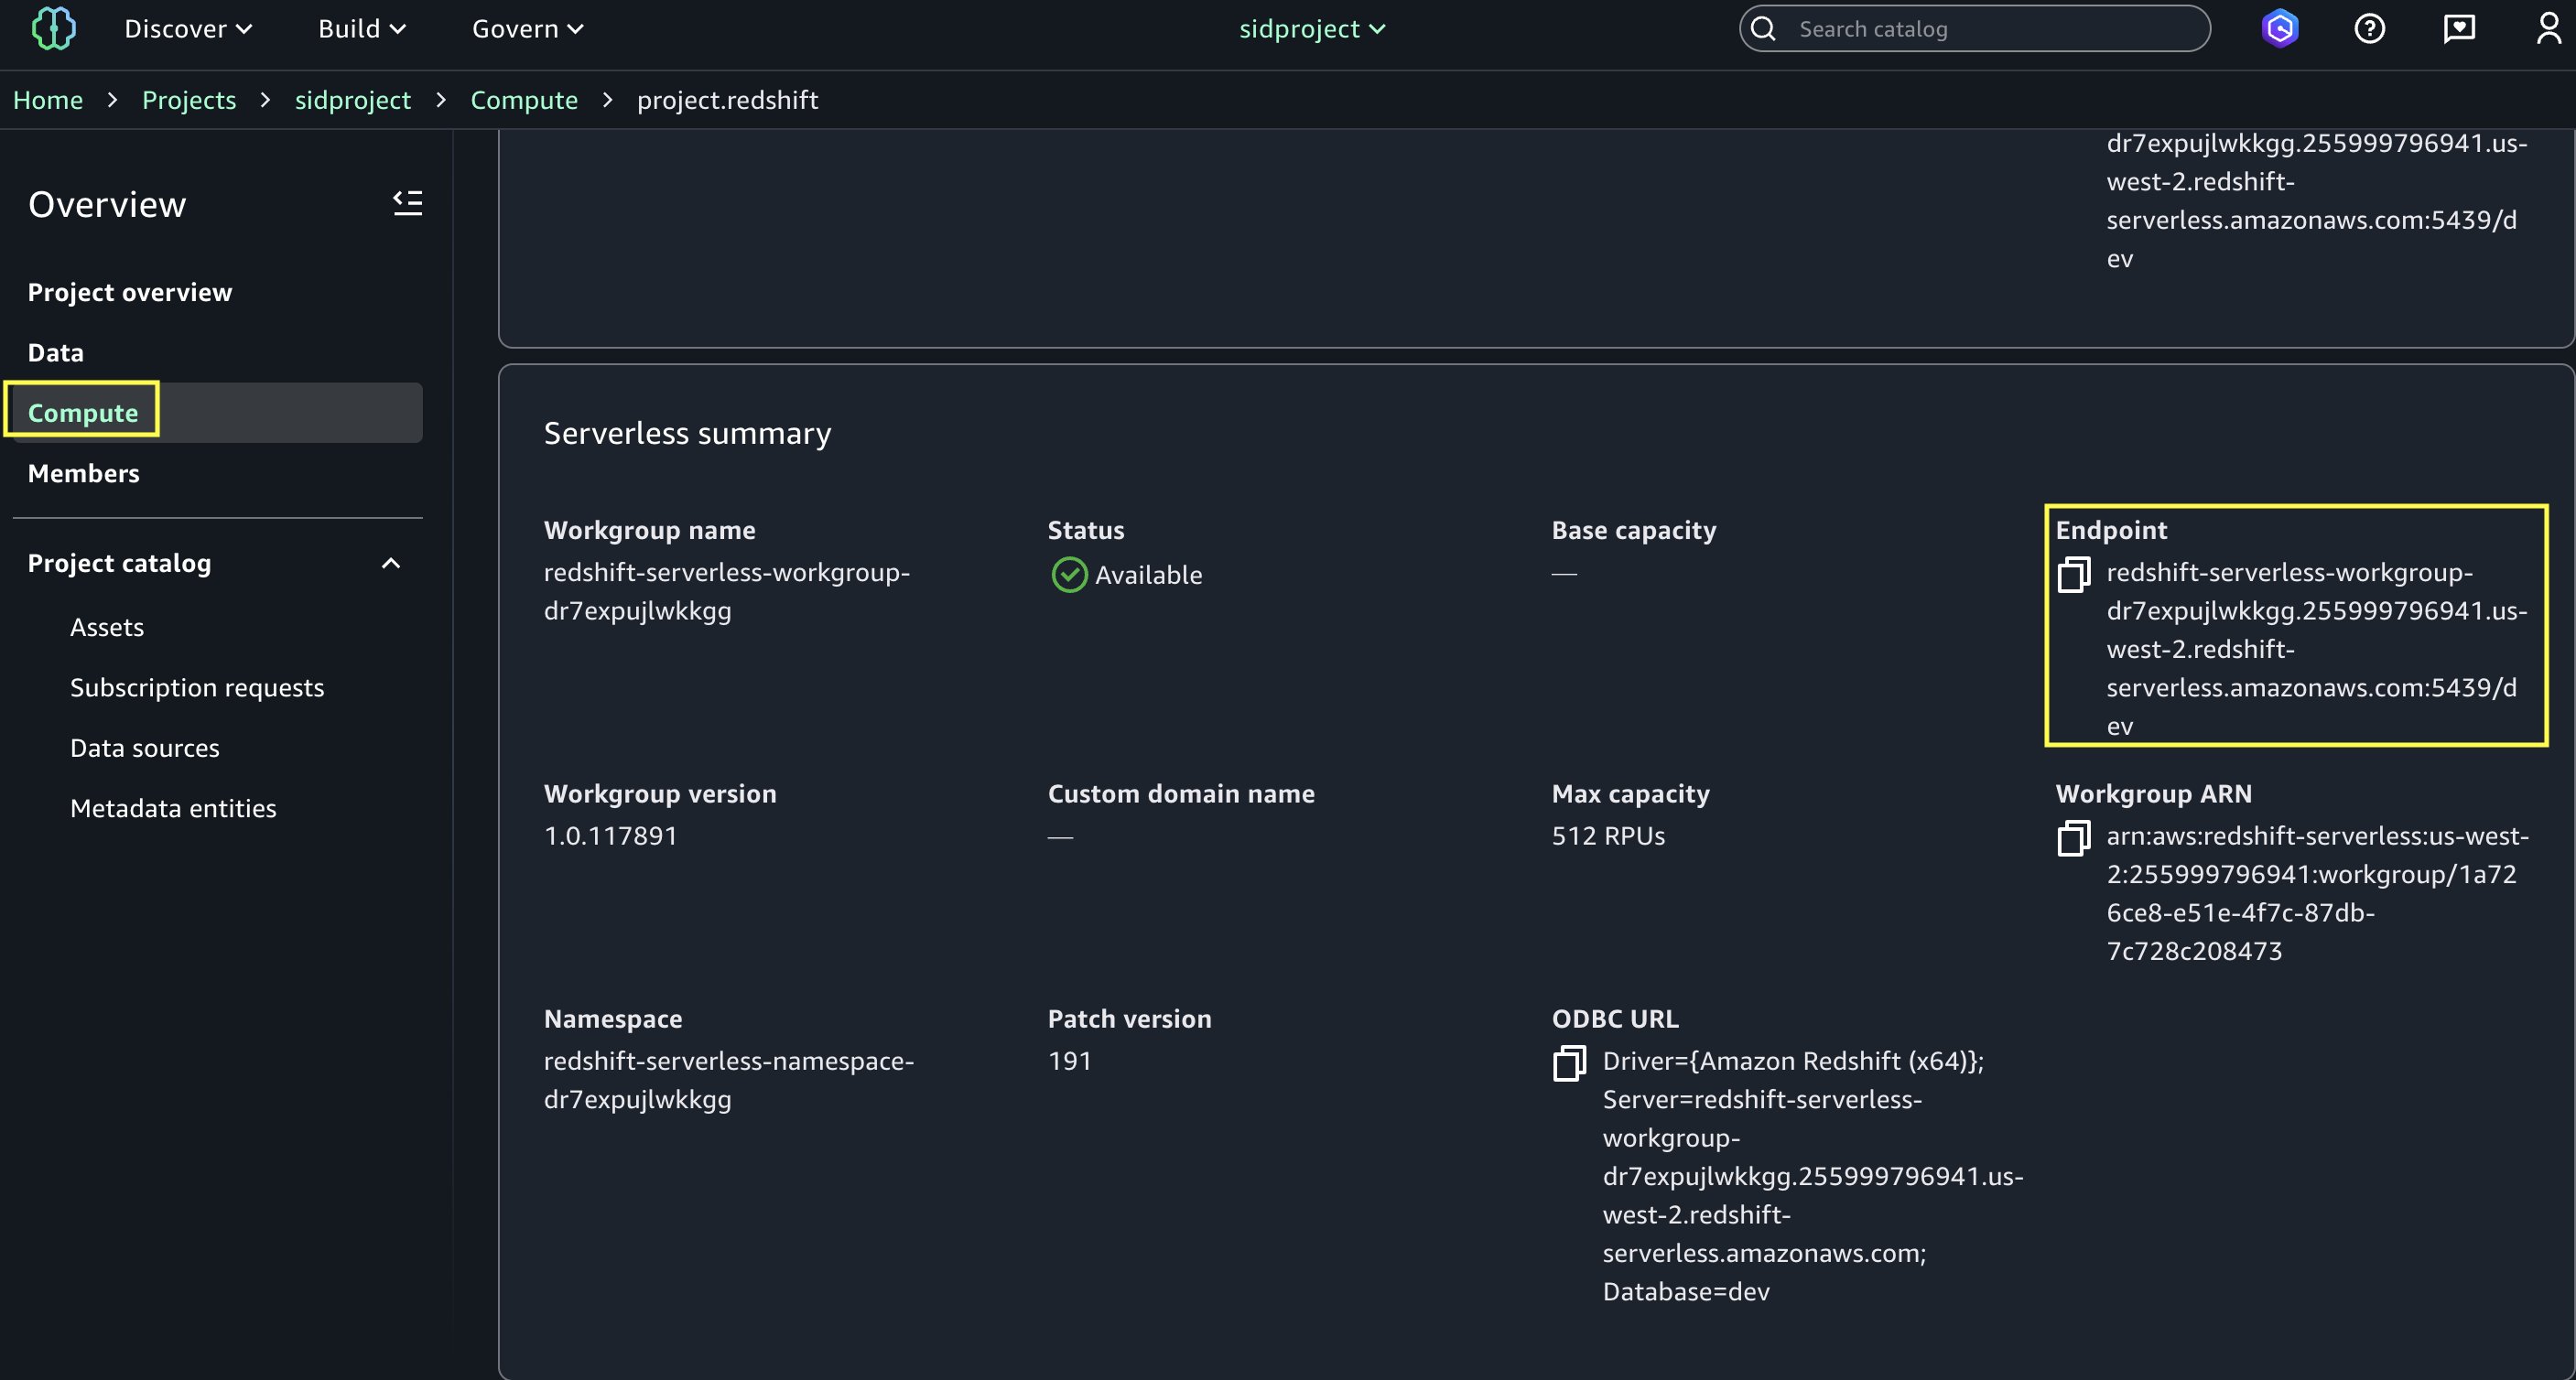
- Under Compute, choose Data warehouse.
- Open
project.redshiftand copy the endpoint name (redshift-serverless-workgroup-xxxxxxx).
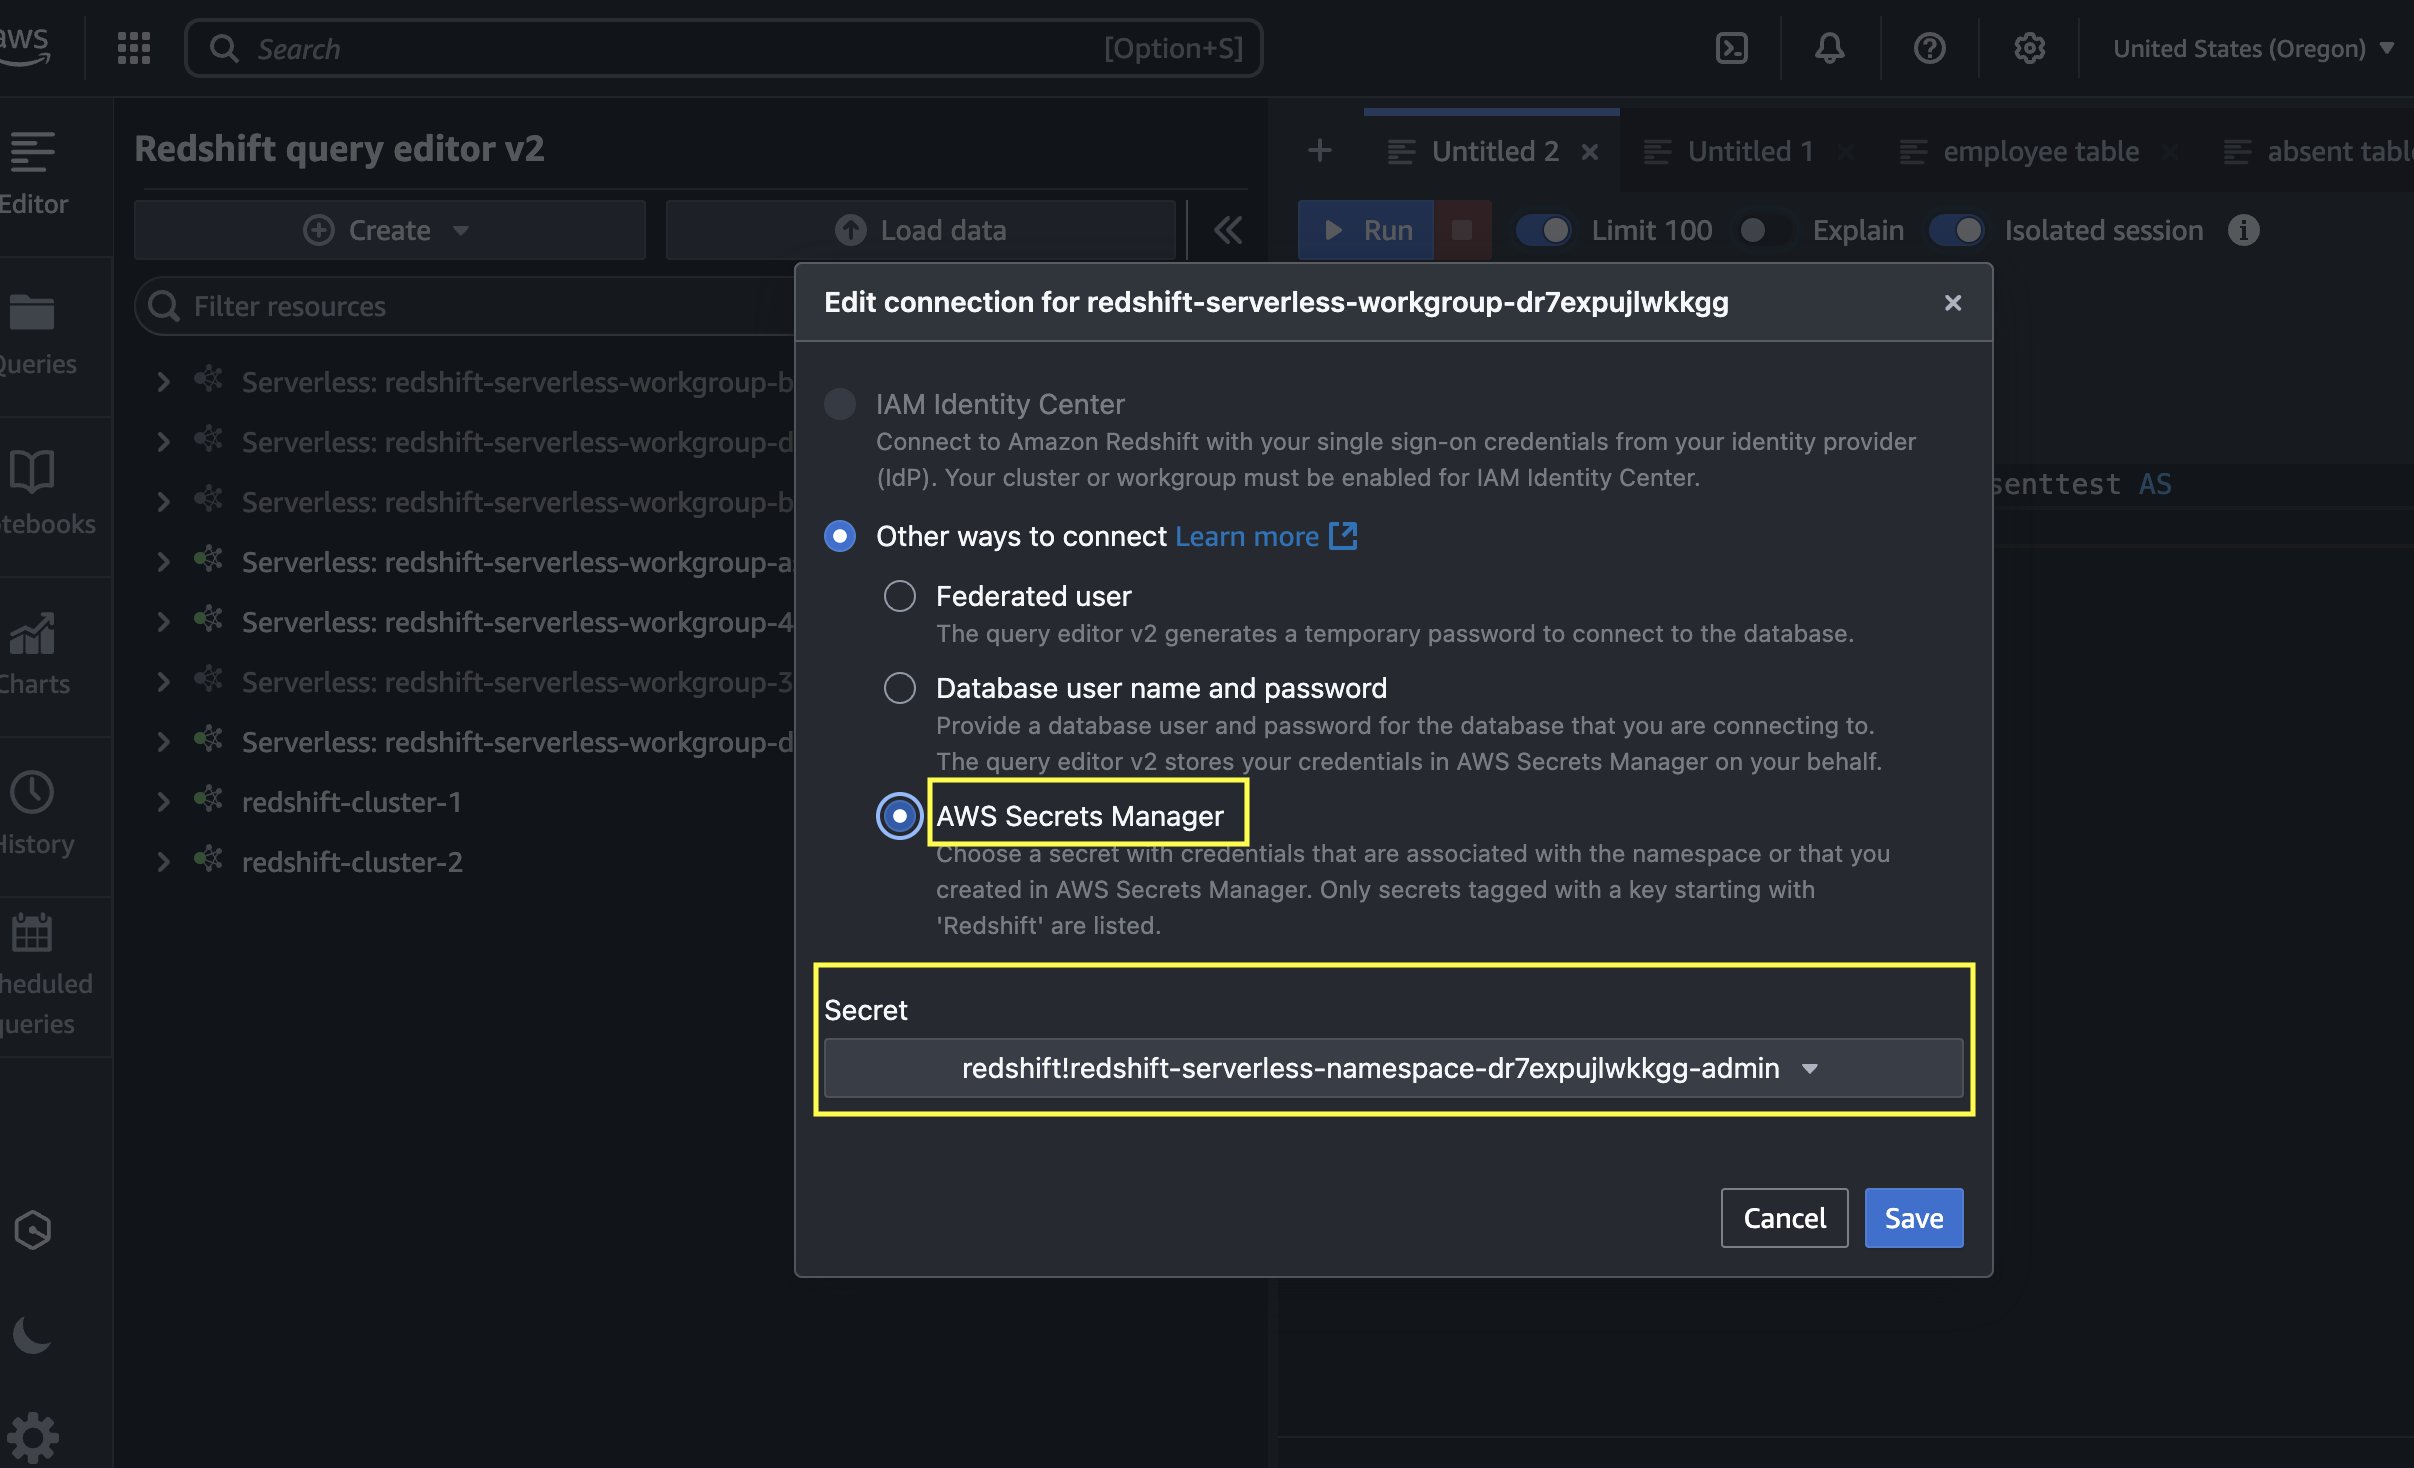
- On the Amazon Redshift console, open the Query Editor v2, and connect to the Redshift Serverless workgroup with a secret. Use the AWS Secrets Manager option and choose the secret
redshift-serverless-namespace-xxxxxxxx.
- Use the following code to create tables in Amazon Redshift and load data from Amazon S3 using the COPY command. Make sure the IAM role has
GetObjectpermission on the S3 filesattendance.csvandemployees.csv.Create Redshift table absent
Load data into absent table.
Create Redshift table employee
Load data into employee table.
- After the tables are created and the data is loaded, perform the join between the tables and create a new table with a CTAS query:
- Navigate to the SageMaker Unified Studio domain.
- Choose Project and under Overview, choose Data Sources.
- Select the Amazon Redshift source (
RedshiftServerless-default-redshift-datasource). - On the Actions dropdown menu, choose Edit.
- Under Connection, Enable Import data lineage.
- In the Data Selection section, under Table Selection Criteria, provide a table name or use
*to generate lineage. - Update the data source and choose Run to create an asset called
employeewithabsentin SageMaker Catalog. - Navigate to Assets, choose the
employeewithabsentasset, and navigate to the LINEAGE section.
The following lineage diagram shows joining two redshift tables and creating a new redshift table and registers it as an asset in SageMaker Catalog.
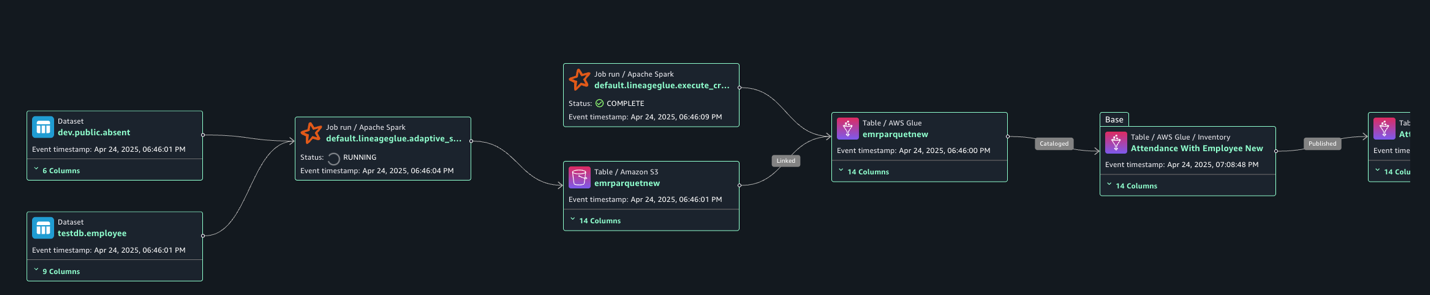
Capture lineage from EMR Serverless job
To demonstrate the lineage, we read employee data from an RDS for MySQL table and an attendance dataset from Amazon Redshift, and join both datasets. Finally, we write the data to Amazon S3 and create the attendance_with_employee table in the Data Catalog. Complete the following steps:
- On the Amazon EMR console, choose EMR Serverless in the navigation pane.
- To create or manage EMR Serverless applications, you need the EMR Studio UI.
- If you already have an EMR Studio in the Region where you want to create an application, choose Manage applications to navigate to your EMR Studio, or select the EMR Studio that you want to use.
- If you don’t have an EMR Studio in the Region where you want to create an application, choose Get started and then choose Create and launch Studio. EMR Serverless creates an EMR Studio for you so you can create and manage applications.
- In the Create studio UI that opens in a new tab, enter the name, type, and release version for your application.
- Choose Create application.
- Create an EMR Spark serverless application with the following configuration:
- For Type, choose Spark.
- For Release version, choose emr-7.8.0.
- For Architecture, choose x86_64.
- For Application setup options, select Use custom settings.
- For Interactive endpoint, enable the endpoint for EMR Studio.
- For Application configuration, use the following configuration:
- Choose Create and Start application.
- After application has started, submit the Spark application to generate lineage events. Copy the following script and upload it to the S3 bucket (
s3://datazone-{account_id}/script/). Upload the MySQL-connector-java JAR file to the S3 bucket (s3://datazone-{account_id}/jars/) to read the data from MySQL. - After you upload the script, use the following command to submit the Spark application. Change the following parameters according to your environment details:
application-id: Provide the Spark application ID you generated.execution-role-arn: Provide the EMR execution role.entryPoint: Provide the Spark script S3 path.domainID: Provide the domain ID (from the CloudFormation template output forDataZoneDomainid:dzd_xxxxxxxx).accountID: Provide your AWS account ID.
- After the job has executed successfully, navigate to the SageMaker Unified Studio domain.
- Choose Project and under Overview, choose Data Sources.
- Select the Data Catalog source (
{account_id}-AwsDataCatalog-glue_db_xxxxxxxxxx-default-datasource). - On the Actions dropdown menu, choose Edit.
- Under Connection, enable Import data lineage.
- In the Data Selection section, under Table Selection Criteria, provide a table name or use
*to generate lineage. - Update the data source and choose Run to create an asset called
attendancewithempnewin SageMaker Catalog. - Navigate to Assets, choose the
attendancewithempnewasset, and navigate to the LINEAGE section.
The following lineage diagram shows an AWS Glue job that integrates employee information stored in Amazon RDS for MySQL and employee absence records stored in Amazon Redshift. The AWS Glue job combines these datasets through a join operation, then creates a table in the Data Catalog and registers it as an asset in SageMaker Catalog.
Clean up
To clean up your resources, complete the following steps:
- On the AWS Glue console, delete the AWS Glue job.
- On the Amazon EMR console, delete the EMR Serverless Spark application and EMR Studio.
- On the AWS CloudFormation console, delete the CloudFormation stack
vpc-analytics-lineage-sus.
Conclusion
In this post, we showed how data lineage in SageMaker Catalog helps you track and understand the complete lifecycle of your data across various AWS analytics services. This comprehensive tracking system provides visibility into how data flows through different processing stages, transformations, and analytical workflows, making it an essential tool for data governance, compliance, and operational efficiency.
Try out these lineage visualization methods for your own use cases, and share your questions and feedback in the comments section.