AWS DevOps & Developer Productivity Blog
Blue/Green deployment with AWS Developer tools on Amazon EC2 using Amazon EFS to host application source code
Many organizations building modern applications require a shared and persistent storage layer for hosting and deploying data-intensive enterprise applications, such as content management systems, media and entertainment, distributed applications like machine learning training, etc. These applications demand a centralized file share that scales to petabytes without disrupting running applications and remains concurrently accessible from potentially thousands of Amazon EC2 instances.
Simultaneously, customers want to automate the end-to-end deployment workflow and leverage continuous methodologies utilizing AWS developer tools services for performing a blue/green deployment with zero downtime. A blue/green deployment is a deployment strategy wherein you create two separate, but identical environments. One environment (blue) is running the current application version, and one environment (green) is running the new application version. The blue/green deployment strategy increases application availability by generally isolating the two application environments and ensuring that spinning up a parallel green environment won’t affect the blue environment resources. This isolation reduces deployment risk by simplifying the rollback process if a deployment fails.
Amazon Elastic File System (Amazon EFS) provides a simple, scalable, and fully-managed elastic NFS file system for use with AWS Cloud services and on-premises resources. It scales on demand, thereby eliminating the need to provision and manage capacity in order to accommodate growth. Utilize Amazon EFS to create a shared directory that stores and serves code and content for numerous applications. Your application can treat a mounted Amazon EFS volume like local storage. This means you don’t have to deploy your application code every time the environment scales up to multiple instances to distribute load.
In this blog post, I will guide you through an automated process to deploy a sample web application on Amazon EC2 instances utilizing Amazon EFS mount to host application source code, and utilizing a blue/green deployment with AWS code suite services in order to deploy the application source code with no downtime.
How this solution works
This blog post includes a CloudFormation template to provision all of the resources needed for this solution. The CloudFormation stack deploys a Hello World application on Amazon Linux 2 EC2 Instances running behind an Application Load Balancer and utilizes Amazon EFS mount point to store the application content. The AWS CodePipeline project utilizes AWS CodeCommit as the version control, AWS CodeBuild for installing dependencies and creating artifacts, and AWS CodeDeploy to conduct deployment on EC2 instances running in an Amazon EC2 Auto Scaling group.
Figure 1 below illustrates our solution architecture.
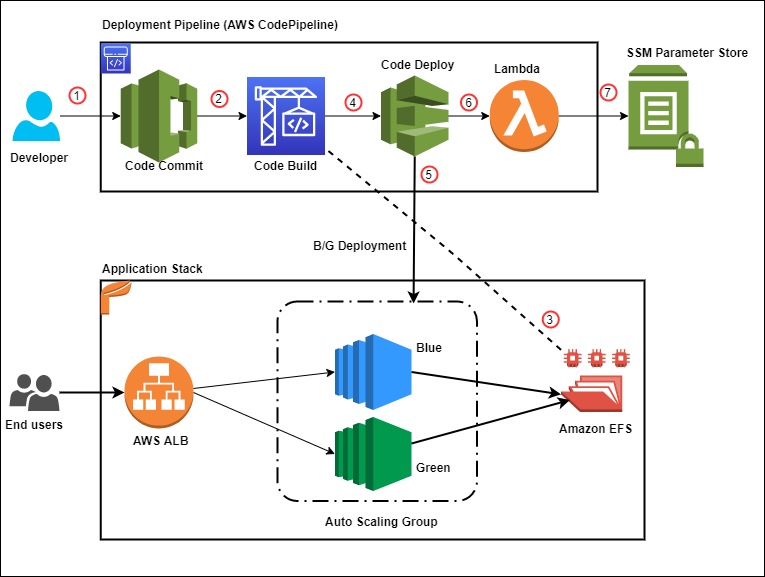
Figure 1: Sample solution architecture
The event flow in Figure 1 is as follows:
- A developer commits code changes from their local repo to the CodeCommit repository. The commit triggers CodePipeline execution.
- CodeBuild execution begins to compile source code, install dependencies, run custom commands, and create deployment artifact as per the instructions in the Build specification reference file.
- During the build phase, CodeBuild copies the source-code artifact to Amazon EFS file system and maintains two different directories for current (green) and new (blue) deployments.
- After successfully completing the build step, CodeDeploy deployment kicks in to conduct a Blue/Green deployment to a new Auto Scaling Group.
- During the deployment phase, CodeDeploy mounts the EFS file system on new EC2 instances as per the CodeDeploy AppSpec file reference and conducts other deployment activities.
- After successful deployment, a Lambda function triggers in order to store a deployment environment parameter in Systems Manager parameter store. The parameter stores the current EFS mount name that the application utilizes.
- The AWS Lambda function updates the parameter value during every successful deployment with the current EFS location.
Prerequisites
For this walkthrough, the following are required:
- An AWS account
- Access to an AWS account with administrator or PowerUser (or equivalent) AWS Identity and Access Management(IAM) role policies attached
- Git Command Line installed and configured in your local environment
Deploy the solution
Once you’ve assembled the prerequisites, download or clone the GitHub repo and store the files on your local machine. Utilize the commands below to clone the repo:
mkdir -p ~/blue-green-sample/
cd ~/blue-green-sample/
git clone https://github.com/aws-samples/blue-green-deployment-pipeline-for-efs
Once completed, utilize the following steps to deploy the solution in your AWS account:
- Create a private Amazon Simple Storage Service (Amazon S3) bucket by using this documentation

Figure 2: AWS S3 console view when creating a bucket
- Upload the cloned or downloaded GitHub repo files to the root of the S3 bucket. the S3 bucket objects structure should look similar to Figure 3:

Figure 3: AWS S3 bucket object structure
- Go to the S3 bucket and select the template name solution-stack-template.yml, and then copy the object URL.
- Open the CloudFormation console. Choose the appropriate AWS Region, and then choose Create Stack. Select With new resources.
- Select Amazon S3 URL as the template source, paste the object URL that you copied in Step 3, and then choose Next.
- On the Specify stack details page, enter a name for the stack and provide the following input parameter. Modify the default values for other parameters in order to customize the solution for your environment. You can leave everything as default for this walkthrough.
- ArtifactBucket– The name of the S3 bucket that you created in the first step of the solution deployment. This is a mandatory parameter with no default value.
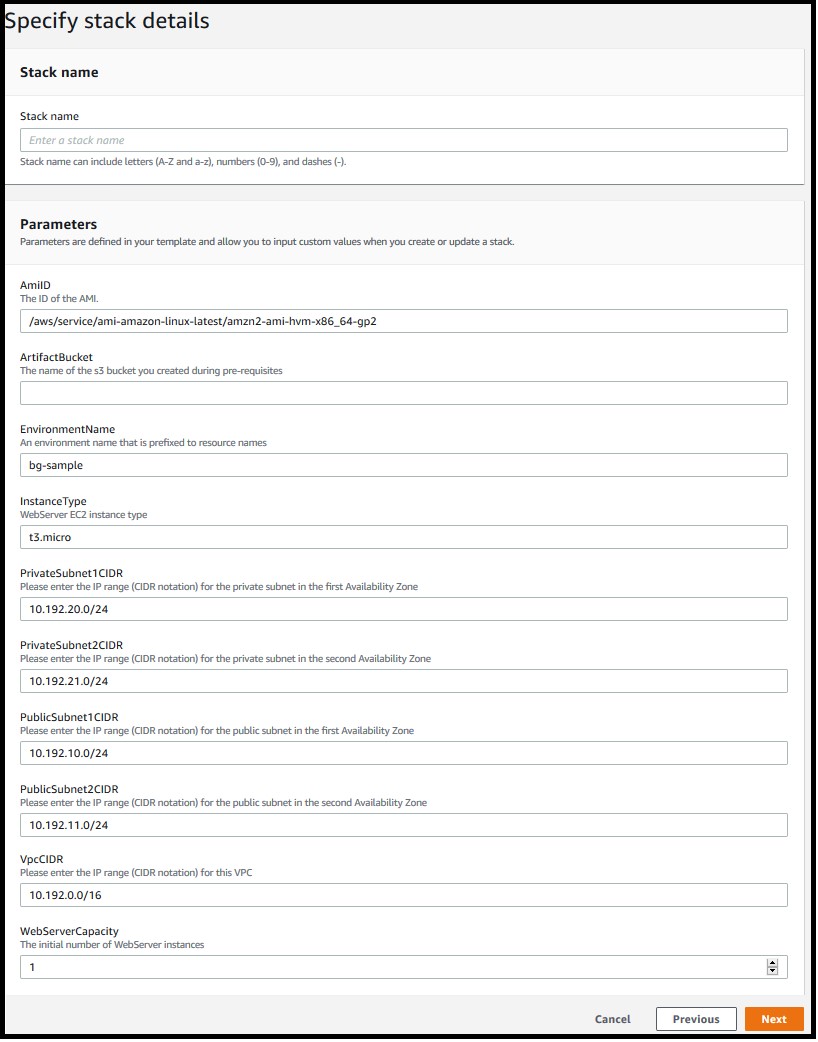
Figure 4: Defining the stack name and input parameters for the CloudFormation stack
- Choose Next.
- On the Options page, keep the default values and then choose Next.
- On the Review page, confirm the details, acknowledge that CloudFormation might create IAM resources with custom names, and then choose Create Stack.
- Once the stack creation is marked as CREATE_COMPLETE, the following resources are created:
- A virtual private cloud (VPC) configured with two public and two private subnets.
- NAT Gateway, an EIP address, and an Internet Gateway.
- Route tables for private and public subnets.
- Auto Scaling Group with a single EC2 Instance.
- Application Load Balancer and a Target Group.
- Three security groups—one each for ALB, web servers, and EFS file system.
- Amazon EFS file system with a mount target for each Availability Zone.
- CodePipeline project with CodeCommit repository, CodeBuild, and CodeDeploy resources.
- SSM parameter to store the environment current deployment status.
- Lambda function to update the SSM parameter for every successful pipeline execution.
- Required IAM Roles and policies.
Note: It may take anywhere from 10-20 minutes to complete the stack creation.
Test the solution
Now that the solution stack is deployed, follow the steps below to test the solution:
- Validate CodePipeline execution status
After successfully creating the CloudFormation stack, a CodePipeline execution automatically triggers to deploy the default application code version from the CodeCommit repository.
- In the AWS console, choose Services and then CloudFormation. Select your stack name. On the stack Outputs tab, look for the CodePipelineURL key and click on the URL.
- Validate that all steps have successfully completed. For a successful CodePipeline execution, you should see something like Figure 5. Wait for the execution to complete in case it is still in progress.
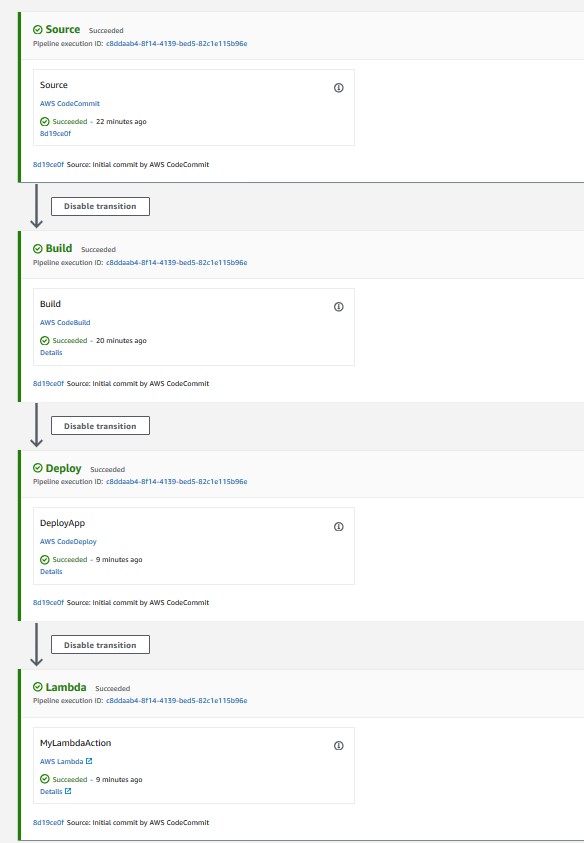
Figure 5: CodePipeline console showing execution status of all stages
- Validate the Website URL
After completing the pipeline execution, hit the website URL on a browser to check if it’s working.
- On the stack Outputs tab, look for the WebsiteURL key and click on the URL.
- For a successful deployment, it should open a default page similar to Figure 6.
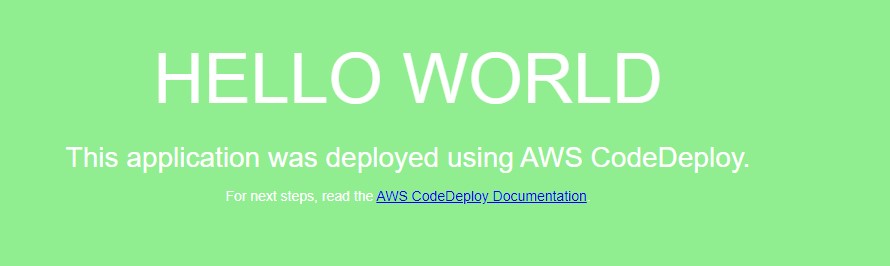
Figure 6: Sample “Hello World” application (Green deployment)
- Validate the EFS share
After the website deployed successfully, we will get into the application server and validate the EFS mount point and the application source code directory.
- Open the Amazon EC2 console, and then choose Instances in the left navigation pane.
- Select the instance named bg-sample and choose
- For Connection method, choose Session Manager, and then choose connect
After the connection is made, run the following bash commands to validate the EFS mount and the deployed content. Figure 7 shows a sample output from running the bash commands.
sudo df –h | grep efs
ls –la /efs/green
ls –la /var/www/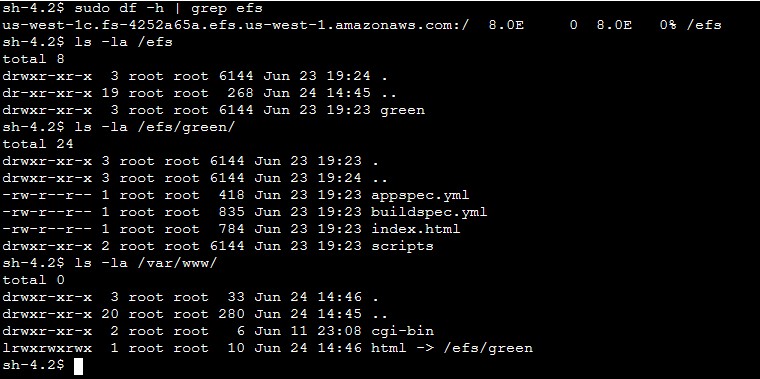
Figure 7: Sample output from the bash command (Green deployment)
- Deploy a new revision of the application code
After verifying the application status and the deployed code on the EFS share, commit some changes to the CodeCommit repository in order to trigger a new deployment.
- On the stack Outputs tab, look for the CodeCommitURL key and click on the corresponding URL.
- Click on the file html.
- Click on
- Uncomment line 9 and comment line 10, so that the new lines look like those below after the changes:
background-color: #0188cc;
#background-color: #90ee90;- Add Author name, Email address, and then choose Commit changes.
After you commit the code, the CodePipeline triggers and executes Source, Build, Deploy, and Lambda stages. Once the execution completes, hit the Website URL and you should see a new page like Figure 8.
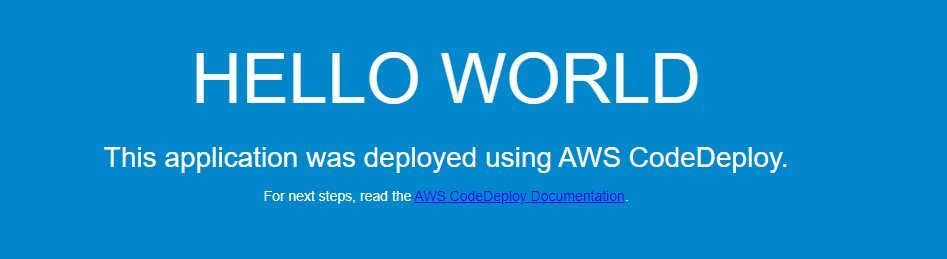
Figure 8: New Application version (Blue deployment)
On the EFS side, the application directory on the new EC2 instance now points to /efs/blue as shown in Figure 9.
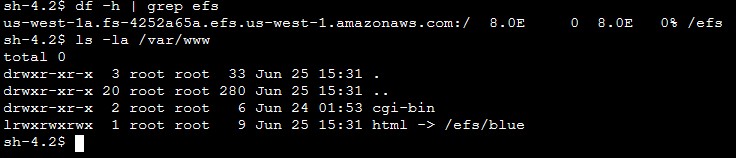
Figure 9: Sample output from the bash command (Blue deployment)
Solution review
Let’s review the pipeline stages details and what happens during the Blue/Green deployment:
1) Build stage
For this sample application, the CodeBuild project is configured to mount the EFS file system and utilize the buildspec.yml file present in the source code root directory to run the build. Following is the sample build spec utilized in this solution:
version: 0.2
phases:
  install:
    runtime-versions:
      php: latest
  build:
    commands:
      - current_deployment=$(aws ssm get-parameter --name $SSM_PARAMETER --query "Parameter.Value" --region $REGION --output text)
      - echo $current_deployment
      - echo $SSM_PARAMETER
      - echo $EFS_ID $REGION
      - if [[ "$current_deployment" == "null" ]]; then echo "this is the first GREEN deployment for this project" ; dir='/efs/green' ; fi
      - if [[ "$current_deployment" == "green" ]]; then dir='/efs/blue' ; else dir='/efs/green' ; fi
      - if [ ! -d $dir ]; then  mkdir $dir >/dev/null 2>&1 ; fi
      - echo $dir
      - rsync -ar $CODEBUILD_SRC_DIR/ $dir/
artifacts:
  files:
      - '**/*'
During the build job, the following activities occur:
- Installs latest php runtime version.
- Reads the SSM parameter value in order to know the current deployment and decide which directory to utilize. The SSM parameter value flips between green and blue for every successful deployment.
- Synchronizes the latest source code to the EFS mount point.
- Creates artifacts to be utilized in subsequent stages.
Note: Utilize the default buildspec.yml as a reference and customize it further as per your requirement. See this link for more examples.
2) Deploy Stage
The solution is utilizing CodeDeploy blue/green deployment type for EC2/On-premises. The deployment environment is configured to provision a new EC2 Auto Scaling group for every new deployment in order to deploy the new application revision. CodeDeploy creates the new Auto Scaling group by copying the current one. See this link for more details on blue/green deployment configuration with CodeDeploy. During each deployment event, CodeDeploy utilizes the appspec.yml file to run the deployment steps as per the defined life cycle hooks. Following is the sample AppSpec file utilized in this solution.
version: 0.0
os: linux
hooks:
  BeforeInstall:
    - location: scripts/install_dependencies
      timeout: 180
      runas: root
  AfterInstall:
    - location: scripts/app_deployment
      timeout: 180
      runas: root
  BeforeAllowTraffic :
     - location: scripts/check_app_status
       timeout: 180
runas: root Note: The scripts mentioned in the AppSpec file are available in the scripts directory of the CodeCommit repository. Utilize these sample scripts as a reference and modify as per your requirement.
For this sample, the following steps are conducted during a deployment:
- BeforeInstall:
- Installs required packages on the EC2 instance.
- Mounts the EFS file system.
- Creates a symbolic link to point the apache home directory /var/www/html to the appropriate EFS mount point. It also ensures that the new application version deploys to a different EFS directory without affecting the current running application.
- AfterInstall:
- Stops apache web server.
- Fetches current EFS directory name from Systems Manager.
- Runs some clean up commands.
- Restarts apache web server.
- BeforeAllowTraffic:
- Checks application status if running fine.
- Exits the deployment with error if the app returns a non 200 HTTP status code.
3) Lambda Stage
After completing the deploy stage, CodePipeline triggers a Lambda function in order to update the SSM parameter value with the updated EFS directory name. This parameter value alternates between “blue” and “green” to help CodePipeline identify the right EFS file system path during the next deployment.
CodeDeploy Blue/Green deployment
Let’s review the sequence of events flow during the CodeDeploy deployment:
- CodeDeploy creates a new Auto Scaling group by copying the original one.
- Provisions a replacement EC2 instance in the new Auto Scaling Group.
- Conducts the deployment on the new instance as per the instructions in the yml file.
- Sets up health checks and redirects traffic to the new instance.
- Terminates the original instance along with the Auto Scaling Group.
- After completing the deployment, it should appear as shown in Figure 10.
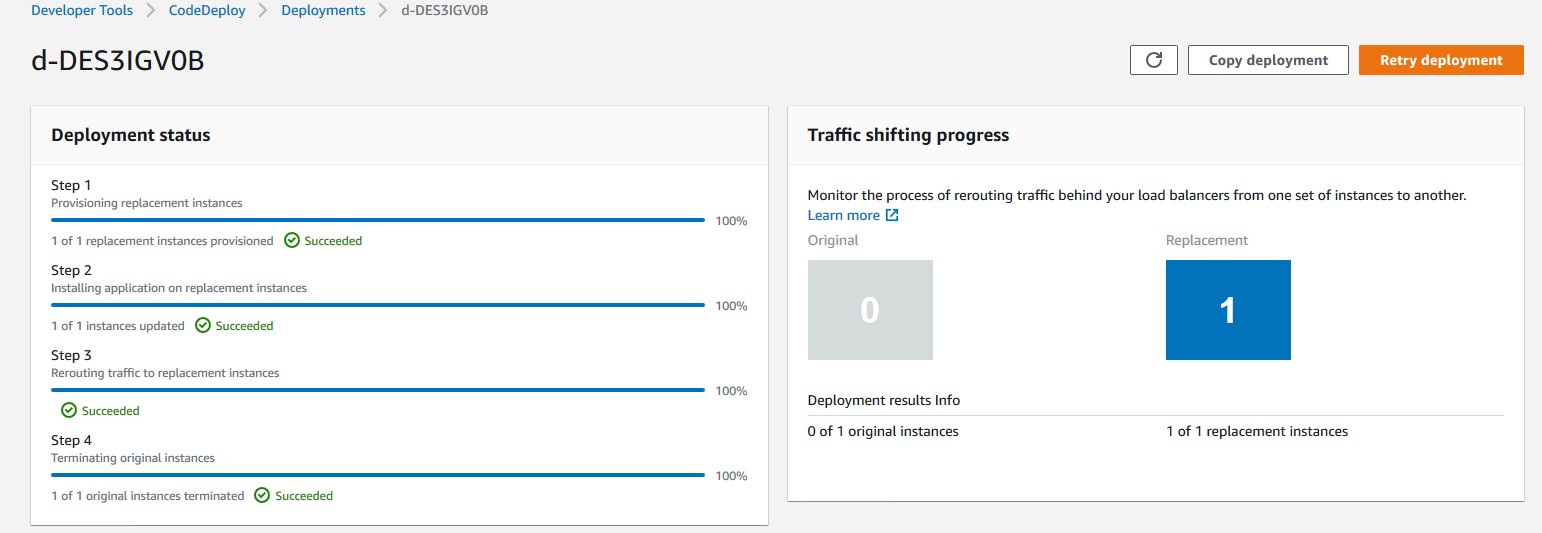
Figure 10: AWS console view of a Blue/Green CodeDeploy deployment on Ec2
Troubleshooting
To troubleshoot any service-related issues, see the following links:
- Troubleshooting AWS CloudFormation
- Troubleshooting AWS CodePipeline
- Troubleshooting AWS CodeDeploy
- Troubleshooting AWS CodeCommit
- Troubleshooting AWS CodeBuild
- Troubleshooting Amazon EFS file system
More information
Now that you have tested the solution, here are some additional points worth noting:
- The sample template and code utilized in this blog can work in any AWS region and are mainly intended for demonstration purposes. Utilize the sample as a reference and modify it further as per your requirement.
- This solution works with single account, Region, and VPC combination.
- For this sample, we have utilized AWS CodeCommit as version control, but you can also utilize any other source supported by AWS CodePipeline like Bitbucket, GitHub, or GitHub Enterprise Server
Clean up
Follow these steps to delete the components and avoid any future incurring charges:
- Open the AWS CloudFormation console.
- On the Stacks page in the CloudFormation console, select the stack that you created for this blog post. The stack must be currently running.
- In the stack details pane, choose Delete.
- Select Delete stack when prompted.
- Empty and delete the S3 bucket created during deployment step 1.
Conclusion
In this blog post, you learned how to set up a complete CI/CD pipeline for conducting a blue/green deployment on EC2 instances utilizing Amazon EFS file share as mount point to host application source code. The EFS share will be the central location hosting your application content, and it will help reduce your overall deployment time by eliminating the need for deploying a new revision on every EC2 instance local storage. It also helps to preserve any dynamically generated content when the life of an EC2 instance ends.
Author bio
 Rakesh Singh
Rakesh is a Senior Technical Account Manager at Amazon. He loves automation and enjoys working directly with customers to solve complex technical issues and provide architectural guidance. Outside of work, he enjoys playing soccer, singing karaoke, and watching thriller movies.