AWS Security Blog
How to build a CI/CD pipeline for container vulnerability scanning with Trivy and AWS Security Hub
In this post, I’ll show you how to build a continuous integration and continuous delivery (CI/CD) pipeline using AWS Developer Tools, as well as Aqua Security‘s open source container vulnerability scanner, Trivy. You’ll build two Docker images, one with vulnerabilities and one without, to learn the capabilities of Trivy and how to send all vulnerability information to AWS Security Hub.
If you’re building modern applications, you might be using containers, or have experimented with them. A container is a standard way to package your application’s code, configurations, and dependencies into a single object. In contrast to virtual machines (VMs), containers virtualize the operating system rather than the server. Thus, the images are orders of magnitude smaller, and they start up much more quickly.
Like VMs, containers need to be scanned for vulnerabilities and patched as appropriate. For VMs running on Amazon Elastic Compute Cloud (Amazon EC2), you can use Amazon Inspector, a managed vulnerability assessment service, and then patch your EC2 instances as needed. For containers, vulnerability management is a little different. Instead of patching, you destroy and redeploy the container.
Many container deployments use Docker. Docker uses Dockerfiles to define the commands you use to build the Docker image that forms the basis of your container. Instead of patching in place, you rewrite your Dockerfile to point to more up-to-date base images, dependencies, or both and to rebuild the Docker image. Trivy lets you know which dependencies in the Docker image are vulnerable, and which version of those dependencies are no longer vulnerable, allowing you to quickly understand what to patch to get back to a secure state.
Solution architecture
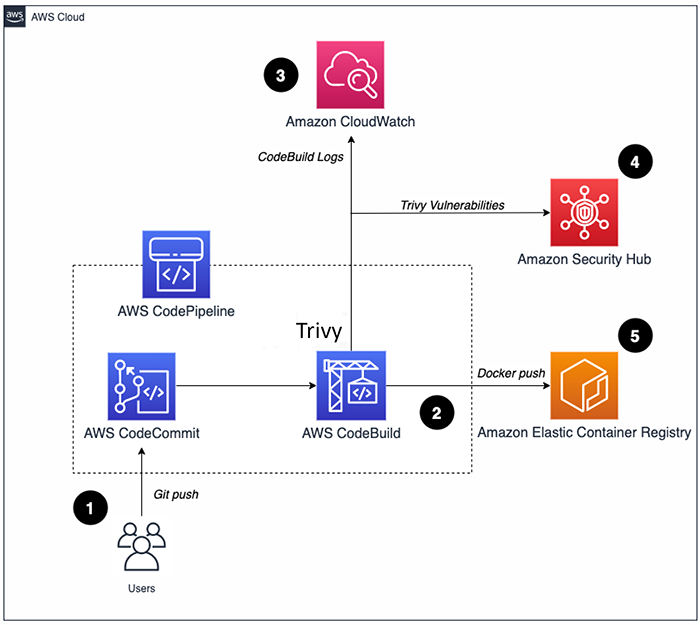
Figure 1: Solution architecture
Here’s how the solution works, as shown in Figure 1:
- Developers push Dockerfiles and other code to AWS CodeCommit.
- AWS CodePipeline automatically starts an AWS CodeBuild build that uses a build specification file to install Trivy, build a Docker image, and scan it during runtime.
- AWS CodeBuild pushes the build logs in near real-time to an Amazon CloudWatch Logs group.
- Trivy scans for all vulnerabilities and sends them to AWS Security Hub, regardless of severity.
- If no critical vulnerabilities are found, the Docker images are deemed to have passed the scan and are pushed to Amazon Elastic Container Registry (ECR), so that they can be deployed.
Note: CodePipeline supports different sources, such as Amazon Simple Storage Service (Amazon S3) or GitHub. If you’re comfortable with those services, feel free to substitute them for this walkthrough of the solution.
To quickly deploy the solution, you’ll use an AWS CloudFormation template to deploy all needed services.
Prerequisites
- You must have Security Hub enabled in the AWS Region where you deploy this solution. In the AWS Management Console, go to AWS Security Hub, and select Enable Security Hub.
- You must have Aqua Security integration enabled in Security Hub in the Region where you deploy this solution. To do so, go to the AWS Security Hub console and, on the left, select Integrations, search for Aqua Security, and then select Accept Findings.
Setting up
For this stage, you’ll deploy the CloudFormation template and do preliminary setup of the CodeCommit repository.
- Download the CloudFormation template from GitHub and create a CloudFormation stack. For more information on how to create a CloudFormation stack, see Getting Started with AWS CloudFormation.
- After the CloudFormation stack completes, go to the CloudFormation console and select the Resources tab to see the resources created, as shown in Figure 2.
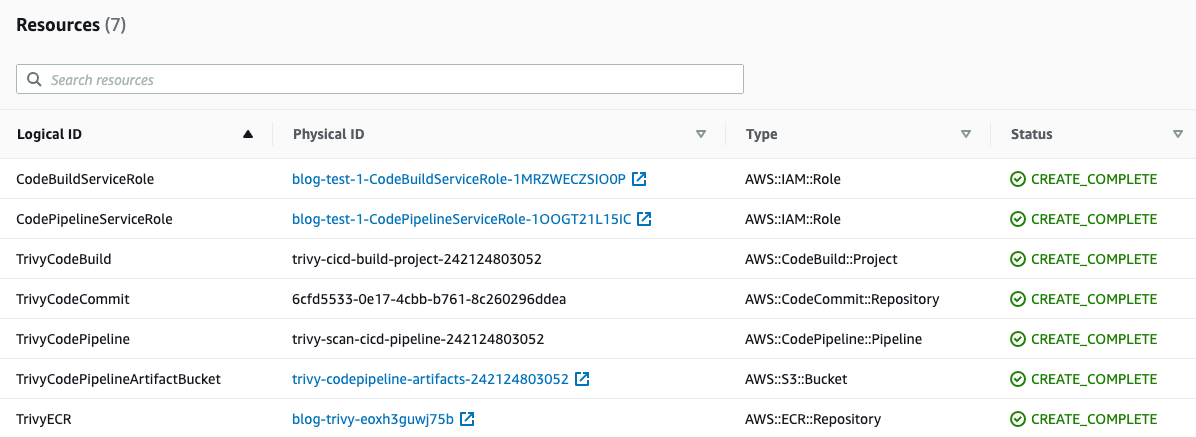
Figure 2: CloudFormation output
Setting up the CodeCommit repository
CodeCommit repositories need at least one file to initialize their master branch. Without a file, you can’t use a CodeCommit repository as a source for CodePipeline. To create a sample file, do the following.
- Go to the CodeCommit console and, on the left, select Repositories, and then select your CodeCommit repository.
- Scroll to the bottom of the page, select the Add File dropdown, and then select Create file.
- In the Create a file screen, enter readme into the text body, name the file readme.md, enter your name as Author name and your Email address, and then select Commit changes, as shown in Figure 3.

Figure 3: Creating a file in CodeCommit
Simulate a vulnerable image build
For this stage, you’ll create the necessary files and add them to your CodeCommit repository to start an automated container vulnerability scan.
-
- Download the buildspec.yml file from the GitHub repository.
Note: In the buildspec.yml code, the values prepended with $ will be populated by the CodeBuild environmental variables you created earlier. Also, the command trivy -f json -o results.json --exit-code 1 will fail your build by forcing Trivy to return an exit code 1 upon finding a critical vulnerability. You can add additional severity levels here to force Trivy to fail your builds and ensure vulnerabilities of lower severity are not published to Amazon ECR.
- Download the python code file sechub_parser.py from the GitHub repository. This script parses vulnerability details from the JSON file that Trivy generates, maps the information to the AWS Security Finding Format (ASFF), and then imports it to Security Hub.
- Next, download the Dockerfile from the GitHub repository. The code clones a GitHub repository maintained by the Trivy team that has purposely vulnerable packages that generate critical vulnerabilities.
- Go back to your CodeCommit repository, select the Add file dropdown menu, and then select Upload file.
- In the Upload file screen, select Choose file, select the build specification you just created (buildspec.yml), complete the Commit changes to master section by adding the Author name and Email address, and select Commit changes, as shown in Figure 4.
- Download the buildspec.yml file from the GitHub repository.
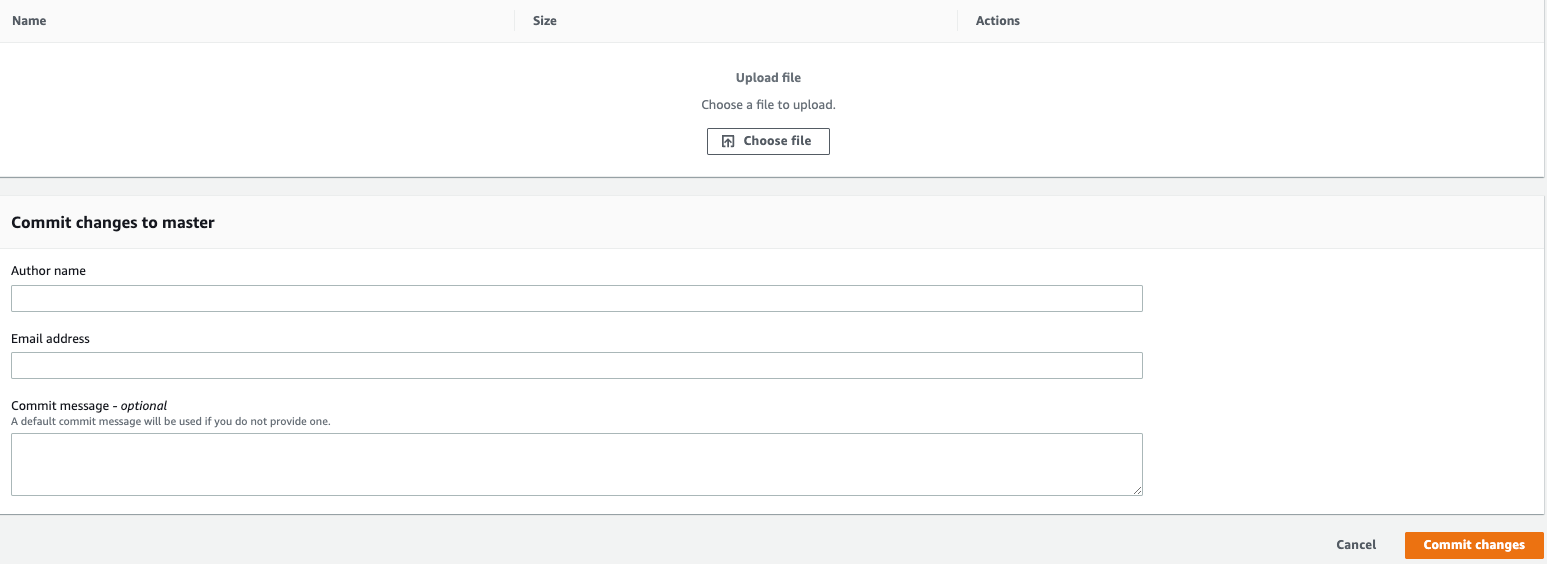
Figure 4: Uploading a file to CodeCommit
- To upload your Dockerfile and sechub_parser.py script to CodeCommit, repeat steps 4 and 5 for each of these files.
- Your pipeline will automatically start in response to every new commit to your repository. To check the status, go back to the pipeline status view of your CodePipeline pipeline.
- When CodeBuild starts, select Details in the Build stage of the CodePipeline, under BuildAction, to go to the Build section on the CodeBuild console. To see a stream of logs as your build progresses, select Tail logs, as shown in Figure 5.

Figure 5: CodeBuild Tailed Logs
- After Trivy has finished scanning your image, CodeBuild will fail due to the critical vulnerabilities found, as shown in Figure 6.
Note: The command specified in the post-build stage will run even if the CodeBuild build fails. This is by design and allows the sechub_parser.py script to run and send findings to Security Hub.

Figure 6: CodeBuild logs failure
You’ll now go to Security Hub to further analyze the findings and create saved searches for future use.
Analyze container vulnerabilities in Security Hub
For this stage, you’ll analyze your container vulnerabilities in Security Hub and use the findings view to locate information within the ASFF.
- Go to the Security Hub console and select Integrations in the left-hand navigation pane.
- Scroll down to the Aqua Security integration card and select See findings, as shown in Figure 7. This filters to only Aqua Security product findings in the Findings view.

Figure 7: Aqua Security integration card
- You should now see critical vulnerabilities from your previous scan in the Findings view, as shown in Figure 8. To see more details of a finding, select the Title of any of the vulnerabilities, and you will see the details in the right side of the Findings view.

Figure 8: Security Hub Findings pane
Note: Within the Findings view, you can apply quick filters by checking the box next to certain fields, although you won’t do that for the solution in this post.
- To open a new tab to a website about the Common Vulnerabilities and Exposures (CVE) for the finding, select the hyperlink within the Remediation section, as shown in Figure 9.

Figure 9: Remediation information
Note: The fields shown in Figure 9 are dynamically populated by Trivy in its native output, and the CVE website can differ greatly from vulnerability to vulnerability.
- To see the JSON of the full ASFF, at the top right of the Findings view, select the hyperlink for Finding ID.
- To find information mapped from Trivy, such as the CVE title and what the patched version of the vulnerable package is, scroll down to the Other section, as shown in Figure 10.

Figure 10: ASFF, other
This was a brief demonstration of exploring findings with Security Hub. You can use custom actions to define response and remediation actions, such as sending these findings to a ticketing system or aggregating them in a security information event management (SIEM) tool.
Push a non-vulnerable Dockerfile
Now that you’ve seen Trivy perform correctly with a vulnerable image, you’ll fix the vulnerabilities. For this stage, you’ll modify Dockerfile to remove any vulnerable dependencies.
- Open a text editor, paste in the code shown below, and save it as Dockerfile. You can overwrite your previous example if desired.
- Upload the new Dockerfile to CodeCommit, as shown earlier in this post.
Clean up
To avoid incurring additional charges from running these services, disable Security Hub and delete the CloudFormation stack after you’ve finished evaluating this solution. This will delete all resources created during this post. Deleting the CloudFormation stack will not remove the findings in Security Hub. If you don’t disable Security Hub, you can archive those findings and wait 90 days for them to be fully removed from your Security Hub instance.
Conclusion
In this post, you learned how to create a CI/CD Pipeline with CodeCommit, CodeBuild, and CodePipeline for building and scanning Docker images for critical vulnerabilities. You also used Security Hub to aggregate scan findings and take action on your container vulnerabilities.
You now have the skills to create similar CI/CD pipelines with AWS Developer Tools and to perform vulnerability scans as part of your container build process. Using these reports, you can efficiently identify CVEs and work with your developers to use up-to-date libraries and binaries for Docker images. To further build upon this solution, you can change the Trivy commands in your build specification to fail the builds on different severity levels of found vulnerabilities. As a final suggestion, you can use ECR as a source for a downstream CI/CD pipeline responsible for deploying your newly-scanned images to Amazon Elastic Container Service (Amazon ECS).
If you have feedback about this post, submit comments in the Comments section below. If you have questions about this post, start a new thread on the AWS Security Hub forum.
Want more AWS Security how-to content, news, and feature announcements? Follow us on Twitter.