Process and Analyse Big Data Using Hive on Amazon EMR and MicroStrategy Suite
MicroStrategy's business intelligence software and mobile app development platform are now available as a free software suite through an Amazon EC2 image on AWS Marketplace. The MicroStrategy Intelligence suite offers features for modeling, reporting and analyzing data, including in-memory cubes for high-performance analysis. By configuring the Free MicroStrategy Suite EC2 instance to connect to a Hive job flow running on Amazon Elastic MapReduce, you can create a secure and extensible platform for reporting and analytics.
Submitted By: Chris Keyser
AWS Products Used: Elastic MapReduce, AWS CloudFormation
Created On: March 29, 2013
- Using Hive With Amazon EMR and MicroStrategy Intelligence Suite
- Deployment Options Overview
- Configuring Option 1: SSH Port Forwarding
- Configuring Option 2: Amazon VPC with Security Groups
- Summary
Using Hive with Amazon EMR and MicroStrategy Intelligence Suite
Hive data warehouses are well suited for doing batch oriented, non-real time aggregation and processing of unstructured, semistructured, or structured data to derive information from very large datasets. A Hive data warehouse complements the MicroStrategy suite as a platform for creating structured data to load into MicroStrategy, where you can perform real-time analytical processing, presentation, mining, and reporting.
The MicroStrategy Business Intelligence suite provides a Hadoop Hive connector to connect to a Hive data warehouse and import the query results into a data cube. The MicroStrategy suite can be installed on premise or on servers running in AWS. For an AWS installation, you can create the MicroStrategy Business Intelligence server instance using an Amazon Machine Image (AMI) available from the AWS Marketplace.
The MicroStrategy Hive connector uses the thrift protocol to issue queries to the Hive thrift service, which is the standard approach for database connections to Hive. Amazon EMR automatically starts the thrift service when Hive option is installed on the cluster. This service runs on the master node of the Amazon EMR cluster, and the TCP port used to connect to the service is determined by the version of Hive being run (10000-10003). For more information on Hive versions and ports, see Using the Hive JDBC Driver.
Hadoop does not currently support an authentication mechanism using the thrift service. Data being processed using Amazon EMR is often sensitive information that must be secured. There are several secure methods to control access between your MicroStrategy servers running in the Amazon EMR cluster, depending upon your security requirements and your desired network topology.
Deployment Options Overview
Many network topology designs let you securely connect your MicroStrategy suite to Amazon EMR, but two in particular provide a basis for more secure deployments⦣8364;”one using SSH and the other an Amazon Virtual Private Cloud (Amazon VPC) with security groups. The example below involves a single server configuration of MicroStrategy. Typical enterprise deployments include multiple servers in the MicroStrategy suite; you can extend the scenarios to multiserver configurations.
With a Amazon VPC you can build complex network topologies with multiple layers of security defense. You can connect a VPC securely over a Virtual Private Network (VPN) connection to your corporate network. For information on extending your VPC using a VPN to your corporate network, see Adding a Hardware Virtual Private Gateway to Your VPC and Amazon Virtual Private Cloud.
Option 1: Using SSH with Port Forwarding
SSH (secure shell) lets you create an encrypted and authenticated connection between the MicroStrategy server and the Elastic Map Reduce master node. The standard Amazon EMR configuration uses SSH to connect with the master node using a public/private key pair for authentication and encryption. You can use SSH either for console access or to forward connections on ports from one instance to another. In this case, SSH forwards connections for the ports used by Hive (10000-10003) from the MicroStrategy server to the Amazon EMR master node.
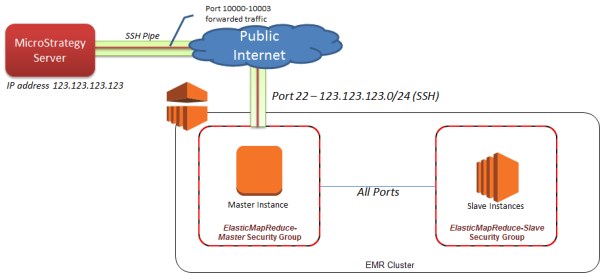
The MicroStrategy server may be located on premise or running in AWS. Restricting the IP addresses that can connect over SSH to your EC2 master node is a recommended security practice. By default the Elastic MapReduce Master Security Group allows any IP address range to connect over SSH. You should modify that rule to restrict the range, for example, to the public IP address range of your corporate network. The IP address range is specified by a CIDR (Classless Inter-Domain Routing). A CIDR address range is a combination of a base IP address and bit mask to define the range. The example above shows restricting access to the CIDR range of 123.123.123.0/24 (which specifies an IP address range of 123.123.123.1 to 123.123.123.255).
Option 2: Using Virtual Private Cloud with Security Groups
Another option is to establish secure access between a MicroStrategy Intelligence server running in AWS with an Amazon EMR cluster. In this case a VPC security feature, Security Groups, protect your servers from unauthorized access over the Hive port. A Security Group acts as a firewall within a VPC for a group of instances. Members of the same security group can belong to different subnets within the VPC, and an instance may belong to more than one security group.
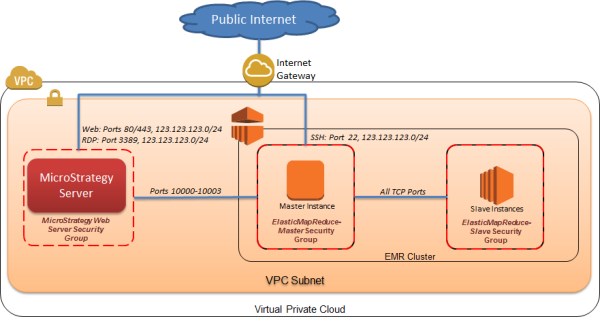
The Elastic MapReduce Master Security Group permits connections from instances belonging to the MicroStrategy Web Server Security Group access on ports 10000-10003. Instances that do not belong to this security group will not be able to connect to the master node on these ports, including other EC2 instances within the same subnet.
Operationally, a VPC configuration is less complex to manage since no special software needs to run on the MicroStrategy server as is the case with SSH port tunneling. A downside of the approach is that no authentication at the operating system or application level occurs. In addition, while the traffic between the MicroStrategy Server and the EMR master node is contained within the VPC network, it is not encrypted in transit within the subnet.
You can use network Access Control Lists (ACLs) as an additional security layer (sometimes also called NACLs). Network ACLs restrict traffic at the subnet boundary and behave as a stateless firewall. They are typically used for specialized applications, or to help segment traffic based upon subnet for multisubnet configurations rules. In this scenario we are not using network ACLs since security groups provide sufficient firewall protection. Network ACLs can be complex to manage, especially if you don't have experience with stateless firewalls. If you choose to add network ACLs, make sure that you permit traffic on both port 8443 outbound as well as the ephemeral port range (1024-65535) inbound. This connectivity is required by Amazon EMR. For more information on network ACLs, see Recommended Network ACL Rules for Your VPC and Network ACLs.
The two scenarios can be combined to use SSH within the VPC in addition to security groups. In this case, traffic does not traverse the Internet, the MicroStrategy Intelligence Servers are authenticated to the Amazon EMR master node, and data is encrypted within the VPC. The following diagram depicts this configuration.
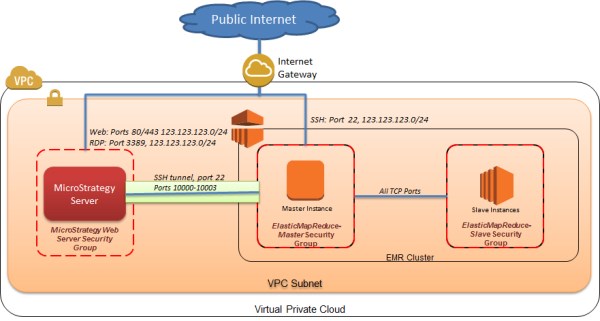
The operational environment using SSH is more complex compared to security groups since the connection must be established on every MicroStrategy Intelligence server connecting to the Amazon EMR master node.
Configuring Option 1: SSH Port Forwarding
This scenario outlines how to go through manual steps to setup the environment. The following high level steps are performed to configure the environment:
- Set up the MicroStrategy AMI from AWS Marketplace. Create an instance of the MicroStrategy server and configure MicroStrategy licensing information.
- Create Amazon EMR cluster with Hive. This step is optional; you can use an existing cluster if you have one.
- Configure SSH Port Forwarding. Install a SSH client program, puTTY, on the MicroStrategy Intelligence server and configure port forwarding for the Hive port to the Amazon EMR master node.
- Setup Connectivity from the MicroStrategy Intelligence Server to Amazon EMR.
- Execute Hive Queries and Load Cube Data from the MicroStrategy Intelligence Server.
Step 1: Set up the MicroStrategy AMI from AWS Marketplace
- Visit the AWS Marketplace
and search for
MicroStrategy. - Select the Free MicroStrategy Suite on Windows Server instance.
- Select either the 1-Click Launch or the Launch with EC2 Console choosing the appropriate Region, Firewall and Key Pair settings.
- Once the instance is up and running, you will need to retrieve the administrative password. For more information on retrieving your administrator password see Connect to Your Amazon EC2 Instance.
- Use Windows Remote Desktop Connection to connect to the MicroStrategy instance. You will be presented with instructions that lead you through the license setup process. At the end of the process, you will be presented with a Readme file.
Step 2: Create an Amazon EMR cluster with Hive (optional)
If you don't already have a Hive data warehouse running, then you will need to set one up. The article Contextual Advertising using Apache Hive and Amazon EMR leads you through creating a Hive Data Warehouse and loading test data for web logs. At the end of the article you will have a running data warehouse containing online advertisement click analysis information that can be used in subsequent steps. When you use the port forwarding approach, you will need to deploy the private key for the key pair you use when creating the Amazon EMR job flow to the MicroStrategy server. You should strongly consider creating a key pair specifically for this use. Other users may access the MicroStrategy server and potentially compromise the secret key. By creating a new key pair you limit the potential risk.
Step 3: Configuring SSH Port Forwarding
You will establish connectivity from the MicroStrategy Intelligence server to the Amazon EMR job flow's master node using SSH. SSH supports forwarding connections on a TCP port from the local instance to a connected instance (called port forwarding). By setting up a SSH port forward for the Hive port, you'll be able to make connections from the MicroStrategy Intelligence Server instance to the Hive thrift server running on the master node. For more information on ports for various hive versions, see Using the Hive JDBC Driver (you will use the MicroStrategy driver, not the Hive JDBC driver, but the port information is the same for both). To prepare for this configuration:
- Get the DNS name for the master node of the Amazon EMR cluster. You will find this entry in management console for Amazon EMR, in the description tab under Master Public DNS Name.
- Copy the private key file for the key pair (.pem or .ppk) specified when creating the Amazon EMR job flow to the MicroStrategy Intelligence server.
You will need to install puTTY on the MicroStrategy Intelligence server. For detailed instructions on installing puTTY and creating a .ppk key file see Connect to Your Amazon EC2 Instance from Windows Using PuTTY .
After you have installed puTTY, follow these steps to set up port forwarding for the Hive port.
- Start PuTTY.
- Specify master node DNS name as the Host Name.
- Make sure the SSH port is set to 22.
- Under Category, expand Connection, then SSH, and select Tunnels to open the Options controlling SSH port forwarding page.
- Specify 10003 as the Source port. (This assumes you used the default version of Hive, 0.8.1, on the Amazon EMR cluster. Otherwise specify the correct port for your version.)
- Specify localhost:10003 as the Destination port
- In the section with radio buttons, select Local and Auto.
- Click the Add button. This should create an entry L10003 localhost:10003.
- Now navigate to Connection >> SSH >> Auth to set up the private key settings.
- Click Browse under Private key for authentication and choose the location where you saved the .ppk key file.
- Navigate to Connection
>> Data and type
hadoopas the Auto-login username. - In the Category pane, click Session to go back to the main page.
- In Saved Sessions, specify a name for this setting and click Save. Next time you can select this setting and click Load.
- Click Open to create the SSH tunnel.
If you are configuring a version of the MicroStrategy Intelligence Server that you have installed on Linux rather than using the Amazon Marketplace AMI to create the instance as described above, then configuring port forwarding is straightforward:
- Save the .pem file to a location on your UNIX system, for example: $HOME/mykey.pem.
- Run the command:
chmod og-rwx $HOME/mykey.pem
- Then run the command:
ssh -o ServerAliveInterval=10 -L 10003:localhost:10003 hadoop@DNSNameofMasterNode -i $HOME/ mykey.pem
Step 4: Setup Connectivity from the MicroStrategy Intelligence Server to Amazon EMR
- Open a web browser on the MicroStrategy
Intelligence
Server instance and browse to
https://localhost/MicroStrategy/asp/Main.aspx. - You'll be prompted to enter a username and password.
Enter
administratorin the user name field and leave the password field blank. You should add an administrative password after signing into the system. - You'll be presented with two projects, MicroStrategy Tutorial and My First Project. A project in MicroStrategy is a workspace for you to design your reports, dashboards, and more.
- Select My First Project. Scroll to the bottom of the screen and select Import Data.
- You'll be presented with the File and Freeform
options.
- File is used for importing Excel or .csv files on your local system or the network.
- Freeform is used for querying databases, web services or hadoop/hive.
- Select Freeform.
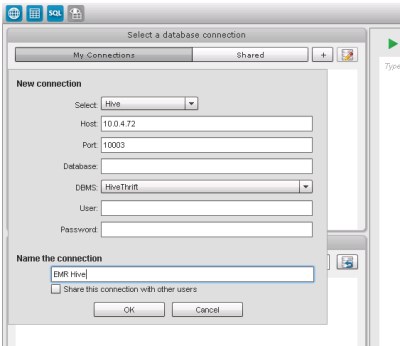
- Click the + (plus) sign to define a database connection. A database connection lets MicroStrategy query data from the source system through the corresponding query language. In this case, we'll be defining a database connection to Hive running on the Amazon EMR cluster.
- Fill out the dialog with the values shown below.
These settings assume the SSH tunnel to the Hive job flow
is via port 10003 on localhost.
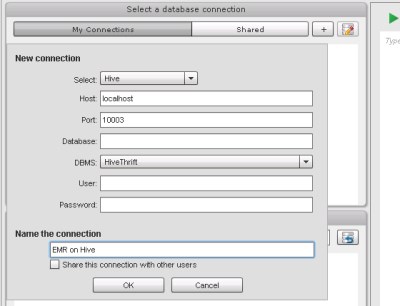
- Click OK. The data import interface will then display a list of tables from your Hive metastore. If you used the contextual advertising example, you should see feature_index and joined_impressions listed.
Step 5: Execute Hive Queries and Load Cube Data from the MicroStrategy Intelligence Server
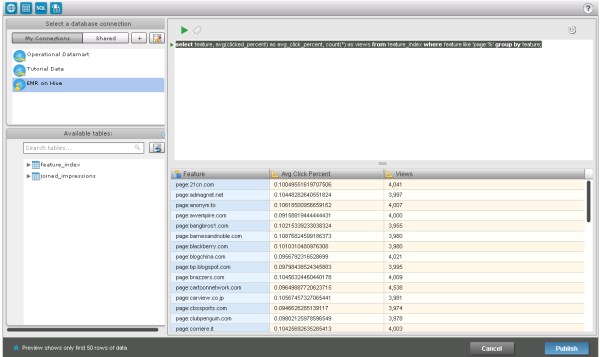
- You can start querying the data in those tables by
supplying the HiveQL scripts in the query pane in the top right-hand
corner. For example, if you have loaded the data from the contextual
advertising sample and want to get the average click percent by page
and number of views, you could execute this:
select feature, avg(clicked_percent) as avg_click_percent,
count(*) as views from feature_index select feature,
avg(clicked_percent) as avg_click_percent,
count(*) as views from feature_index where feature like 'page:%' group by feature - Clicking the play button will execute the query against the Hadoop cluster and let you preview the results. Execution times depend upon the size of your Amazon EMR cluster, but it will take at a minimum one minute to execute the query.
- You can categorize the results, with columns displaying attributes (dimensions) or metrics (measures/KPIs). Click the column header to make the switch.
- You can also choose to not import a particular column by clicking Do not import.
- Once you are satisfied with the results, click Publish. You'll be
asked you save the results, which in turn will
be added to a MicroStrategy in-memory cube.
- You can then create Reports, Documents or Analysis from this published result set.
- Click Create Analysis. Analysis allows visual data discovery of the underlying dataset that has been published in the in-memory cube. Consult the MicroStrategy documentation that comes with the EC2 instance for more details.
Configuring Option 2: VPC with Security Groups
Amazon Virtual Private Cloud constructs a virtual network with fine grained security and networking control in the cloud. This approach provides defense in depth. Operation of the MicroStrategy Intelligence Server and the Amazon EMR cluster once configured will be the same as defined in option 1 (steps 4 and 5). When using this approach if new nodes are added to your MicroStrategy Intelligence Server, no further security configuration will be required as long as those instances are deployed to the same subnet within the VPC and associated with the same security group as the other nodes.
PowerShell Scripts and Cloud Formation Templates
Often customers with cloud-based solutions will automate deployments of infrastructure and services using a variety of approaches, including the AWS CloudFormation service and scripting. PowerShell scripts and cloud formation template definitions are provided with this article to automate the setup of the VPC scenario. For more information on downloading the tools and configuring PowerShell for AWS see AWS Tools for Windows PowerShell. See the AWS CloudFormation site for information on that service. In order to run the script associated with the example of this approach, you will need to have PowerShell for AWS installed. Detailed setup instructions for configuring PowerShell and your account information are in the PowerShell Users Guide.
Creating the Environment using the PowerShell Script
Using a VPC is like configuring your own private network. You can create subnets, route tables, and assign your own private IP address ranges. Creating a VPC manually requires multiple steps, but you can save on manual configuration by using the PowerShell script and AWS CloudFormation template included with this tutorial. You will run the PowerShell script in order to create the environment. The PowerShell script performs several tasks:
- Executes the AWS CloudFormation template to create most of the VPC environment described below.
- Creates an Amazon EMR cluster (which cannot be done with AWS CloudFormation).
- Creates the security rules that permit access between the Amazon EMR master node and the MicroStrategy Intelligence Server.
Before you run the script, you will need to collect the following information to input:
- The name of a S3 bucket where log files from the Amazon EMR logs will be stored. For more information, see Create a Bucket.
- The name of a key pair to use to retrieve the password for the MicroStrategy Intelligence server instance. For more information on creating a key pair, see Create a Key Pair. Note that when you run the script, the key name that you enter is case sensitive.
- The name of a key pair to use to access the Amazon EMR master node. This can be the same key pair as above.
- The CIDR range to use for RDP (Remote Desktop Protocol) access. Specifying a CIDR range limits the range if IP addresses that can access machines using RDP. The script will suggest a CIDR to you as an example based upon what it detects as your public IP address. Specifying 0.0.0.0/0 allows anyone to access the MicroStrategy server over RDP. They will still need the password information to actually log in into the instances. For production use, consider restricting the IP address range that can access your instance.
By default an Amazon EMR cluster with a large instance (m1.large) for the master node will be launched, with a single large MicroStrategy Intelligence server. If you open the script, you will see some additional variables at the top of the script that you can modify, although this not necessary:
- The type of instance for the MicroStrategy Intelligence Server.
- The types and number of instances for the Amazon EMR cluster. Increasing the number of instances to more than one creates slave nodes.
In order to run the script, open Windows
PowerShell for AWS from the Start menu and
change your
directory location to that of the script and templates you
downloaded. (This menu entry is only available after you have installed
the PowerShell for AWS tools as described above.) Enter ./CreateMicrostrategyInVPC.ps1
to run the script. You will be prompted for the information you
previously collected, and once the script is finished, your environment
will be configured.
At this point, you can proceed to steps 4 and 5 in Option 1 above. For step 4, you will need to use the private IP address of the Amazon EMR master node when creating the hive connection to the EMR master node rather than localhost. You can find the private IP address in the EC2 management console by selecting the master node instance (this will be the only instance that belongs to the Elastic MapReduce Master Security Group). The following example for the Hive connection has a master node assigned a private IP address of 10.0.4.72:
The script creates the Amazon EMR cluster for you but does not provision data. To load sample data, follow the steps outlined in Contextual Advertising using Apache Hive and Amazon EMR starting at the section Declaring External Tables in the Interactive Job Flow.
Description of the VPC Environment
The following diagram shows the network environment which looks similar in structure to what you might deploy in your own data center. The script and Cloud Formation template automatically configure all of the components represented in this diagram.
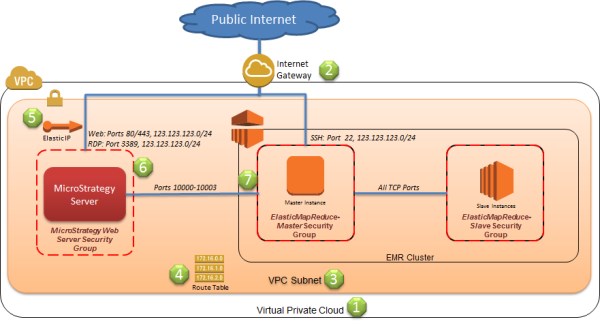
The following list refers to the numbered items in the diagram, and describes in detail the configured components.
- The Amazon Virtual Private Cloud is a container for components your private network, and defines the private IP address range used within your network. In the case of the script, the CIDR for address range used is 10.0.0.0/16.
- The Internet Gateway (IGW) shown in this configuration
provides a connection to the public Internet from your VPC. If an IGW
is not defined, then you will not be able to reach instances from the
Internet (including with Remote Desktop or SSH), and the instances
running within subnet will not be able to connect out to the Internet.
Amazon EMR uses public IP addresses for control communications with the
master and slave nodes. The subnet containing the Amazon EMR cluster
must be able to access the Internet. Amazon EMR uses several security
techniques to ensure that only the master and slave nodes in the
cluster are able to communicate with each other, and only over
encrypted connections.
Note: A Virtual Private Gateway (VPG) can connect your VPC through VPN to your corporate network. Typically you configure a VPG to connect to your instances directly from your corporate network if you don't configure an IGW. The Amazon EMR public Internet access can also be achieved by routing public IP traffic back through your own corporate network over the VPG if an IGW is not used. - The subnet is analogous to a subnet in a typical
corporate
network. The VPC created by the example script contains one subnet, but
you may create as many subnets as you like within your VPC as long as
there are IP address ranges remaining.
- You define address ranges for each subnet using a CIDR as well, which cannot overlap with other subnets within the VPC. The created subnet uses 10.0.0.0/20, which means private IP addresses assigned to instances within the subnet must fall between 10.0.0.0 and 10.0.15.255. Since there are address ranges left in the VPC (for example, the range defined by the CIDR 10.0.16.0/20 is available), you can define additional ones.
- You can associate a subnet with Network ACLs, which in this example are not necessary.
- Each subnet is associated with a route table. This route table defines what traffic flows between the subnet and the Internet, or a virtual private gateway (attached to your corporate network). The route table for this configuration routes all traffic in the 10.0.0.0/16 range within the VPC, and all other traffic (0.0.0.0/0) to the public Internet through the Internet gateway. You can have multiple route tables in a virtual private cloud. Therefore, if you had a subnet that you did not want to have Internet access, you would attach a route table that did not contain a route to the Internet gateway. You cannot define routes between subnets, although there can be entries for routing traffic from a subnet to certain types of instances, like a NAT, that act as an intermediary for network traffic. The slave and master internodes communications occur over the private IP address space.
- By default instances you create in a subnet will not have a public IP address. This means that instances will not be able to communicate to the Internet (without taking additional measures, like adding a NAT instance), and they will not be reachable from the Internet, even if a route is defined in the route table for the Internet gateway. The master node in the Amazon EMR cluster is automatically assigned a public IP address by the Amazon EMR provisioning infrastructure. However, the MicroStrategy Intelligence Server is not assigned a public IP address automatically. An Elastic IP address (EIP) provides a mechanism to attach a public IP address to an instance. The template assigns the MicroStrategy server an EIP, so you can reach it through a Remote Desktop client, as well as access web site. The EIP combined with the route table settings and network ACLs settings provide the means to reach the server from the Internet.
- The MicroStrategy EC2 instance and an associated
security
group are also created. The Windows Server operating system is running
a firewall as an additional layer after the security group, but that
will not require any modifications.
- The instance is created from an Amazon Machine Image. This automates the creation of the server instance that was defined in the SSH option, Step 1: Set up the MicroStrategy AMI from AWS Marketplace, previously. MicroStrategy Intelligence Server is preinstalled, but you will still need to run through the licensing steps to configure the instance. You will notice under the EC2 console that the MicroStrategy server in this case has a public IP address rather than a DNS entry. This is the EIP address that is assigned.
- A security group is created for the MicroStrategy Intelligence server instance within the VPC, which you can see from the AWS management console when you select the VPC service. The security group should be obvious as it will include MicroStrategy in the group name. This group is similar to an OS firewall conceptually, although the security group can be assigned to multiple instances, and an instance can belong to multiple security groups. Security groups make it easier as a result to manage settings that apply to multiple server instances in one place, and these instances can reside in different subnets as well. The security group for the MicroStrategy server only permits ingress traffic for remote desktop (RDP port 3389) and http (port 80) over the IP address range you specify with the CIDR in the script.
- The Amazon EMR provisioning logic creates security groups automatically when the cluster is provisioned to the subnet in the VPC for slave and master nodes. The Amazon EMR cluster is created by the PowerShell script after the AWS CloudFormation template creates the VPC components and the MicroStrategy Intelligence server. The script adds a rule into the Elastic MapReduce Master Security Group after the cluster is provisioned that permits any instance that is a member of the MicroStrategy Web Server Security Group access over ports 10000-10003. This rule makes management easier than the case of SSH, since once configured, no further action is necessary. Subsequent MicroStrategy server instances created for are added to this group. Typically in production you will also update the rule created in the Elastic MapReduce Master Security Group by the provisioning infrastructure for port 22 (SSH) to restrict the IP range to your corporate network.
A VPC is a powerful means to add defense in depth to systems deployed within the cloud. With more sophisticated configurations using a Virtual Private Gateway you can remove access from the Internet for the MicroStrategy Intelligence servers completely, and only permit access from your corporate network to those servers. When using Amazon EMR, you will always need to ensure that the subnet containing the EMR cluster has access to the Internet.
Summary
This article outlined a couple of approaches to using a MicroStrategy Intelligence Server with Amazon Elastic MapReduce-based Hive data. By using a combination of subnets, network ACLs, and security groups you can create multiple isolation layers that can help ensure only the components that require Internet access are exposed. These configurations also let you connect an on-premise MicroStrategy installation to an Amazon EMR Hive data warehouse. By combining the analysis and mining capabilities of the MicroStrategy Intelligence server with the big data processing power of an Amazon EMR Hive data warehouse, you can create a powerful and scalable platform for processing and analyzing big data.