AWS Partner Network (APN) Blog
Malware protection for Amazon Elastic File System with Cloud Storage Security
By Aaron Gettings, Director of Engineering at Cloud Storage Security
by Ashok Mahajan, Sr. Partner Solutions Architect, Startups at AWS
by Neil Salamack, Senior Product Marketing Manager at AWS
Managing file storage data security is an inherently complex task. Uncoordinated file storage in the cloud often leads to disparate environments with fragmented data. The result can expose security vulnerabilities which bad actors can discover and exploit, causing data breaches and financial loss.
Throughout the data storage landscape, file data faces persistent threats from malware, ransomware, and integrity exploits. For those already running Amazon Elastic File System (Amazon EFS) in production, you’re familiar with its benefit simplifying cloud storage operations. Amazon EFS is a serverless service that handles the complexity of storing and sharing file data without requiring you to provision or manage storage capacity. Customers choose Amazon EFS for diverse workloads including application hosting, machine learning training and inference, media processing, content management, financial analytics, and high-performance computing – all while paying only for the storage they use. As a fully managed service, Amazon EFS is inherently secure. But as malicious tactics evolve, organizations can increase protection with a proactive approach.
This blog will share how to augment Amazon EFS security by integrating an active monitoring solution by AWS Security Competency partner Cloud Storage Security (CSS).
Overview
CSS provides an anti-malware solution that integrates with AWS storage so that enterprises can scan file systems to make sure they are free of malware. Using CSS in conjunction with Amazon EFS allows organizations to pair advanced threat detection with flexible file storage, harmonizing convenience with security.
The self-hosted malware protection of CSS is designed to be deployed and maintained within your AWS environment. It integrates seamlessly with AWS services, ensuring data integrity because data never leaves your environment. Its scanning capabilities keep your data completely isolated within your AWS account.
How it works
CSS uses an architecture employing core AWS services to facilitate scanning and reporting. The CSS solution discovers EFS file systems, allowing you to quickly identify which ones to protect. You can configure CSS for various malware scenarios, such as on-demand or scheduled scanning, to best align with your organizational needs.
Before you start scanning, you need to decide which, and how many, malware engines to use. Generally, when used in parallel, a higher number of malware scanning engines results in a lower number of false positive and false negative results. CSS provides the following engines for use by customers: Sophos, CSS Premium and CSS Secure.
When the file systems are selected, CSS creates an access point for the agents to mount the EFS file system to AWS Fargate. The first agent scans the file system, identifying each file to scan, and sends those files to Amazon Simple Queue Service (SQS) to queue for the second agent. The second agent receives the Amazon SQS messages and starts scanning each identified file. CSS scans files by mounting the EFS file system and scanning the files in place. As each file is scanned, the scanning agent processes the results and performs the requested action for infected files, such as tag, quarantine, or delete. After the scan, the second agent sends the results to Amazon CloudWatch and Amazon DynamoDB, as shown in Figure 1.
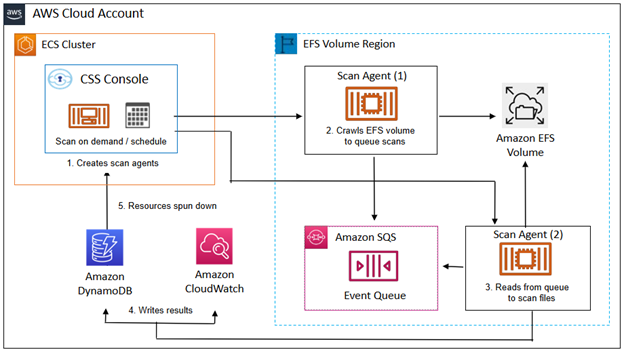
Figure 1: Architecture overview of CSS malware protection for Amazon EFS
Creating a test environment
To see how the CSS solution identifies and reports on malicious files, first set up a test environment following these 3 steps:
1. Set up an Amazon EC2 instance: Launch an EC2 instance and configure it to mount your EFS file system. Use Amazon EFS with EC2 Linux instances to create this test environment.
2. Copy EICAR test file: When you’ve mounted the EFS file system to an EC2 instance, use Secure Copy Protocol (SCP) to transfer the malware test file (EICAR Anti-Virus test file) to the Amazon EFS mount point. You can follow the steps listed in Transfer files to a Linux instance using SCP. Make sure that the test file isn’t copied to the home directory of the EC2 instance.
3. Verify the transfer: Run the `df -T` command to confirm that the test file resides at the correct mount point in your Amazon EFS directory.
This environment allows you to simulate real-world conditions and validate the efficacy of the CSS malware protection solution.
Implementing CSS malware protection
To implement CSS malware protection follow these 4 steps:
1) Subscribe to AWS Marketplace
Search for the CSS Malware Protection for Amazon Elastic File System PAYG 30 Day Free Trial.
1a. Choose View purchase options and Accept Terms.
1b. When you see an Effective Date, choose Continue to Configuration.
1c. For Fulfillment Option, choose Console Deployment and Permission Setup.
1d. For Software Version, choose the latest date available.
1e. Choose Continue to Launch.
1f. Under Deployment template, choose Launch Malware Protection for EFS Deployment. This takes you to the CloudFormation console. If you prefer to deploy through Terraform, follow these steps.
2) Deploy CloudFormation template
A pre-configured CloudFormation template streamlines setup by automating resource creation. The only necessary fields are stack name, VPC ID, subnet A, subnet B, an email address (used for Cognito service), and a console security group CIDR block.
2a. After you enter these values, choose the box next to I acknowledge that AWS CloudFormation might create IAM resources with custom names and choose Create Stack.
2b. When the stack has successfully deployed, you should receive an email with a link to the admin console and a temporary password. Follow the link, log in, and change your temporary password.
2c. After changing your password, log in. Complete the Stay Connected form, which allows CSS to send you important updates. Reference “Steps to deploy” in CSS Help Docs for more guidance.
3) Configure protection
When it’s deployed, CSS automatically discovers EFS file systems associated with the AWS account that you used for deployment.
To configure malware scanning:
3a. Navigate to Protection -> AWS -> EFS File systems.
3b. Choose the check box next to the file systems you want to protect and choose Actions.
3c. To set specific days and times for malware scanning, choose Create AV Schedule.
3d. To start an on-demand malware scan, choose Scan Existing – AV, as shown in Figure 2.
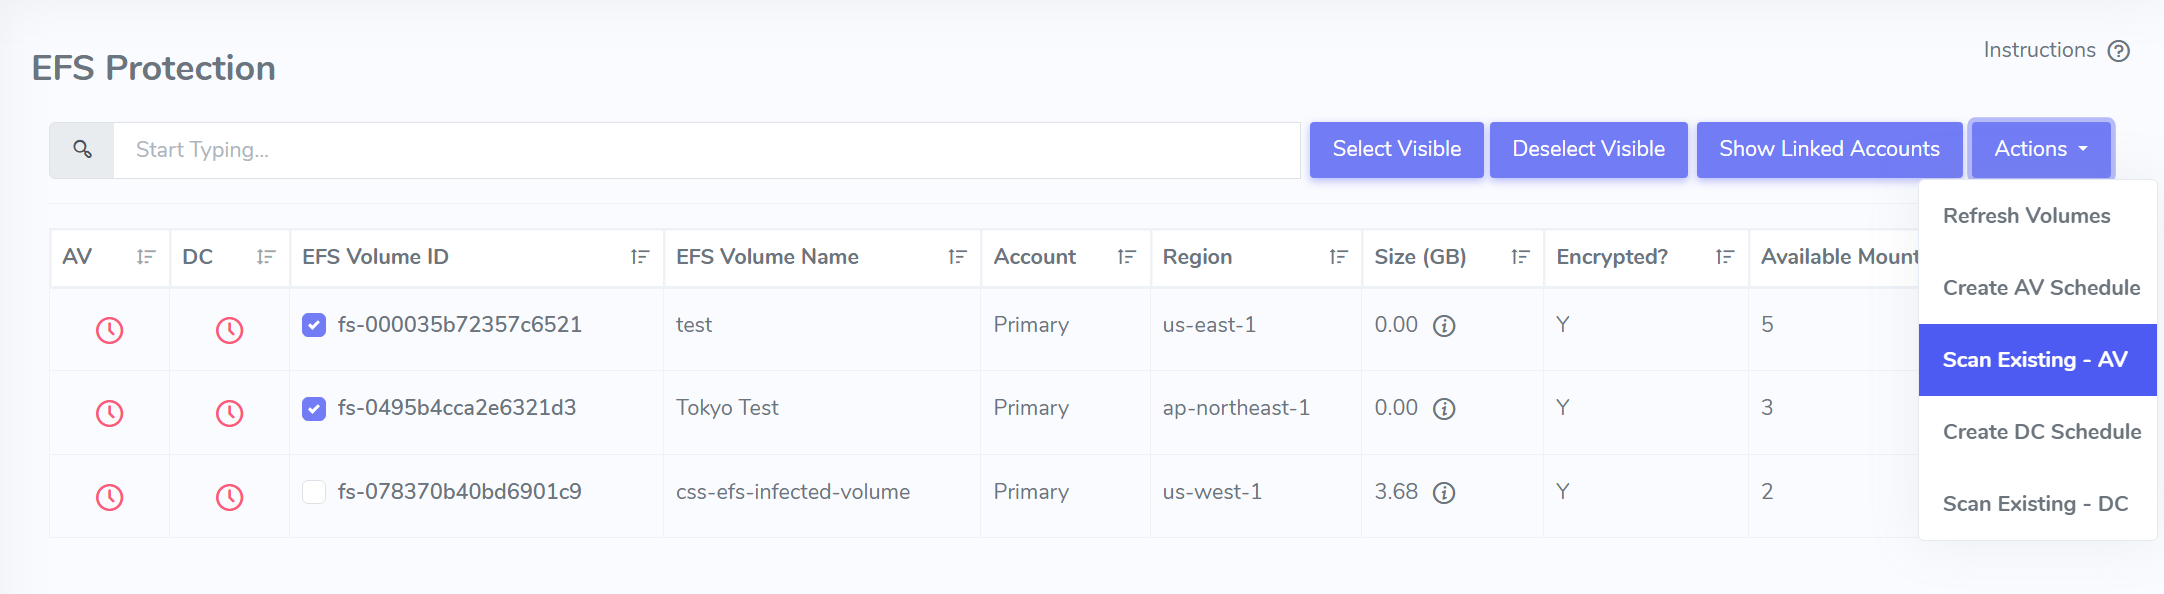
Figure 2: EFS Protection menu in admin console
The following steps walk through the on-demand function Scan Existing – AV. Job Networking under Configuration in the main menu allows you to choose the VPCs and Subnets for scanning agents. To scan EFS file systems, the scanning agent must be placed in the same Availability Zone (AZ) and subnet as the Amazon EFS mount targets. Choose the appropriate subnets and choose Save.
Under the Scan Existing Files menu, you can confirm the Amazon EFS file system IDs, data range, and prefixes or paths that you may want to include for scanning. Choose the open box next to I understand that scanning existing files will result in a charge and choose Scan Selected.
When the scan job starts, check the status under Monitoring -> Jobs. You should see two jobs: one job with a status that says Finding Files, and another job with a status of Scanning Files. When the job of scanning completes, the status changes to Completed.
4) Get results
The CSS configurable dashboards make it straightforward to view patterns, detailed file status, and compliance metrics. You can get scan results by navigating to Findings in the main menu (Figure 3). Scans that result in Suspicious, Infected, Error, or Unscannable are posted here by default. Real-time malware detection powered by Cloud Storage Security’s scanning engines provides prompt threat mitigation, with an automated approach that removes files before they can be accessed.

Figure 3: Findings menu in admin console
You can also review the scan results in CloudWatch under the Log groups of CloudStorageSecurity.Agent.ScanResults. Look for the Log stream of *infected* to confirm an event has been published. CSS also integrates with the Security Information and Event Management (SIEM) tools you’re already using.
To configure scheduled scanning, follow the steps listed in the Schedules section of the CSS Help Docs. The process is like on-demand scanning, except you choose a scan period, frequency, and files (as opposed to new files since the last scan).
Clean up
To avoid charges from resources used when following this blog, follow these steps.
1. Navigate to Monitoring > Deployment in the Cloud Storage Security console. Click the three dots next to each deployment and click “Delete Application“.
2. Navigate to the CloudFormation console. Click Stacks, locate the stack generated by Cloud Storage Security upon deployment.
3. At the top of the new window, click Delete. A warning window will pop-up. Click Delete.
Conclusion
In this post, I shared how to proactively secure your Amazon EFS file systems by integrating malware protection provided by AWS Security Competency partner Cloud Storage Security (CSS). We covered how to subscribe, deploy, and test malware scanning with EFS. The addition of CSS malware protection protects Amazon EFS by embedding critical security capabilities including scanning for ransomware, viruses, and other advanced threats. The CSS solution provides another level of assurance that data stored in Amazon EFS is safe for accessing, processing, and sharing to compute resources both inside and outside of AWS.