AWS Big Data Blog
Use Grok patterns in AWS Glue to process streaming data into Amazon Elasticsearch Service
September 8, 2021: Amazon Elasticsearch Service has been renamed to Amazon OpenSearch Service. See details.
Recently, we launched AWS Glue custom connectors for Amazon OpenSearch Service, which provides the capability to ingest data into Amazon OpenSearch Service with just a few clicks. You can now use Amazon OpenSearch Service as a data store for your extract, transform, and load (ETL) jobs using AWS Glue and AWS Glue Studio. This integration helps you make the data in your data lake searchable using Amazon OpenSearch Service in minutes.
AWS Glue custom connectors integrate with AWS Secrets Manager, which allows you to simplify the distribution of security credentials. Additionally, AWS Glue custom connectors support AWS Glue features such as bookmarking for processing incremental data, data source authorization, source data filtering, and query response pagination.
With AWS Glue ETL streaming jobs and its support for Grok patterns, you don’t need to add custom logic just to parse the source data. You can focus on building your ETL logics. You can easily develop your streaming jobs on the AWS Glue Studio console without having deep knowledge of Apache Spark—you can simply run the jobs on a highly scalable distributed engine powered by Apache Spark. You can also customize your ETL logics using custom transformation with the AWS Glue ETL library, DynamicFrame, Spark DataFrame, and Spark SQL.
In this post, we cover the end-to-end process of building a log analytics pipeline using Grok patterns and various AWS services. The process includes the following high-level steps:
- Network preparation and planning.
- Export Apache web server logs into a Kinesis data stream. We use Apache for this post, but you can use any other software that generates log files. If you use other log formats, you need to change the Grok pattern accordingly.
- Create an AWS Glue table based on a Kinesis data stream.
- Export structured data from AWS Glue to Amazon OpenSearch Service using an AWS Glue ETL job and AWS Glue Connector for Elasticsearch from the AWS Glue Studio.
- Analyze the data inside Amazon OpenSearch Service with Kibana.
Network preparation and planning
For this post, we assume that you already created a VPC for running your web servers and deployed your web application to these servers. The next step is to create an Amazon OpenSearch Service domain in the same VPC where your Amazon Elastic Compute Cloud (Amazon EC2) instances are running. The following diagram illustrates this architecture.
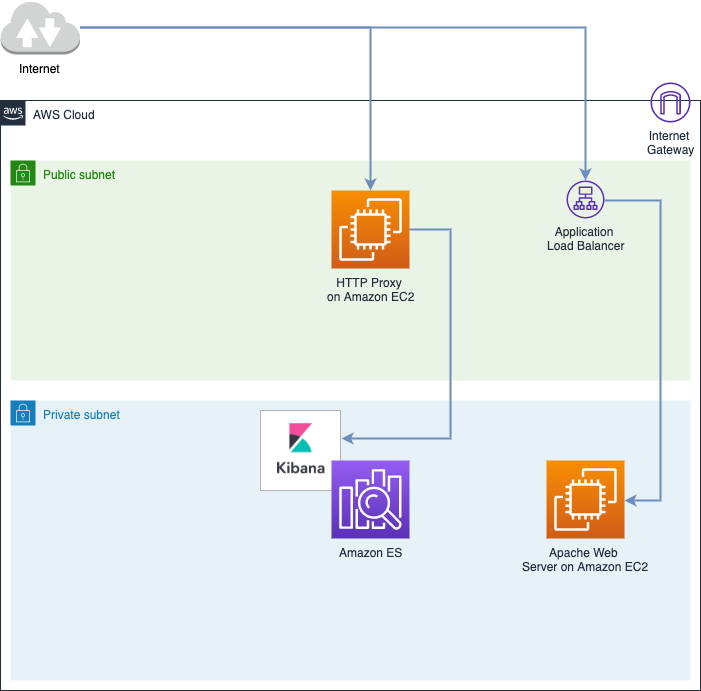
To follow the best security practices and minimize traffic going through the public internet, we try to keep traffic within Amazon Virtual Private Cloud (Amazon VPC) whenever possible. We can accomplish this by using VPC endpoints. VPC endpoints enable private connectivity to a VPC and supported AWS services without requiring an internet gateway, NAT device, VPN connection, or AWS Direct Connect connection. It allows you to connect resources in a service with a VPC over private IP addresses. Traffic between your VPC and the other service doesn’t leave the Amazon network.
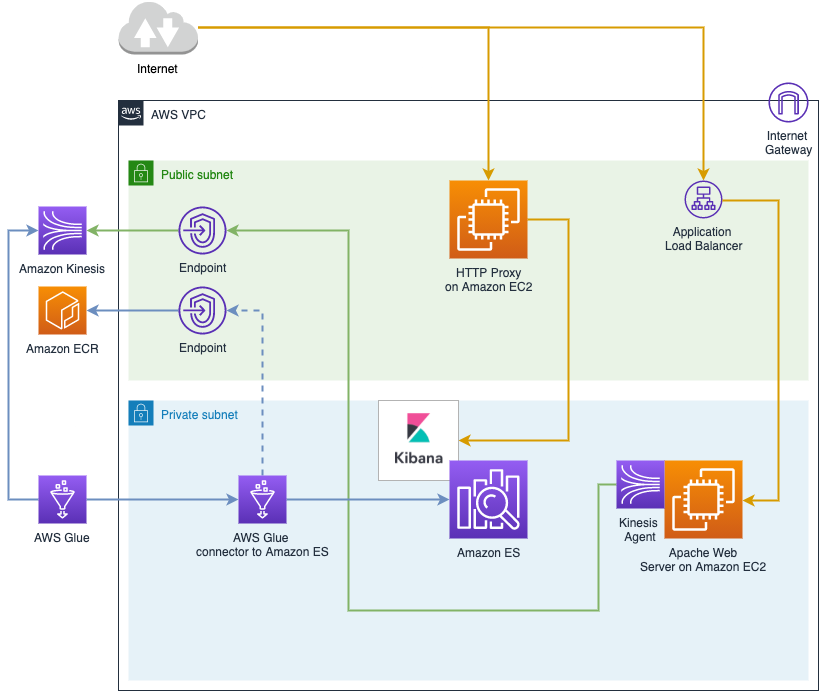
We need to set up the following endpoints:
- Kinesis Data Streams interface VPC endpoint – Used to feed data into the Kinesis data streams and read it from there by AWS Glue.
- Amazon ECR interface VPC endpoint – Used to download the Amazon OpenSearch Service connector image by AWS Glue.
- DKR endpoint – Used for the Docker Registry APIs. Docker client commands such as push and pull use this endpoint.
- API endpoint – Used for calls to the Amazon Elastic Container Registry (Amazon ECR) API. API actions such as
DescribeImagesandCreateRepositoriesgo to this endpoint.
Apart from the service endpoints, we need to set up proper security groups for all the network interfaces and services we use inside and outside of the VPC:
- A security group for the preceding service endpoints. The security group attached to the VPC endpoint must allow incoming connections on port 443 from the private subnet of the VPC.
- A security group for the AWS Glue connector (the same as Amazon OpenSearch Service).
- A security group for Amazon OpenSearch Service. This self-referencing security group uses itself as inbound and outbound rules. Any EC2 instances with the same security group can talk to each other.

When all these are ready, we can proceed to creating the Kinesis data stream, setting up the Amazon OpenSearch Service connector, and creating the AWS Glue table and AWS Glue job that connects all the pieces. The following diagram shows our target infrastructure.
Export Apache web server logs into a Kinesis data stream
For this post, we use Apache web server logs because this server is still responsible for handling about one third of the internet traffic. However, you could use another web server like Nginx or Microsoft IIS. Apache log records look like the following code:
This format is a text file in which each record is space-delimited, not the standard structured format like JSON. If we use CSV format to recognize this data, the whole line is treated as one cell. To process this kind of non-structured data, you need to define the pattern of the data. In our example, we use a Grok pattern to do so.
Creating a Kinesis data stream is a pretty straightforward task; you can use the AWS Management Console, Kinesis Data Streams API, or the AWS Command Line Interface (AWS CLI). For this post, we use the console.
- On the Kinesis Data Streams console, choose your Region.
- Choose Create data stream.
- Enter a name for your stream and the number of shards you need.
- Choose Create Kinesis stream.
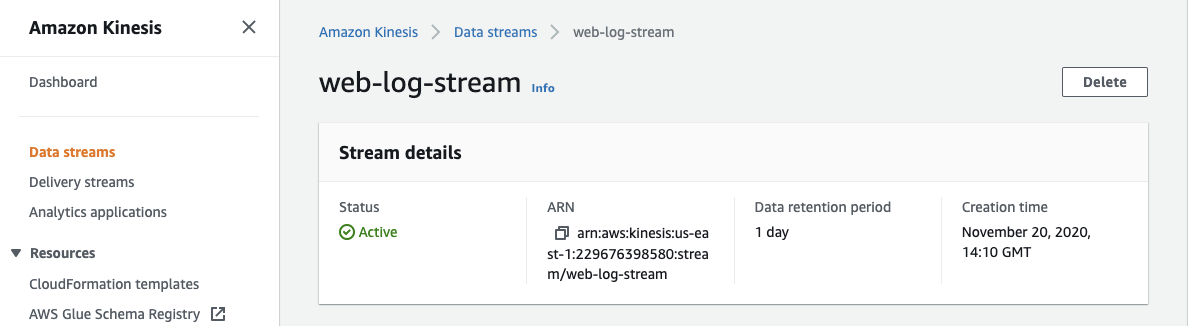
On the Data streams page, you can see the stream’s status as Creating. When the stream is ready to use, the status changes to Active. Choose your stream to see the stream details, which includes a summary of your stream configuration and monitoring information.
You can feed log data into the Kinesis data stream in various ways, including direct API calls, but the simplest way typically is to use Kinesis Agent, a standalone Java software application that can run next to your Apache web server and push the log files into the data stream. Installation of Kinesis Agent falls outside the scope of this post; for instructions, see Writing to Amazon Kinesis Data Streams Using Kinesis Agent.
Create an AWS Glue table based on a Kinesis data stream
We use Grok patterns to convert the logs to structured data because the log format is unstructured text. The ETL job then processes the data as a structured data source. You specify the Grok patterns to apply when you create the Data Catalog table for the streaming source.
- On the AWS Glue console, create a Data Catalog table for your streaming source.
- For Type of Source, choose Kinesis.
- Select ‘Stream in my account’ and the AWS region where Kinesis stream was created.
- For Kinesis stream name, select the stream from the drop-down.
- Specify the data format as Grok.
- For Grok pattern, enter a pattern that presents Apache log format:
- Choose Next through the remaining sections.
- Choose Finish.

Remember the name of the Data Catalog table; you use it as a data source for the AWS Glue ETL job in the next sections.
Export structured data using the AWS Glue custom connector
AWS Glue is a powerful tool for ETL processing as well as for connecting to different data sources and destinations. It has native integration with Amazon Simple Storage Service (Amazon S3), Amazon Redshift, Amazon Relational Database Service (Amazon RDS), and Amazon Kinesis. To export data to Amazon OpenSearch Service, we can use a connector. Connectors for non-natively supported data stores are available in AWS Marketplace. Third-party companies and developers can also develop their own connectors to use when creating connections.
To add your connector to Amazon OpenSearch Service, complete the following steps:
- On the AWS Glue console, choose your preferred Region.
- In the navigation pane, choose AWS Glue Studio.
- Choose Connectors.
- Choose Go to AWS Marketplace.
- In the Search AWS Glue Studio products field, enter
Elasticsearch. - Choose AWS Glue Connector for Elasticsearch.
- Choose Continue to Launch.
- Choose Usage Instructions and choose the link in the window that appears.
You’re redirected to the AWS Glue Studio console.
- Enter a name for the connection (for example,
glue-es-connection). - For Connection credential type, choose User name and password.
- For AWS secret, enter the name of your secret that contains details to connect for Amazon OpenSearch Service (for example,
glue-es-secret). - Choose the VPC and subnet you used for the Opensearch Service cluster.
- Choose the security group you created earlier for the connector.
- Choose Create connection and activate connector.
For more information, see Step 2: Subscribe to the connector and Step 3: Activate the connector.
Create an AWS Glue ETL job and export to Amazon OpenSearch Service
Now we need to create a new AWS Identity and Access Management (IAM) role for the AWS Glue ETL job. By default, the AWS managed role AWSGlueServiceRole doesn’t have access to the secret. To set up access control for your secrets, see Authentication and access control for AWS Secrets Manager and Limiting Access to Specific Secrets. We include the key IAM policies and permissions in this section.
Basic AWS Glue permissions that are needed for any AWS Glue job. This includes S3 buckets that are used by AWS Glue, access to Amazon CloudWatch and Amazon CloudWatch Logs, and the ability to create network interfaces within your VPC and run AWS Glue API calls.
You might want to scope the resources section of your access policy to only those resources that are required.
- Configure your IAM role with the following code:
The following policy grants access to Kinesis Data Streams from the job:
The following policy allows you to write data into Amazon OpenSearch Service from the AWS Glue connector:
Finally, the connector needs to download the Docker image from Amazon ECR. You can limit access to a specific image or allow read-only access to Amazon ECR by attaching the managed AmazonEC2ContainerRegistryReadOnly policy.
- On the AWS Glue console, under ETL in the navigation pane, choose Jobs.
- Choose Add job.
- For Type, choose Spark Streaming as the type of AWS Glue job to ingest streaming data.
You can also add streaming jobs for Apache Kafka and Amazon Managed Streaming for Apache Kafka (Amazon MSK). For more information, see Adding Streaming ETL Jobs in AWS Glue.
- For Glue version, choose Spark 2.4, Python 3 with improved job startup times (Glue Version 2.0).
With AWS Glue Version 2.0, jobs start 10 times faster than v1.0 and get 1-minute minimum billing, which is especially important for jobs running for a short amount of time.
- Provide the S3 paths where the script is stored and the temporary directory.
- For Monitoring options, select Job metrics and Continuous logging to help with debugging.

- For Job timeout (minutes), enter 20.
If you don’t specify the timeout, Glue streaming job default timeout is 0, i.e., no timeout at all.

- In the Connections section, choose the connection you created earlier.

Adding the connecter automatically updates the AWS Glue script to include exporting to Amazon OpenSearch Service. After the job starts, you can use the AWS Glue Studio to track the job’s progress.


Analyze the data inside Amazon OpenSearch Service with Kibana
Kibana is a popular open-source visualization tool designed to work with Amazon OpenSearch Service. Amazon OpenSearch Service provides an installation of Kibana with every Amazon OpenSearch Service domain and can be referenced using the link provided under the Amazon OpenSearch Service domain dashboard (for example, https://domain-endpoint/_plugin/kibana/).
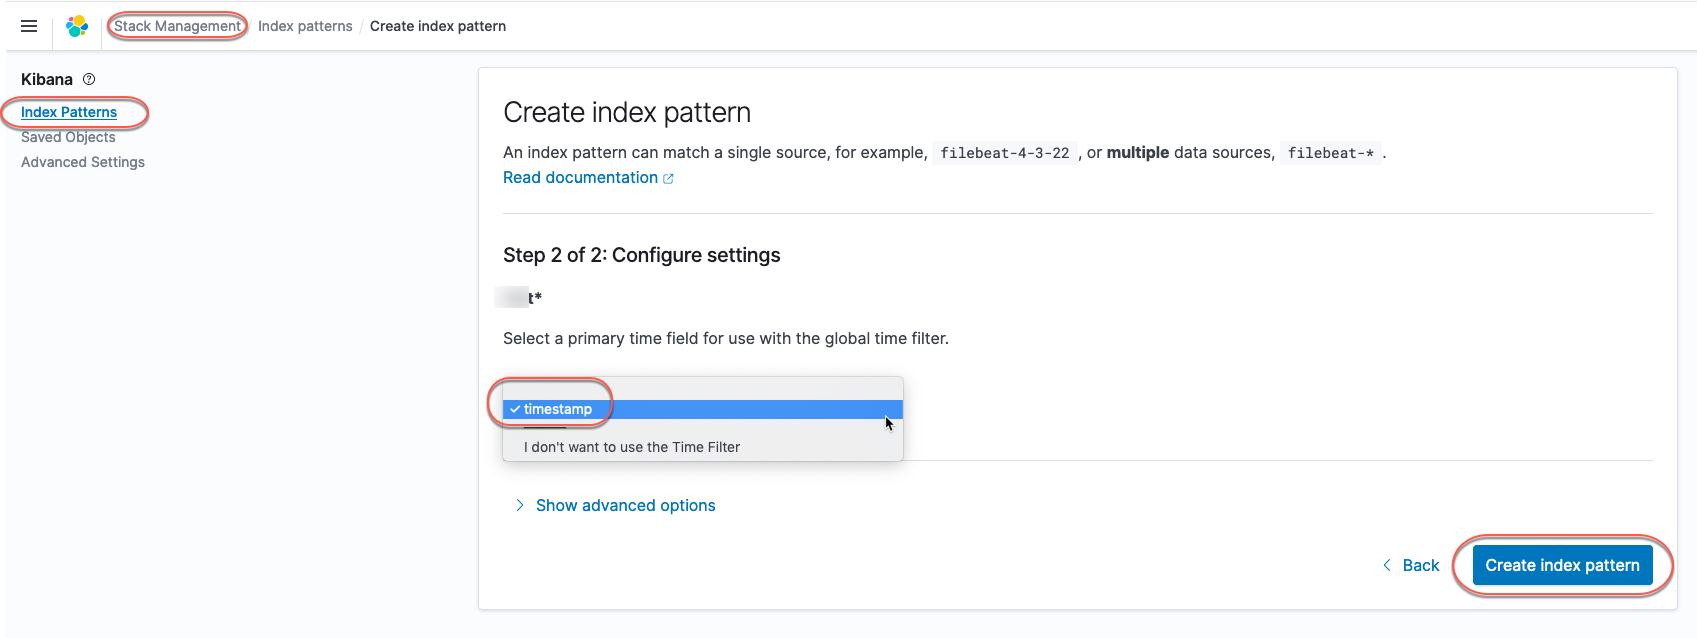
To visualize the streaming data ingested using AWS Glue into Amazon OpenSearch Service, we need to first create Kibana index patterns based on Amazon OpenSearch Service indexes.
- On Kibana console, choose Stack Management.
- In the navigation pane, choose Index patterns.
- Choose Create index pattern.
- Enter the index name with an asterisk wild card (for example, apache-*) as the default index pattern.
- Choose timestamp as the time filter.
- Choose Create index pattern.
After you create the index pattern, you use Kibana visualizations to create charts to explore the ingested data. Kibana offers powerful and easy-to-use features such as histograms, line graphs, pie charts, and heat maps to extract and process data by using a series of Amazon OpenSearch Service aggregations.
- On the Kibana navigation pane, choose Visualize.
- Choose a chart type (for example, Vertical Bar) to visualize the data.

- Choose the index pattern you created earlier.
- On the Data menu, choose the + icon under Buckets and choose X-axis.
- Under Aggregation, choose Terms.
- Choose an index field (for example,
verb.keyword) under Field option. - Choose an appropriate date range to populate the graph data.
- Choose Update.

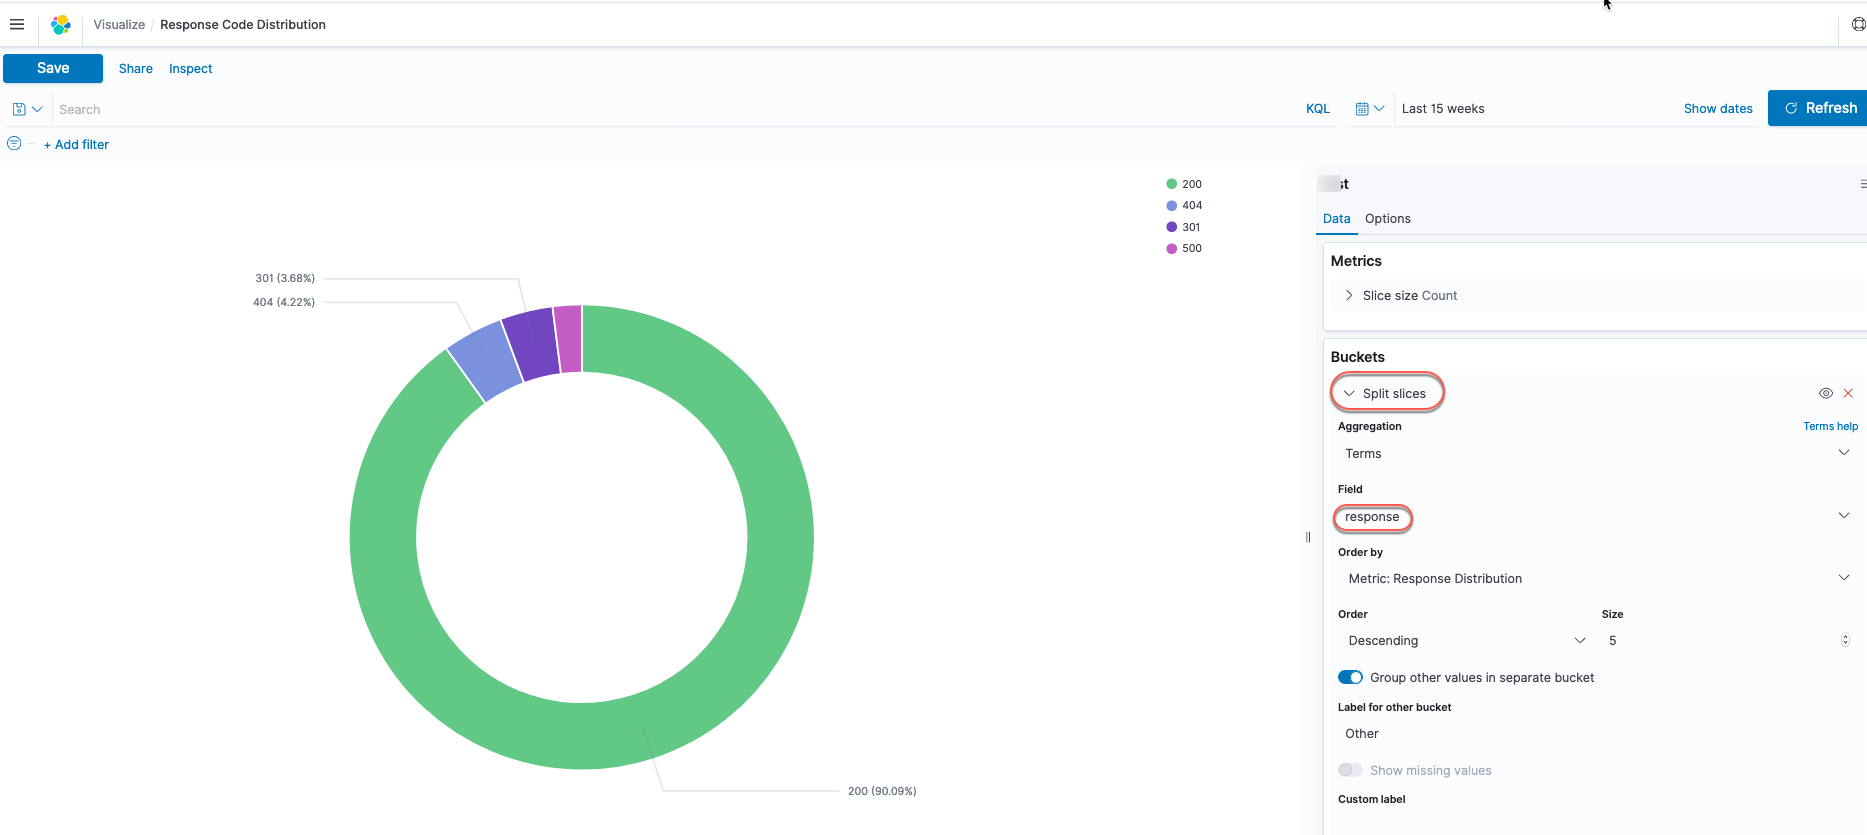
Similarly, you can visualize data based on other chart types. The following screenshot shows a pie chart to visualize application response codes by using the Split slices option under Buckets and choosing the response field.
To visualize time series data, choose Date Histogram and choose the field with a date data type (for example, timestamp).

Conclusion
You can use this straightforward solution to build a log processing pipeline that can scale with your applications. Another benefit of this solution is that we keep all the traffic inside the VPC to improve security and save on traffic costs.
This post demonstrates the AWS Glue custom connector for Amazon OpenSearch Service, which makes it easy to transfer data from your data lake into Amazon OpenSearch Service within minutes. In addition, you can write data to multiple target data stores like Amazon S3 and Amazon DynamoDB. The AWS Glue built-in transform provides the additional capability to process data within your ETL pipeline.
About the Authors
 Viral Shah is a Senior Solutions Architect with the AWS Data Lab team based out of New York, NY. He has over 20 years of experience working with enterprise customers and startups, primarily in the data and database space. He loves to travel and spend quality time with his family.
 Li Ma is a solution architect. She works with AWS startup customers to provide them with architectural guidance on building scalable and reliable systems on AWS. In her previous roles, she works in data engineering and analytics roles in Amazon retail. She was also a startup co-founding partner.
 Pavel Morshenyuk is a Startup Solutions Architect at Amazon Web Services based in London, UK. He has over 15 years of experience in software development and IT. He is working as an architect of the scalable cost-effective cloud-based solutions since 2012 across multiple countries. He loves snowboarding and traveling with his family.