AWS Compute Blog
AWS Outposts monitoring and reporting: A comprehensive Amazon EventBridge solution
Organizations using AWS Outposts racks commonly manage capacity from a single AWS account and share resources through AWS Resource Access Manager (AWS RAM) with other AWS accounts (consumer accounts) within AWS Organizations. In this post, we demonstrate one approach to create a multi-account serverless solution to surface costs in shared AWS Outposts environments using Amazon EventBridge, AWS Lambda, and Amazon DynamoDB. This solution reports on instance runtime and allocated storage for Amazon Elastic Compute Cloud (Amazon EC2), Amazon Relational Database Services (Amazon RDS), and Amazon Elastic Block Store (Amazon EBS) services running on Outposts racks. In turn, teams can track the cost of infrastructure associated with their workloads across AWS accounts. This solution is a framework that can be customized to meet your organization’s specific business objectives.
Solution overview
The following is the Terraform-based reference architecture used to represent the solution, including EventBridge, DynamoDB, and Lambda across a multi-account environment. Relevant launch events are tracked in EventBridge that invoke Lambda functions, which are logged in DynamoDB tables (see sample code). This allows reporting on captured event data through the AWS SDK for Python (Boto3). 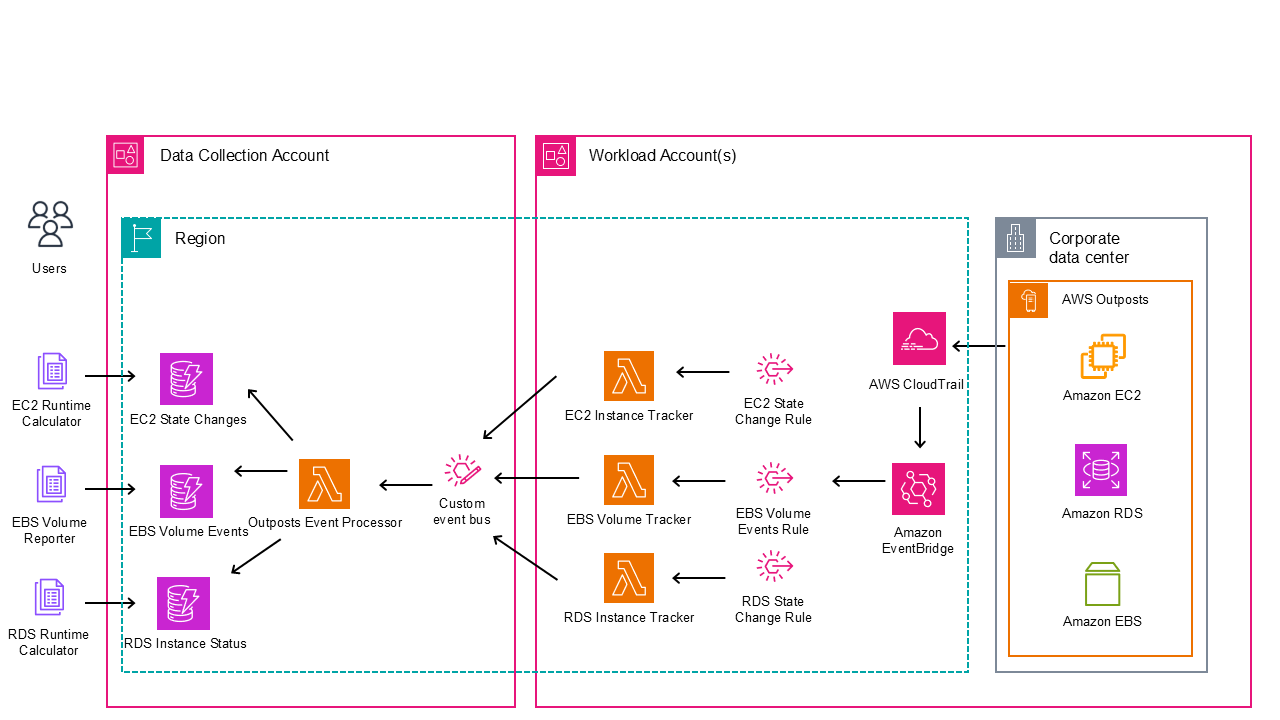
Figure 1: Reference architecture for reporting solution on AWS Outposts
Prerequisites
The following prerequisites are necessary to implement this solution:
- At least two active AWS accounts in the same AWS Organization as the Outposts owner account.
- One AWS account, which is the data collection account to store the event data (this doesn’t have to be the account that owns the Outposts).
- Workload accounts where resources are deployed on Outposts.
- AWS Command Line Interface (AWS CLI) installed and configured on an administrative instance. For more information, see Installing, updating, and uninstalling the AWS CLI in the AWS CLI documentation.
- Terraform installed on the same administrative instance. For more information, see the Terraform documentation.
- Make sure that you have the necessary AWS Identity and Access Management (IAM) permissions necessary to create the AWS resources using Terraform in all accounts.
- Prior Experience with Terraform deployments on AWS Cloud. To increase your familiarity, you can explore Get Started – AWS on the HashiCorp website.
- Access to clone the AWS Outposts Monitoring and Reporting git repository.
- SDK for Python installed and configured on a local machine.
Walkthrough
The following sections walk you through how to deploy this solution.
Deploying in data collection account
Step 1: Create a bucket in-Region to hold the Terraform state file in the data collection account.
Step 2: Clone the repository.On your local machine, clone the repository that contains the sample by running the following command:
git clone https://github.com/aws-samples/sample-outposts-monitoring-and-reports.git
Navigate to the cloned repository by running the following command:cd sample-outposts-monitoring-and-reports/data_collection
Step 3: Edit the providers.tf to configure the AWS provider.
Step 4: Edit the backend.tf to provide the Terraform state bucket and Outposts anchored AWS Region.
Step 5: Modify the variables.tf.From the root directory of the cloned repository, modify the variables.tf file with the target Region and workload accounts as shown in the following example. The target Region is the collection destination.
Initialize the configuration directory of the data collection account to download and install the providers defined in the configuration by running the following command:
All resources are deployed with minimal permissions to serve as an example. We recommend viewing all configurations to make sure that they meet your organizational security policies. Step 6: Deploy infrastructure in the data collection account.Run terraform plan on the configuration to and review which resources are created:
When you have reviewed the plan, run the following command and enter “yes” to accept the changes and deploy:
Deployment should take less than 5 minutes. If you receive any errors, review the previously mentioned steps to ensure that you followed them in their entirety. If the errors persist, reach out to AWS Support for additional guidance.
Deploying in workload account
The data collection account receives events from EventBridge and performs intelligent analysis and storage from the AWS Outposts resource data.Step 1: Navigate to the workload account directory by running the following command:
Step 2: Edit variables.tf to set up the Region and event bus Amazon Resource Name (ARN).
Edit the code to update the event bus name.
Step 3: Run the following command to create the backend.tf and create the Terraform state bucket for each workload account.
This is an idempotent operation that creates a file from the template and a bucket with a fixed name including the account ID if it doesn’t exist.
Step 4: Initialize the configuration directory of the Data Collection Account to download and install the providers defined in the configuration by running the following command:
Step 5: Deploy the infrastructure in the Data Collection Account.Run a terraform plan on the configuration and review which resources are created:
After you have reviewed the plan, run the following command and enter “yes” to accept the changes and deploy:
Deployment should take less than 5 minutes. If you receive any errors, follow the troubleshooting steps in the previous section.
At this point, any Amazon EC2 or Amazon RDS instances and Amazon EBS volumes are logged to the DynamoDB tables in the data collection account. Repeat Steps 3–5 for each workload account running resources on AWS Outposts with appropriate account credentials. If you’re deploying at scale and using AWS Control Tower consider using AWS Control Tower Account Factory for Terraform (AFT).
Running monthly reports
With this solution in place, reports can be generated on demand. These reports can be customized by modifying the Python example scripts shown to support your needs. Reports can be created from a local machine with credentials that have access to the DynamoDB tables in the data collection account. The examples were created from the source directory of the data collection account git repository. Run the following command to view the report for Amazon RDS usage in September 2025:

Figure 2: Example of RDS runtime report
Run the following command to view the report for Amazon EBS usage in September 2025:

Figure 3: Example of EBS usage report
Run the following command to view the report for Amazon EC2 usage in September 2025:
./ec2_runtime_calculator.py --month 9 --year 2025 --output ec2_report.csv

Figure 4: Example of EC2 runtime report
Cleaning up
Complete the following steps to clean up the resources that were deployed by this solution. For each workload account, complete the following:
Enter “yes” to proceed. You can then manually empty and remove the terraform state S3 bucket for that account.
For the data collection, complete the following:
Enter “yes” to proceed. You can then manually empty and remove the terraform state S3 bucket for that account.
Conclusion
Customers who have shared multi-account Outposts deployments can use this solution to create account level reporting for Outposts resources using real-time event capture and processing, state analysis and categorization, historical usage metrics, and serverless architecture. Teams can use this to visualize and report on the costs of running their workloads on Outposts. The event-driven design supports accurate tracking while maintaining low operational overhead. The solution scales effectively across multiple Outposts and accounts, providing a unified view of hybrid infrastructure. Keep in mind that you can extend the functionality described here to meet your business objectives.
Deploy this solution today using the GitHub repository to gain financial insights to share with the tenants of your Outposts workload accounts. Reach out to your AWS account team, or fill out this form to learn more about Outposts.