Deploy production generative AI at the edge using Amazon EKS Hybrid Nodes with NVIDIA DGX
Modern generative AI applications require deployment closer to where data is generated and business decisions are made, but this creates new infrastructure challenges. Organizations in manufacturing, healthcare, finance, and telecommunications need to deliver low-latency, energy-efficient AI workloads at the edge while maintaining data locality and regulatory compliance. However, managing Kubernetes on-premises adds operational complexity that can slow down innovation.
You can use Amazon Elastic Kubernetes Service (Amazon EKS) Hybrid Nodes to address this by joining on-premises infrastructure to the Amazon EKS control plane as remote nodes. This allows you to accelerate AI workload deployment with consistent operational practices, while addressing latency, compliance, and data residency requirements. EKS Hybrid Nodes removes the complexity and burden of self-managing Kubernetes on-premises so that your team can focus on deploying AI applications and driving innovations. It provides unified workflows and tooling alongside centralized monitoring and enhanced observability across your distributed infrastructure.
EKS Hybrid Nodes enables you to deliver AI capabilities wherever your business demands, such as the following use cases:
Run low-latency services at on-premises locations, including real-time inference at the edge
Train models with data that must remain on-premises to meet regulatory compliance requirements
Deploy inference workloads near source data, such as Retrieval-Augmented Generation (RAG) applications using a local knowledge base
Repurpose existing hardware investment
This post demonstrates a real-world example of integrating EKS Hybrid Nodes with NVIDIA DGX Spark, a compact and energy-efficient GPU platform optimized for edge AI deployment. In this post we walk you through deploying a large language model (LLM) for low-latency generative AI inference on-premises, setting up node monitoring and GPU observability with centralized management through Amazon EKS. Although this post uses DGX Spark, the architecture and patterns discussed apply to other NVIDIA DGX systems or GPU platforms.
Solution overview
For this demo walkthrough, you create an EKS cluster with EKS Hybrid Nodes enabled, and connect an on-premises DGX Spark as a hybrid node. You install the NVIDIA GPU Operator for Kubernetes to provision GPU resources for the local generative AI inference. Then, you deploy an LLM on the hybrid nodes using NVIDIA NIM, which are a set of microservices optimized by NVIDIA for accelerated model deployment. You also set up the Amazon EKS Node Monitoring Agent (NMA) to monitor node health and detect GPU-specific issues. Finally, you integrate the NVIDIA Data Center GPU Manager (DCGM) Exporter with Amazon Managed Service for Prometheus and Amazon Managed Grafana to provide GPU metrics observability across hybrid nodes.
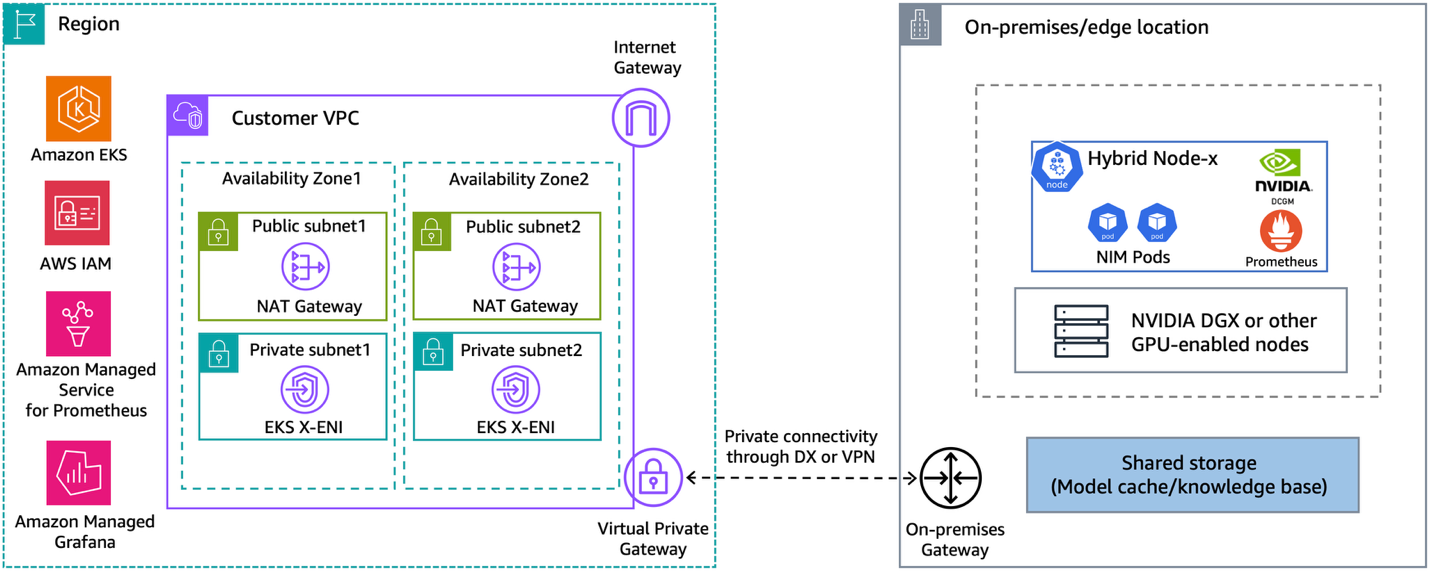
The following diagram presents a high-level overview of the architecture of our solution.
Figure 1: Hybrid architecture for deploying GenAI workloads on-premises or at the edge using Amazon EKS Hybrid Nodes with NVIDIA DGX
EKS Hybrid Nodes requires private network connectivity between your on-premises or edge environment and the AWS Region. This connectivity can be established using either AWS Direct Connect or AWS Site-to-Site VPN into your Amazon Virtual Private Cloud (Amazon VPC). The node and pod Classless Inter-Domain Routing (CIDR) blocks for your hybrid nodes and container workloads must be unique and routable across your network environment. You provide these CIDRs as the RemoteNodeNetwork and RemotePodNetwork values when creating the EKS cluster with hybrid nodes.
This walkthrough doesn’t cover hybrid networking prerequisites for EKS Hybrid Nodes. Go to the Amazon EKS user guide for the details.
Prerequisites
The following prerequisites are necessary to complete this solution:
Private connectivity between the on-premises network and Amazon VPC (through VPN or Direct Connect).
Two routable RFC-1918 or CGNAT CIDR blocks for RemoteNodeNetwork and RemotePodNetwork.
Configure the on-premises firewall and the EKS cluster security groups to allow bi-directional communications between the Amazon EKS control plane and remote node and pod CIDRs, as per the networking prerequisites.
NVIDIA DGX (or other GPU-enabled) systems as hybrid nodes.
NVIDIA NGC account and API key for accessing NIMs, see the NVIDIA documentation.
The following steps walk you through this solution.
Prepare EKS Hybrid Nodes
The following three sections walk you through preparations for EKS Hybrid Nodes.
Prepare IAM credentials
Amazon EKS Hybrid Nodes use temporary AWS Identity and Access Management (IAM) credentials provisioned by AWS Systems Manager hybrid activations or IAM Roles Anywhere to authenticate with the EKS cluster. Follow the Amazon EKS user guide to create the required Hybrid Nodes IAM role (AmazonEKSHybridNodesRole) using either one of the two options.
Create an Amazon EKS access entry with the Hybrid Nodes IAM role to enable your on-premises nodes to join the cluster. Go to Prepare cluster access for hybrid nodes in the Amazon EKS user guide for more details.
Install nodeadm and join the DGX Spark as hybrid node
Use EKS Hybrid Nodes CLI (nodeadm) to bootstrap and install all required components for your hybrid nodes to join the EKS cluster. This demo uses the ARM64 version of the nodeadm for the DGX Spark.
Prepare a nodeConfig.yaml configuration file using the temporary IAM credentials generated in the previous section. The following is an example for using Systems Manager hybrid activations for hybrid nodes credentials.
For mixed GPU and non-GPU hybrid nodes, we recommend that you add a --register-with-taints=nvidia.com/gpu=Exists:NoScheduletaint to GPU nodes to maximize GPU resource usage. Refer to the documentation regarding how to modify the kubelet configuration using nodeadm.
If you’re running webhooks on hybrid nodes, then you must make sure that on-premises Pod CIDRs are routable across the hybrid network environment, using techniques such as BGP routing, static routing, or ARP proxying. This demo uses Cilium BGP control-plane to enable BGP peering between hybrid nodes and on-premises routers, and to advertise Pod CIDRs to the on-premises network.
Apply the following Cilium BGP configuration to your cluster.
Validate that your nodes are connected to the EKS cluster and in a Ready state.
$ kubectl get nodes -o wide -l eks.amazonaws.com/compute-type=hybrid
NAME                   STATUS   ROLES    AGE   VERSION               INTERNAL-IP       EXTERNAL-IP   OS-IMAGE             KERNEL-VERSION       CONTAINER-RUNTIME
mi-0e06d30895cfcc155   Ready    <none>   17d   v1.34.2-eks-ecaa3a6   192.168.100.101   <none>        Ubuntu 24.04.3 LTS   6.14.0-1015-nvidia   containerd://2.2.1
Install NVIDIA GPU Operator for Kubernetes
The NVIDIA GPU Operator uses the Kubernetes operator framework to automate the lifecycle management of NVIDIA software components required to provision GPU resources. These components include the NVIDIA drivers (for enabling CUDA), Kubernetes device plugin for GPUs, the NVIDIA Container Toolkit, and DCGM based monitoring and others.
Deploy NVIDIA GPU Operator on hybrid nodes using the official Helm chart.
The NVIDIA GPU Operator validates the stack using the nvidia-operator-validator and the nvidia-cuda-validator pods. Verify the logs on these pods and confirm that the validations are successful.
$ kubectl logs -n gpu-operator nvidia-operator-validator-t662d
Defaulted container "nvidia-operator-validator" out of: nvidia-operator-validator, driver-validation (init), toolkit-validation (init), cuda-validation (init), plugin-validation (init)
all validations are successful

$ kubectl logs -n gpu-operator nvidia-cuda-validator-nzwmh
Defaulted container "nvidia-cuda-validator" out of: nvidia-cuda-validator, cuda-validation (init)
cuda workload validation is successful
The GPU within the DGX Spark node is now exposed to the kubelet and is visible in nodes allocatable:
$ kubectl get nodes "-o=custom-columns=NAME:.metadata.name,GPU:.status.allocatable.nvidia\.com/gpu" -l eks.amazonaws.com/compute-type=hybrid
NAME                   GPU
mi-0e06d30895cfcc155   1
Deploy NVIDIA NIM for inference on EKS Hybrid Nodes
To deploy NVIDIA NIM, you must set up an NVIDIA NGC API key and create container registry secrets using the key.
Download the NIM Helm chart using the following command:
helm fetch https://helm.ngc.nvidia.com/nim/charts/nim-llm-<version_number>.tgz --username='$oauthtoken' --password=$NGC_API_KEY
cd nim-deploy/helm
Select a supported model for NVIDIA NIM based on the GPU specification of your hybrid nodes. Create the helm charts overrides using the NIM container image path, and set the ngcAPISecret and imagePullSecrets using the secrets created in Step 1.
Deploy a NIM based LLM using the following command. In this example I’m running a Qwen3-32B image that is specifically optimized for the DGX Spark node.
This deployment isn’t persistent and doesn’t use a model cache. To implement a model cache, you need to install CSI drivers and configure Persistent Volumes using the on-premises storage infrastructure.
The NIM pod deployed on hybrid nodes is routable through BGP, thus you can directly access its API to test the model.
{
  "id": "cmpl-d5161978bda9401b9b7a4ef0a529b6ce",
  "object": "text_completion",
  "created": 1770465499,
  "model": "Qwen/Qwen3-32B",
  "choices": [
    {
      "index": 0,
      "text": " Why do you need it?\n\nKubernetes is a container orchestration system that automates the deployment, scaling, and management of containerized applications. It is an open-source system that was originally developed by Google and is now maintained by the Cloud Native Computing Foundation (CNCF). Kubernetes allows developers to easily deploy and manage applications in a distributed environment, making it a popular choice for organizations that use containerized applications.\n\nOne of the main reasons why Kubernetes is needed is because it provides a way to manage container",
      "logprobs": null,
      "finish_reason": "length",
      "stop_reason": null,
      "prompt_logprobs": null
    }
  ],
  "service_tier": null,
  "system_fingerprint": null,
  "usage": {
    "prompt_tokens": 4,
    "total_tokens": 104,
    "completion_tokens": 100,
    "prompt_tokens_details": null
  },
  "kv_transfer_params": null
}
You have successfully deployed an LLM using NVIDIA NIM on your EKS Hybrid Nodes.
Configure centralized monitoring and observability for GPU metrics
The following two sections walk you through configuring centralized monitoring and observability for GPU metrics.
Install EKS Node Monitoring Agent
The EKS Node Monitoring Agent (NMA) is bundled into a container image that can be deployed as a DaemonSet across your EKS Hybrid Nodes. It collects node health information and detects GPU-specific issues using the NVIDIA DCGM and NVIDIA Management Library (NVML). It reports health issues by updating node status conditions and emitting Kubernetes events. Go to this AWS Container post to learn more details on NMA.
To install the NMA on hybrid nodes, use the following AWS CLI command to create the Amazon EKS add-on.
When it’s installed, NMA starts collecting custom node conditions for the EKS Hybrid Nodes. From the following example, you can see NMA detected the 200 GbE clustering interface (enp1s0f0np0) of the hybrid node is disconnected because I am only using a single DGX Spark.
kubectl describe node mi-0e06d30895cfcc155 | sed -n '/^Conditions:/,/^Addresses:/p' | head -n -1
Conditions:
  Type                       Status  LastHeartbeatTime                 LastTransitionTime                Reason                             Message
  ----                       ------  -----------------                 ------------------                ------                             -------
  NetworkingReady            False   Sat, 07 Feb 2026 23:52:59 +1100   Sat, 07 Feb 2026 05:22:59 +1100   InterfaceNotRunning                Interface Name: "enp1s0f0np0", MAC: "4c:bb:47:2c:11:1d" is not up
  KernelReady                True    Sat, 07 Feb 2026 05:12:28 +1100   Sat, 07 Feb 2026 05:12:28 +1100   KernelIsReady                      Monitoring for the Kernel system is active
  AcceleratedHardwareReady   True    Sat, 07 Feb 2026 05:12:28 +1100   Sat, 07 Feb 2026 05:12:28 +1100   NvidiaAcceleratedHardwareIsReady   Monitoring for the Nvidia AcceleratedHardware system is active
  ContainerRuntimeReady      True    Sat, 07 Feb 2026 05:12:28 +1100   Sat, 07 Feb 2026 05:12:28 +1100   ContainerRuntimeIsReady            Monitoring for the ContainerRuntime system is active
  StorageReady               True    Sat, 07 Feb 2026 05:12:28 +1100   Sat, 07 Feb 2026 05:12:28 +1100   DiskIsReady                        Monitoring for the Disk system is active
  [...]
NMA also provides an automated log collection method through a Kubernetes CRD called NodeDiagnostic. To enable the log collection from your hybrid nodes, create a NodeDiagnostic custom resource on your cluster, and refer to the Amazon EKS user guide for more details.
Integrate NVIDIA DCGM Exporter with Amazon Managed Service for Prometheus and Amazon Managed Grafana
Beyond node health monitoring, you can use the NVIDIA DCGM Exporter (within the GPU Operator stack) to gather GPU performance metrics and telemetry data that can be scraped by Prometheus. This section shows how to integrate DCGM Exporter with Amazon Managed Service for Prometheus and Amazon Managed Grafana to enable enhanced GPU observability across your EKS Hybrid Nodes.
Start by creating an Amazon Managed Service for Prometheus workspace.
Next, follow this user guide to create an IAM role that allows Prometheus to ingest the scraped GPU metrics from EKS Hybrid Nodes to the managed workspace. Verify that the role has the following permissions attached.
Prepare a Prometheus installation Helm values file as the following example. Provide the Prometheus ingestion role Amazon Resource Name (ARN) from the last step, update the remoteWrite endpoint path with the managed Prometheus workspace URL, and add the DCGM Exporter scrape configurations.
Use Helm to deploy Prometheus to hybrid nodes using the preceding values. Prometheus uses DCGM Exporter to scrape GPU performance metrics and remote write to the Amazon Managed Service for Prometheus workspace.
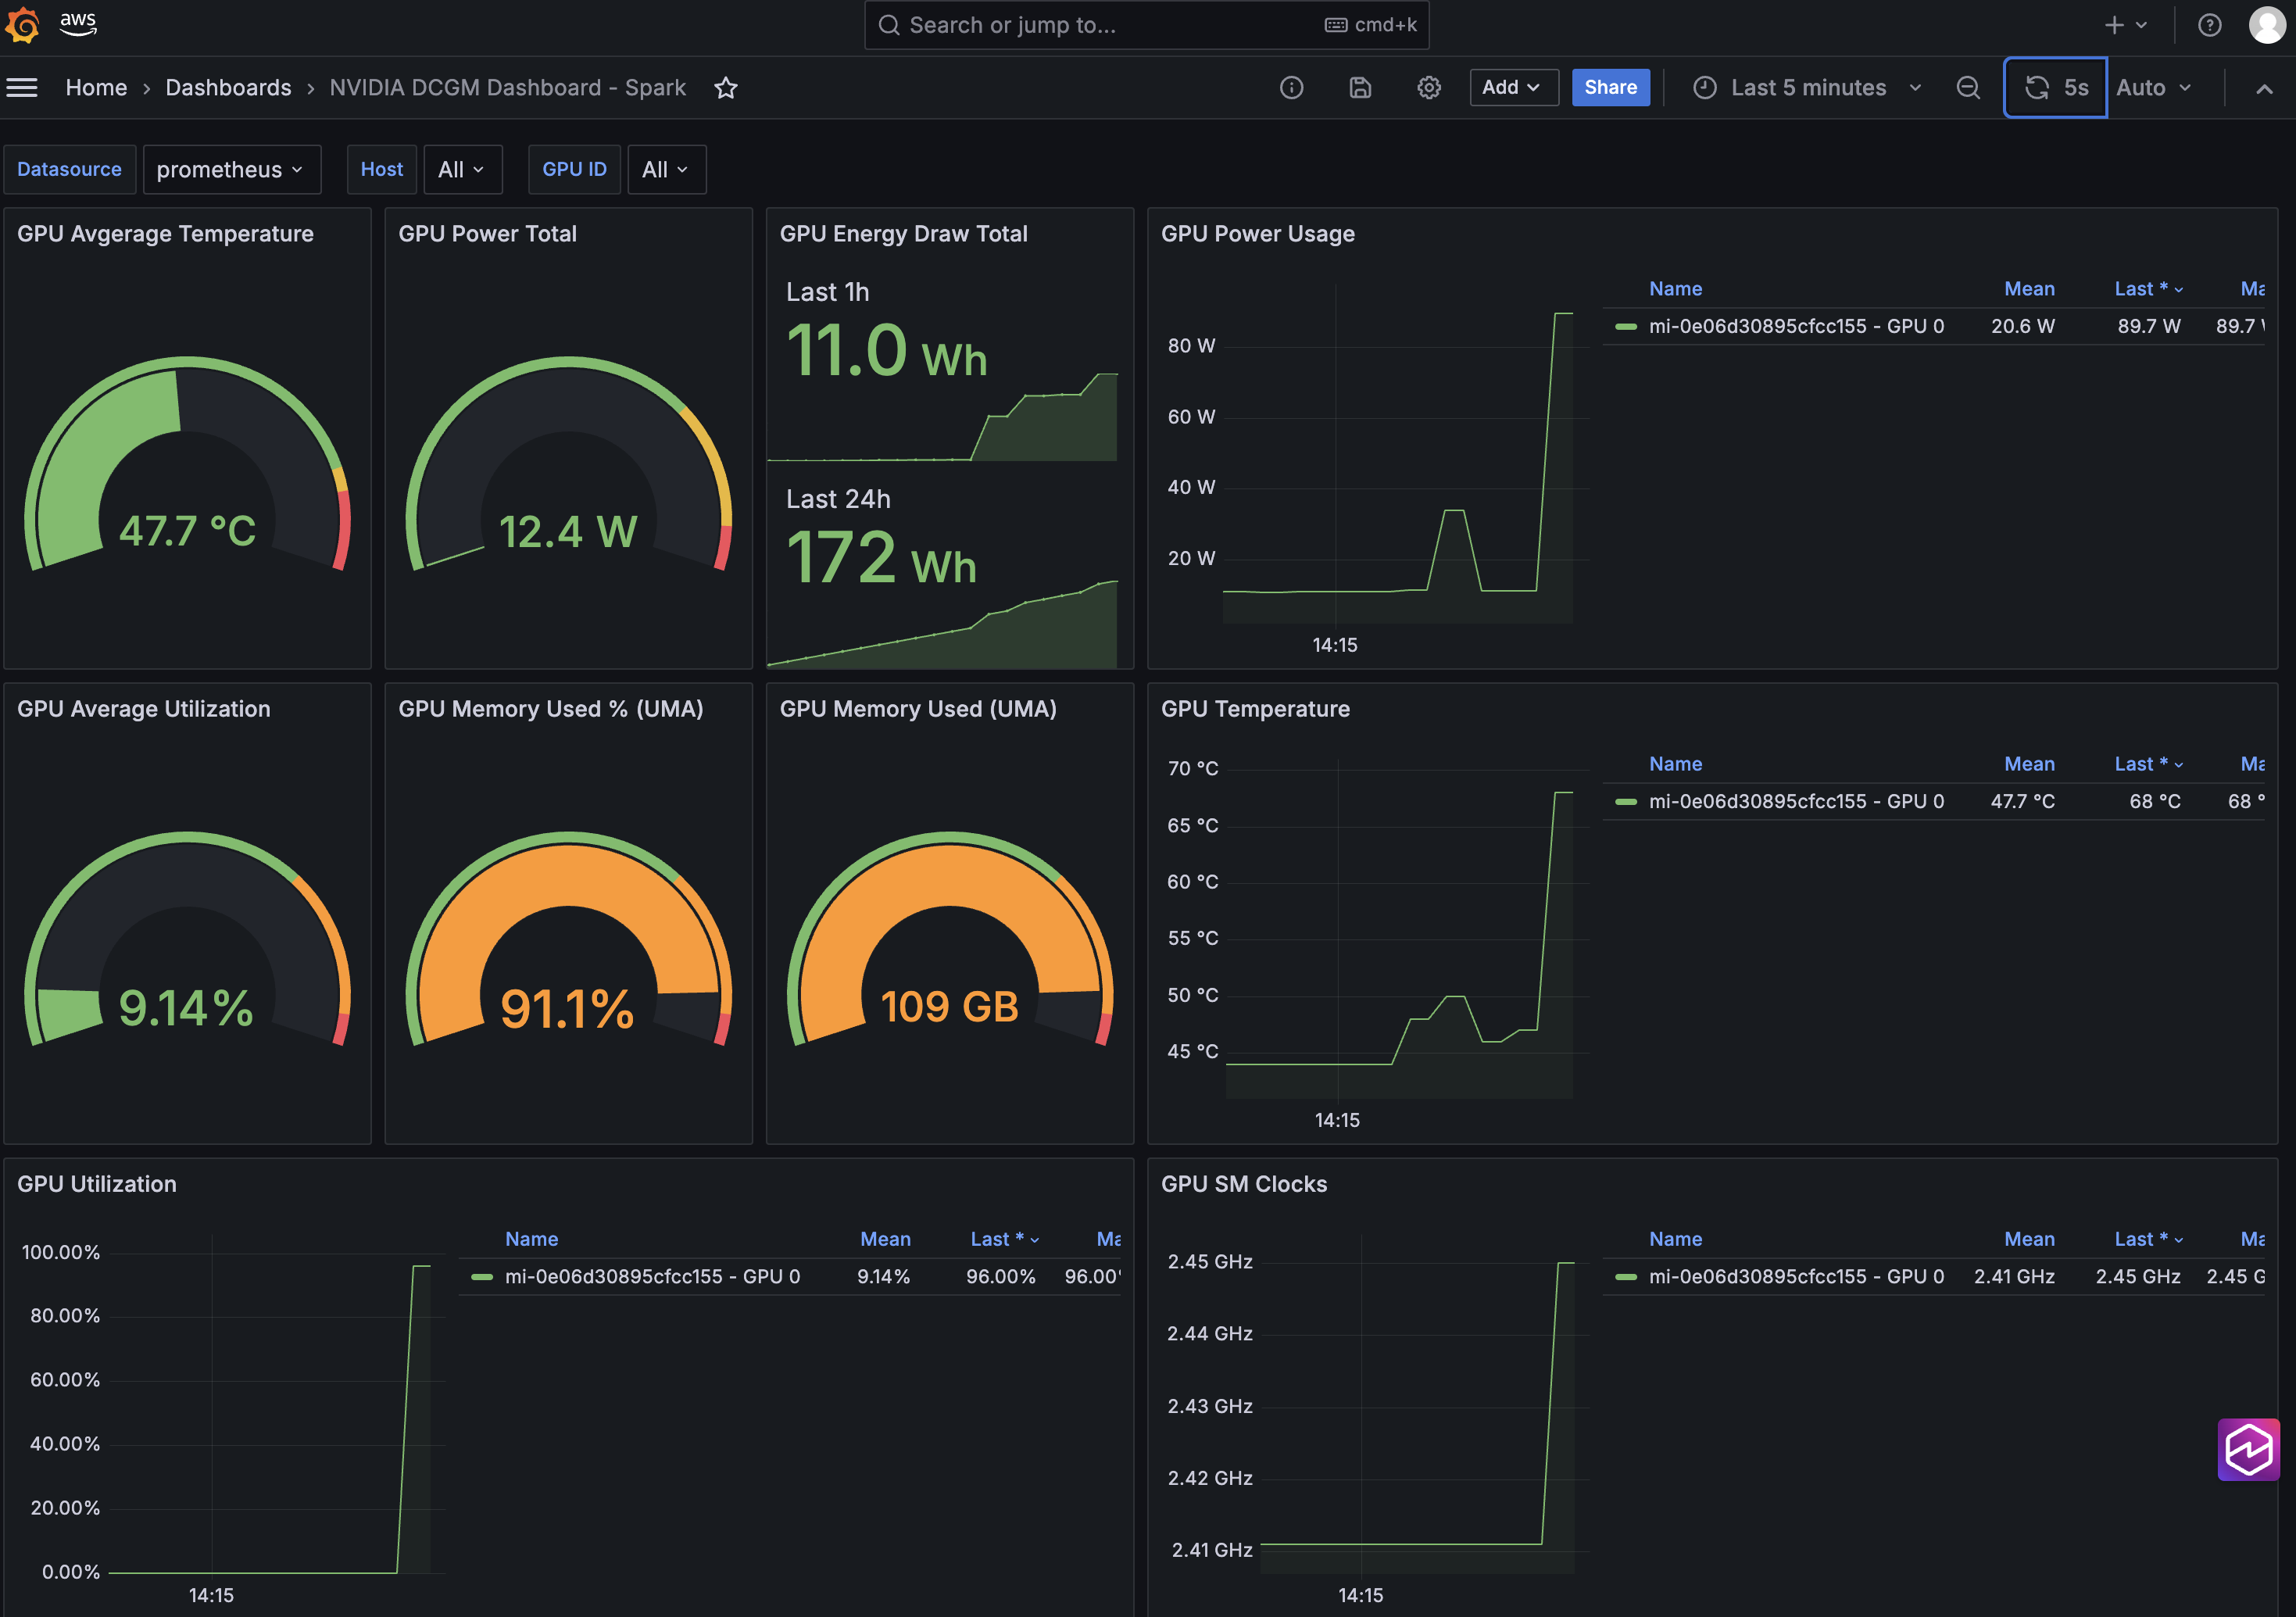
Finally, create a new Grafana dashboard (or import one like this) to visualize scraped GPU metrics such as GPU utilization, GPU memory used, and GPU temperature and energy consumption.
Figure 2: Use Amazon Managed Grafana to monitor and visualize GPU metrics and telemetry across hybrid nodes
You can integrate EKS Hybrid Nodes with AWS cloud services to streamline generative AI deployment on-premises by removing the Kubernetes management overhead, while maintaining consistent operational practices with centralized observability across cloud, on-premises, and edge locations.
Cleaning up
To avoid incurring long-term charges, delete the AWS resources created as part of the demo walkthrough.
Clean up other prerequisite resources that you created if they’re no longer needed.
Conclusion
This post provides a practical example of how Amazon EKS Hybrid Nodes empowers generative AI deployment using your own GPU nodes at on-premises and edge locations. Organizations can use EKS Hybrid Nodes to accelerate AI implementation with data locality and minimal latency, while maintaining consistent management and centralized observability across distributed environments.
To learn more about EKS Hybrid Nodes or running AI/ML workloads on Amazon EKS, explore the following resources: