Desktop and Application Streaming
How to configure certificate-based authentication for WorkSpaces Applications
In this blog, I discuss the benefits of using certificate-based authentication (CBA) for WorkSpaces Applications. I give an overview of the short-lived certificate mode offered by AWS Private Certificate Authority and why it is important to this use mode. Also, I walk you through the steps to configure CBA for Amazon WorkSpaces Applications.
Amazon WorkSpaces Applications0 certificate-based authentication requires a SAML 2.0 identity provider (IdP) configured for the stack. With CBA, the authentication experience is improved through single sign-on. You issue a private certificate to a WorkSpaces Applications user in order to identify them as trusted. With this certificate, the user authenticates once during their login; until the certificate expires with a maximum lifetime of 24 hours. Each logon to WorkSpaces Applications issues a new certificate.
| Time to read | 25 minutes |
| Time to complete | 1.5 hours |
| Cost to complete | $50 for Private CA per month, $0.058 per certificate issued, see Amazon CloudFront pricing. |
| Learning level | 400 |
| Services used | Amazon WorkSpaces Applications |
| AWS Private CA | |
| Amazon Simple Storage Service (Amazon S3) | |
| Amazon CloudFront | |
| AWS CloudTrail |
What is certificate-based authentication?
Certificate-based authentication provides an enhanced user experience by allowing users to authenticate once; then access resources like Amazon WorkSpaces or Amazon WorkSpaces Applications, without re-entering credentials. CBA requires a private certificate authority (CA) to create private certificates to identify users.
To issue private certificates for CBA, you can use your existing public key infrastructure (PKI), or use AWS Private CA. Private CA is a highly available, fully managed private certificate authority service you can use to create CA hierarchies, and issue private X.509 certificates. The recommendation for CBA is to use short-lived private certificates that can be used to authenticate a user and then expire shortly afterward.
Short-lived certificates are used with CBA to reduce the potential impact of a compromised credential. A short validity period for the certificate reduces the impact of a compromised certificate. After the time expires, a new certificate must be issued for authentication.
Understanding the differences between AWS Private CA short-lived certificate mode, and general-purpose certificate mode
AWS Private CA now offers short-lived certificate mode, a lower cost mode of AWS Private CA designed for issuing short-lived certificates. If you must issue end-entity certificates that are only intended to be valid for a week or less, use short-lived certificate mode. The default mode of AWS Private CA is now known as general-purpose mode. This mode supports certificates of any validity period. Both modes have distinct pricing for the different use cases that they support. Find more information on supported CA modes in the AWS Private CA documentation.
You can issue short-lived certificates from both the general-purpose and short-lived certificate modes of AWS Private CA. General-purpose mode incurs a higher monthly charge per CA than a short-lived mode CA. The general purpose-mode CA can issue certificates of any validity period. The short-lived mode CA incurs a lower monthly charge per CA when compared to the general-purpose mode CA. A short-live mode CA only issues certificates with a validity period up to 7 days. The general purpose mode CA has a tiered pricing structure for issuing certificates, based on how many certificates are issued per month. The cost of issuing certificates from a short-lived mode CA is the same for each certificate, regardless of how many certificates are issued per month. You can find more information and example pricing exercises on the AWS Private CA pricing web page.
The short-lived certificate authority mode is optimized for use cases like certificate-based authentication with Amazon WorkSpaces and WorkSpaces Applications. It will be the most cost-effective choice for customers who are issuing less than 75,000 short-lived certificates per month. You can find pricing examples to help you determine the first-rate choice for your workload on the AWS Private CA pricing page.
Overview of the solution
The following figure illustrates the end-to-end user authentication flow from the initial user request through SAML 2.0 and Active Directory authentication using CBA.
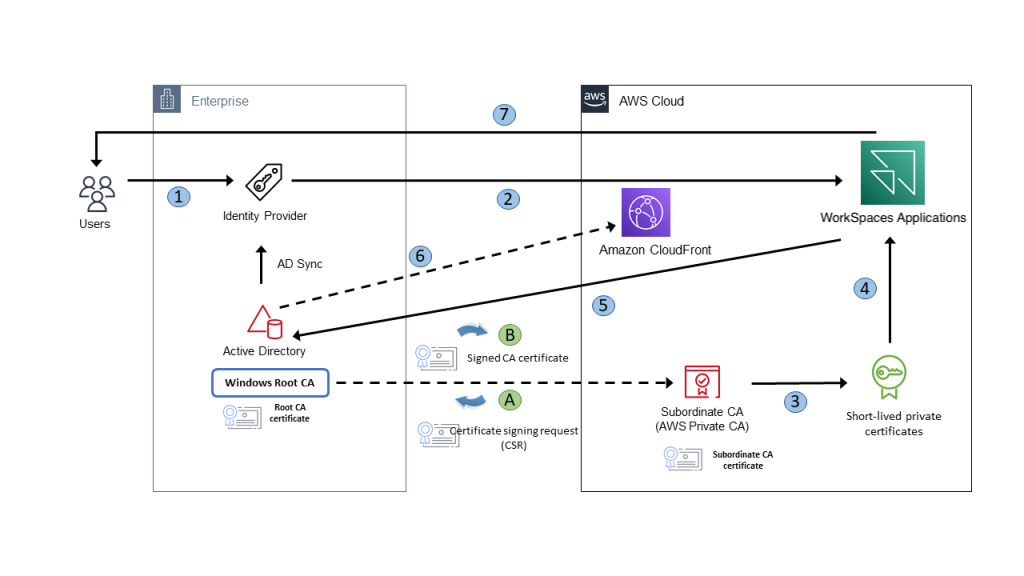
Certificate chain of trust
You can use a CA hierarchy to validate certificates issued by the subordinate certificate authority hosted in AWS Private CA that you trust.
In this example, a Windows Root CA is configured to act as the top of the certificate chain of trust. This may be an existing Root CA you use, or a new Root CA for this use case. This Root CA then cryptographically signs the CA certificate used by the subordinate CA that you create using the AWS Private CA service.
The subordinate CA is now trusted by the Root CA, meaning any end-entity certificates issued by the subordinate CA will also be trusted. For more details on CA hierarchies and certificate trust chains, refer to the AWS Private CA documentation. The following instructions describe the certificate signing process:
A. The certificate signing request (CSR) is generated and sent to the Windows Root CA hosted in your data center.
B. The Root CA provides a signed CA certificate that is imported to the subordinate CA in AWS.
User authentication flow
- Authenticate to the SAML 2.0 identity provider.
- As a federated user, you are authorized to access an WorkSpaces Applications fleet instance.
- Based on attributes in the SAML assertion, WorkSpaces Applications is issued a short-lived private certificate, signed by the subordinate CA hosted in AWS Private CA.
- WorkSpaces Applications publishes the short-lived certificate to your session.
- WorkSpaces Applications seamlessly authenticates you to Active Directory using the short-lived certificate issued from the subordinate CA hosted in AWS Private CA.
- Domain Controllers validate the revocation status of the short-lived certificate against the certificate revocation list (CRL), which is stored in Amazon S3 and made public by Amazon CloudFront.
- You are authenticated to your WorkSpaces Applications session.
Prerequisites
- Active Directory Certificate Services (AD CS) with Enterprise CA Server deployed in Active Directory Domain.
- NOTE: If your Active Directory Domain does not have AD CS deployed and you do not wish to deploy and manage AD CS infrastructure, you may use AWS Private CA as an alternative. Stop here and refer to this guide instead: Simplify certificate-based authentication for WorkSpaces with AWS Private CA Connector for Active Directory.
- AWS CLI (or if you prefer to use AWS CloudShell) and Console IAM permissions to perform commands for the AWS Services used.
- Installation of OpenSSL on the device used to run this blog.
- SAML 2.0 Identity Provider (IdP) configured for the WorkSpaces Applications stack.
- Follow the prerequisites to Enable Certificate-based Authentication instructions found in the Administration Guide.
- Ensure you configure security groups to allow network communications with your Active Directory Domain Controllers.
- Additional SAML attributes configured in the WorkSpaces application for your SAML 2.0 IdP:
https://aws.amazon.com/SAML/Attributes/PrincipalTag:UserPrincipalName- Request for the Subject Alternative Name field in certificates issued.
- NOTE: The User Principal Name (UPN) must be the primary assigned in Windows Active Directory matching its DNS name, not an alternate UPN.
https://aws.amazon.com/SAML/Attributes/PrincipalTag:ObjectSid- Required for a strong mapping to the Active Directory User.
Enable CBA for Amazon WorkSpaces Applications with AWS Private CA
In this walk-through, you configure certificate-based authentication for Amazon WorkSpaces Applications. You use AWS Private CA to issue short-lived certificates with an Active Directory Certificate Server Root Authority.
If you have completed How to configure certificate-based authentication for Amazon WorkSpaces in the same AWS Account, you may proceed to Step 6.
Step 1: Create public repository to host certificate revocation list (CRL)
- Create an Amazon S3 Bucket, keep ACLs disabled, and blocking all public access.
- Create a CloudFront distribution:
- Navigate to the CloudFront console.
- Create a Distribution.
- For Origin Domain, select the S3 Bucket created as the Origin domain in step 1.
- For Origin access, select Origin access control settings (recommended).
- Choose Create control setting.
- Choose Create distribution.
- Create the S3 Bucket Policy:
- Navigate to the Amazon S3 Console.
- Select the S3 Bucket.
- Choose the Permissions tab.
- Select the Bucket Policy, choose Edit.
- Enter as the following. Replace S3-BUCKET-NAME, AWS-ACCOUNT-NUMBER, and CLOUDFRONT-DISTRIBUTION with your values. Then, choose Save.
{
    "Version": "2012-10-17",
    "Statement": [
        {
            "Effect": "Allow",
            "Principal": {
                "Service": "acm-pca.amazonaws.com"
            },
            "Action": [
                "s3:PutObject",
                "s3:PutObjectAcl",
                "s3:GetBucketAcl",
                "s3:GetBucketLocation"
            ],
            "Resource": [
                "arn:aws:s3:::S3-BUCKET-NAME/*",
                 "arn:aws:s3:::S3-BUCKET-NAME"
            ],
            "Condition": {
                "StringEquals": {
                    "aws:SourceAccount": "AWS-ACCOUNT-NUMBER"
                }
            }
        },
        {
            "Sid": "AllowCloudFrontServicePrincipal",
            "Effect": "Allow",
            "Principal": {
                "Service": "cloudfront.amazonaws.com"
            },
            "Action": "s3:GetObject",
            "Resource": "arn:aws:s3:::S3-BUCKET-NAME/*",
            "Condition": {
                "StringEquals": {
                    "AWS:SourceArn": "arn:aws:cloudfront::AWS-ACCOUNT-NUMBER:distribution/CLOUDFRONT-DISTRIBUTION"
                }
            }
        }
    ]
}
Step 2: Establish Active Directory root certificate authority and subordinate template
The steps outlined here are specific to Active Directory Certificate Services. If your Active Directory Domain already has AD CS and Enterprise CA deployed, continue with the steps below.
If your Active Directory Domain does not have AD CS deployed and you do not wish to deploy and manage AD CS infrastructure, you may use AWS Private CA as an alternative. Stop here and refer to this guide instead: Simplify certificate-based authentication for WorkSpaces with AWS Private CA Connector for Active Directory
- On a domain-joined Windows Server, verify that Certificate Authority Role has been installed and configured to your organization’s policies.
- Verify that the following additional Role is installed: Certificate Authority Web Enrollment.
- Configure the Certificate Authority:
- Launch
certsrv.msc, or open Certificate Authority Microsoft Management Console (MMC). - Select Certificate Templates and choose Manage.
- Select Subordinate Certification Authority, secondary select Duplicate Template.
- In the General tab, change the name to Private CA – Subordinate Certification Authority.
- In the Security tab, add a domain user you will later use to create the subordinate request, and select the box to Enroll for permissions.
- Return to Certification Authority (Local) and secondary select Certificate Templates.
- Choose New-> Certificate Template to Issue.
- Select Private CA – Subordinate Certification Authority, then choose OK.
- Launch
- Configure the Web Service:
- Launch
inetmgr.msc, or open Internet Information Services (IIS) Manager. - Navigate to Sites. Expand, and choose Default Web Site.
- In Edit Site, choose Bindings.
- Add a binding for ‘https 443′.
- Assign the generated SSL certificate from the drop-down for SSL Certificate.
- Choose OK. Close out of Bindings.
- Select the Default Web Site. Select CertSrv. Then choose SSL Settings from the IIS section.
- Choose the checkbox to Require SSL. Choose Apply.
- Launch
Step 3: Create a CA using AWS Private Certificate Authority
Review how to incorporate AWS Private CA into your existing Windows Active Directory Certificate Services. This section is not a substitute for the depth covered in that blog.
NOTE: At launch, Amazon WorkSpaces Applications must reside in the same AWS account as the AWS Private CA.
CLI
For specific CLI guidance in completing this section, review the Private CA administrative guide for Procedure for creating a CA (CLI).
- Create a
ca_config.txtfile, formatted with the following information and replacing information in bold with your organizational information:
{
   "KeyAlgorithm":"RSA_2048",
   "SigningAlgorithm":"SHA256WITHRSA",
   "Subject":{
      "Country":"YOUR-COUNTRY",
      "Organization":"YOUR-ORG",
      "OrganizationalUnit":"YOUR-OU",
      "State":"YOUR-STATE",
      "Locality":"YOUR-LOCALITY",
      "CommonName":"SUBORDINATE-DOMAIN"
   }
}
- Create a
revoke_config.txtfile, formatted with the following information (make sure HTTPS is not included in the FQDN for CustomCname) replacing information in bold.
{
   "CrlConfiguration":{
      "Enabled":true,
      "ExpirationInDays":7,
      "S3BucketName":"YOUR-S3-BUCKET-NAME",
      "S3ObjectAcl":"BUCKET_OWNER_FULL_CONTROL",
        "CustomCname":"CLOUDFRONT-DISTRIBUTION-FQDN"
   }
}
- Enter the following AWS CLI (or use AWS CloudShell) command to create the short lived Subordinate AWS Private CA. (Note: These values are required and must be not altered):
aws acm-pca create-certificate-authority \
      --certificate-authority-configuration file://ca_config.txt \
      --revocation-configuration file://revoke_config.txt \
      --certificate-authority-type "SUBORDINATE" \
      --idempotency-token 01234567 \
      --tags Key=euc-private-ca,Value= \
--usage-mode SHORT_LIVED_CERTIFICATE- Once the command completes, copy the AWS ARN for the certificate authority that is returned to be used later.
- Launch the AWS Certificate Manager (ACM) Console in the Region of your choice.
- Choose AWS Private CA.
- In the AWS Private CA Console, select the newly created Subordinate with status ‘Pending certificate‘.
- Choose Actions -> Install CA Certificate.
- Select External Private CA.
- ‘CSR for this CA’ is presented. Select the certificate. Choose Copy.
Certificate Authority Web Enrollment
- Using a web browser, visit your Active Directory Certificate Authority Web Enrollment server. The URL will be in the following format, where the FQDN is the FQDN of your CS Web Enrollment server:
https://FQDN/CertSrv/certrqxt.asp - Paste CSR into the Base-64-encoded certificate request (CMC or PKCS #10 or PKCS #7) field.
- From the Certificate Template drop-down, choose Private CA – Subordinate Certification Authority.
- Choose Submit, Note: If using Internet Explorer, you may receive an error if the FQDN is not a member of Trusted Sites.
- Choose Yes.
- Select Base 64 encoded.
- Choose Download for both certificate and certificate chain as
certnew.p7bonto the device with OpenSSL installed.
Create Plain Text Data
- Create the PEM file with Open SSL using the following command:
openssl pkcs7 -print_certs -in certnew.p7b -out subordinate.pem - Open
subordinate.pemwith a text editor. - Return to Private CA Console to ‘Import a signed certificate authority (CA) certificate’ section.
- Paste top portion of PEM starting with
‘-----BEGIN CERTIFICATE-----’and ending with‘-----END CERTIFICATE-----’in the Certificate body field. - Paste the bottom portion of PEM starting with
‘-----BEGIN CERTIFICATE-----’and ending with‘-----END CERTIFICATE-----’in the Certificate chain field. - Choose ‘Confirm and install’ to publish.
Step 4: Publish subordinate CA in Windows Active Directory
- Open the AWS Private CA console.
- Select Subordinate. Then choose Actions -> Get CA.
- Choose Export certificate body to a file. Then choose Done.
- On a domain-joined Windows instance (such as an existing WorkSpace), enter the following commands in an elevated command prompt to publish to Active Directory:
certutil -dspublish -f subordinate.pem RootCA
certutil -dspublish -f subordinate.pem NTAuthCA
NOTE: If you receive a return the certificate already exists in DS Store, the certificate chain was exported and published in error, not the certificate body.
- Allow time for publishing Root and Subordinate through the Domain. The exact time it will take varies on the size of your AD Site Topology.
Step 5: Validate Certificate
For Active Directory Domain Controllers to successfully authenticate you to WorkSpaces Applications, the Domain Controllers must have certificates installed through auto-enrollment and be able to access the public CRL created in CloudFront.
- Return to the S3 Bucket you created in Step 1. Verify the creation of crl/ folder.
- Explore crl/ to get the full path to the CRL.
- Copy the Cloudfront Distribution URL and append /crl/ and the full string including .crl (for example: https://d3slps3e7spwpp.cloudfront.net/crl/321a4e86-4b46-4bbf-a0e3-f794432502d7.crl).
- In a web browser, paste the new URL and verify the CRL is publicly accessible from the Active Directory Domain Controllers used specifically for WorkSpaces Applications authentication and the WorkSpaces Applications fleet instances. On success, a CRL file downloads.
- Follow the instruction to View certificates in the MMC Snap-in:
- Select Certificates (Local Computer) → Trusted Root Certification Authorities → Certificates and locate the subordinate CA.
- Select the Subordinate Certificate. Choose Certification Path.
- Validate Certificate Status is This certificate is OK.
- Select (Local Computer) → Intermediate Certification Authorities → Certificates and locate the subordinate CA.
- Select the Subordinate Certificate and choose Certification Path.
- Validate Certificate Status is This certificate is OK.
Step 6: Enable CBA on Amazon WorkSpaces Applications directory config
Follow the instructions to Enable certificate-based authentication from the WorkSpaces Applications administration guide.
AWS CloudTrail is used to verify users are authenticating with AWS Private CA as detailed in Logging and Monitoring.
Cleaning up
- Open Amazon WorkSpaces Applications console in the Region of your choice.
- Select Directory Configs, select the Directory Name desired, and select Edit.
- Deselect ‘Enable Certificate-Based Authentication’.
- In the AWS Private CA Console, delete the Private CA you created.
- In the CloudFront Console, delete the CloudFront Distribution you created.
Conclusion
In this post, you learned how to configure Amazon WorkSpaces Applications with Certificate Based Authentication (CBA). The key goal of CBA is to remove a secondary password prompt for Windows Active Directory after authenticating to your SAML 2.0 IdP.
I outlined the WorkSpaces Applications CBA logon authentication workflow. By combining WorkSpaces Applications CBA with AWS Private CA, and short-lived certificate mode you reduce reliance on passwords and streamline the end user experience.
To learn more about WorkSpaces Applications with certificate-based authentication review the Administration Guide.
 |
Stephen Stetler Senior Solution Architect, AWS End User Computing |