AWS DevOps & Developer Productivity Blog
Building a cross-account CI/CD pipeline for single-tenant SaaS solutions
With the increasing demand from enterprise customers for a pay-as-you-go consumption model, more and more independent software vendors (ISVs) are shifting their business model towards software as a service (SaaS). Usually this kind of solution is architected using a multi-tenant model. It means that the infrastructure resources and applications are shared across multiple customers, with mechanisms in place to isolate their environments from each other. However, you may not want or can’t afford to share resources for security or compliance reasons, so you need a single-tenant environment.
To achieve this higher level of segregation across the tenants, it’s recommended to isolate the environments on the AWS account level. This strategy brings benefits, such as no network overlapping, no account limits sharing, and simplified usage tracking and billing, but it comes with challenges from an operational standpoint. Whereas multi-tenant solutions require management of a single shared production environment, single-tenant installations consist of dedicated production environments for each customer, without any shared resources across the tenants. When the number of tenants starts to grow, delivering new features at a rapid pace becomes harder to accomplish, because each new version needs to be manually deployed on each tenant environment.
This post describes how to automate this deployment process to deliver software quickly, securely, and less error-prone for each existing tenant. I demonstrate all the steps to build and configure a CI/CD pipeline using AWS CodeCommit, AWS CodePipeline, AWS CodeBuild, and AWS CloudFormation. For each new version, the pipeline automatically deploys the same application version on the multiple tenant AWS accounts.
There are different caveats to build such cross-account CI/CD pipelines on AWS. Because of that, I use AWS Command Line Interface (AWS CLI) to manually go through the process and demonstrate in detail the various configuration aspects you have to handle, such as artifact encryption, cross-account permission granting, and pipeline actions.
Single-tenancy vs. multi-tenancy
One of the first aspects to consider when architecting your SaaS solution is its tenancy model. Each brings their own benefits and architectural challenges. On multi-tenant installations, each customer shares the same set of resources, including databases and applications. With this mode, you can use the servers’ capacity more efficiently, which generally leads to significant cost-saving opportunities. On the other hand, you have to carefully secure your solution to prevent a customer from accessing sensitive data from another. Designing for high availability becomes even more critical on multi-tenant workloads, because more customers are affected in the event of downtime.
Because the environments are by definition isolated from each other, single-tenant solutions are simpler to design when it comes to security, networking isolation, and data segregation. Likewise, you can customize the applications per customer, and have different versions for specific tenants. You also have the advantage of eliminating the noisy-neighbor effect, and can plan the infrastructure for the customer’s scalability requirements. As a drawback, in comparison with multi-tenant, the single-tenant model is operationally more complex because you have more servers and applications to maintain.
Which tenancy model to choose depends ultimately on whether you can meet your customer needs. They might have specific governance requirements, be bound to a certain industry regulation, or have compliance criteria that influences which model they can choose. For more information about modeling your SaaS solutions, see SaaS on AWS.
Solution overview
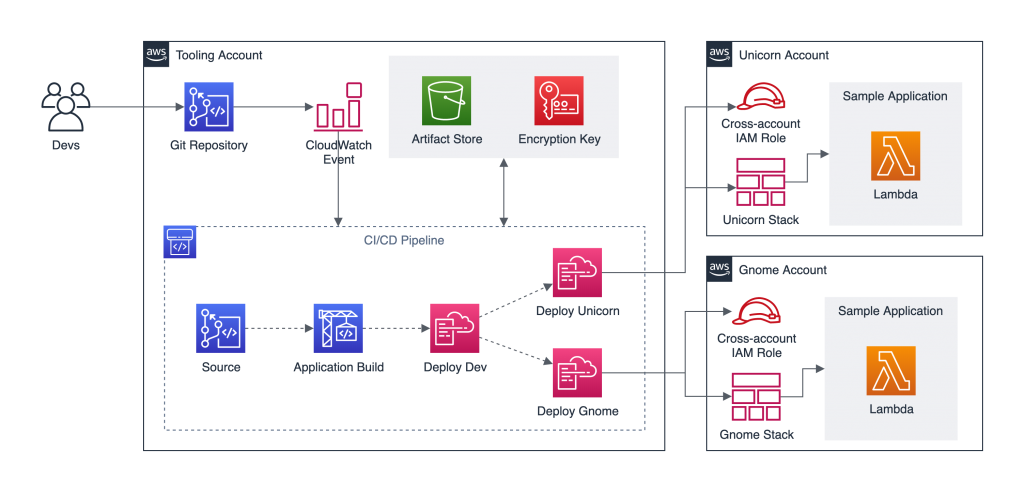
To demonstrate this solution, I consider a fictitious single-tenant ISV with two customers: Unicorn and Gnome. It uses one central account where the tools reside (Tooling account), and two other accounts, each representing a tenant (Unicorn and Gnome accounts). As depicted in the following architecture diagram, when a developer pushes code changes to CodeCommit, Amazon CloudWatch Events triggers the CodePipeline CI/CD pipeline, which automatically deploys a new version on each tenant’s AWS account. It ensures that the fictitious ISV doesn’t have the operational burden to manually re-deploy the same version for each end-customers.
For illustration purposes, the sample application I use in this post is an AWS Lambda function that returns a simple JSON object when invoked.
Prerequisites
Before getting started, you must have the following prerequisites:
- Three AWS accounts:
- Tooling – Where the CodeCommit repository, the artifact store, and the pipeline orchestration reside.
- Tenant 1 – The dedicated account for the first tenant, called Unicorn.
- Tenant 2 – The dedicated account for the second tenant, called Gnome.
- Install and authenticate the AWS CLI. You can authenticate with an AWS Identity and Access Management (IAM) user or an AWS Security Token Service (AWS STS) token.
- Install Git.
Setting up the Git repository
Your first step is to set up your Git repository.
- Create a CodeCommit repository to host the source code.
The CI/CD pipeline is automatically triggered every time new code is pushed to that repository.
- Make sure Git is configured to use IAM credentials to access AWS CodeCommit via HTTP by running the following command from the terminal:
git config --global credential.helper '!aws codecommit credential-helper $@'
git config --global credential.UseHttpPath true- Clone the newly created repository locally, and add two files in the root folder:
index.jsandapplication.yaml.
The first file is the JavaScript code for the Lambda function that represents the sample application. For our use case, the function returns a JSON response object with statusCode: 200 and the body Hello!\n. See the following code:
exports.handler = async (event) => {
    const response = {
        statusCode: 200,
        body: `Hello!\n`,
    };
    return response;
};
The second file is where the infrastructure is defined using AWS CloudFormation. The sample application consists of a Lambda function, and we use AWS Serverless Application Model (AWS SAM) to simplify the resources creation. See the following code:
AWSTemplateFormatVersion: '2010-09-09'
Transform: 'AWS::Serverless-2016-10-31'
Description: Sample Application.

Parameters:
    S3Bucket:
        Type: String
    S3Key:
        Type: String
    ApplicationName:
        Type: String

Resources:
    SampleApplication:
        Type: 'AWS::Serverless::Function'
        Properties:
            FunctionName: !Ref ApplicationName
            Handler: index.handler
            Runtime: nodejs12.x
            CodeUri:
                Bucket: !Ref S3Bucket
                Key: !Ref S3Key
            Description: Hello Lambda.
            MemorySize: 128
Timeout: 10- Push both files to the remote Git repository.
Creating the artifact store encryption key
By default, CodePipeline uses server-side encryption with an AWS Key Management Service (AWS KMS) managed customer master key (CMK) to encrypt the release artifacts. Because the Unicorn and Gnome accounts need to decrypt those release artifacts, you need to create a customer managed CMK in the Tooling account.
From the terminal, run the following command to create the artifact encryption key:
aws kms create-key --region <YOUR_REGION>This command returns a JSON object with the key ARN property if run successfully. Its format is similar to arn:aws:kms:<YOUR_REGION>:<TOOLING_ACCOUNT_ID>:key/<KEY_ID>. Record this value to use in the following steps.
The encryption key has been created manually for educational purposes only, but it’s considered a best practice to have it as part of the Infrastructure as Code (IaC) bundle.
Creating an Amazon S3 artifact store and configuring a bucket policy
Our use case uses Amazon Simple Storage Service (Amazon S3) as artifact store. Every release artifact is encrypted and stored as an object in an S3 bucket that lives in the Tooling account.
To create and configure the artifact store, follow these steps in the Tooling account:
- From the terminal, create an S3 bucket and give it a unique name:
aws s3api create-bucket \
    --bucket <BUCKET_UNIQUE_NAME> \
    --region <YOUR_REGION> \
--create-bucket-configuration LocationConstraint=<YOUR_REGION>- Configure the bucket to use the customer managed CMK created in the previous step. This makes sure the objects stored in this bucket are encrypted using that key, replacing <KEY_ARN> with the ARN property from the previous step:
aws s3api put-bucket-encryption \
    --bucket <BUCKET_UNIQUE_NAME> \
    --server-side-encryption-configuration \
        '{
            "Rules": [
                {
                    "ApplyServerSideEncryptionByDefault": {
                        "SSEAlgorithm": "aws:kms",
                        "KMSMasterKeyID": "<KEY_ARN>"
                    }
                }
            ]
}'- The artifacts stored in the bucket need to be accessed from the
UnicornandGnomeConfigure the bucket policies to allow cross-account access:
aws s3api put-bucket-policy \
    --bucket <BUCKET_UNIQUE_NAME> \
    --policy \
        '{
            "Version": "2012-10-17",
            "Statement": [
                {
                    "Action": [
                        "s3:GetBucket*",
                        "s3:List*"
                    ],
                    "Effect": "Allow",
                    "Principal": {
                        "AWS": [
                            "arn:aws:iam::<UNICORN_ACCOUNT_ID>:root",
                            "arn:aws:iam::<GNOME_ACCOUNT_ID>:root"
                        ]
                    },
                    "Resource": [
                        "arn:aws:s3:::<BUCKET_UNIQUE_NAME>"
                    ]
                },
                {
                    "Action": [
                        "s3:GetObject*"
                    ],
                    "Effect": "Allow",
                    "Principal": {
                        "AWS": [
                            "arn:aws:iam::<UNICORN_ACCOUNT_ID>:root",
                            "arn:aws:iam::<GNOME_ACCOUNT_ID>:root"
                        ]
                    },
                    "Resource": [
                        "arn:aws:s3:::<BUCKET_UNIQUE_NAME>/CrossAccountPipeline/*"
                    ]
                }
            ]
        }'
This S3 bucket has been created manually for educational purposes only, but it’s considered a best practice to have it as part of the IaC bundle.
Creating a cross-account IAM role in each tenant account
Following the security best practice of granting least privilege, each action declared on CodePipeline should have its own IAM role. For this use case, the pipeline needs to perform changes in the Unicorn and Gnome accounts from the Tooling account, so you need to create a cross-account IAM role in each tenant account.
Repeat the following steps for each tenant account to allow CodePipeline to assume role in those accounts:
- Configure a named CLI profile for the tenant account to allow running commands using the correct access keys.
- Create an IAM role that can be assumed from another AWS account, replacing <TENANT_PROFILE_NAME> with the profile name you defined in the previous step:
aws iam create-role \
    --role-name CodePipelineCrossAccountRole \
    --profile <TENANT_PROFILE_NAME> \
    --assume-role-policy-document \
        '{
            "Version": "2012-10-17",
            "Statement": [
                {
                    "Effect": "Allow",
                    "Principal": {
                        "AWS": "arn:aws:iam::<TOOLING_ACCOUNT_ID>:root"
                    },
                    "Action": "sts:AssumeRole"
                }
            ]
}'- Create an IAM policy that grants access to the artifact store S3 bucket and to the artifact encryption key:
aws iam create-policy \
    --policy-name CodePipelineCrossAccountArtifactReadPolicy \
    --profile <TENANT_PROFILE_NAME> \
    --policy-document \
        '{
            "Version": "2012-10-17",
            "Statement": [
                {
                    "Action": [
                        "s3:GetBucket*",
                        "s3:ListBucket"
                    ],
                    "Resource": [
                        "arn:aws:s3:::<BUCKET_UNIQUE_NAME>"
                    ],
                    "Effect": "Allow"
                },
                {
                    "Action": [
                        "s3:GetObject*",
                        "s3:Put*"
                    ],
                    "Resource": [
                        "arn:aws:s3:::<BUCKET_UNIQUE_NAME>/CrossAccountPipeline/*"
                    ],
                    "Effect": "Allow"
                },
                {
                    "Action": [
                        "kms:DescribeKey",
                        "kms:GenerateDataKey*",
                        "kms:Encrypt",
                        "kms:ReEncrypt*",
                        "kms:Decrypt"
                    ],
                    "Resource": "<KEY_ARN>",
                    "Effect": "Allow"
                }
            ]
}'- Attach the
CodePipelineCrossAccountArtifactReadPolicyIAM policy to theCodePipelineCrossAccountRoleIAM role:
aws iam attach-role-policy \
    --profile <TENANT_PROFILE_NAME> \
    --role-name CodePipelineCrossAccountRole \
--policy-arn arn:aws:iam::<TENANT_ACCOUNT_ID>:policy/CodePipelineCrossAccountArtifactReadPolicy- Create an IAM policy that allows to pass the IAM role
CloudFormationDeploymentRoleto CloudFormation and to perform CloudFormation actions on the application Stack:
aws iam create-policy \
    --policy-name CodePipelineCrossAccountCfnPolicy \
    --profile <TENANT_PROFILE_NAME> \
    --policy-document \
        '{
            "Version": "2012-10-17",
            "Statement": [
                {
                    "Action": [
                        "iam:PassRole"
                    ],
                    "Resource": "arn:aws:iam::<TENANT_ACCOUNT_ID>:role/CloudFormationDeploymentRole",
                    "Effect": "Allow"
                },
                {
                    "Action": [
                        "cloudformation:*"
                    ],
                    "Resource": "arn:aws:cloudformation:<YOUR_REGION>:<TENANT_ACCOUNT_ID>:stack/SampleApplication*/*",
                    "Effect": "Allow"
                }
            ]
}'- Attach the
CodePipelineCrossAccountCfnPolicyIAM policy to theCodePipelineCrossAccountRoleIAM role:
aws iam attach-role-policy \
    --profile <TENANT_PROFILE_NAME> \
    --role-name CodePipelineCrossAccountRole \
    --policy-arn arn:aws:iam::<TENANT_ACCOUNT_ID>:policy/CodePipelineCrossAccountCfnPolicy
Additional configuration is needed in the Tooling account to allow access, which you complete later on.
Creating a deployment IAM role in each tenant account
After CodePipeline assumes the CodePipelineCrossAccountRole IAM role into the tenant account, it triggers AWS CloudFormation to provision the infrastructure based on the template defined in the application.yaml file. For that, AWS CloudFormation needs to assume an IAM role that grants privileges to create resources into the tenant AWS account.
Repeat the following steps for each tenant account to allow AWS CloudFormation to create resources in those accounts:
- Create an IAM role that can be assumed by AWS CloudFormation:
aws iam create-role \
    --role-name CloudFormationDeploymentRole \
    --profile <TENANT_PROFILE_NAME> \
    --assume-role-policy-document \
        '{
            "Version": "2012-10-17",
            "Statement": [
                {
                    "Effect": "Allow",
                    "Principal": {
                        "Service": "cloudformation.amazonaws.com"
                    },
                    "Action": "sts:AssumeRole"
                }
            ]
}'- Create an IAM policy that grants permissions to create AWS resources:
aws iam create-policy \
    --policy-name CloudFormationDeploymentPolicy \
    --profile <TENANT_PROFILE_NAME> \
    --policy-document \
        '{
            "Version": "2012-10-17",
            "Statement": [
                {
                    "Action": "iam:PassRole",
                    "Resource": "arn:aws:iam::<TENANT_ACCOUNT_ID>:role/*",
                    "Effect": "Allow"
                },
                {
                    "Action": [
                        "iam:GetRole",
                        "iam:CreateRole",
                        "iam:DeleteRole",
                        "iam:AttachRolePolicy",
                        "iam:DetachRolePolicy"
                    ],
                    "Resource": "arn:aws:iam::<TENANT_ACCOUNT_ID>:role/*",
                    "Effect": "Allow"
                },
                {
                    "Action": "lambda:*",
                    "Resource": "*",
                    "Effect": "Allow"
                },
                {
                    "Action": "codedeploy:*",
                    "Resource": "*",
                    "Effect": "Allow"
                },
                {
                    "Action": [
                        "s3:GetObject*",
                        "s3:GetBucket*",
                        "s3:List*"
                    ],
                    "Resource": [
                        "arn:aws:s3:::<BUCKET_UNIQUE_NAME>",
                        "arn:aws:s3:::<BUCKET_UNIQUE_NAME>/*"
                    ],
                    "Effect": "Allow"
                },
                {
                    "Action": [
                        "kms:Decrypt",
                        "kms:DescribeKey"
                    ],
                    "Resource": "<KEY_ARN>",
                    "Effect": "Allow"
                },
                {
                    "Action": [
                        "cloudformation:CreateStack",
                        "cloudformation:DescribeStack*",
                        "cloudformation:GetStackPolicy",
                        "cloudformation:GetTemplate*",
                        "cloudformation:SetStackPolicy",
                        "cloudformation:UpdateStack",
                        "cloudformation:ValidateTemplate"
                    ],
                    "Resource": "arn:aws:cloudformation:<YOUR_REGION>:<TENANT_ACCOUNT_ID>:stack/SampleApplication*/*",
                    "Effect": "Allow"
                },
                {
                    "Action": [
                        "cloudformation:CreateChangeSet"
                    ],
                    "Resource": "arn:aws:cloudformation:<YOUR_REGION>:aws:transform/Serverless-2016-10-31",
                    "Effect": "Allow"
                }
            ]
        }'
The granted permissions in this IAM policy depend on the resources your application needs to be provisioned. Because the application in our use case consists of a simple Lambda function, the IAM policy only needs permissions over Lambda. The other permissions declared are to access and decrypt the Lambda code from the artifact store, use AWS CodeDeploy to deploy the function, and create and attach the Lambda execution role.
- Attach the IAM policy to the IAM role:
aws iam attach-role-policy \
    --profile <TENANT_PROFILE_NAME> \
    --role-name CloudFormationDeploymentRole \
    --policy-arn arn:aws:iam::<TENANT_ACCOUNT_ID>:policy/CloudFormationDeploymentPolicy
Configuring an artifact store encryption key
Even though the IAM roles created in the tenant accounts declare permissions to use the CMK encryption key, that’s not enough to have access to the key. To access the key, you must update the CMK key policy.
From the terminal, run the following command to attach the new policy:
aws kms put-key-policy \
    --key-id <KEY_ARN> \
    --policy-name default \
    --region <YOUR_REGION> \
    --policy \
        '{
             "Id": "TenantAccountAccess",
             "Version": "2012-10-17",
             "Statement": [
                {
                    "Sid": "Enable IAM User Permissions",
                    "Effect": "Allow",
                    "Principal": {
                        "AWS": "arn:aws:iam::<TOOLING_ACCOUNT_ID>:root"
                    },
                    "Action": "kms:*",
                    "Resource": "*"
                },
                {
                    "Effect": "Allow",
                    "Principal": {
                        "AWS": [
                            "arn:aws:iam::<GNOME_ACCOUNT_ID>:role/CloudFormationDeploymentRole",
                            "arn:aws:iam::<GNOME_ACCOUNT_ID>:role/CodePipelineCrossAccountRole",
                            "arn:aws:iam::<UNICORN_ACCOUNT_ID>:role/CloudFormationDeploymentRole",
                            "arn:aws:iam::<UNICORN_ACCOUNT_ID>:role/CodePipelineCrossAccountRole"
                        ]
                    },
                    "Action": [
                        "kms:Decrypt",
                        "kms:DescribeKey"
                    ],
                    "Resource": "*"
                }
             ]
         }'
Provisioning the CI/CD pipeline
Each CodePipeline workflow consists of two or more stages, which are composed by a series of parallel or serial actions. For our use case, the pipeline is made up of four stages:
- Source – Declares CodeCommit as the source control for the application code.
- Build – Using CodeBuild, it installs the dependencies and builds deployable artifacts. In this use case, the sample application is too simple and this stage is used for illustration purposes.
- Deploy_Dev – Deploys the sample application on a sandbox environment. At this point, the deployable artifacts generated at the
Buildstage are used to create a CloudFormation stack and deploy the Lambda function. - Deploy_Prod – Similar to
Deploy_Dev, at this stage the sample application is deployed on the tenant production environments. For that, it contains two actions (one per tenant) that are run in parallel. CodePipeline usesCodePipelineCrossAccountRoleto assume a role on the tenant account, and from there,CloudFormationDeploymentRoleis used to effectively deploy the application.
To provision your resources, complete the following steps from the terminal:
- Download the CloudFormation pipeline template:
curl -LO https://cross-account-ci-cd-pipeline-single-tenant-saas.s3.amazonaws.com/pipeline.yaml- Deploy the CloudFormation stack using the pipeline template:
aws cloudformation deploy \
    --template-file pipeline.yaml \
    --region <YOUR_REGION> \
    --stack-name <YOUR_PIPELINE_STACK_NAME> \
    --capabilities CAPABILITY_IAM \
    --parameter-overrides \
        ArtifactBucketName=<BUCKET_UNIQUE_NAME> \
        ArtifactEncryptionKeyArn=<KMS_KEY_ARN> \
        UnicornAccountId=<UNICORN_TENANT_ACCOUNT_ID> \
        GnomeAccountId=<GNOME_TENANT_ACCOUNT_ID> \
        SampleApplicationRepositoryName=<YOUR_CODECOMMIT_REPOSITORY_NAME> \
        RepositoryBranch=<YOUR_CODECOMMIT_MAIN_BRANCH>
This is the list of the required parameters to deploy the template:
-
- ArtifactBucketName – The name of the S3 bucket where the deployment artifacts are to be stored.
- ArtifactEncryptionKeyArn – The ARN of the customer managed CMK to be used as artifact encryption key.
- UnicornAccountId – The AWS account ID for the first tenant (
Unicorn) where the application is to be deployed. - GnomeAccountId – The AWS account ID for the second tenant (
Gnome) where the application is to be deployed. - SampleApplicationRepositoryName – The name of the CodeCommit repository where source changes are detected.
- RepositoryBranch – The name of the CodeCommit branch where source changes are detected. The default value is
masterin case no value is provided.
- Wait for AWS CloudFormation to create the resources.
When stack creation is complete, the pipeline starts automatically.
For each existing tenant, an action is declared within the Deploy_Prod stage. The following code is a snippet of how these actions are configured to deploy the application on a different account:
RoleArn: !Sub arn:aws:iam::${UnicornAccountId}:role/CodePipelineCrossAccountRole
Configuration:
    ActionMode: CREATE_UPDATE
    Capabilities: CAPABILITY_IAM,CAPABILITY_AUTO_EXPAND
    StackName: !Sub SampleApplication-unicorn-stack-${AWS::Region}
    RoleArn: !Sub arn:aws:iam::${UnicornAccountId}:role/CloudFormationDeploymentRole
    TemplatePath: CodeCommitSource::application.yaml
    ParameterOverrides: !Sub |
        {
            "ApplicationName": "SampleApplication-Unicorn",
            "S3Bucket": { "Fn::GetArtifactAtt" : [ "ApplicationBuildOutput", "BucketName" ] },
            "S3Key": { "Fn::GetArtifactAtt" : [ "ApplicationBuildOutput", "ObjectKey" ] }
        }
The code declares two IAM roles. The first one is the IAM role assumed by the CodePipeline action to access the tenant AWS account, whereas the second is the IAM role used by AWS CloudFormation to create AWS resources in the tenant AWS account. The ParameterOverrides configuration declares where the release artifact is located. The S3 bucket and key are in the Tooling account and encrypted using the customer managed CMK. That’s why it was necessary to grant access from external accounts using a bucket and KMS policies.
Besides the CI/CD pipeline itself, this CloudFormation template declares IAM roles that are used by the pipeline and its actions. The main IAM role is named CrossAccountPipelineRole, which is used by the CodePipeline service. It contains permissions to assume the action roles. See the following code:
{
    "Action": "sts:AssumeRole",
    "Effect": "Allow",
    "Resource": [
        "arn:aws:iam::<TOOLING_ACCOUNT_ID>:role/<PipelineSourceActionRole>",
        "arn:aws:iam::<TOOLING_ACCOUNT_ID>:role/<PipelineApplicationBuildActionRole>",
        "arn:aws:iam::<TOOLING_ACCOUNT_ID>:role/<PipelineDeployDevActionRole>",
        "arn:aws:iam::<UNICORN_ACCOUNT_ID>:role/CodePipelineCrossAccountRole",
        "arn:aws:iam::<GNOME_ACCOUNT_ID>:role/CodePipelineCrossAccountRole"
    ]
}
When you have more tenant accounts, you must add additional roles to the list.
After CodePipeline runs successfully, test the sample application by invoking the Lambda function on each tenant account:
aws lambda invoke --function-name SampleApplication --profile <TENANT_PROFILE_NAME> --region <YOUR_REGION> outThe output should be:
{
    "StatusCode": 200,
    "ExecutedVersion": "$LATEST"
}
Cleaning up
Follow these steps to delete the components and avoid future incurring charges:
- Delete the production application stack from each tenant account:
aws cloudformation delete-stack --profile <TENANT_PROFILE_NAME> --region <YOUR_REGION> --stack-name SampleApplication-<TENANT_NAME>-stack-<YOUR_REGION>- Delete the dev application stack from the
Toolingaccount:
aws cloudformation delete-stack --region <YOUR_REGION> --stack-name SampleApplication-dev-stack-<YOUR_REGION>- Delete the pipeline stack from the
Toolingaccount:
aws cloudformation delete-stack --region <YOUR_REGION> --stack-name <YOUR_PIPELINE_STACK_NAME>- Delete the customer managed CMK from the
Toolingaccount:
aws kms schedule-key-deletion --region <YOUR_REGION> --key-id <KEY_ARN>
- Delete the S3 bucket from the
Toolingaccount:
aws s3 rb s3://<BUCKET_UNIQUE_NAME> --force- Optionally, delete the IAM roles and policies you created in the tenant accounts
Conclusion
This post demonstrated what it takes to build a CI/CD pipeline for single-tenant SaaS solutions isolated on the AWS account level. It covered how to grant cross-account access to artifact stores on Amazon S3 and artifact encryption keys on AWS KMS using policies and IAM roles. This approach is less error-prone because it avoids human errors when manually deploying the exact same application for multiple tenants.
For this use case, we performed most of the steps manually to better illustrate all the steps and components involved. For even more automation, consider using the AWS Cloud Development Kit (AWS CDK) and its pipeline construct to create your CI/CD pipeline and have everything as code. Moreover, for production scenarios, consider having integration tests as part of the pipeline.

Rafael Ramos
Rafael is a Solutions Architect at AWS, where he helps ISVs on their journey to the cloud. He spent over 13 years working as a software developer, and is passionate about DevOps and serverless. Outside of work, he enjoys playing tabletop RPG, cooking and running marathons.