Artificial Intelligence
Host multiple TensorFlow computer vision models using Amazon SageMaker multi-model endpoints
Amazon SageMaker helps data scientists and developers prepare, build, train, and deploy high-quality machine learning (ML) models quickly by bringing together a broad set of capabilities purpose-built for ML. SageMaker accelerates innovation within your organization by providing purpose-built tools for every step of ML development, including labeling, data preparation, feature engineering, statistical bias detection, AutoML, training, tuning, hosting, explainability, monitoring, and workflow automation.
Companies are increasingly training ML models based on individual user data. For example, an image sharing service designed to enable discovery of information on the internet trains custom models based on each user’s uploaded images and browsing history to personalize recommendations for that user. The company can also train custom models based on search topics for recommending images per topic. Building custom ML models for each use case leads to higher inference accuracy, but increases the cost of deploying and managing models. These challenges become more pronounced when not all models are accessed at the same rate but still need to be available at all times.
SageMaker multi-model endpoints provide a scalable and cost-effective way to deploy large numbers of ML models in the cloud. SageMaker multi-model endpoints enable you to deploy multiple ML models behind a single endpoint and serve them using a single serving container. Your application simply needs to include an API call with the target model to this endpoint to achieve low-latency, high-throughput inference. Instead of paying for a separate endpoint for every single model, you can host many models for the price of a single endpoint. For more information about SageMaker multi-model endpoints, see Save on inference costs by using Amazon SageMaker multi-model endpoints.
In this post, we demonstrate how to use SageMaker multi-model endpoints to host two computer vision models with different model architectures and datasets for image classification. In practice, you can deploy tens of thousands of models on multi-model endpoints.
Overview of solution
SageMaker multi-model endpoints work with several frameworks, such as TensorFlow, PyTorch, MXNet, and sklearn, and you can build your own container with a multi-model server. Multi-model endpoints are also supported natively in the following popular SageMaker built-in algorithms: XGBoost, Linear Learner, Random Cut Forest (RCF), and K-Nearest Neighbors (KNN). You can directly use the SageMaker-provided containers while using these algorithms without having to build your own custom container.
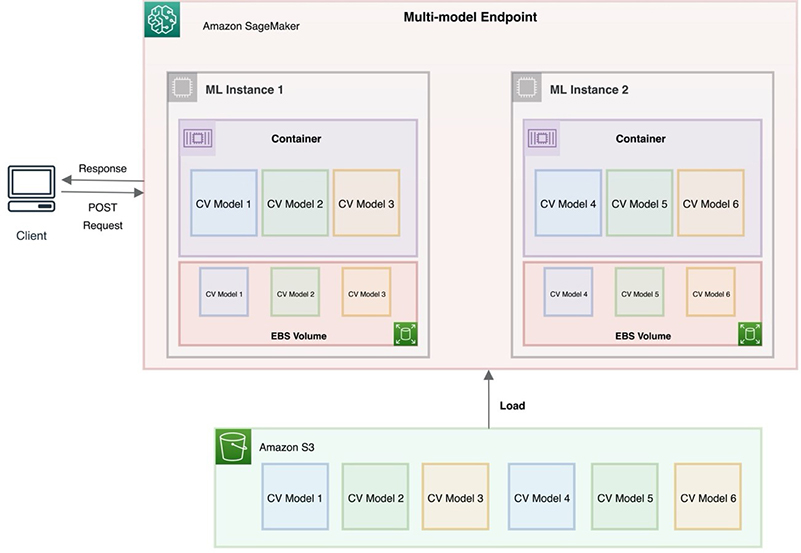
The following diagram is a simplified illustration of how you can host multiple (for this post, six) models using SageMaker multi-model endpoints. In practice, multi-model endpoints can accommodate hundreds to tens of thousands of ML models behind an endpoint. In our architecture, if we host more models using model artifacts stored in Amazon Simple Storage Service (Amazon S3), multi-model endpoints dynamically unload some of the least-used models to accommodate newer models.
In this post, we show how to host two computer vision models trained using the TensorFlow framework behind a single SageMaker multi-model endpoint. We use the TensorFlow Serving container enabled for multi-model endpoints to host these models. For our first model, we train a smaller version of AlexNet CNN to classify images from the CIFAR-10 dataset. For the second model, we use a VGG16 CNN model pretrained on the ImageNet dataset and fine-tuned on the Sign Language Digits Dataset to classify hand symbol images. We also provide a fully functional notebook to demonstrate all the steps.
Model 1: CIFAR-10 image classification
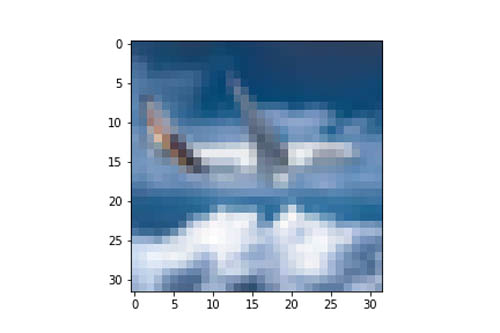
CIFAR-10 is a benchmark dataset for image classification in computer vision and ML. CIFAR images are colored (three channels) with dramatic variation in how the objects appear. It consists of 32 × 32 color images in 10 classes, with 6,000 images per class. It contains 50,000 training images and 10,000 test images. The following image shows a sample of the images grouped by the labels.

To build the image classifier, we use a simplified version of the classical AlexNet CNN. The network is composed of five convolutional and pooling layers, and three fully connected layers. Our simplified architecture stacks three convolutional layers and two fully connected (dense) layers.
The first step is to load the dataset into train and test objects. The TensorFlow framework provides the CIFAR dataset for us to load using the load_data() method. Next, we rescale the input images by dividing the pixel values by 255: [0,255] ⇒ [0,1]. We also need to prepare the labels using one-hot encoding. One hot encoding is a process by which the categorical variables are converted into a numerical form. The following code snippet shows these steps in action:
After the dataset is prepared and ready for training, it’s saved to Amazon S3 to be used by SageMaker. The model architecture and the training code for the image classifier are assembled into a training script (cifar_train.py). To generate batches of tensor image data for the training process, we use ImageDataGenerator. This enables us to apply data augmentation transformations like rotation, width, and height shifts to our training data.
In the next step, we use the training script to create a TensorFlow estimator using the SageMaker SDK (see the following code). We use the estimator to fit the CNN model on CIFAR-10 inputs. When the training is complete, the model is saved to Amazon S3.
Later, we demonstrate how to host this model using SageMaker multi-model endpoint alongside our second model (the sign language digits classifier).
Model 2: Sign language digits classification
For our second model, we use the sign language digits dataset. This dataset distinguishes the sign language digits from 0–9. The following image shows a sample of the dataset.
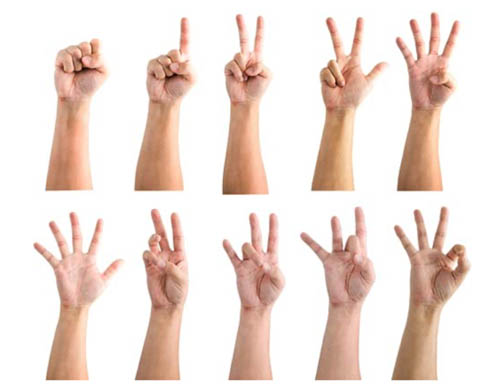
The dataset contains 100 x 100 images in RGB color and has 10 classes (digits 0–9). The training set contains 1,712 images, the validation set 300, and the test set 50.
This dataset is very small. Training a network from scratch on this small a dataset doesn’t achieve good results. To achieve higher accuracy, we use transfer learning. Transfer learning is usually the go-to approach when starting a classification project, especially when you don’t have much training data. It migrates the knowledge learned from the source dataset to the target dataset, to save training time and computational cost.
To train this model, we use a pretrained VGG16 CNN model trained on the ImageNet dataset and fine-tune it to work on our sign language digits dataset. A pretrained model is a network that has been previously trained on a large dataset, typically on a large-scale image classification task. The VGG16 model architecture we use has 13 convolutional layers in total. For the sign language dataset, because its domain is different from the source domain of the ImageNet dataset, we only fine-tune the last few layers. Fine-tuning here refers to freezing a few of the network layers that are used for feature extraction, and jointly training both the non-frozen layers and the newly added classifier layers of the pretrained model.
The training script (sign_language_train.py) encapsulates the model architecture and the training logic for the sign language digits classifier. First, we load the pretrained weights from the VGG16 network trained on the ImageNet dataset. Next, we freeze part of the feature extractor part, followed by adding the new classifier layers. Finally, we compile the network and run the training process to optimize the model for the smaller dataset.
Next, we use this training script to create a TensorFlow estimator using the SageMaker SDK. This estimator is used to fit the sign language digits classifier on the supplied inputs. When the training is complete, the model is saved to Amazon S3 to be hosted by SageMaker multi-model endpoints. See the following code:
Deploy a multi-model endpoint
SageMaker multi-model endpoints provide a scalable and cost-effective solution to deploy large numbers of models. It uses a shared serving container that is enabled to host multiple models. This reduces hosting costs by improving endpoint utilization compared to using single-model endpoints. It also reduces deployment overhead because SageMaker manages loading models in memory and scaling them based on the traffic patterns to them.
To create the multi-model endpoint, first we need to copy the trained models for the individual estimators (1 and 2) from their saved S3 locations to a common S3 prefix that can be used by the multi-model endpoint:
After the models are copied to the common location designated by the S3 prefix, we create a serving model using the TensorFlowModel class from the SageMaker SDK. The serving model is created for one of the models to be hosted under the multi-model endpoint. In this case, we use the first model (the CIFAR-10 image classifier). Next, we use the MultiDataModel class from the SageMaker SDK to create a multi-model data model using the serving model for model-1, which we created in the previous step:
Finally, we deploy the MultiDataModel by calling the deploy() method, providing the attributes needed to create the hosting infrastructure required to back the multi-model endpoint:
The deploy call returns a predictor instance, which we can use to make inference calls. We see this in the next section.
Test the multi-model endpoint for real-time inference
Multi-model endpoints enable sharing memory resources across your models. If the model to be referenced is already cached, multi-model endpoints run inference immediately. On the other hand, if the particular requested model isn’t cached, SageMaker has to download the model, which increases latency for that initial request. However, this takes only a fraction of the time it would take to launch an entirely new infrastructure (instances) to host the model individually on SageMaker. After a model is cached in the multi-model endpoint, subsequent requests are initiated in real time (unless the model is removed). As a result, you can run many models from a single instance, effectively decoupling our quantity of models from our cost of deployment. This makes it easy to manage ML deployments at scale and lowers your model deployment costs through increased usage of the endpoint and its underlying compute instances. For more information and a demonstration of cost savings of over 90% for a 1,000-model example, see Save on inference costs using Amazon SageMaker multi-model endpoints.
Multi-model endpoints also unload unused models from the container when the instances backing the endpoint reach memory capacity and more models need to be loaded into its container. SageMaker deletes unused model artifacts from the instance storage volume when the volume is reaching capacity and new models need to be downloaded. The first invocation to a newly added model takes longer because the endpoint takes time to download the model from Amazon S3 to the container’s memory of the instances backing the multi-model endpoint. Models that are unloaded remain on the instance’s storage volume and can be loaded into the container’s memory later without being downloaded again from the S3 bucket.
Let’s see how to make an inference from the CIFAR-10 image classifier (model-1) hosted under the multi-model endpoint. First, we load a sample image from one of the classes—airplane— and prepare it to be sent to the multi-model endpoint using the predictor we created in the previous step.
With this predictor, we can call the predict() method along with the initial_args parameter, which specifics the name of the target model to invoke. In this case, the target model is cifar.tar.gz. The following snippet demonstrates this process in detail:
Running the preceding code returns the prediction output as the label airplane, which is correctly interpreted by our served model:
Next, let’s see how to dynamically load the sign language digit classifier (model-2) into a multi-model endpoint by invoking the endpoint with sign-language.tar.gz as the target model.
We use the following sample image of the hand sign digit 0.

The following snippet shows how to invoke the multi-model endpoint with the sample image to get back the correct response:
The following code is our response, with the label 0:
Conclusion
In this post, we demonstrated the SageMaker feature multi-model endpoints to optimize inference costs. Multi-model endpoints are useful when you’re dealing with hundreds to tens of thousands of models and where you don’t need to deploy each model as an individual endpoint. Models are loaded and unloaded dynamically, according to usage and the amount of memory available on the endpoint.
This post discussed how to host multiple computer vision models trained using the TensorFlow framework under one SageMaker multi-model endpoint. The image classification models were of different model architectures and trained on different datasets. The notebook included with the post provides detailed instructions on training and hosting the models.
Give SageMaker multi-model endpoints a try for your use case and leave your feedback in the comments.
About the Authors
 Arunprasath Shankar is an Artificial Intelligence and Machine Learning (AI/ML) Specialist Solutions Architect with AWS, helping global customers scale their AI solutions effectively and efficiently in the cloud. In his spare time, Arun enjoys watching sci-fi movies and listening to classical music.
 Mark Roy is a Principal Machine Learning Architect for AWS, helping AWS customers design and build AI/ML solutions. Mark’s work covers a wide range of ML use cases, with a primary interest in computer vision, deep learning, and scaling ML across the enterprise. He has helped companies in many industries, including Insurance, Financial Services, Media and Entertainment, Healthcare, Utilities, and Manufacturing. Mark holds six AWS certifications, including the ML Specialty Certification. Prior to joining AWS, Mark was an architect, developer, and technology leader for 25+ years, including 19 years in financial services.