Artificial Intelligence
Manage AI costs with Amazon Bedrock Projects
As organizations scale their AI workloads on Amazon Bedrock, understanding what’s driving spending becomes critical. Teams might need to perform chargebacks, investigate cost spikes, and guide optimization decisions, all of which require cost attribution at the workload level.
With Amazon Bedrock Projects, you can attribute inference costs to specific workloads and analyze them in AWS Cost Explorer and AWS Data Exports. In this post, you will learn how to set up Projects end-to-end, from designing a tagging strategy to analyzing costs.
How Amazon Bedrock Projects and cost allocation work
A project on Amazon Bedrock is a logical boundary that represents a workload, such as an application, environment, or experiment. To attribute the cost of a project, you attach resource tags and pass the project ID in your API calls. You can then activate the cost allocation tags in AWS Billing to filter, group, and analyze spend in AWS Cost Explorer and AWS Data Exports.
The following diagram illustrates the end-to-end flow:
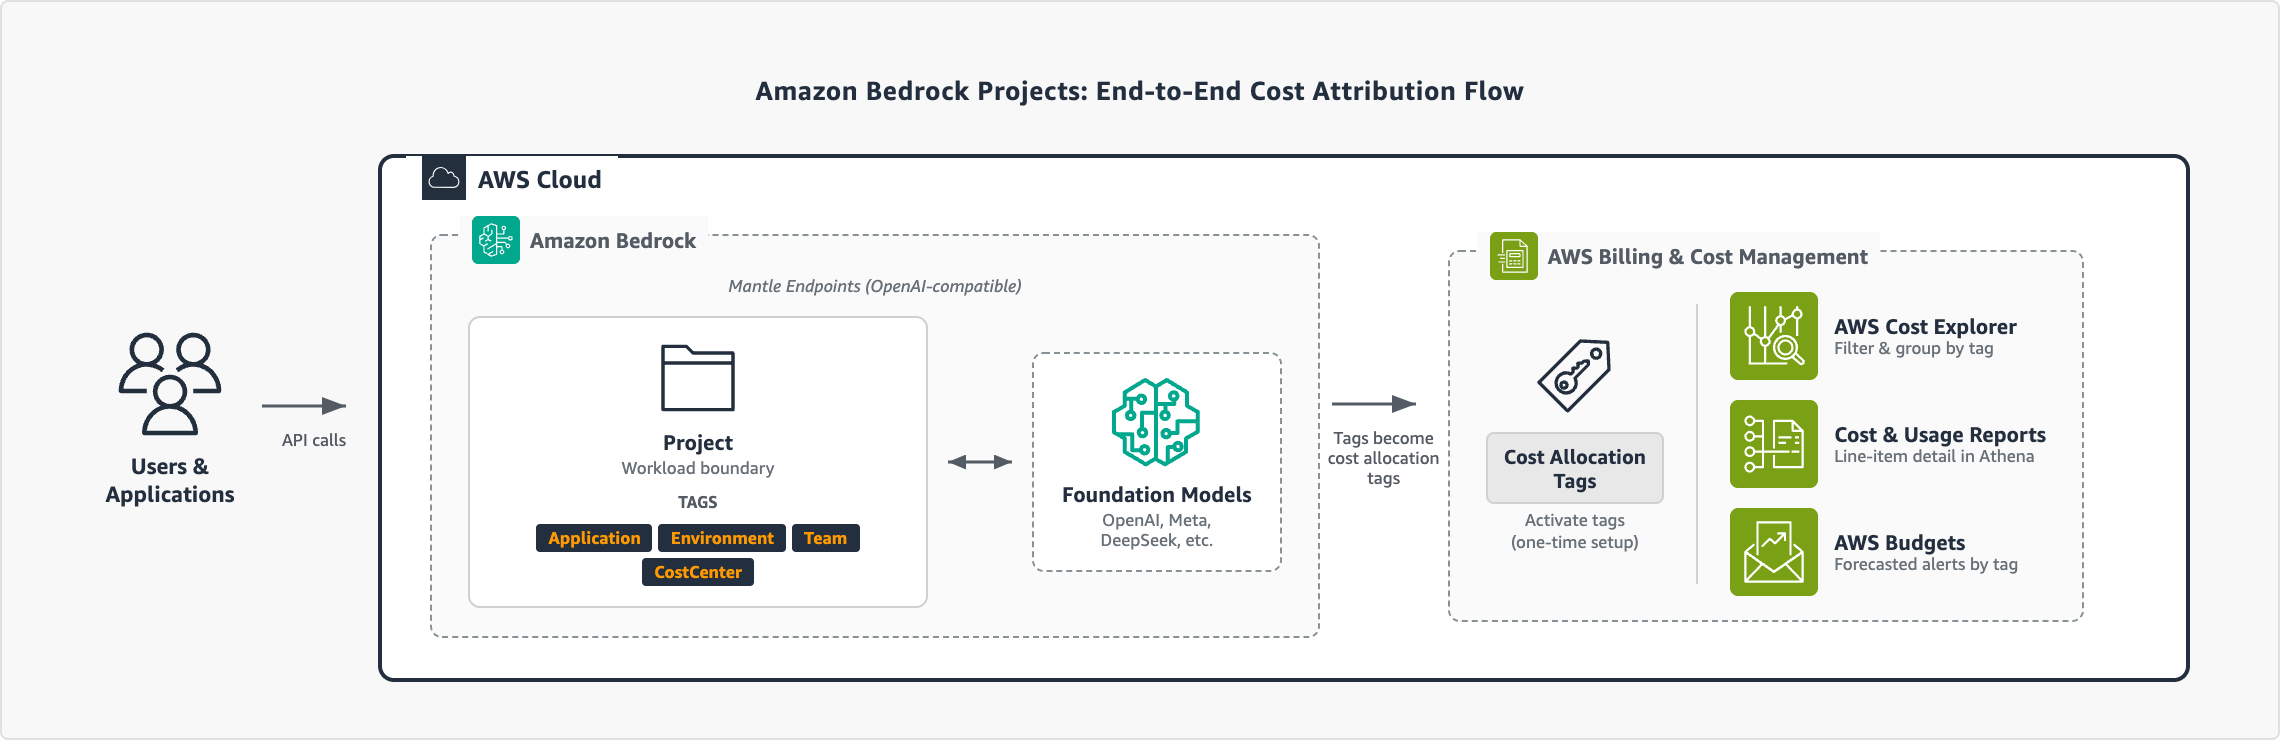
Figure 1: End-to-end cost attribution flow with Amazon Bedrock Projects
Notes:
- Amazon Bedrock Projects support the OpenAI-compatible APIs: Responses API and Chat Completions API.
- Requests without a project ID are automatically associated with the default project in your AWS account.
Prerequisites
To follow along with the steps in this post, you need:
- Access to Amazon Bedrock with the OpenAI SDK. See Amazon Bedrock Quickstart to get started.
- IAM permissions for Amazon Bedrock Projects, inference, and tagging. For this example, you can attach the AWS managed policy AmazonBedrockMantleFullAccess. For production, see Implementing least privilege for Amazon Bedrock.
- Access to the AWS Billing and Cost Management console.
Define your tagging strategy
The tags that you attach to projects become the dimensions that you can filter and group by in your cost reports. We recommend that you plan these before creating your first project. A common approach is to tag by application, environment, team, and cost center:
| Tag key | Purpose | Example values |
| Application | Which workload or service | CustomerChatbot, Experiments, DataAnalytics |
| Environment | Lifecycle stage | Production, Development, Staging, Research |
| Team | Ownership | CustomerExperience, PlatformEngineering, DataScience |
| CostCenter | Finance mapping | CC-1001, CC-2002, CC-3003 |
For more guidance on building a cost allocation strategy, see Best Practices for Tagging AWS Resources. With your tagging strategy defined, you’re ready to create projects and start attributing costs.
Create a project
With your tagging strategy and permissions in place, you can create your first project. Each project has its own set of cost allocation tags that flow into your billing data. The following example shows how to create a project using the Projects API.
First, install the required dependencies:
$ pip3 install openai requestsCreate a project with your tag taxonomy:
The OpenAI SDK uses the OPENAI_API_KEY environment variable. Set this to your Bedrock API key.
import os
import requests

# Configuration
BASE_URL = "https://bedrock-mantle.<YOUR-REGION-HERE>.api.aws/v1"
API_KEY  = os.environ.get("OPENAI_API_KEY")  # Your Amazon Bedrock API key

def create_project(name: str, tags: dict) -> dict:
    """Create a Bedrock project with cost allocation tags."""
    response = requests.post(
        f"{BASE_URL}/organization/projects",
        headers={
            "Authorization": f"Bearer {API_KEY}",
            "Content-Type": "application/json"
        },
        json={"name": name, "tags": tags}
    )

    if response.status_code != 200:
        raise Exception(
            f"Failed to create project: {response.status_code} - {response.text}"
        )

    return response.json()

# Create a production project with full tag taxonomy
project = create_project(
    name="CustomerChatbot-Prod",
    tags={
        "Application": "CustomerChatbot",
        "Environment": "Production",
        "Team":        "CustomerExperience",
        "CostCenter":  "CC-1001",
        "Owner":       "alice"
    }
)
print(f"Created project: {project['id']}")
The API returns the project details, including the project ID and ARN:
{
  "id": "proj_123",
  "arn": "arn:aws:bedrock-mantle:<YOUR-REGION-HERE>:<YOUR-ACCOUNT-ID-HERE>:project/<YOUR-PROJECT-ID>"
}
Save the project ID. You will use it to associate inference requests in the next step. The ARN is used for IAM policy attachment if you must restrict access to this project. Repeat this for each workload. The following table shows a sample project structure for an organization with three applications:
| Project name | Application | Environment | Team | Cost Center |
| CustomerChatbot-Prod | CustomerChatbot | Production | CustomerExperience | CC-1001 |
| CustomerChatbot-Dev | CustomerChatbot | Development | CustomerExperience | CC-1001 |
| Experiments-Research | Experiments | Production | PlatformEngineering | CC-2002 |
| DataAnalytics-Prod | DataAnalytics | Production | DataScience | CC-3003 |
You can create up to 1,000 projects per AWS account to fit your organization’s needs.
Associate inference requests with your project
With your projects created, you can associate inference requests by passing the project ID in your API calls. The following example uses the Responses API:
from openai import OpenAI

client = OpenAI(
    base_url="https://bedrock-mantle.<YOUR-REGION-HERE>.api.aws/v1",
    project="<YOUR-PROJECT-ID>", # ID returned when you created the project
)
response = client.responses.create(
    model="openai.gpt-oss-120b",
    input="Summarize the key findings from our Q4 earnings report."
)
print(response.output_text)
To maintain clean cost attribution, always specify a project ID in your API calls rather than relying on the default project.
Activate cost allocation tags
Before your project tags appear in cost reports, you must activate them as cost allocation tags in AWS Billing. This one-time setup connects your project tags to the billing pipeline. For more information about activating cost allocation tags, see the AWS Billing documentation.
It can take up to 24 hours for tags to propagate to AWS Cost Explorer and AWS Data Exports. You can activate your tags immediately after creating your first project to avoid gaps in cost data.
View project costs
With projects created, inference requests tagged, and cost allocation tags activated, you can see exactly where your Amazon Bedrock spend is going. Every dimension that you defined in your taxonomy is now available as a filter or grouping in your AWS Billing cost reports.
AWS Cost Explorer
AWS Cost Explorer provides the fastest way to visualize your costs by project. Complete the following steps to review your costs by project:
- Open the AWS Billing and Cost Management console and choose Cost Explorer.
- In the Filters pane, expand Service and select Amazon Bedrock.
- Under Group by, select Tag and choose your tag key (for example, Application).

Figure 2: Cost Explorer showing daily Amazon Bedrock spending grouped by the Application tag
For more ways to refine your view, see Analyzing your costs and usage with AWS Cost Explorer.
For more granular analysis and line-item detail with your project tags, see Creating Data Exports in the AWS Billing documentation.
Conclusion
With Amazon Bedrock Projects, you can attribute costs to individual workloads and track spending using the AWS tools that your organization already relies on. As your workloads scale, use the tagging strategy and cost visibility patterns covered in this post to maintain accountability across teams and applications.
For more information, see Amazon Bedrock Projects documentation and the AWS Cost Management User Guide.