Artificial Intelligence
Predicting Customer Churn with Amazon Machine Learning
Note: This post has a companion talk that was delivered at AWS re:Invent 2016.
Losing customers is costly for any business. Identifying unhappy customers early on gives you a chance to offer them incentives to stay. This post describes using machine learning (ML) for the automated identification of unhappy customers, also known as customer churn prediction. ML models rarely give perfect predictions though, so my post is also about how to incorporate the relative costs of prediction mistakes when determining the financial outcome of using ML.
I use an example of churn that is familiar to all of us–leaving a mobile phone operator. Seems like I can always find fault with my provider du jour! And if my provider knows that I’m thinking of leaving, it can offer timely incentives–I can always use a phone upgrade or perhaps have a new feature activated–and I might just stick around. Incentives are often much more cost effective than losing and reacquiring a customer.
| Interested in learning more about customer churn models? These posts might interest you: |
Churn dataset
Mobile operators have historical records on which customers ultimately ended up churning and which continued using the service. We can use this historical information to construct an ML model of one mobile operator’s churn using a process called training. After training the model, we can pass the profile information of an arbitrary customer (the same profile information that we used to train the model) to the model, and have the model predict whether this customer is going to churn. Of course, we expect the model to make mistakes–after all, predicting the future is tricky business! But I’ll also show how to deal with prediction errors.
The dataset I use is publicly available and was mentioned in the book “Discovering Knowledge in Data” by Daniel T. Larose. It is attributed by the author to the University of California Irvine Repository of Machine Learning Datasets, and can be downloaded from the author’s website here (look for the churn.txt file inside the archive).
By modern standards, it’s a relatively small dataset, with only 3,333 records, where each record uses 21 attributes to describe the profile of a customer of an unknown US mobile operator. The attributes are:
- State: the US state in which the customer resides, indicated by a two-letter abbreviation; for example, OH or NJ
- Account Length: the number of days that this account has been active
- Area Code: the three-digit area code of the corresponding customer’s phone number
- Phone: the remaining seven-digit phone number
- Int’l Plan: whether the customer has an international calling plan: yes/no
- VMail Plan: whether the customer has a voice mail feature: yes/no
- VMail Message: presumably the average number of voice mail messages per month
- Day Mins: the total number of calling minutes used during the day
- Day Calls: the total number of calls placed during the day
- Day Charge: the billed cost of daytime calls
- Eve Mins, Eve Calls, Eve Charge: the billed cost for calls placed during the evening
- Night Mins, Night Calls, Night Charge: the billed cost for calls placed during nighttime
- Intl Mins, Intl Calls, Intl Charge: the billed cost for international calls
- CustServ Calls: the number of calls placed to Customer Service
- Churn?: whether the customer left the service: true/false
The last attribute, Churn?, is known as the target attribute–the attribute that we want the ML model to predict. Because the target attribute is binary, our model will be performing binary prediction, also known as binary classification.
Amazon Machine Learning
The simplest way to build the model is to use the AWS ML service, Amazon Machine Learning (Amazon ML), using the binary classification model. First, I prepare and analyze the training dataset, then I create the model, and finally I evaluate the model to decide whether I can use it.
Preparing the training data
With Amazon ML, I need to first create a datasource representing the training dataset. I upload the corresponding CSV file to Amazon S3 and use the resulting S3 URL in constructing the datasource. (To learn how to do this, see AWS documentation for Using Amazon S3 with ML.)
Before doing that, I changed the column names in the .csv file slightly, eliminating special characters and replacing spaces with underscores. I also removed the trailing ‘.’ from each line so that Amazon ML can recognize False and True as proper binary values.
I use the Create ML Model wizard in the Amazon ML console to create the datasource. I specify that the first line of the .csv file contains the column names. Generally, Amazon ML automatically infers the data types of attributes, distinguishing between Binary, Categorical, Numeric, and Text attributes. You can correct incorrectly inferred types.
With this dataset, Amazon ML made the right choices, with the exception of Area Code. I had to relabel it as Categorical as opposed to the inferred Numeric type–a perfectly understandable mistake. Although I can leave Phone as the Text type, I changed it to Categorical because there is no point in tokenizing the phone number, which Amazon ML does automatically with Text fields. Instead of manually making these corrections, you can supply your own schema that describes the dataset. To learn how, see AWS documentation for Creating a Data Schema for Amazon ML.
After specifying that I plan to use this datasource for creating a model, I needed to select the target attribute, Churn?. The wizard also asks about the identifier for each row. In a practical application, you should supply an identifier for each data point–such as a customer ID–to tie the churn predictions back to the corresponding customers. Because this dataset doesn’t contain a natural ID, I chose No and proceed to creating the datasource. For more information about the purpose of row ID, see AWS documentation for Creating a Data Schema for Amazon ML.
As it creates the datasource, Amazon ML analyzes the data and computes basic statistics, such as the correlation of individual attributes to the target attribute, and the range and distribution of the values. It always pays to spend some time trying to understand the data you are working with. For this dataset, the Amazon ML console shows me that most of the numeric attributes, such as Day_Mins, appear to be normally distributed, while CustServ_Calls appears to be positively skewed:


Amazon ML automatically transforms all binary values, such as yes/no and True/False into corresponding 1/0 values. Looking at the distribution of the target attribute, Churn?, we see that 483 out of 3,333 customers, or approximately 14.49 %, did churn. As you will see later, this is an important statistic for deciding whether the trained model is usable.

Finally, looking at the statistics computed for Area_Code and State, I discover that there are only three different area codes (all from California, I might add), while there are 51 distinct states–the expected 50 US states, plus the District of Columbia. One explanation I can think of is that the phone numbers (and thus the area codes) in this dataset are fictitious, having been replaced for privacy reasons.

Creating a model
Now that I’ve prepared my datasource, I’m ready to train the model. With Amazon ML, this can be as simple as clicking a button, pointing to the datasource, and choosing default configurations. By default, the service sets aside 30% of your training data for model evaluation and uses the other 70% to train the model. Additionally, Amazon ML chooses default training parameters and uses a default data recipe for feature transformation prior to training. You can use the default settings, but if you carefully look at your data, supplying a custom recipe based on your insights might improve the accuracy of the model. With Amazon ML, this is my opportunity to customize model training.
A recipe allows me to modify and transform the data before training the model. I’ll use the same recipe later to process the new data when we put the model to use. I can always perform the transformations outside of Amazon ML, but the service makes it convenient to apply commonly used transformations. In this particular case, I chose to do two things to the data:
- Eliminate the Phone attribute because it is useless. A customer whose phone number is hard to remember could be more likely to churn, but because the numbers appear to be fictitious, this action seems reasonable. It’s a good practice to drop attributes that you are sure have no effect on the target attribute because it eliminates noise that the model training algorithm would need to deal with.
- Normalize all numeric attributes, except CustServ_Calls. After normalization, the corresponding attributes have a mean of 0 and a variance of 1. Numeric attributes with higher absolute values could dominate the ML model. The purpose of normalization is to treat all attributes equally at the outset. At the same time, I am guessing that the number of calls placed to Customer Service might be highly correlated with churn. After all, a happy customer doesn’t need to call Customer Service. So, I choose to boost the significance of CustServ_Calls by not normalizing it. Most of the values of this attribute are still fairly close to 0 with a mean of about 1.56, so it’s unlikely to completely dominate other attributes. If a particular record has a rather high value, like 7, it’s likely to stand out as significant.
Here is the resulting recipe that I used to build the model. (I replaced the default recipe in the Create ML Model wizard.)
For recipe syntax, see the Amazon ML documentation.
Model evaluation
After training the model, Amazon ML automatically evaluates it. Remember that 30% of the data was set aside to form the testing dataset, which wasn’t examined during training. Amazon ML runs the model against the testing dataset and compares known values of the Churn? attribute for this testing dataset with those predicted by the model. The result of the evaluation consists of the distribution of model predictions over the testing dataset. It summarizes the evaluation with four important statistics relative to the total number of predictions: the percentage of true negatives (TN), true positives (TP), false negatives (FN), and false positives (FP). These stats are often presented in the form of a , as follows.

The binary classification model actually produces a score between 0 and 1, instead of giving me a truly binary response. This gives me a chance to further tune predictions by selecting a threshold, or a cutoff score, that the service will use to give me the final prediction. By default, this threshold is set at 0.5. The Amazon ML console allows you to interactively change the threshold by showing you how a given setting affects the four statistics.
The sum of false positive and false negative percentages gives us the total error percentage; in other words, the percentage of records of the testing dataset for which the model made a prediction mistake. The console also shows this combined error statistic, along with other ways to look at the same basic information, such as Precision and Recall.
As I move the slider to find the best threshold, all of the statistics change dynamically. Naturally, my first thought is to find the cutoff value that minimizes the percentage of errors my model produces. As I drag the slider, I note that the lowest error percentage I can get is 14.5% (8.9% false negatives + 5.6% false positives), when the cutoff is set to 0.3:
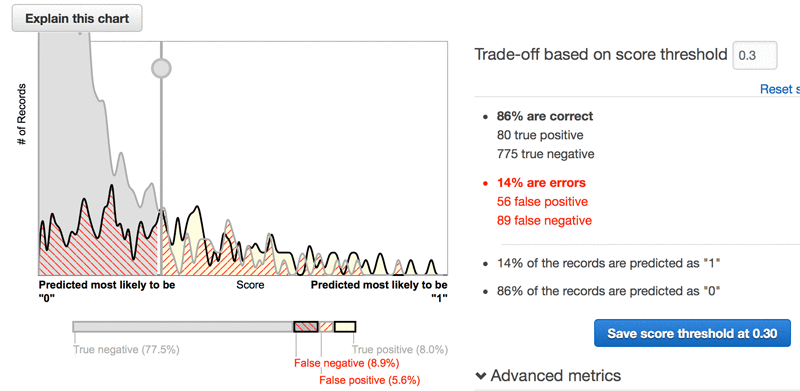
At first, the result appears to be disappointing. (If the meaning of the chart is not quite clear, see AWS documentation for Binary Model Insights. Remember that I started with a distribution of the target attribute of 14.49% of customers who churn. Put differently, if I don’t use Amazon ML and simply assume that no customer is ever going to churn, I would be wrong by roughly the same percentage!
Looking at the chart, it seems like the model is assigning scores that are closer to 0 (no churn) for a substantial number of customers that are known to be churning (solid black line). Likewise, there are still many non-churning customers with scores closer to 1 (churn), to the right of the threshold. The chart is messy and is far from the ideal, where scores for one class clearly gravitate toward 0 and for the other class toward 1, with little overlap between the two.
Overall, this seems like a useless result. But is it? Read on.
Relative cost of errors
Any practical binary classification problem is likely to produce a similarly messy chart. That by itself isn’t a problem. After all, if the scores for two classes are really easy to separate, the problem probably isn’t very hard to begin with and might even be solvable with simple rules instead of ML.
More important, if I put an ML model into production, there are costs associated with the model erroneously assigning false positives and false negatives. I also need to look at similar costs associated with correct predictions of true positives and true negatives. Because the choice of the threshold affects all four of these statistics, I need to consider the relative costs to the business for each of these four outcomes for each prediction.
Assigning costs
What are the costs for my problem of mobile operator churn? The costs, of course, depend on the specific actions that the business takes. I will make some assumptions here.
First, I will assign the true negatives the cost of $0. My model essentially correctly identified a happy customer in this case, and I don’t need to do anything.
False negatives are the most problematic, because they incorrectly predict that a churning customer will stay. I will lose the customer and will have to pay all the costs of acquiring a replacement customer, including foregone revenue, advertising costs, administrative costs, point of sale costs, and likely a phone hardware subsidy. A quick search on the Internet reveals that such costs typically run in the hundreds of dollars so, for the purposes of this post, I will assume $500. This is the cost of false negatives.
Finally, for customers that my model identifies as churning, I will assume a retention incentive in the amount of $100. If my provider offered me such a concession, I’d certainly think twice before leaving. This is the cost of both true positive and false positive outcomes. In the case of false positives (the customer is happy, but the model mistakenly predicted churn), I will “waste” the $100 concession. I probably could have spent that $100 more effectively, but I possibly increased the loyalty of an already loyal customer, so that’s not so bad.
Finding the optimal threshold
It’s clear that false negatives are substantially more costly than false positives. Instead of optimizing for total error, I should be minimizing a cost function that looks like this:
$500*FN(C) + $0*TN(C) + $100*FP(C) + $100*TP(C)
FN(C) means that the false negative percentage is a function of the cutoff, C, and similar for TN, FP, and TP. I need to find the cutoff, C, where the result of the expression is smallest.
To do this, I need to run the testing dataset against the model and obtain the prediction results. Amazon ML already did this automatically to generate the model evaluation, but the prediction results for the testing dataset are not available at the moment. They need to be downloaded. Not a big deal though, because Amazon ML automatically created a separate datasource to represent the testing dataset. I can simply point my model to the datasource and rerun the predictions in a batch. Amazon ML writes the results of the model predictions to an S3 location of my choosing.
All that’s left is performing the optimization calculation. I’ve used a spreadsheet for this, but this task isn’t trivial and I don’t like spreadsheets, so I’ve written a handy Python script for this. I just need to supply the model ID, the testing datasource ID, the S3 location to write the predictions to, and, naturally, the four costs, expressed in the same units. Here’s how I invoke the script:
./cost_based_ml.py --ml-model-id=ml-5fqIJ4T6IqR --test-datasource-id 89730913-826b-4fcd-90a1-a15792ec3be9 --output-uri-s3 s3://denisb-aml/result/ --true-pos 100 --false-pos 100 --true-neg 0 --false-neg 500The script outputs the optimal value of the threshold as approximately 0.1698949:
It also displays a graph of the cost as a function of the threshold:

If you’d like to use my script for finding optimum threshold, you can download it from our Github repository.
Comparing models
Now I’m ready to compare the financial outcomes of using vs. not using my ML model. I can treat not using an ML model as a simple strategy–a kind of primitive model. In other words, if I don’t use ML, I’m assuming that everyone is loyal and not offering anyone any concessions. I’ll be making a false negative type of mistake 14.49% of the time. If I want to maintain my current pool of customers, this strategy will cost me $500 * 0.1449 or $72.45/customer, on average.
If I use my ML model with a calculated optimal threshold of 0.1698949, my total error percentage is going to be approximately 19%–even higher than not using a model, but, as the script reports, the overall cost of this strategy drops to $50.30/customer. This is substantially better than $72.45/customer. I feel much better about deploying my ML model into production!
This approach gives you the ability to compare the performance of different strategies–including strategies that don’t involve ML–in clear financial terms. Suppose that your company has established a rule-based process for identifying churning customers. You can view this as a kind of a model, estimate the cost of using this process, and compare it with something more powerful, like ML. In our example, using an ML model has a $22.15/customer advantage. If our costs and assumptions are accurate, for a hypothetical small mobile operator with only 100,000 customers this equals over $2MM in savings!
Conclusion
In this example, I clearly made many simplifying assumptions. To realistically predict churn, you might want to take into account some the following issues:
- Some customers who receive retention incentives will still churn.
- Customers who switch to a lower-priced plan or who deactivate a paid feature represent different kinds of churn that you probably need to model.
- You should model the evolution of customer behavior. If usage is dropping and the number of calls placed to Customer Service is increasing, you are more likely to experience churn then if the trend is the opposite. A customer profile should incorporate behavior trends.
Your training data and your monetary cost assignments could be more complex, or you might have to build multiple models for each type of churn. Regardless of the added complexity, the same principles described in this post will likely apply.
Hopefully, this post has inspired you to use Amazon ML to tackle churn prediction for your customers.
About the Author

Denis V. Batalov is a Solutions Architect for AWS, specializing in Machine Learning. He’s been with Amazon since 2005 and is currently based in Luxembourg. Denis has a PhD in the field of AI. Follow him on Twitter: @dbatalov.