AWS for M&E Blog
Clipping VOD content using manifest file time stamps
Amazon Interactive Video Service (Amazon IVS), a managed live streaming solution that lets users build interactive video experiences, has added HTTP live streaming (HLS) Program-Date-Time (PDT) tags and HLS byte range manifest files. The PDT provides precise presentation timestamps to allow time-synchronized tasks, while the byte range manifest allows detailed segmentation and selective loading of the media content. These features are available when using Auto-Record to Amazon S3, giving developers have access to each archived media segment using the absolute date and time information in the playlist manifest, and additional byte range manifest files.
The PDT tag is a time stamp embedded in an HLS manifest that is used to indicate the absolute date and time of a particular stream media segment, typically a few seconds long. Inside the manifest, each element of an HLS stream has a unique PDT tag that includes the PDT information for each media segment.
The byte range manifest is used to divide a media segment file into smaller segments, marked by keyframe intervals. It specifies the start and end byte range for each segment, allowing clients to request only the portion of the media that they need.
In this blog, we explore how to use PDT tagging and the byte range manifest to clip content and export the best moments of your live stream. By trimming the initial and final parts, developers can remove undesired portions of the recorded live stream, such as when the streamer was live and recording but wasn’t fully ready yet.
A brief definition of Program-Date-Time (PDT)
As described in the RFC8216, the embedded time stamp tag EXT-X-PROGRAM-DATE-TIME associates the first sample of a media segment with an absolute date or time, indicating the wall-clock time for every HLS segment produced by using the coordinated universal time (UTC) ISO-8601 format.
In a manifest file, it applies only to the following media segment URL. Its format is:
YYYY = four-digit year
MM = two-digit month (01=January)
DD = two-digit day of month (01 through 31)
hh = two digits of hour (00 through 23) (am/pm NOT allowed)
mm = two digits of minute (00 through 59)
ss = two digits of second (00 through 59)
SSS = digits representing a decimal fraction of a second (milliseconds, for example)
Z = time zone designator (Z or +hh:mm or -hh:mm)
Z is the UTC designator that is added to the end of a time representation to indicate that a time of day is represented as UTC of day. The use of the character Z comes from its commonly known relationship with the zero meridian and its usage in the military and navigation as Zulu time, which was inherited from Greenwich mean time (GMT).
In the example below, the tag references UTC+8 time zone:
The byte range manifest
Live recordings with Amazon IVS Auto-Record to Amazon S3 now include byte range manifest files, with the structure of the media file and the location of the media segments. Besides information about target duration and sequence number, it adds the tag #EXT-X-BYTERANGE that specifies the start offset and length of a single media segment, allowing up to one-second segmentation of the media content, depending on the source encoding configuration.
The byte range tag and manifest have the following structure:
#EXTINF:1.000, #EXT-X-BYTERANGE:116748@68056
Scenario Diagram

Figure 1: Clip manifest API diagram
Let’s assume that we have a 100-seconds-long live streaming session, where we want to clip just the most relevant 50 seconds. By using this API, created on top of Amazon API Gateway—a fully managed service that makes it easy for developers to create, publish, maintain, monitor, and secure APIs at nearly any scale—and AWS Lambda, a serverless, event-driven compute service, we can create an HTTP request with desired start and end times, as demonstrated in Figure 1.
The solution parses the original Amazon IVS source playlist manifest and returns a new clipped playlist manifest containing just the media segments of interest.
NOTE: This solution uses the PDT information and the byte range manifest, and it parses and retrieves only the group of segments in the interval requested. The clip precision will depend on the key-frame interval configuration of the encoder or software encoder, such as Open Broadcast Software (OBS), which can be up to a one second interval.
Getting started installing the clip API
The following steps show how to use AWS Serverless Application Model (AWS SAM), an open-source framework for building serverless applications, to create a deployment built around Amazon S3, Amazon API Gateway, AWS Lambda, and Amazon CloudFront, a content delivery network (CDN) service built for high performance. It also shows how to attach the Amazon CloudFront distribution to the Amazon S3 bucket and apply the required policies to both.
Built on AWS CloudFormation—which lets users model, provision, and manage AWS and third-party resources—AWS SAM provides shorthand syntax to declare serverless resources using JSON or YAML. During deployment, AWS SAM transforms the serverless resources into AWS CloudFormation syntax so that serverless applications can be built faster. As a companion to AWS SAM, the AWS SAM Command Line Interface (AWS SAM CLI) command reference is a command line tool that operates on AWS SAM templates.
Prerequisites
- An AWS account with permissions to create the necessary resources
- AWS SAM CLI installed (instructions here)
- AWS Command Line Interface (AWS CLI), a unified tool to manage AWS services
- A download or clone of the Amazon IVS manifest clip GitHub repository
Cloning the GitHub repository
Clone the GitHub repository of the clip manifest API for Amazon IVS:
NOTE: This blog covers the use of the stand-alone API. However, the solution offers a web user interface with additional web APIs. For the complete solution, please visit the GitHub repository.
After configuring the AWS CLI with your account credentials and the AWS SAM CLI, navigate to the folder where you cloned the GitHub repository and install the required dependencies.
This bucket hosts the deployment packages needed for the AWS SAM installation.
Deploy the package
Amazon IVS channel configuration
If you already have an Amazon IVS channel created that you want to use, you can skip this step.
Instead, copy from the AWS SAM deploy output the recording bucket name and replace the <Your Recording Bucket Name> below.
Please take note of the RecordingConfiguration ARN because it will be used to link your recording configuration.
Create the Amazon IVS channel and link to your recording configuration
Start by making a short live transmission to your Amazon IVS RTMPS endpoint (use the provided ingest server and the stream key). After you stop streaming, navigate to the Amazon S3 Recording Bucket and look for the .m3u8 manifest. The Amazon S3 path should look like the following:
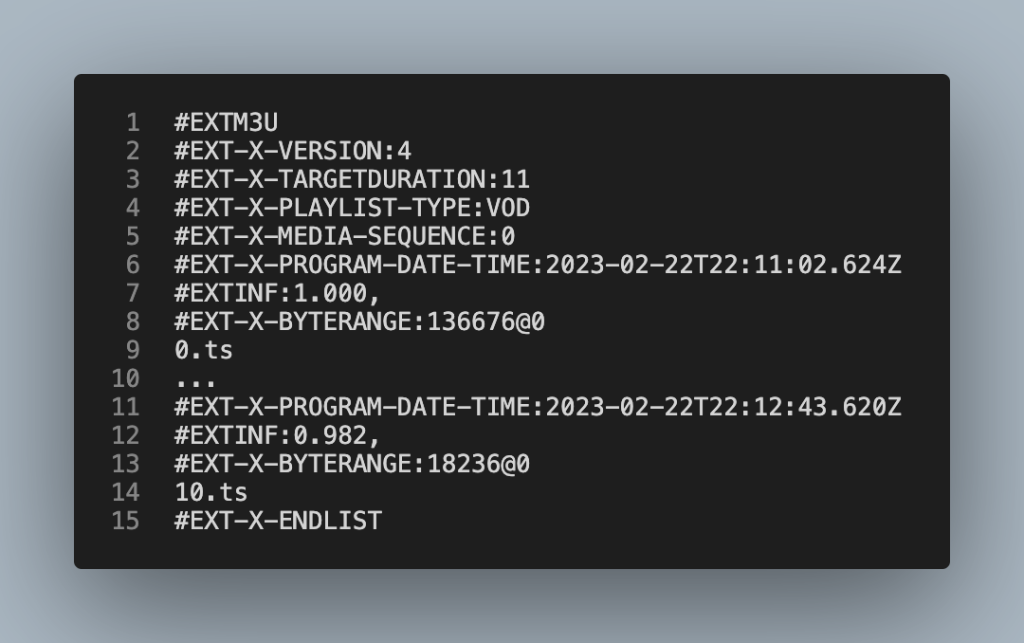 Figure 2: Byte range manifest sample Now that we have our video-on-demand (VOD) recording stored in the Amazon S3 bucket, we can use the API to create our first clip.
Replace <API endpoint> with your endpoint information and configure the parameters of your clip: start_time, end_time, and master_url, and define if you need one-second precision, setting the byte range to true. In this example, we are trimming the first 20 seconds and the last 30 seconds of the 100-seconds-long live stream and creating a playlist manifest with approximately 50 seconds.
Figure 2: Byte range manifest sample Now that we have our video-on-demand (VOD) recording stored in the Amazon S3 bucket, we can use the API to create our first clip.
Replace <API endpoint> with your endpoint information and configure the parameters of your clip: start_time, end_time, and master_url, and define if you need one-second precision, setting the byte range to true. In this example, we are trimming the first 20 seconds and the last 30 seconds of the 100-seconds-long live stream and creating a playlist manifest with approximately 50 seconds.
 Figure 3: Main manifest folder
Figure 4: Playlist folder
The clip playlist manifest will have only the media segments inside the requested interval that we inputted in the clipmanifest API call.  Figure 5: Sample clipped manifest
Test the generated VOD clip
You can use the Amazon IVS Player Tester tool to test the new playlist manifest. Just paste the playback URL of the clipped manifest using the Amazon CloudFront distribution URL and click Load.
You should see the player running from the first media segment.

Figure 6: Amazon IVS debug player
Cleanup steps
Optionally, if you need to remove the resources deployed in this blog, you can use the AWS SAM CLI tool with the following command:
Confirm the deletion of both stacks and template files in Amazon S3.
You can also delete the Amazon IVS channel that you created by using this command:
Conclusion
In this blog post, we learned the Program-Date-Time (PDT) concepts and discussed how to deploy an open-source API using Amazon API Gateway to clip the recorded live stream content and export the best moments by trimming undesired parts of the recorded live streams.
This is a reference AWS Lambda function code that is not for use in a production environment but is ideal for testing and accelerating your cloud adoption. Please reach out to your AWS representative or click here for more information on architecting a custom solution for large-scale production-grade events.