Microsoft Workloads on AWS
Automate Microsoft web application deployments with GitHub Actions and Terraform
Managing infrastructure deployments and application code releases can be challenging. Manual processes often lead to delays, errors, and inconsistency across different environments. This inconsistency, known as environment drift, makes it difficult to ensure reliable deployments. As a result, teams struggle to maintain a high release velocity.
In this blog post, we will show how GitHub Actions and Terraform can automate the deployment of your workloads. By using Infrastructure as Code (IaC) and Continuous Integration/Continuous Deployment (CI/CD) pipelines, you can streamline the deployment process, ensure consistency across different environments, and accelerate the release cycle. The pipelines can also incorporate checks to align your workload with AWS Well-Architected Framework principles, improving security, cost optimization, and adherence to best practices.
This guide, along with its accompanying code repository, will walk you through the process of creating a pipeline and enable you to implement automated deployments quickly and efficiently.
Solution overview
This solution demonstrates how to use GitHub Actions and Terraform to deploy a sample ASP.NET Core web application. The codebase for the sample application is managed in a GitHub repository, and a pipeline is used to deploy AWS services to three different environments: development, test, and production. The solution deployment consists of 4 stages:
- Prerequisites: The first stage involves setting up the prerequisites, which ensure that your local Integrated Development Environment (IDE) is set up to complete the walkthrough. This solution uses GitHub environments for managing environment configurations, which requires a GitHub Pro, GitHub Team, or GitHub Enterprise subscription. Additionally, four AWS accounts are required, one for each environment and a primary account.
- Account setup: Cross-account IAM roles are established. This allows resource provisioning in stage 3 to be performed from the primary AWS account, adhering to the security principle of least privilege.
- Pipeline build: The use of Terraform to establish the pipeline offers the advantage of creating AWS and GitHub resources concurrently and simplifying the setup procedure. In stage 3, we set up Terraform’s backend using Amazon Simple Storage Service (Amazon S3) and Amazon DynamoDB to store its state file, ensuring durability and preventing conflicts. Next, we configure GitHub for the pipeline. This involves enabling OpenID Connect (OIDC) authentication for secure access from GitHub to AWS. We create separate branches for development, test, and production. We customize secrets, variables, and branch protection policies for each environment. Finally, we establish GitHub workflows to oversee resource creation and deletion, ensuring uniform deployments. The pipeline build is depicted in Figure 1.

Figure 1 – GitHub environment setup architecture (stage 3)
GitHub-hosted runners perform the tasks needed to build the sample web application. They can be adjusted to fit our specific needs and handle tasks efficiently.
- Build: The sample web application is deployed. In this blog post, we have chosen a workload that highlights the value of using a pipeline for multi-account deployments.
Sample workload walkthrough
Figure 2 shows the sample workload deployed in stage 4.
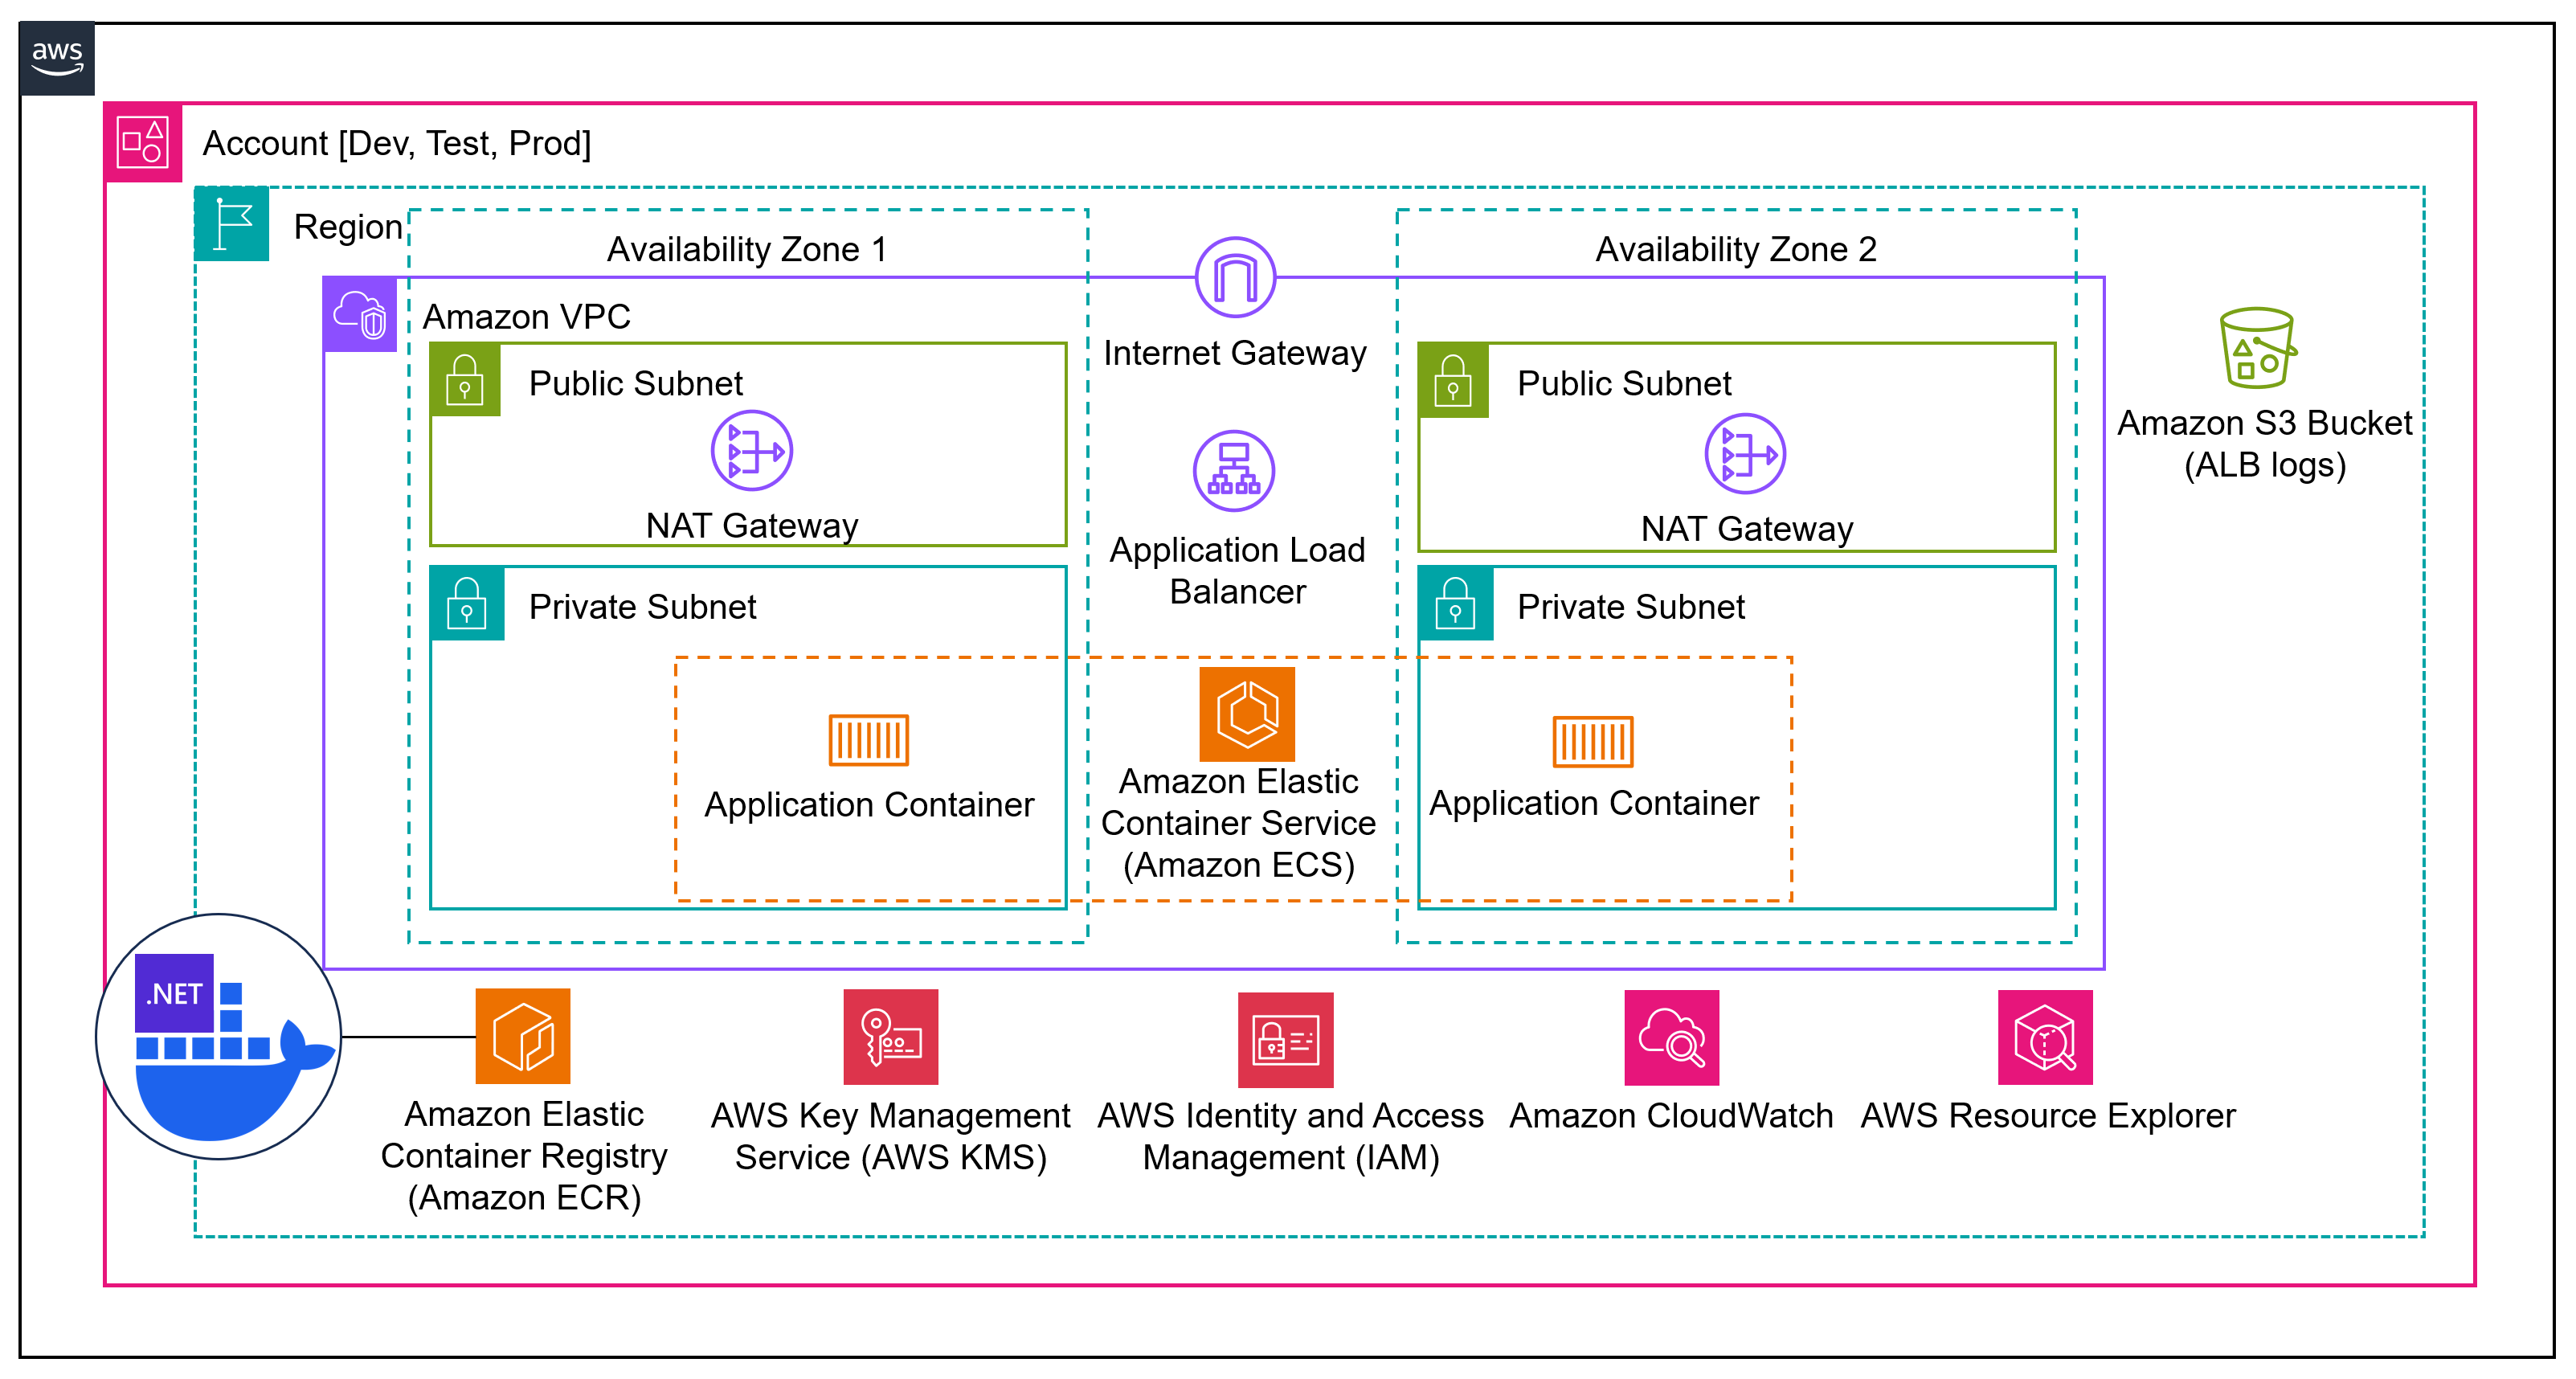
Figure 2 – Sample workload architecture overview (stage 4)
The workload resides within an Amazon Virtual Private Cloud (VPC). It consists of a .NET Core web application that is containerized and hosted on Amazon Elastic Container Service (Amazon ECS) using the AWS Fargate launch type. Containers are spread across two AWS Availability Zones. Incoming requests are balanced by an Application Load Balancer (ALB) while outbound communication is facilitated by NAT Gateways. An Internet Gateway enables external access and an Amazon Simple Storage Service (Amazon S3) bucket stores ALB logs.
The application container image is stored in Amazon Elastic Container Registry (Amazon ECR) and AWS Key Management Service (AWS KMS) encrypts various aspects of the workload. AWS Identity and Access Management (IAM) is used for access management, while Amazon CloudWatch handles observability. Additionally, AWS Resource Groups allows grouping components based on tags for efficient management.
This sample application is provided for non-production use. When considering adoption for production, it is important to review the code to ensure it meets your security standards. For example, review the IAM policies using AWS IAM Access Analyzer to create appropriately scoped policies and consider restricting access to the ALB to port 443 using an SSL certificate.
GitHub Actions walkthrough
GitHub Actions Workflows allow users to create detailed plans for different situations, making complex deployment tasks easy to manage. The solution incorporates six workflows for deploying and destroying the sample application across each environment.
Figure 3 illustrates the review and deploy test environment GitHub actions workflow, triggered by pull requests and merges.
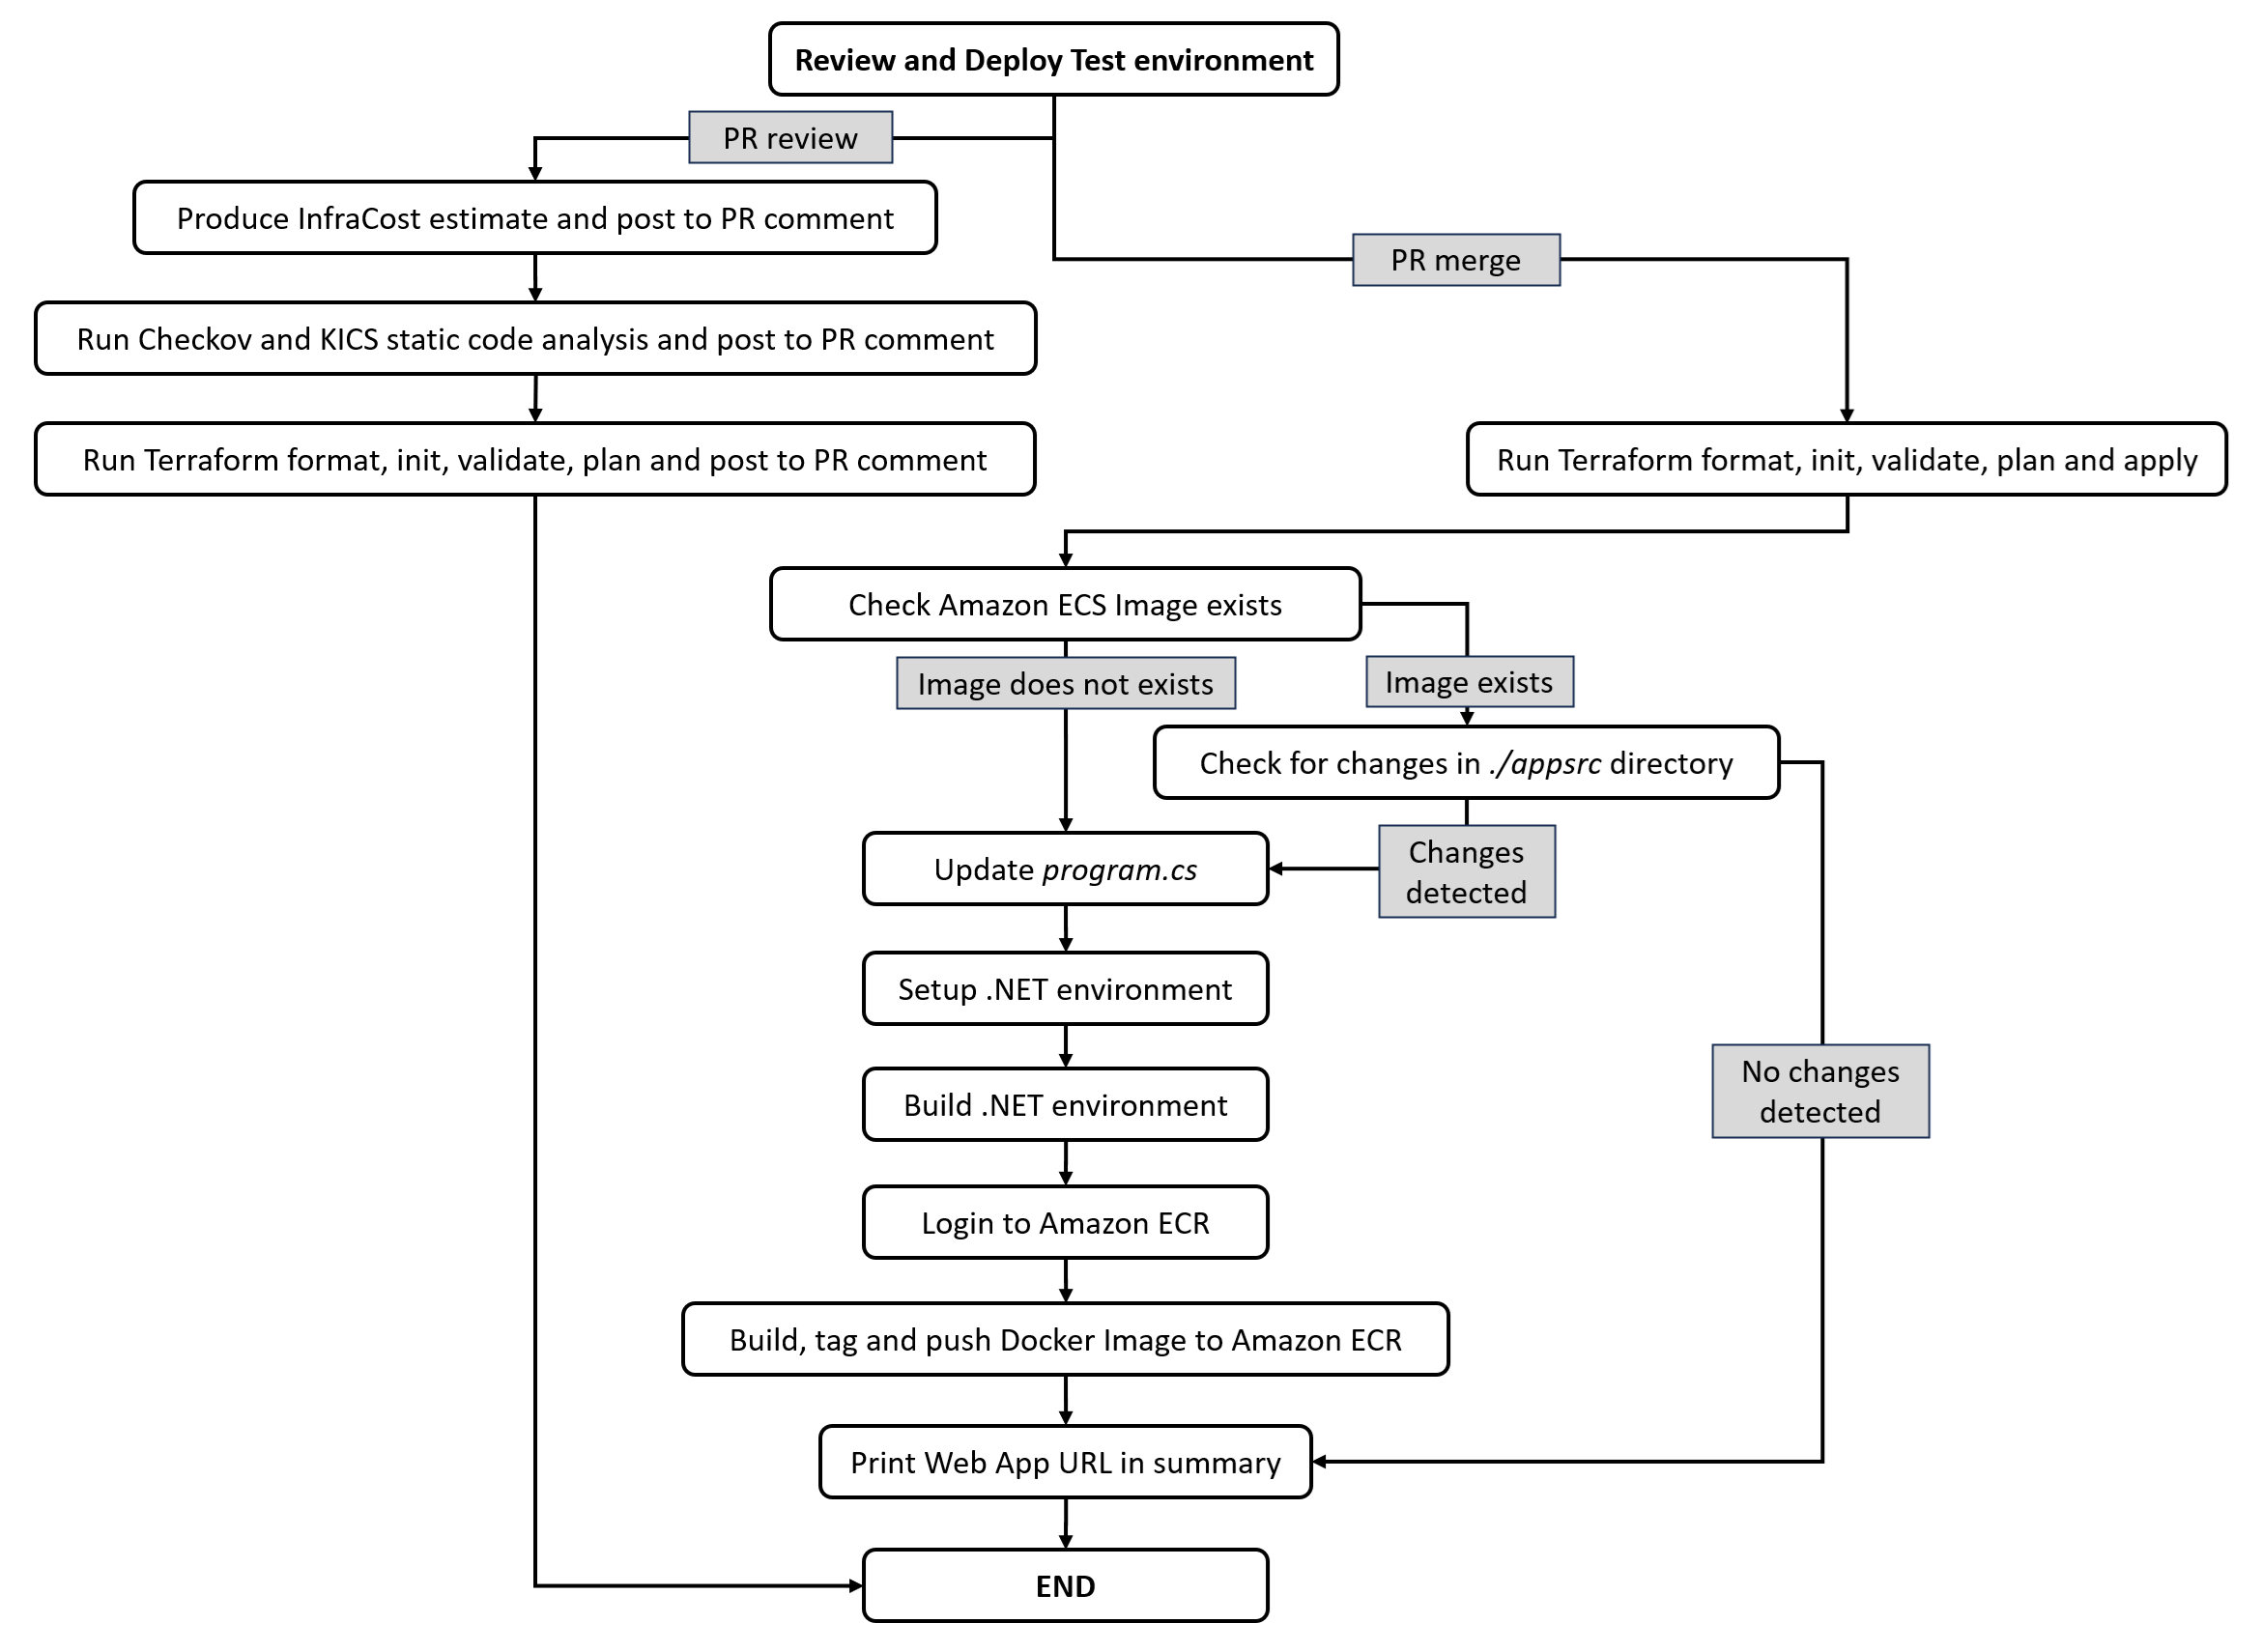
Figure 3 – GitHub Actions Workflow for test environment review and deployment
It begins by generating an Infracost estimate and conducting static code analysis using Checkov and KICS. Then, Terraform GitHub Actions ensure proper formatting, initialization, and validation of infrastructure changes and the results are shared as comments on the pull request for review.
Upon merging, Terraform applies the changes to build the solution. The workflow verifies the presence of the Amazon ECS image or any updates to the application source code. If necessary, the program.cs file is updated and the .NET web application is built, followed by uploading the Docker image to Amazon ECR. The updated image isn’t automatically deployed to the Amazon ECS cluster, ensuring precise control over deployments through a manually scheduled process. The process ends with the web application URL printed in the Summary, making it easy to access and check its functionality.
GitHub simplifies the setup of automation workflows by offering a wide range of preconfigured building blocks, known as GitHub Actions. These actions serve various purposes within the deployment pipeline, such as building, testing, deploying, and automating repetitive tasks. When designing your pipeline, you can use preconfigured actions to streamline the process and achieve your desired outcomes efficiently. Table 1 provides an overview of the GitHub Actions used in the solution, their purpose, and the publisher.
| GitHub Action name | Purpose | Publisher |
| checkout v4 | Checkout a Git repository at a particular version | GitHub |
| configure-aws-credentials | Configures AWS credentials for use in subsequent steps in a GitHub Action workflow | AWS |
| infracost | Show cloud cost estimates for Terraform in pull requests | Infracost |
| checkov-action | Run Checkov security scan against infrastructure as code, open-source packages, container images, and CI/CD configurations as a pre-packaged GitHub Action | Prisma Cloud |
| kics-github-action | Run KICS security scan against IaC projects | Checkmarx |
| setup-terraform | Sets up Terraform CLI in your GitHub Actions workflow | Hashicorp |
| github-script | Run simple scripts using the GitHub client | GitHub |
| paths-filter | Execute your workflow steps only if relevant files are modified | Michal Dorner |
| setup-dotnet | Used to build and publish .NET source. Set up a specific version of the .NET and authentication to private NuGet repository | Microsoft Developer Community |
| amazon-ecr-login | Logs in the local Docker client to one or more Amazon ECR Private registries or an Amazon ECR Public registry | AWS |
Table 1 – GitHub Actions used in the solution
Once the solution is deployed, users can push code changes directly to the repository, triggering a build of the development environment. Pull requests manage the release of infrastructure and application code to higher environments like test and production.
In the following section, we will show you how to deploy the solution.
Prerequisites
This guide is tailored for individuals with a fundamental grasp of AWS, Terraform, and GitHub. Prior to moving forward, confirm that you have the required prerequisites prepared.
- A GitHub Pro, GitHub Team, or GitHub Enterprise subscription, required for GitHub environments.
- 4 AWS accounts – a primary account and separate accounts for the development, test and production environments.
- Visual Studio Code installed with the following extensions:
- Git installed and authenticated.
- GitHub CLI installed and configured.
- GitHub CLI installed and configured.
- Terraform v1.7.1 or above installed and configured.
- AWS CLI installed with 4 AWS profiles configured (Figure 1):
- One profile for the AWS primary account.
- One profile for each AWS account representing the deployment environments.
- (Optional) Infracost installed and API key retrieved.
Deployment walkthrough
The code for this blog post is available in the AWS Samples Git repository. During the walkthrough, we will focus on a multi-account deployment. This exercise will take about 30 minutes to complete.
We will use Visual Studio Code’s integrated terminal to run all commands.
GitHub repository setup
The first step is to clone the AWS Samples Git repository to your own GitHub account. Here are the steps to follow:
- Create a new GitHub repository in your GitHub account.
- Open the integrated terminal in Visual Studio Code.
- Use the cd command to navigate to the local directory where you want to store a local copy of the repository:
cd path/to/local/directory - Authenticate Visual Studio Code with your GitHub using the GitHub CLI by running:
gh auth login - Use the GitHub CLI to clone the AWS Samples repository to your local machine:
gh repo clone aws-samples/use-github-and-terraform-to-deploy-web-applications - Navigate to the newly created repository folder:
cd use-github-and-terraform-to-deploy-web-applications - Update the remote origin of your local repository to point to the new GitHub repository created in step 1:
git remote set-url origin https://github.com/<githuborg>/<newreponame>.git - Verify that the remote origin has been updated correctly:
git remote -v - Finally, push the code from your local repository to the new GitHub repository:
git push -u origin main
Account Setup
In this stage, we will set up cross-account IAM roles to facilitate Terraform backend deployment from the primary account.
- Configure your AWS credential file for authentication to all four AWS accounts.
- Open the \bootstrap\accountsetup\provider.tf file and update the profile names to match those defined in your AWS credential file (Figure 4).

Figure 4 – Modifying provider.tf file profiles
- Modify the \bootstrap\accountsetup\terraform.tfvars file and update the Region parameter to the desired region for the deployment. Be sure to save the file.
- Navigate to the \bootstrap\accountsetup directory and initialize Terraform:
terraform init - Run Terraform plan and apply commands to create the cross account IAM roles and permissions:
terraform plan

terraform apply - Make a note of the ARNs from the Terraform output, as you will need these for the next stage. The ARNs are displayed as part of the terraform apply command (Figure 5).

Figure 5 – Account setup Terraform output
The cross-account IAM roles have now been deployed. You can remove references to the development, test, and production environments from the AWS credential file. Next, we will deploy the Terraform backend configuration and set up the GitHub Actions release pipeline.
Pipeline build
- Open the \bootstrap\pipelinebuild\terraform.tfvars file and update Regions, Assumed role ARNs and Github settings parameters. Use the output (Figure 5) to fill in the Assumed Role ARNs (Figure 6). Ensure you save the file.

Figure 6 – Modifying \bootstrap\pipelinebuild\terraform.tfvars
For clarification on the purpose of each parameter within terraform.tfvars, consult variables.tf, which contains a description for each item.
- The environment-specific secrets and variables for building the .NET web application are stored in GitHub. To avoid unnecessary duplication, these are declared as locals in the \bootstrap\pipelinebuild\githubresources.tf file. Modify these as needed to reflect the desired configuration (Figure 7).

Figure 7 – Modifying \bootstrap\pipelinebuild\terraform.tfvars
- Check the \bootstrap\pipelinebuild\provider.tf file to ensure the AWS profile for the primary account is correctly set and specify the owner value for the GitHub provider, which should be your GitHub organization name (Figure 8).

Figure 8 – Modifying bootstrappipelinebuildprovider.tf
- Navigate to the \bootstrap\pipelinebuild directory and initialize Terraform:
terraform init - Run Terraform plan and apply commands to deploy AWS and GitHub resources:
terraform plan
terraform apply
You have successfully deployed the Terraform backend configuration and set up the GitHub Actions release pipeline. Review your GitHub repository (Figure 9) to observe the newly configured setup.
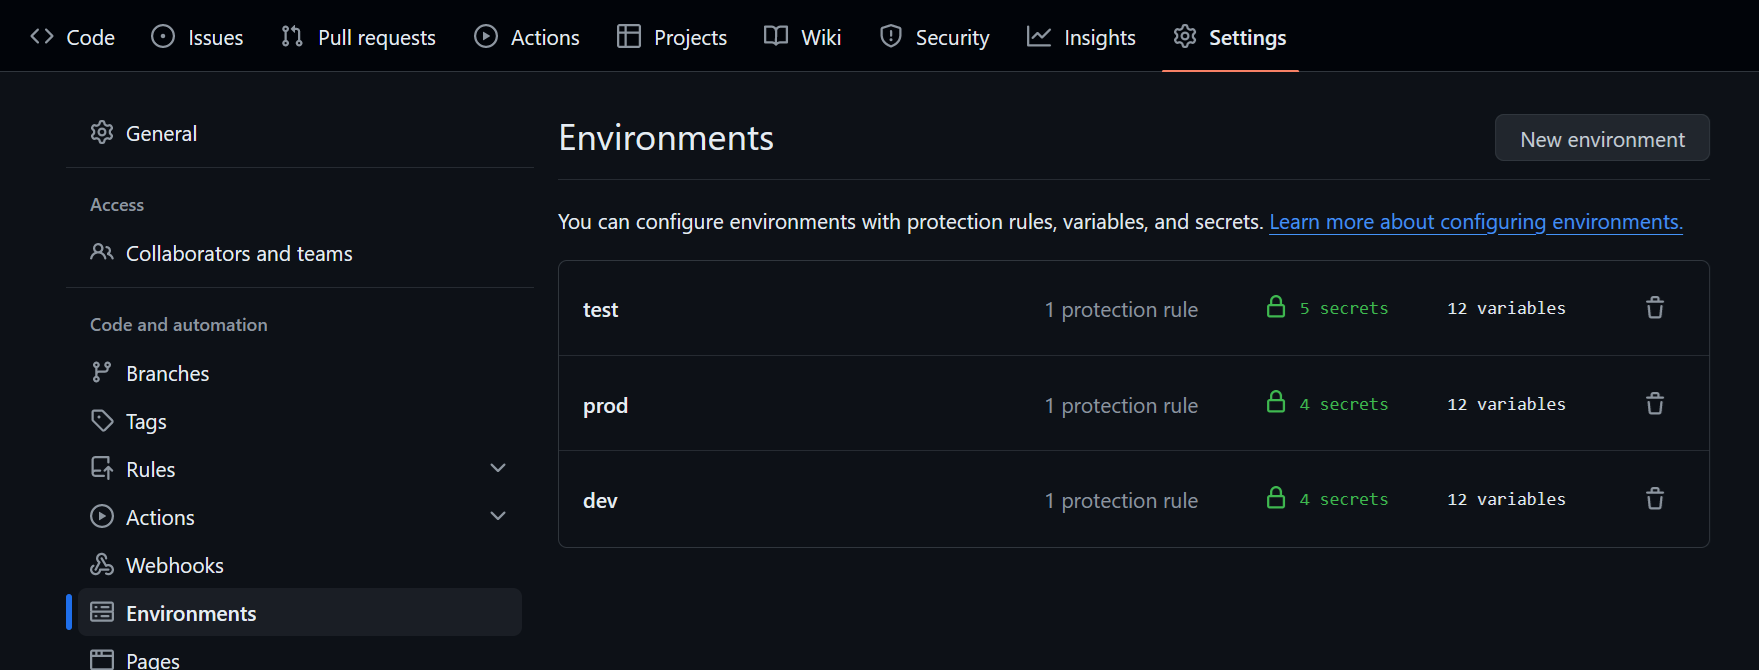
Figure 9 – GitHub stored secrets and variables for each environment
In the next step, we will deploy the sample worload and the .NET Core web application.
Build sample workload and deploy .NET Core web application in development environment
- The GitHub Action workflows are declared as code in the \.github\workflows directory (Figure 10).

Figure 10 – GitHub Action workflows location
- Run the following command to fetch the latest GitHub branch configuration:
git fetch - From the Visual Studio Code integrated terminal, switch to the newly created dev branch:
git checkout dev - Make a small change to a file in your local repository, such as adding a character to the \build\appsrc\delete.me file and save the changes.
- Use the following command to stage the modified file:
git add -A - Commit the changes with a message:
git commit -m "Initial build in Development account" - Push the committed changes to the remote GitHub repository.
git push
This will automatically trigger the Review and deploy development environment workflow, which deploys all .tf files located in the .\build folder using Terraform on a GitHub hosted runner. - Navigate to your GitHub repository page (Figure 11), then go to the Actions tab. Monitor the progress of the deployment workflow for the development environment.

Figure 11 – Workflows runs overview
- Once the job completes, select Summary to view the output URL. You can access this URL to verify the successful deployment of the web application (Figure 12). The website may take a few minutes to become fully functional. Please refresh the page intermittently.

Figure 12 – Workflow result output
- Optionally, log in to the AWS development account and review the newly provisioned resources. These are grouped together in an AWS Resource Group (Figure 13).

Figure 13 – Accessing AWS Resource Groups to check deployed AWS resources.
The development environment has now been successfully deployed. Developers can make changes to the build folder and follow steps 5-7 to update the environment with the latest changes. Next, we will deploy the sample workload and application to the test environment.
Release sample workload and .NET web application to test environment
- Navigate to your GitHub repository page and go to Pull requests section to create a new one.
- Ensure the pull request is being created from the Dev branch to the test branch (Figure 14).

Figure 14 – Pull request from dev to test
- Select Create pull request and add a suitable title and description on then select Create pull request.In the review phase of the workflow, several checks will be performed on the pull request. Comments will be added containing Terraform validation outputs, Kiks scan results, and Infracost cost estimate results (Figure 15). Additionally, Checkov results will be displayed in the Summary.

Figure 15 – PR comment showing Infracost cost estimate and Terraform validation outputs
- After reviewing the pull request, select Merge pull request to start the build process for the test environment. Then, confirm the merge by choosing Confirm Merge (Figure 16).

Figure 16 – Merge pull request from dev to test
- Navigate to the GitHub repository page, then go to the Actions tab. Monitor the progress of the deployment workflow for the test environment. You can obtain the URL for the test environment from the Summary.
The test environment has been successfully deployed into the corresponding AWS account. Once User Acceptance Test (UAT) has been completed, you can proceed to provision the production environment.
Release sample .NET web application to production environment
To release the sample workload and .NET web application to the production environment, follow a similar procedure as the one used for releasing to the test environment. However, you need to account for the additional branch protection rules configured for the production (main) branch. These rules include Require approvals and Require review from Code Owners. Ensure that the appropriate code owners are listed in the \.github\CODEOWNERS file.
Cleanup
Once you’ve completed your evaluation of this solution, you can clean up by following these steps to avoid incurring future charges.
- Navigate to the GitHub repository page and access the Actions tab. Trigger the Destroy workflows for all provisioned environments. Ensure you select the correct branch when initiating the destroy workflow to avoid failures (Figure 17).

Figure 17 – Workflows to destroy environments
- From the Visual Studio Code integrated terminal, navigate to \bootstrap\pipelinebuild and execute the following command:
terraform destroy -auto-approve - Move to the \bootstrap\accountsetup and execute the following command:
terraform destroy -auto-approve
Conclusion
In this blog post, we have showed you how GitHub Actions and Terraform can be leveraged to automate the deployment of infrastructure and application code to AWS. By adopting Infrastructure as Code (IaC) principles and implementing release pipelines, teams can streamline their deployment processes, maintain consistency across environments, and increase release velocity.
AWS has significantly more services, and more features within those services, than any other cloud provider, making it faster, easier, and more cost effective to move your existing applications to the cloud and build nearly anything you can imagine. Give your Microsoft applications the infrastructure they need to drive the business outcomes you want. Visit our .NET on AWS and AWS Database blogs for additional guidance and options for your Microsoft workloads. Contact us to start your migration and modernization journey today.