AWS Storage Blog
Automated extraction of compressed files on Amazon S3 using AWS Batch and Amazon ECS
Organizations frequently upload compressed TAR files to Amazon S3 for efficient data transfer, but downstream applications often need extracted files for processing. Although AWS Glue excels at processing splittable files across worker nodes, TAR files need single-node processing, traditionally forcing teams to manually provision servers, monitor extraction jobs, and manage resource cleanup.
This post demonstrates how to build an automated, event-driven solution that detects uploaded TAR files and extracts them without manual intervention. The architecture combines Amazon S3, Amazon EventBridge, AWS Batch, and Amazon Elastic Block Store (Amazon EBS) to create a scalable pipeline that handles TAR files of any size while reducing operational overhead.
Although our example focuses on TAR file extraction, this architecture pattern can be applied to any workload requiring single-server compute processing-from transcoding media files to running simulations or processing specialized data formats.
Solution overview
Our solution implements an event-driven architecture that automatically processes TAR files as they are uploaded to Amazon S3. We combine the AWS Batch computing power with Amazon EBS storage for temporary processing, to achieve reliable extraction of TAR files of any size while maintaining cost efficiency.The key benefits of this approach include:
- Fully automated extraction triggered by Amazon S3 uploads
- Scalable processing using AWS Batch compute resources
- Efficient parallel upload of extracted files
- Secure processing in a private VPC environment
- Comprehensive monitoring and logging capabilities
Architecture overview
The solution creates an extraction pipeline by connecting several AWS services into a coordinated workflow. This workflow is detailed in this section and in the following figure.
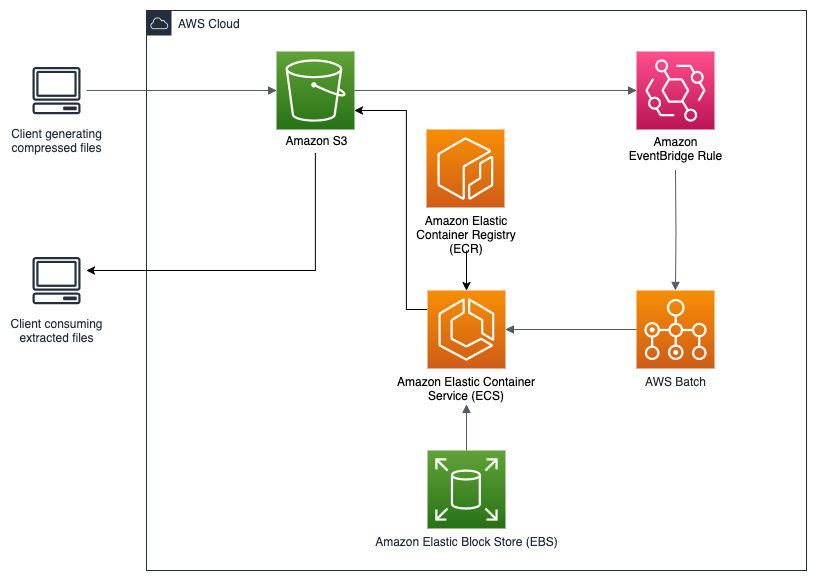
Figure 1: End-to-end architecture for scalable, automated extraction of compressed files on Amazon S3.
Workflow and process
This solution implements an end-to-end automated process for TAR file extraction that works as follows:
- Event Initiation: When you upload a TAR file to the input S3 bucket, it generates an event notification.
- Orchestration: EventBridge receives this notification and evaluates it against defined rules. Using input transformation, EventBridge extracts key parameters such as bucket name and object key from the event and directly submits an AWS Batch job with these parameters.
- Resource Provisioning: AWS Batch schedules the job based on resource availability and priority. It automatically provisions a compute instance with a correctly sized EBS volume attached for temporary storage. This right-sizing provides sufficient space for extraction while controlling costs.
- Extraction Execution: The compute instance runs a container that implements the fetch-and-run pattern. This container does the following:
- Downloads the latest extraction script from the scripts bucket
- Retrieves the target TAR file using the provided bucket and key
- Extracts the TAR file contents to the mounted EBS volume
- Uploads extracted files to the destination S3 bucket using parallel operations for efficiency
- Monitoring and Notification: Throughout execution, the job logs status and metrics to Amazon CloudWatch.
- Resource Cleaning up: When the processing completes, AWS Batch automatically terminates the compute resources, so that you only pay for what you use.
This solution separates the execution logic (scripts) from the container image, thereby enabling updates to the extraction process without rebuilding containers. This streamlines the ongoing maintenance and enhancements.
Prerequisites
Before beginning deployment, you need to have the following:
- An AWS account with appropriate permissions to create the required resources
- AWS CLI configured with appropriate credentials
- Docker installed on your local machine for building the container image
- Basic familiarity with AWS services (S3, Batch, CloudFormation)
Solution deployment
This section walks through the steps to deploy the automated TAR file extraction solution in your AWS account. The deployment process uses AWS CloudFormation to provision most resources, with a few manual steps to complete the setup.
Step 1: Build and push the Docker Image
The first step is to build and push the processing container to Amazon Elastic Container Registry (Amazon ECR). This container includes all necessary tools for extracting TAR files and interacting with Amazon S3. You use a script to automate this process.
- Download the following files from the GitHub repository in a new or existing folder for this project:
- Dockerfile
- fetch_and_run.sh
- ExtractLogic.sh
- Inside the same folder, create a file named `build_and_push.sh` with the following contents:
- Make the shell scripts executable:
chmod +x build_and_push.sh ExtractLogic.sh fetch_and_run.sh
- Run the script:
./build_and_push.sh
The container image uses a base image with AWS Command Line Interface (AWS CLI) and TAR utilities installed, along with scripts to handle the extraction process.
Step 2: Deploy the CloudFormation stack
The CloudFormation template provisions the core infrastructure including the following:
- S3 bucket
- EventBridge rules for monitoring Amazon S3 uploads
- AWS Batch compute environment with appropriate Amazon EBS configuration
- AWS Identity and Access Management (IAM) roles with least-privilege permissions
- Security groups and VPC resources for secure processing
To deploy:
- Choose the Launch Stack button following this list to open the CloudFormation console.
- Review the stack parameters, enter the URI of the docker image stored in the Amazon ECR repo, and adjust other parameters as needed for your environment.
- Acknowledge resource creation capabilities and choose Create stack.
![]()
The creation process typically takes 5–7 minutes to complete. You can monitor progress in the CloudFormation console.
Step 3: Upload the extraction script
The solution uses a fetch-and-run pattern where the execution logic is stored separately from the container. You can use this approach to update extraction logic without rebuilding containers.
- Locate the S3 bucket name from the CloudFormation outputs:
- Upload the extraction script:
aws s3 cp ExtractLogic.sh s3://<bucket_name>/scripts/ExtractLogic.sh
The extraction script contains the logic for downloading TAR files, extracting contents, and uploading results back to Amazon S3.
Step 4: Verify deployment
Verify that all components are properly configured:
- Verify that the AWS Batch compute environment is VALID:
- Confirm the EventBridge rule is enabled:
aws events describe-rule --name Batch-Extract-EventRule --query "State" --output text
- Check that the job queue is ready:
You may also log in to the AWS console and verify the deployment.
Testing the solution
When the deployment is complete, test the solution by uploading a TAR file to the input bucket:
- Find the input bucket name from CloudFormation outputs:
- Upload a test TAR file:
aws s3 cp sample.tar s3://<bucket_name>/
- Monitor the extraction process:
- AWS Batch console: Check job status under “Jobs” → “extract-job-*”
- CloudWatch Logs: View detailed execution logs in the “
/aws/batch/job” log group - Amazon S3 console/API: Verify that the extracted files appear in the output bucket through the console or the ListObjectsV2 API
The extraction process typically starts within 1–2 minutes after uploading the TAR file. Extraction time varies depending on file size and complexity.
Troubleshooting
If issues occur during deployment or testing, then consider the following:
- Job failures: Check CloudWatch Logs for error messages and verify that IAM permissions are correct
- Missing events: Verify Amazon S3 event notifications are properly configured and the EventBridge rule is enabled
- Container errors: Verify that the Docker image contains all necessary utilities and has proper permissions
Most issues can be resolved by checking CloudWatch Logs for the specific AWS Batch job that encountered problems.
Cleaning up
When you’re finished with this solution, follow these steps to clean up all resources and avoid ongoing charges. The cleanup process needs several steps to verify proper resource deletion.
Step 1: Empty S3 buckets
Before deleting the CloudFormation stack, empty the S3 bucket created by the solution:
Step 2: Clean-up AWS Batch resources
AWS Batch resources must be disabled before deletion, and they need to be removed in the correct order:
Step 3: Remove Amazon ECR Repository Images
The Amazon ECR repository must be empty before it can be deleted:
Step 4: Delete the CloudFormation stack
Now you can delete the main CloudFormation stack:aws cloudformation delete-stack --stack-name <stack_name>
You can also do this using the Console:
- Open the CloudFormation console.
- Choose the relevant CloudFormation stack.
- Choose Delete.
- Confirm the deletion when prompted.
Monitor the stack deletion status in the CloudFormation console. If the deletion fails with a DELETE_FAILED state, then you may need to use the force delete option in the console by choosing Retry delete and choosing one of the force delete options.
Step 5: Verify Resource clean up
After the stack deletion completes, verify that all resources have been properly removed:
This cleanup process verifies that all components of the solution are properly removed, preventing any unexpected charges for resources you’re no longer using.
Conclusion
This solution demonstrates how event-driven architectures on AWS can eliminate manual operational overhead from file processing workflows. You can combine Amazon S3 event notifications, Amazon EventBridge, and AWS Batch to create a scalable, automated pipeline that processes TAR files without human intervention that can reduce operational costs and improve reliability. The architecture handles TAR files of any size through appropriately provisioned Amazon EBS volumes and processes files efficiently using parallel uploads. You can use the fetch-and-run pattern to update extraction logic without rebuilding containers, streamlining ongoing maintenance.