Build a Flutter Mobile App Using AWS Amplify - Part 2
Use nested data and Amplify functions to create a trip planner app for iOS and Android


Module 4: Add the Profile feature
Overview
The Amplify function will interact with a GraphQL API that uses AWS AppSync (a managed GraphQL service) backed by Amazon DynamoDB (a NoSQL database).
What you will accomplish
- Add the profile data model to the app
- Add an Amplify function to create the user profile
- Implement the UI for displaying and editing the profile
Minimum time to complete
45 minutes
Implementation
Add profile data model to the app
Step 1: You need to configure the API for AWS Identity and Access Management (IAM) authentication to grant the AWS Lambda function access to the GraphQL API. Run the following command in the root folder of the app to update the authorization modes of the API.
amplify update apiStep 2: Select the GraphQL option, then select Authorization modes to edit it. Accept the Amazon Cognito User Pool as the default authorization type, select Y in response to the Configure additional auth types prompt. Finally, choose IAM from the additional authorization types.
? Select from one of the below mentioned services: GraphQL

General information
- Name: amplifytripsplanner
- API endpoint: https://qmrokxalkng4xdaegffe4g2nsq.appsync-api.us-west-1.amazonaws.com/graphql

Authorization modes
- Default: Amazon Cognito User Pool

Conflict detection (required for DataStore)
- Disabled

? Select a setting to edit Authorization modes
? Choose the default authorization type for the API Amazon Cognito User Pool
Use a Cognito user pool configured as a part of this project.
? Configure additional auth types? Yes
? Choose the additional authorization types you want to configure for the API IAMStep 3: Open the amplify/backend/api/amplifytripsplanner/schema.graphql file and add a data model for the profile
type Trip @model @auth(rules: [{ allow: owner }]) {
  id: ID!
  tripName: String!
  destination: String!
  startDate: AWSDate!
  endDate: AWSDate!
  tripImageUrl: String
  tripImageKey: String
  Activities: [Activity] @hasMany(indexName: "byTrip", fields: ["id"])
}

type Activity @model @auth(rules: [{allow: owner}]) {
  id: ID!
  activityName: String!
  tripID: ID! @index(name: "byTrip", sortKeyFields: ["activityName"])
  trip: Trip! @belongsTo(fields: ["tripID"])
  activityImageUrl: String
  activityImageKey: String
  activityDate: AWSDate!
  activityTime: AWSTime
  category: ActivityCategory!
}


type Profile
  @model
  @auth(
    rules: [
      { allow: private, provider: iam }
      { allow: owner, operations: [read, update, create] }
    ]
  ) {
  id: ID!
  email: String!
  firstName: String
  lastName: String
  homeCity: String
  owner: String!
}

enum ActivityCategory { Flight, Lodging, Meeting, Restaurant }Step 4: Run the following command in the root folder of the app to generate the models files.
amplify codegen modelsThe Amplify CLI will generate the dart files in the lib/models folder.

Step 5: Run the command amplify push to create the resources in the cloud.

Step 6: Press Enter. The Amplify CLI will deploy the resources and display a confirmation, as shown in the screenshot.

Create the Auth service
Step 1: Create a new dart file inside the folder lib/common/services and name it auth_service.dart.

Step 2: Open auth_service.dart file and update it with the following code to create the AuthService. The service will use Amplify to sign the user out.
import 'package:amplify_flutter/amplify_flutter.dart';
import 'package:flutter/material.dart';
import 'package:flutter_riverpod/flutter_riverpod.dart';

final authServiceProvider = Provider<AuthService>((ref) {
  return AuthService();
});

class AuthService {
  AuthService();

  Future<void> signOut() async {
    try {
      await Amplify.Auth.signOut();
    } on Exception catch (e) {
      debugPrint(e.toString());
    }
  }
}Step 3: Open the file lib/common/navigation/ui/the_navigation_drawer.dart. Update it with the following code to add the option to sign out from the app.
          ListTile(
            leading: const Icon(Icons.exit_to_app),
            title: const Text('Logout'),
            onTap: () => ref.read(authServiceProvider).signOut(),
),The the_navigation_drawer.dart should look like the following code snippet.
import 'package:amplify_trips_planner/common/navigation/router/routes.dart';
import 'package:amplify_trips_planner/common/services/auth_service.dart';
import 'package:amplify_trips_planner/common/utils/colors.dart' as constants;
import 'package:flutter/material.dart';
import 'package:flutter_riverpod/flutter_riverpod.dart';
import 'package:go_router/go_router.dart';

class TheNavigationDrawer extends ConsumerWidget {
  const TheNavigationDrawer({
    super.key,
  });

  @override
  Widget build(BuildContext context, WidgetRef ref) {
    return Drawer(
      child: ListView(
        padding: EdgeInsets.zero,
        children: [
          const DrawerHeader(
            decoration: BoxDecoration(
              color: Color(constants.primaryColorDark),
            ),
            padding: EdgeInsets.all(16),
            child: Column(
              children: [
                SizedBox(height: 10),
                Text(
                  'Amplify Trips Planner',
                  style: TextStyle(fontSize: 22, color: Colors.white),
                ),
              ],
            ),
          ),
          ListTile(
            leading: const Icon(Icons.home),
            title: const Text('Trips'),
            onTap: () {
              context.goNamed(
                AppRoute.home.name,
              );
            },
          ),
          ListTile(
            leading: const Icon(Icons.category),
            title: const Text('Past Trips'),
            onTap: () {
              context.goNamed(
                AppRoute.pastTrips.name,
              );
            },
          ),
          ListTile(
            leading: const Icon(Icons.exit_to_app),
            title: const Text('Logout'),
            onTap: () => ref.read(authServiceProvider).signOut(),
          ),
        ],
      ),
    );
  }
}Add the Amplify function to create the profile
Step 1: Navigate to the root folder of the app and run the following command in your terminal to update the authentication configurations.
amplify update authStep 2: Go through the configuration and select Yes for configuring Lambda triggers and then enable a Post Confirmation trigger:
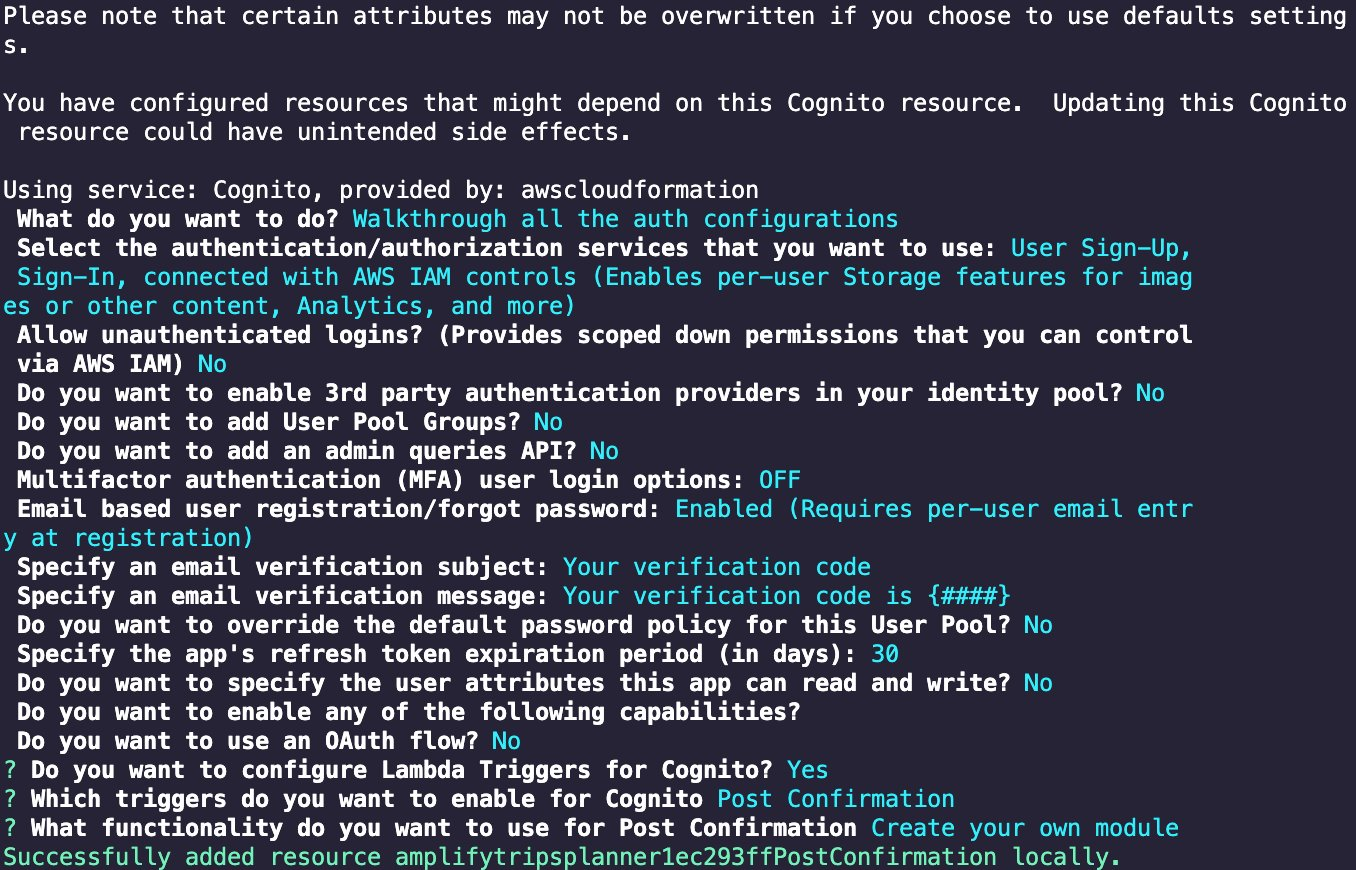
Please note that certain attributes may not be overwritten if you choose to use defaults settings.

You have configured resources that might depend on this Cognito resource.  Updating this Cognito resource could have unintended side effects.

Using service: Cognito, provided by: awscloudformation
 What do you want to do? Walkthrough all the auth configurations
 Select the authentication/authorization services that you want to use: User Sign-Up, Sign-In, connected with AWS IAM controls (Enables per-user Storage features for images or other content, Analytics, and more)
 Allow unauthenticated logins? (Provides scoped down permissions that you can control via AWS IAM) No
 Do you want to enable 3rd party authentication providers in your identity pool? No
 Do you want to add User Pool Groups? No
 Do you want to add an admin queries API? No
 Multifactor authentication (MFA) user login options: OFF
 Email based user registration/forgot password: Enabled (Requires per-user email entry at registration)
 Specify an email verification subject: Your verification code
 Specify an email verification message: Your verification code is {####}
 Do you want to override the default password policy for this User Pool? No
 Specify the app's refresh token expiration period (in days): 30
 Do you want to specify the user attributes this app can read and write? No
 Do you want to enable any of the following capabilities?
 Do you want to use an OAuth flow? No
? Do you want to configure Lambda Triggers for Cognito? Yes
? Which triggers do you want to enable for Cognito Post Confirmation
? What functionality do you want to use for Post Confirmation Create your own module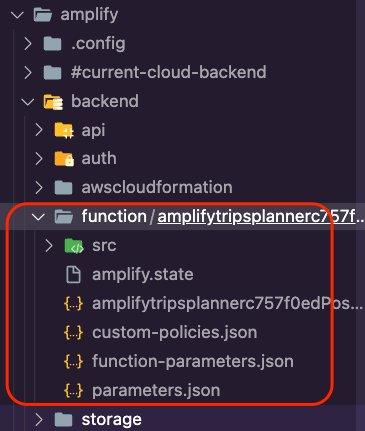
Successfully added resource amplifytripsplannere57d0b5cPostConfirmation locally.The Amplify CLI will add a new folder for the function which will include the Post Confirmation trigger where you will write the function to create the user’s profile
Step 3: Open the package.json file in the src folder, which is inside the function’s folder.

Step 4: Update the package.json file as shown in the following to install the required dependencies.
  "dependencies": {
    "axios": "latest",
    "@aws-crypto/sha256-js": "^2.0.1",
    "@aws-sdk/credential-provider-node": "^3.76.0",
    "@aws-sdk/protocol-http": "^3.58.0",
    "@aws-sdk/signature-v4": "^3.58.0",
    "node-fetch": "2"
},The package.json file should now look like the following.
{
  "name": "amplifytripsplannere57d0b5cPostConfirmation",
  "version": "2.0.0",
  "description": "Lambda function generated by Amplify",
  "main": "index.js",
  "license": "Apache-2.0",
  "dependencies": {
    "axios": "latest",
    "@aws-crypto/sha256-js": "^2.0.1",
    "@aws-sdk/credential-provider-node": "^3.76.0",
    "@aws-sdk/protocol-http": "^3.58.0",
    "@aws-sdk/signature-v4": "^3.58.0",
    "node-fetch": "2"
  },
  "devDependencies": {
    "@types/aws-lambda": "^8.10.92"
  }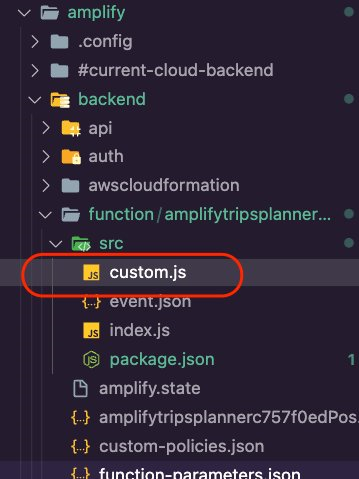
}Step 5: Open the custom.js file inside the function src folder.
Step 6: Update the custom.js file as shown in the following to run a GraphQL mutation and pass the required variables as arguments to create a profile record.
const { Sha256 } = require("@aws-crypto/sha256-js");
const { defaultProvider } = require("@aws-sdk/credential-provider-node");
const { SignatureV4 } = require("@aws-sdk/signature-v4");
const { HttpRequest } = require("@aws-sdk/protocol-http");
const { default: fetch, Request } = require("node-fetch");

const GRAPHQL_ENDPOINT = process.env.API_AMPLIFYTRIPSPLANNER_GRAPHQLAPIENDPOINTOUTPUT;
const AWS_REGION = process.env.AWS_REGION || 'us-east-1';

const query = /* GraphQL */ `
  mutation createProfile($email: String!,$owner: String!) {
    createProfile(input: {
      email: $email,
      owner: $owner,

    }) {
      email
    }
  }
`;


/**
 * @type {import('@types/aws-lambda').PostConfirmationTriggerHandler}
 */
 exports.handler = async (event) => {
  console.log(`EVENT: ${JSON.stringify(event)}`);


  const variables = {

      email: event.request.userAttributes.email,
      owner: `${event.request.userAttributes.sub}::${event.userName}`

  };


  const endpoint = new URL(GRAPHQL_ENDPOINT);

  const signer = new SignatureV4({
    credentials: defaultProvider(),
    region: AWS_REGION,
    service: 'appsync',
    sha256: Sha256
  });

  const requestToBeSigned = new HttpRequest({
    method: 'POST',
    headers: {
      'Content-Type': 'application/json',
      host: endpoint.host
    },
    hostname: endpoint.host,
    body: JSON.stringify({ query, variables }),
    path: endpoint.pathname
  });

  const signed = await signer.sign(requestToBeSigned);
  const request = new Request(endpoint, signed);

  let statusCode = 200;
  let body;
  let response;

  try {
    response = await fetch(request);
    body = await response.json();
    if (body.errors) statusCode = 400;
  } catch (error) {
    statusCode = 500;
    body = {
      errors: [
        {
          message: error.message
        }
      ]
    };
  }

  console.log(`statusCode: ${statusCode}`);
  console.log(`body: ${JSON.stringify(body)}`);

  return {
    statusCode,
    body: JSON.stringify(body)
  };
};Step 7: Navigate to the root folder of the app and run the following command in your terminal to update the configurations of the function you created above.
amplify update functionStep 8: Select the function you created above and update the Resource access permissions to allow the function to access the API for Query, Mutation, and Subscription
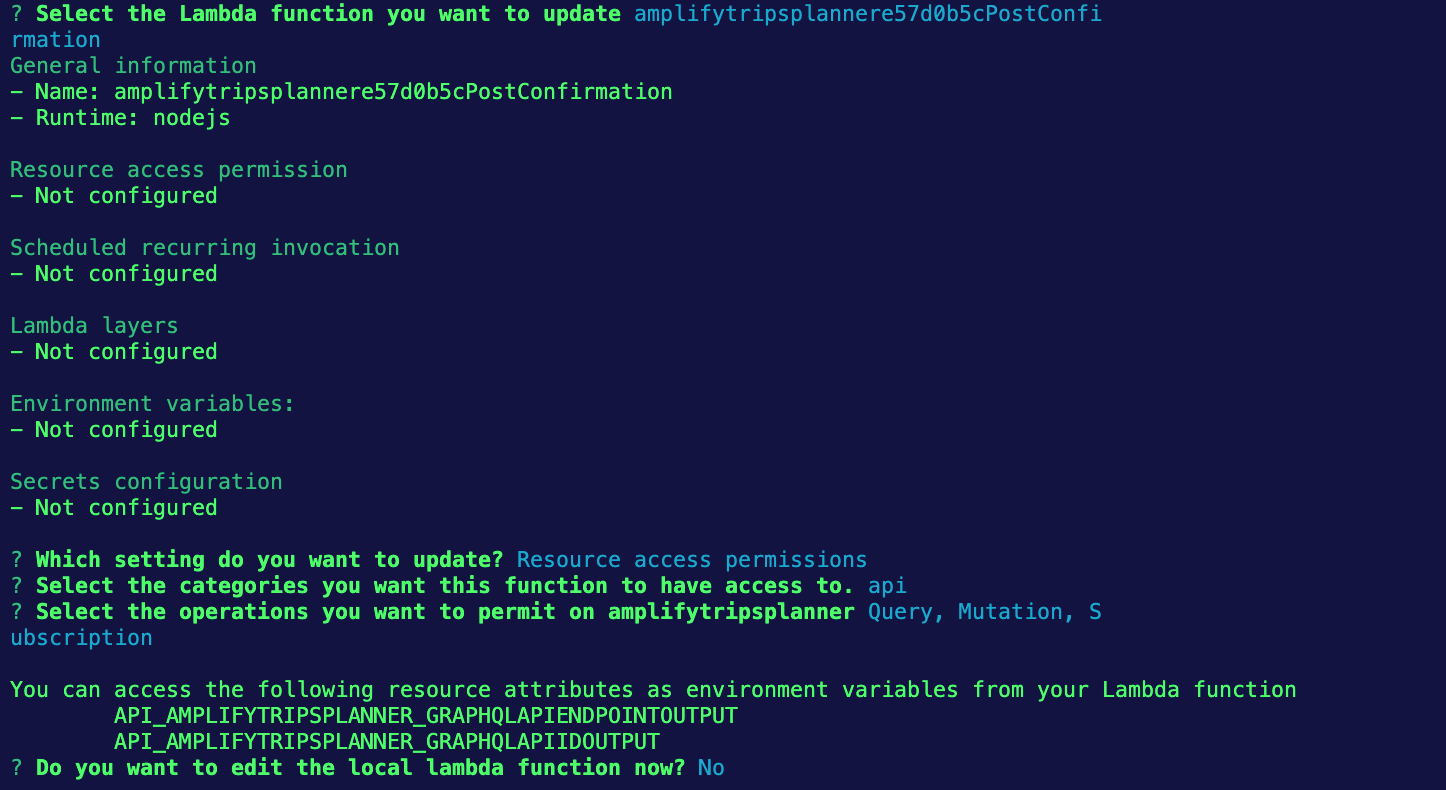
? Select the Lambda function you want to update amplifytripsplannere57d0b5cPostConfi
rmation
General information
- Name: amplifytripsplannere57d0b5cPostConfirmation
- Runtime: nodejs

Resource access permission
- Not configured

Scheduled recurring invocation
- Not configured

Lambda layers
- Not configured

Environment variables:
- Not configured

Secrets configuration
- Not configured

? Which setting do you want to update? Resource access permissions
? Select the categories you want this function to have access to. api
? Select the operations you want to permit on amplifytripsplanner Query, Mutation, S
ubscription

You can access the following resource attributes as environment variables from your Lambda function
        API_AMPLIFYTRIPSPLANNER_GRAPHQLAPIENDPOINTOUTPUT
        API_AMPLIFYTRIPSPLANNER_GRAPHQLAPIIDOUTPUT
? Do you want to edit the local lambda function now? NoStep 9: Run the command amplify push to create the resources in the cloud.

Step 10: Press Enter. The Amplify CLI will deploy the resources and display a confirmation, as shown in the screenshot.

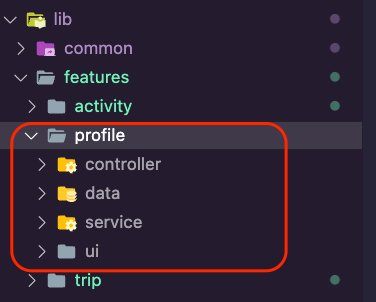
Create the folders for the Profile
Step 1: Create a new folder inside lib/features, and name it profile.

Step 2: Create the following new folders inside the profile folder:
- service: The layer to connect with the Amplify backend.
- data: This will be the repository layer that abstracts away the networking code, specifically service.
- controller: This is an abstract layer to connect the UI with the repository.
- ui: Here, we will create the widgets and the pages that the app will present to the user.
Step 3: Open the file lib/common/navigation/router/routes.dart. Update it to add the enum values for the profile feature. The file routes.dart should look like the following:
enum AppRoute {
  home,
  trip,
  editTrip,
  pastTrips,
  pastTrip,
  activity,
  addActivity,
  editActivity,
  profile,
}Step 4: Create a new dart file inside the lib/features/profile/service folder and call it profile_api_service.dart.

Step 5: Open the profile_api_service.dart file and update it with the following code snippet to create ProfileAPIService, which contains the following functions:
- getProfile: Queries the Amplify API for the user’s profile and returns its details.
- updateProfile: Update the user’s profile using the Amplify API.
import 'package:amplify_api/amplify_api.dart';
import 'package:amplify_flutter/amplify_flutter.dart';
import 'package:amplify_trips_planner/models/ModelProvider.dart';
import 'package:flutter_riverpod/flutter_riverpod.dart';

final profileAPIServiceProvider = Provider<ProfileAPIService>((ref) {
  return ProfileAPIService();
});

class ProfileAPIService {
  ProfileAPIService();

  Future<Profile> getProfile() async {
    try {
      final request = ModelQueries.list(Profile.classType);
      final response = await Amplify.API.query(request: request).response;

      final profile = response.data!.items.first;

      return profile!;
    } on Exception catch (error) {
      safePrint('getProfile failed: $error');
      rethrow;
    }
  }

  Future<void> updateProfile(Profile updatedProfile) async {
    try {
      await Amplify.API
          .mutate(
            request: ModelMutations.update(updatedProfile),
          )
          .response;
    } on Exception catch (error) {
      safePrint('updateProfile failed: $error');
    }
  }
}profile_repository.dart.

Step 7: Open the profile_repository.dart file and update it with the following code:
import 'package:amplify_trips_planner/features/profile/service/profile_api_service.dart';
import 'package:amplify_trips_planner/models/ModelProvider.dart';
import 'package:flutter_riverpod/flutter_riverpod.dart';

final profileRepositoryProvider = Provider<ProfileRepository>((ref) {
  final profileAPIService = ref.read(profileAPIServiceProvider);
  return ProfileRepository(profileAPIService);
});

class ProfileRepository {
  ProfileRepository(this.profileAPIService);
  final ProfileAPIService profileAPIService;

  Future<Profile> getProfile() {
    return profileAPIService.getProfile();
  }

  Future<void> update(Profile updatedProfile) async {
    return profileAPIService.updateProfile(updatedProfile);
  }
}Implement the UI for displaying and updating the profile

Step 2: Open the profile_controller.dart file and update it with the following code. The UI will use the controller to edit the details of the profile.
Note: VSCode will show errors due to the missing profile_controller.g.dart file. You will fix that in the next step.
import 'package:amplify_trips_planner/features/profile/data/profile_repository.dart';
import 'package:amplify_trips_planner/models/ModelProvider.dart';
import 'package:riverpod_annotation/riverpod_annotation.dart';

part 'profile_controller.g.dart';

@riverpod
class ProfileController extends _$ProfileController {
  Future<Profile> _fetchProfile() async {
    final profileRepository = ref.read(profileRepositoryProvider);
    return profileRepository.getProfile();
  }

  @override
  FutureOr<Profile> build() async {
    return _fetchProfile();
  }

  Future<void> updateProfile(Profile profile) async {
    state = const AsyncValue.loading();
    state = await AsyncValue.guard(() async {
      final profileRepository = ref.read(profileRepositoryProvider);
      await profileRepository.update(profile);
      return _fetchProfile();
    });
  }
}dart run build_runner build -d

import 'package:amplify_trips_planner/common/ui/bottomsheet_text_form_field.dart';
import 'package:amplify_trips_planner/features/profile/controller/profile_controller.dart';
import 'package:amplify_trips_planner/models/ModelProvider.dart';
import 'package:flutter/material.dart';
import 'package:flutter_riverpod/flutter_riverpod.dart';
import 'package:go_router/go_router.dart';

class EditProfileBottomSheet extends ConsumerWidget {
  EditProfileBottomSheet({
    required this.profile,
    super.key,
  });

  final Profile profile;

  final formGlobalKey = GlobalKey<FormState>();

  @override
  Widget build(BuildContext context, WidgetRef ref) {
    final firstNameController = TextEditingController(
      text: profile.firstName != null ? profile.firstName! : '',
    );
    final lastNameController = TextEditingController(
      text: profile.lastName != null ? profile.lastName! : '',
    );
    final homeCityController = TextEditingController(
      text: profile.homeCity != null ? profile.homeCity! : '',
    );

    return Form(
      key: formGlobalKey,
      child: Container(
        padding: EdgeInsets.only(
          top: 15,
          left: 15,
          right: 15,
          bottom: MediaQuery.of(context).viewInsets.bottom + 15,
        ),
        width: double.infinity,
        child: Column(
          mainAxisSize: MainAxisSize.min,
          crossAxisAlignment: CrossAxisAlignment.start,
          children: [
            BottomSheetTextFormField(
              labelText: 'First Name',
              controller: firstNameController,
              keyboardType: TextInputType.name,
            ),
            const SizedBox(
              height: 20,
            ),
            BottomSheetTextFormField(
              labelText: 'Last Name',
              controller: lastNameController,
              keyboardType: TextInputType.name,
            ),
            const SizedBox(
              height: 20,
            ),
            BottomSheetTextFormField(
              labelText: 'Home City',
              controller: homeCityController,
              keyboardType: TextInputType.name,
            ),
            const SizedBox(
              height: 20,
            ),
            TextButton(
              child: const Text('OK'),
              onPressed: () async {
                final currentState = formGlobalKey.currentState;
                if (currentState == null) {
                  return;
                }
                if (currentState.validate()) {
                  final updatedProfile = profile.copyWith(
                    firstName: firstNameController.text,
                    lastName: lastNameController.text,
                    homeCity: homeCityController.text,
                  );
                  await ref
                      .watch(profileControllerProvider.notifier)
                      .updateProfile(updatedProfile);

                  if (context.mounted) {
                    context.pop();
                  }
                }
              }, //,
            ),
          ],
        ),
      ),
    );
  }
}
import 'package:amplify_trips_planner/common/utils/colors.dart' as constants;
import 'package:amplify_trips_planner/features/profile/controller/profile_controller.dart';
import 'package:amplify_trips_planner/features/profile/ui/profile_page/edit_profile_bottomsheet.dart';
import 'package:amplify_trips_planner/models/ModelProvider.dart';
import 'package:flutter/material.dart';
import 'package:flutter_riverpod/flutter_riverpod.dart';

class ProfileListView extends ConsumerWidget {
  const ProfileListView({
    required this.profile,
    super.key,
  });

  final AsyncValue<Profile> profile;

  void editProfile(BuildContext context, Profile profile) async {
    await showModalBottomSheet<void>(
      isScrollControlled: true,
      elevation: 5,
      context: context,
      builder: (BuildContext context) {
        return EditProfileBottomSheet(
          profile: profile,
        );
      },
    );
  }

  @override
  Widget build(BuildContext context, WidgetRef ref) {
    switch (profile) {
      case AsyncData(:final value):
        return ListView(
          children: [
            Card(
              child: ListTile(
                leading: const Icon(
                  Icons.verified_user,
                  size: 50,
                  color: Color(constants.primaryColorDark),
                ),
                title: Text(
                  value.firstName != null ? value.firstName! : 'Add your name',
                  style: Theme.of(context).textTheme.titleLarge,
                ),
                subtitle: Text(value.email),
              ),
            ),
            ListTile(
              dense: true,
              title: Text(
                'Home',
                style: Theme.of(context)
                    .textTheme
                    .titleSmall!
                    .copyWith(color: Colors.white),
              ),
              tileColor: Colors.grey,
            ),
            Card(
              child: ListTile(
                title: Text(
                  value.firstName != null ? value.homeCity! : 'Add your city',
                  style: Theme.of(context).textTheme.titleLarge,
                ),
              ),
            ),
            const ListTile(
              dense: true,
              tileColor: Colors.grey,
              visualDensity: VisualDensity(vertical: -4),
            ),
            Card(
              child: Row(
                mainAxisAlignment: MainAxisAlignment.spaceAround,
                children: [
                  TextButton(
                    style: TextButton.styleFrom(
                      textStyle: const TextStyle(fontSize: 20),
                    ),
                    onPressed: () {
                      editProfile(context, value);
                    },
                    child: const Text('Edit'),
                  ),
                ],
              ),
            )
          ],
        );

      case AsyncError():
        return Column(
          mainAxisSize: MainAxisSize.min,
          crossAxisAlignment: CrossAxisAlignment.center,
          children: [
            Padding(
              padding: const EdgeInsets.all(8),
              child: Text(
                'Error',
                style: Theme.of(context).textTheme.titleMedium,
                textAlign: TextAlign.center,
              ),
            ),
            TextButton(
              style: TextButton.styleFrom(
                textStyle: const TextStyle(fontSize: 20),
              ),
              onPressed: () async {
                ref.invalidate(profileControllerProvider);
              },
              child: const Text('Try again'),
            ),
          ],
        );
      case AsyncLoading():
        return const Center(
          child: CircularProgressIndicator(),
        );

      case _:
        return const Center(
          child: Text('Error'),
        );
    }
  }
}
import 'package:amplify_trips_planner/common/ui/the_navigation_drawer.dart';
import 'package:amplify_trips_planner/common/utils/colors.dart' as constants;
import 'package:amplify_trips_planner/features/profile/controller/profile_controller.dart';
import 'package:amplify_trips_planner/features/profile/ui/profile_page/profile_listview.dart';
import 'package:flutter/material.dart';
import 'package:flutter_riverpod/flutter_riverpod.dart';

class ProfilePage extends ConsumerWidget {
  const ProfilePage({
    super.key,
  });

  @override
  Widget build(BuildContext context, WidgetRef ref) {
    final profileValue = ref.watch(profileControllerProvider);
    return Scaffold(
      appBar: AppBar(
        centerTitle: true,
        title: const Text(
          'Amplify Trips Planner',
        ),
        backgroundColor: const Color(constants.primaryColorDark),
      ),
      drawer: const TheNavigationDrawer(),
      body: ProfileListView(
        profile: profileValue,
      ),
    );
  }
} GoRoute(
path: '/profile',
name: AppRoute.profile.name,
builder: (context, state) => const ProfilePage(),
),import 'package:amplify_trips_planner/common/navigation/router/routes.dart';
import 'package:amplify_trips_planner/features/activity/ui/activity_page/activity_page.dart';
import 'package:amplify_trips_planner/features/activity/ui/add_activity/add_activity_page.dart';
import 'package:amplify_trips_planner/features/activity/ui/edit_activity/edit_activity_page.dart';
import 'package:amplify_trips_planner/features/profile/ui/profile_page/profile_page.dart';
import 'package:amplify_trips_planner/features/trip/ui/edit_trip_page/edit_trip_page.dart';
import 'package:amplify_trips_planner/features/trip/ui/past_trip_page/past_trip_page.dart';
import 'package:amplify_trips_planner/features/trip/ui/past_trips/past_trips_list.dart';
import 'package:amplify_trips_planner/features/trip/ui/trip_page/trip_page.dart';
import 'package:amplify_trips_planner/features/trip/ui/trips_list/trips_list_page.dart';
import 'package:amplify_trips_planner/models/ModelProvider.dart';
import 'package:flutter/material.dart';
import 'package:go_router/go_router.dart';
final router = GoRouter(
routes: [
GoRoute(
path: '/',
name: AppRoute.home.name,
builder: (context, state) => const TripsListPage(),
),
GoRoute(
path: '/trip/:id',
name: AppRoute.trip.name,
builder: (context, state) {
final tripId = state.pathParameters['id']!;
return TripPage(tripId: tripId);
},
),
GoRoute(
path: '/edittrip/:id',
name: AppRoute.editTrip.name,
builder: (context, state) {
return EditTripPage(
trip: state.extra! as Trip,
);
},
),
GoRoute(
path: '/pasttrip/:id',
name: AppRoute.pastTrip.name,
builder: (context, state) {
final tripId = state.pathParameters['id']!;
return PastTripPage(tripId: tripId);
},
),
GoRoute(
path: '/pasttrips',
name: AppRoute.pastTrips.name,
builder: (context, state) => const PastTripsList(),
),
GoRoute(
path: '/addActivity/:id',
name: AppRoute.addActivity.name,
builder: (context, state) {
final tripId = state.pathParameters['id']!;
return AddActivityPage(tripId: tripId);
},
),
GoRoute(
path: '/activity/:id',
name: AppRoute.activity.name,
builder: (context, state) {
final activityId = state.pathParameters['id']!;
return ActivityPage(activityId: activityId);
},
),
GoRoute(
path: '/editactivity/:id',
name: AppRoute.editActivity.name,
builder: (context, state) {
return EditActivityPage(
activity: state.extra! as Activity,
);
},
),
    GoRoute(
      path: '/profile',
      name: AppRoute.profile.name,
      builder: (context, state) => const ProfilePage(),
    ),
],
errorBuilder: (context, state) => Scaffold(
body: Center(
child: Text(state.error.toString()),
),
),
); ListTile(
leading: const Icon(Icons.settings),
title: const Text('Settings'),
onTap: () {
context.goNamed(
AppRoute.profile.name,
);
},
),import 'package:amplify_trips_planner/common/navigation/router/routes.dart';
import 'package:amplify_trips_planner/common/services/auth_service.dart';
import 'package:amplify_trips_planner/common/utils/colors.dart' as constants;
import 'package:flutter/material.dart';
import 'package:flutter_riverpod/flutter_riverpod.dart';
import 'package:go_router/go_router.dart';
class TheNavigationDrawer extends ConsumerWidget {
const TheNavigationDrawer({
super.key,
});
@override
Widget build(BuildContext context, WidgetRef ref) {
return Drawer(
child: ListView(
padding: EdgeInsets.zero,
children: [
const DrawerHeader(
decoration: BoxDecoration(
color: Color(constants.primaryColorDark),
),
padding: EdgeInsets.all(16),
child: Column(
children: [
SizedBox(height: 10),
Text(
'Amplify Trips Planner',
style: TextStyle(fontSize: 22, color: Colors.white),
),
],
),
),
ListTile(
leading: const Icon(Icons.home),
title: const Text('Trips'),
onTap: () {
context.goNamed(
AppRoute.home.name,
);
},
),
ListTile(
leading: const Icon(Icons.category),
title: const Text('Past Trips'),
onTap: () {
context.goNamed(
AppRoute.pastTrips.name,
);
},
),
          ListTile(
            leading: const Icon(Icons.settings),
            title: const Text('Settings'),
            onTap: () {
              context.goNamed(
                AppRoute.profile.name,
              );
            },
          ),
ListTile(
leading: const Icon(Icons.exit_to_app),
title: const Text('Logout'),
onTap: () => ref.read(authServiceProvider).signOut(),
),
],
),
);
}
}- Due to the changes in the data schema, you need to erase the app and its contents from the emulator or simulator.
- If you encounter an error on the settings page, it could be because the VTL resolvers were not updated properly. To resolve the issue, add an empty line to the schema.graphql file and run the amplify push command.
Conclusion
In this module, you introduced the feature of displaying and editing the user’s profile. You used an Amplify function to create the user’s profile. You also implemented the UI for displaying the profile details and updating it.
Conclusion
Congratulations! You have created a cross-platform Flutter mobile app using AWS Amplify! You have cloned the app you created in the first tutorial in this series. You then introduced the ability to display the user’s past trips. Additionally, you updated the Amplify API, allowing users to create, read, update, and delete their trip’s activities. You have also added an Amplify function to create a user profile, then you implemented the UI to allow the user to update their profile details.
Clean up resources
Now that you’ve finished this walkthrough, you can delete the backend resources to avoid incurring unexpected costs by running the command below in the root folder of the app.
amplify deleteNext steps
Check out these recommended next steps.