AWS Database Blog
How to Build a Chat Application with Amazon ElastiCache for Redis
Sam Dengler is a Solutions Architect at Amazon Web Services
In this blog post, we review concepts and architectural patterns relevant to a chat application. We also discuss implementation details for a chat client and server, and instructions to deploy a sample chat application into your AWS account.
Background information
Building a chat application requires a communication channel over which a client can send messages that are redistributed to other participants in the chat room. This communication is popularly implemented using the publish-subscribe pattern (PubSub), where a message is sent to a centralized topic channel. Interested parties can subscribe to this channel to be notified of updates. This pattern decouples the publisher and subscribers, so that the set of subscribers can grow or shrink without the knowledge of the publisher.
PubSub is implemented on a backend server, to which clients communicate using WebSockets. WebSockets is a persistent TCP connection that provides a channel for data to be streamed bidirectionally between the client and server. With a single-server architecture, one PubSub application can manage the state of publishers and subscribers, and also the message redistribution to clients over WebSockets. The diagram following illustrates the path that messages travel over WebSockets between two clients on a single-server PubSub architecture.

Single-Server PubSub Architecture
A single-server architecture is valuable to illustrate the communication flow. However, most solution builders will want to design a multiserver architecture. A multiserver architecture helps to increase reliability and create elasticity to horizontally scale your application as the number of clients grow.
In a multiserver architecture, a client makes a WebSocket connection to a load balancer that forwards traffic to a pool of servers. These servers are responsible for managing the WebSocket connections and data streamed over them. Once a WebSocket connection is established with a PubSub application server, that connection is persisted and data streams to the application in both directions. The load balancer distributes requests for a WebSocket connection to healthy servers, meaning that two clients can establish a WebSocket connection to different application servers.
Because multiple applications manage the client WebSocket connections, the applications must communicate among themselves to redistribute messages. This communication is necessary because a message might stream over a WebSocket up to one application server and need to be streamed down to a client connected to a different application server. You can satisfy this requirement for shared communication among applications by externalizing the PubSub solution from the applications that are managing client connections.
The diagram following illustrates the path that messages travel over WebSockets between two clients on a multiserver PubSub architecture. A persistent connection is established through the load balancer between each client and WebSocket server. A persistent connection is also established between the WebSocket server and the PubSub server for each subscription topic, which is shared among all clients.
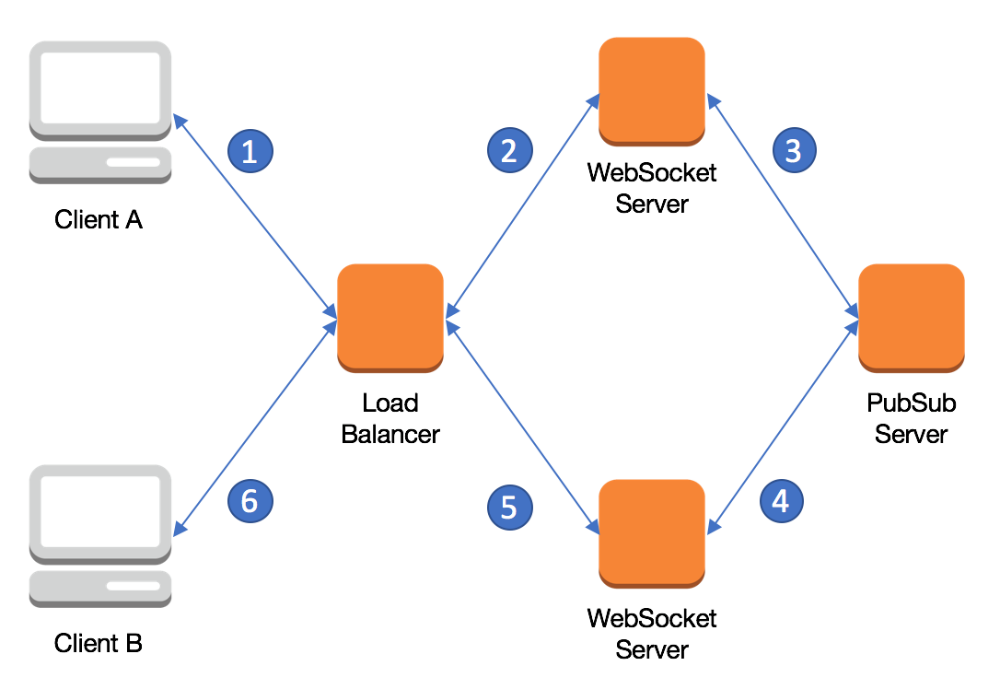
Multiserver PubSub Architecture
A custom PubSub solution is a possibility, but you can also use existing software applications to provide this functionality. Redis is a fast, open-source, in-memory data store and cache that features PubSub support. Amazon ElastiCache for Redis is an in-memory service that delivers the ease of use and power of Redis, along with the availability, reliability, and performance suitable for demanding applications.
Using ElastiCache for Redis and the WebSocket support found in the Application Load Balancer that is part of Elastic Load Balancing, I’ll show you how to build a sample chat application. The application has a backend based on Node.js and AWS Elastic Beanstalk, and a Vue.js web client. You can find all the code for the sample application in the elasticache-redis-chatapp GitHub repository.
Architecture
The diagram following illustrates the final architecture on AWS, using ElastiCache for Redis, Application Load Balancer, a Node.js Elastic Beanstalk application, and a Vue.js web client.

Let’s review the chat application implementation at a high level.
Implementation overview
The sample chat application consists of members and messages that communicate in a shared chat room, illustrated in the screenshot following.
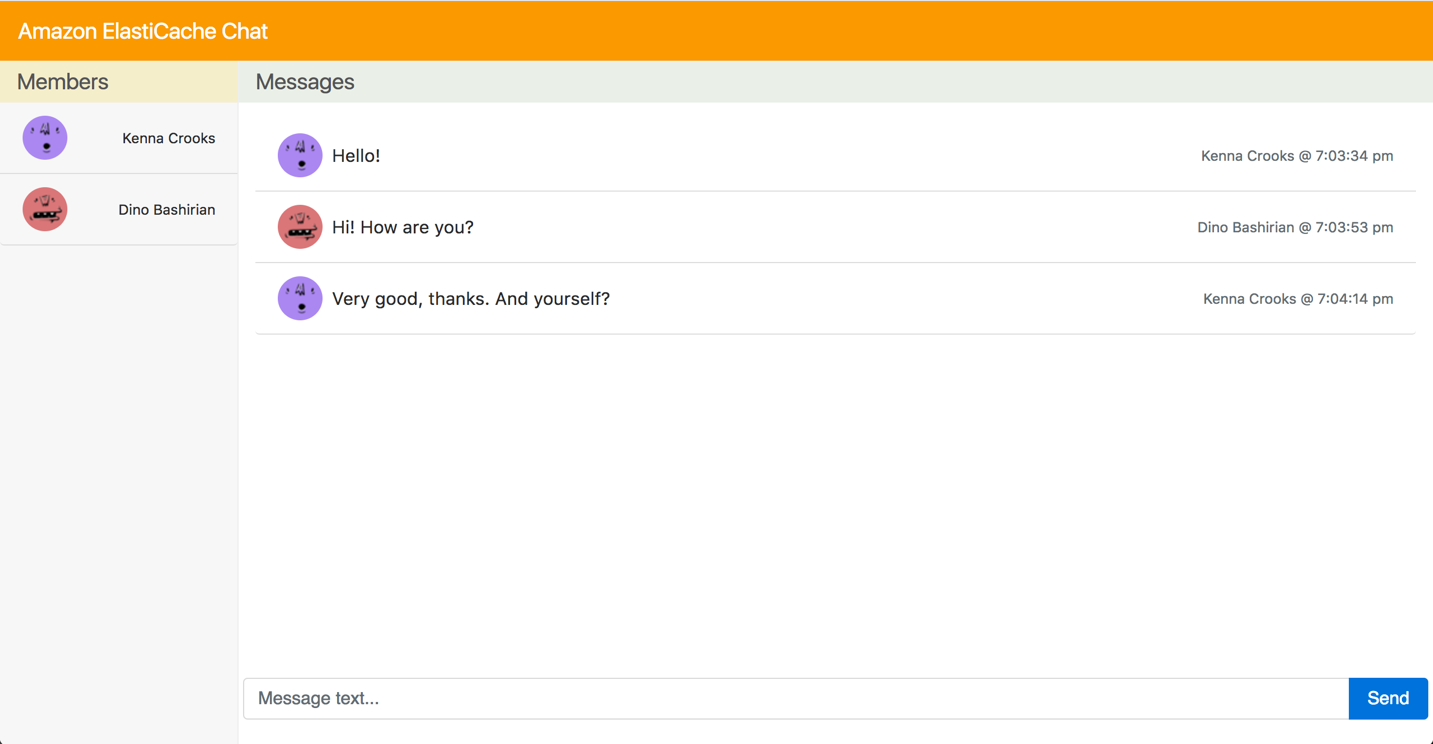
For this sample application, I’ve forgone membership registration, profile management, and login. Instead, when opening the chat application in a browser, a member is generated on your behalf with a random user name and avatar. This name and avatar then appear in the Members list on the left side. As other members join and leave by opening the application in their browsers, their names appear in the web application. Members can send messages, which are redistributed to other web clients and appear in the main chat window.
Next, we’ll examine the Vue.js web client in more depth, followed by the Node.js backend application.
Vue.js web client
The web client is implemented using Vue.js to manage the view layer, Bootstrap for the UI, and Socket.io for WebSocket communication. To reduce complexity for beginners, no JavaScript bundlers were used. However, you should consider webpack, or similar software, in a production application. Vue.js renders UI changes based on updates to underlying data models. I’ve chosen these frameworks and libraries as representatives of modern single-page web applications. However, you can find many analogous choices in the community, with more appearing every day.
Following is a code snippet for the HTML markup that establishes the Vue.js application component and the iterator to display members. I’ve removed some intermediate markup and CSS styling to focus on the functionality. The full example can be found in the GitHub repository.
The v-for parameter is used to define the iterator, in this case a key-value tuple for the members object data model discussed momentarily. Within the iterated loop, Mustache templating is used to access each member object and display the user name. Mustache templating doesn’t work inside an HTML attribute, so a v-bind argument must be used to resolve the member’s avatar image URL.
Vue.js will handle minimal rendering of the UI changes based on smart DOM difference calculations. This approach leaves us free to focus on state modifications to underlying Vue.js data models. The sample application inlines the JavaScript code in the HTML. However, a production system would likely modularize the UI components using external .vue files and transpiling using webpack on build. Socket.io libraries are also initialized and are covered in a little bit.
Here, we’ve declared the Vue.js application and bound it to the HTML div element with the app ID. We’ve also declared three data models:
message: the message text entered in the form.messages: the list of messages. An array is used because we will only be appending messages.members: the list of members. An object is used so that we’re able to locate and remove a member when that member leaves the chat room.
In addition to the markup and Vue.js application declaration, the web client is responsible for establishing a WebSocket connection, declaring the topics on which to subscribe, and establishing how messages published to those topics modify the data models declared preceding. For this application, we establish five topics for communication. Each topic is listed following with the triggering event and corresponding action:
messages
Trigger: A message is sent to the chat room.
Action: Update the list of messages with the message text and member metadata.
member_add
Trigger: A member joins the chat room.
Action: Add the member user name and password to the list of members.
member_delete
Trigger: A member leaves the chat room.
Action: Remove the member from the list of members.
message_history
Trigger: A client initializes the list of messages,
Action: Set the list of messages to the truncated list of historically recent messages,
member_history
Trigger: A client initializes the list of members,
Action: Set the list of members to the list of members participating in the chat room,
Following is a JavaScript code to implement these methods. I’ve kept the Vue.js code from before as a point of reference:
The Socket.io object, declared in the earlier code snippet, subscribes to data topics using socket.on, one for each of the topics described previously. When messages are published to the topic, the callback function is executed. The data models are also updated according to the action (set, add, delete) and target data model (array, object). A bind(this) statement is appended to inject the Vue.js data models into the callback function scope (see Function.prototype.bind for more detail).
Last, there is a Vue.js method that handles the message form submission. Vue.js provides a convenience method to bind form submission to the method. The method publishes the message text over WebSockets, and then sets the message to an empty string. This string in turn updates the UI by using the Vue.js binding.
Node.js backend application
Now that we’ve covered the basics of the web client, let’s take a look at the Node.js backend application. We’ll see how Redis is used to persist data and redistribute WebSocket messages using PubSub.
Setting up Redis and WebSockets
When the web client is opened in a browser, a WebSocket is established with a PubSub application. On connection, the application must assemble some data for existing members and messages to be published to the new client. It also must update other clients about the new chat room participant. Following is a code snippet illustrating how the HTTP application and WebSockets are declared.
In addition to creating the WebSocket listener, the application must also establish multiple connections to the Redis cluster. One connection is required to make updates to Redis data models and to publish messages on a topic. An additional connection is required for each of the topic subscriptions.
In this code snippet, the Redis command channel is established using the ioredis JavaScript client. A function is also defined to initialize a new subscription channel, added to a hash of all subscribers keyed on the channel topic. Each subscription channel functions the same way:
- It receives a JSON string message on a Redis subscription channel.
- It parses the JSON string to a JavaScript object.
- It publishes a JavaScript object to the WebSocket connection, using the same topic used for the Redis PubSub.
As you will see shortly, it’s important that the JavaScript objects are serialized to JSON strings when they are stored as values in Redis data types and published on PubSub topics. The JSON string must be deserialized back to a JavaScript object before publishing over WebSockets. This deserialization must happen because the Socket.io library also serializes and deserializes the object when communicating back to the client.
When a web client joins the chat room in a browser, the client establishes a new connection to a WebSocket. We can take action when this connection is established by defining a function, illustrated following:
The socket is an object that includes an ID property that’s used to identify each WebSocket connection to a client. We use the socket.id value to identify members. This identification lets us find and remove members from the Redis data model. It also lets us communicate member removal to all chat room clients using the member_delete topic. The other functions described following reside in the context of this callback function.
In the next section, we’ll review what happens when a new client connects over WebSockets to the Node.js backed application.
Initializing a new client connection
When a new client joins the chat room, several things happen:
- The current list of members is retrieved.
- Unless this is a client reconnecting, a new member is created with a random user name and avatar URL, and then stored in a Redis Hash.
- A truncated list of historically recent messages is retrieved.
Let’s take a look at the code to accomplish these tasks. First is the following:
The ioredis JavaScript client uses Promises for asynchronous execution processing. The HGETALL(‘members’) call returns all the keys and values of the hash stored at the key ‘members’. Redis supports a Hash data type, but only one level deep. Values of the hash must be strings. The callback function iterates the key-value pairs of the hash, deserialized in the next chain to initialize the member.
The initialize_member Promise function first checks to see if the member is a reconnecting socket. If not, a new member is generated with a random user name using Faker. From this user name, a random avatar URL is generated using the Adorable Avatars service.
The last step in the client initialization is to retrieve a truncated list of historically recent messages. To do so, we can take advantage of another Redis data type called a Sorted Set. This type is similar to a Redis Set but includes a rank for each element in the set. The Sorted Set is a popular data type for leaderboards. You can also use it to store a chronologically ordered collection of elements when timestamp is used as the rank.
We use a Redis method on the Sorted Set, called ZRANGE, which returns a list of elements based on rank. The elements are ordered from the lowest to the highest score, so we need to retrieve the last element (-1) to the maximum number of messages to retrieve on initialization (-1 * channel_history_max). Again, each element has been serialized as a JSON string, so we must deserialize the element to a JavaScript object.
To recap, when a new client joins the chat room, several things happen:
- The current list of members is retrieved.
- Unless this is a client reconnecting, a new member is created with a random user name and avatar URL, and then stored in a Redis Hash.
- A truncated list of historically recent messages is retrieved.
We’ve reviewed each of these steps. Now let’s look at how we complete the initialization and stream data to the client. Because ioredis uses Promises, we can chain the asynchronous executions together and wait for all to complete before processing the results using Promise.all.
Now that we have all the required data, we need to use our WebSocket connections to stream data to initialize the new client and communicate a new member has joined the chat room to the all members.
We use Socket.io’s emit method to stream the list of messages and members to the client that’s undergoing initialization. One WebSocket can be used to emit multiple messages. Here, the topics (member_history, message_history) correspond to the topic listeners that we reviewed in the client code preceding. The new member must be communicated to all participants. To do so, we use our Redis command channel to publish a serialized JSON string to the member_add topic. As you’ll remember from earlier, we set up three Redis topics to redistribute the messages using WebSockets to the clients listening on the same topic.
In the next section, let’s review how we set up handlers to process messages sent in the chat room.
Message handling
When a new client is completing its initial WebSocket connection, we must also define message handler for messages to be sent by the new client. The message will consist of the message text, member username, member avatar, and the message creation timestamp.
We add the message to the message history stored in a Sorted Set using the ZADD command and the message creation timestamp as the rank. Finally, we used the Redis command channel to publish the messages topic, for which we defined a Redis/WebSockets redistribution preceding.
We’ve covered how to initialize a client and process messages sent in the chat room. Last, let’s look at how we handle when a client leaves the chat room.
Disconnection handling
Socket.io creates a heartbeat for the WebSocket established when a client connects to the server. When the heartbeat fails, a disconnect event is fired on the client.
When a client disconnects, we reverse the actions taken during the member initialization. First, we use the Redis HDEL method to remove the client from the member Hash Redis data type using the client’s WebSockets socket ID, the same used to add the client to the Hash. Like we notified all participants of a new member joining the chat room, we must also notify all participants that a member is leaving the chat room. We do so using the member_delete Redis topic. This topic is redistributed to the remaining clients using WebSockets.
That completes the code review. Next, we’ll review deploying the application stack into AWS using AWS CloudFormation.
Application stack deployment using AWS CloudFormation
CloudFormation gives developers and system administrators an easy way to create and manage a collection of related AWS resources. CloudFormation provisions and updates resources in an orderly and predictable fashion. To launch the CloudFormation stack for the chat application, click the button following.
![]()
The CloudFormation script creates an Elastic Beanstalk environment, application, and configuration template. It also creates the ElastiCache cluster for Redis and Amazon EC2 security groups for the load balancer, application servers, and Redis cluster. In this way, we use best practices for least-privilege security configurations between architectural layers.
One note regarding the ElastiCache for Redis configuration snippet following. Although AWS::EC2::SecurityGroup allows the inline specification of ingress security rules, doing so creates a circular reference between the CacheCluster and the SecurityGroup. The ingress rules must be broken out into a separate AWS::EC2::SecurityGroupIngress to break the circular reference, as shown in the following snippet.
Next, let’s review how we modify the configuration of the Elastic Beanstalk Nginx proxy configuration to support WebSockets.
Nginx configuration in AWS Elastic Beanstalk for WebSocket support
Elastic Beanstalk is an easy-to-use service for deploying and scaling web applications and services developed with Java, .NET, PHP, Node.js, Python, Ruby, Go, and Docker on familiar servers such as Apache, Nginx, Passenger, and IIS.
Elastic Beanstalk supports both Elastic Load Balancers (ELB) and Application Load Balancers (ALB). Our clients and servers communicate using WebSockets, so we will configure an ALB for its WebSockets support. For the sample Node.js backend application, we will choose Elastic Beanstalk’s preconfigured application stack based on Node.js. We’ll use Nginx as the web tier proxy in front of the application code.
Socket.io has a means of falling back to a polling strategy when WebSocket is not supported. However, with a simple configuration change to the ALB and Nginx, we can enable WebSocket support and use a push-based data stream from the server to the client. To enable WebSocket support in the ALB, we must enable sticky sessions so that the same instance responds when the client makes two consecutive HTTP requests to upgrade the connection to use Websockets. To enable WebSocket support in Nginx, we must make a small configuration change to Nginx by using the .ebextensions mechanism for Elastic Beanstalk. Container commands provide a way to inject changes to an application after the application archive has been expanded, but before it has been installed as the active application.
The code snippet preceding modifies the Nginx configuration file, /tmp/deployment/config/#etc#nginx#conf.d#00_elastic_beanstalk_proxy.conf, in place. It does so using a sed command to search for the “proxy set header” line and replace it with the configuration to support WebSockets. When the application is installed, Elastic Beanstalk copies the configuration file to /etc/nginx/conf.d/00_elastic_beanstalk_proxy.conf. After this step, the Nginx service is restarted to make the changes active.
Conclusion
In this blog post, we reviewed the publish-subscribe pattern. We also looked at how it can be used within ElastiCache for Redis to support the bidirectional streaming communication for multiple clients in a chat application.
As a reminder, you can find the full source to this example application in the awslabs GitHub repository. After you launch this example application, I encourage you to extend it to include your own ideas for a chat application by adding user authentication, file attachments, or other features you find useful for your own chat or PubSub application.