AWS Compute Blog
Managing your AWS Outposts capacity using Amazon CloudWatch and AWS Lambda
This post is authored by Carlos Castro, AWS Principal Solutions Architect and Kevin Wang, AWS Associate Solutions Architect
Customers are excited about using AWS Outposts to bring services and capabilities available on AWS to on-premises for workloads that require low-latency, local data processing, or local data storage. As part of this, the responsibility for managing capacity shifts from the AWS to the customer. Customers can purchase AWS Outposts configurations from a broad selection of instance types based on the use cases they plan to run on AWS Outposts. When additional capacity is needed, customers can expand their AWS Outposts. When operating in an AWS Region, customers don’t have to worry about redundant capacity. However, with AWS Outposts, customers must ensure that there is sufficient compute and storage capacity to restore services in the event of a hardware or software failure. This allows customers to meet the business continuity and disaster recovery (BCDR) requirements for the workloads that run on their Outpost.
This post shows how you can combine Region-based AWS services for a common management task, ensuring there is available capacity to support an N+M high availability model, where N is the required capacity and M is the spare capacity designed into the solution. I monitor the Amazon EC2 and Amazon EBS capacity on an Outpost and show how to automate governance to ensure that there are available resources to recover from failures. With this, customers can create a “hot-spare” failover mechanism.
Overview of the solution
I use integrations between services in the AWS Outposts’ home Region with the services deployed on the Outpost to accomplish the goal. AWS Outposts provides available and utilized capacity metrics in Amazon CloudWatch. It is a best practice for administrators to create Amazon CloudWatch Events to monitor capacity. For this use case, events trigger fan-out actions to inform (via Amazon Simple Notification Service) and act (via an AWS Lambda function) on the condition. The action from an event can include triggering a workflow to stop low-priority resources, restricting the use of remaining capacity to a subset of the administrators or sending a notification to the appropriate team to plan adding incremental capacity. In this case, I act on the event by updating the permissions policy associated with administrators in AWS Identity and Access Management (IAM). If the threshold has been exceeded, I remove the capability to create more resources by updating an AWS IAM policy. This action allows me to reserve that capacity in the event of a failure. Once the threshold normalizes, I return permissions to the administrators. AWS administrators have the flexibility of assigning the IAM policies you control with the solution to selected IAM users, groups, or roles. For example, application system administrators can be assigned the policies with dynamic resource creation permissions while AWS Outposts infrastructure administrators maintain full access to creating resources.
The following image represents this flow.
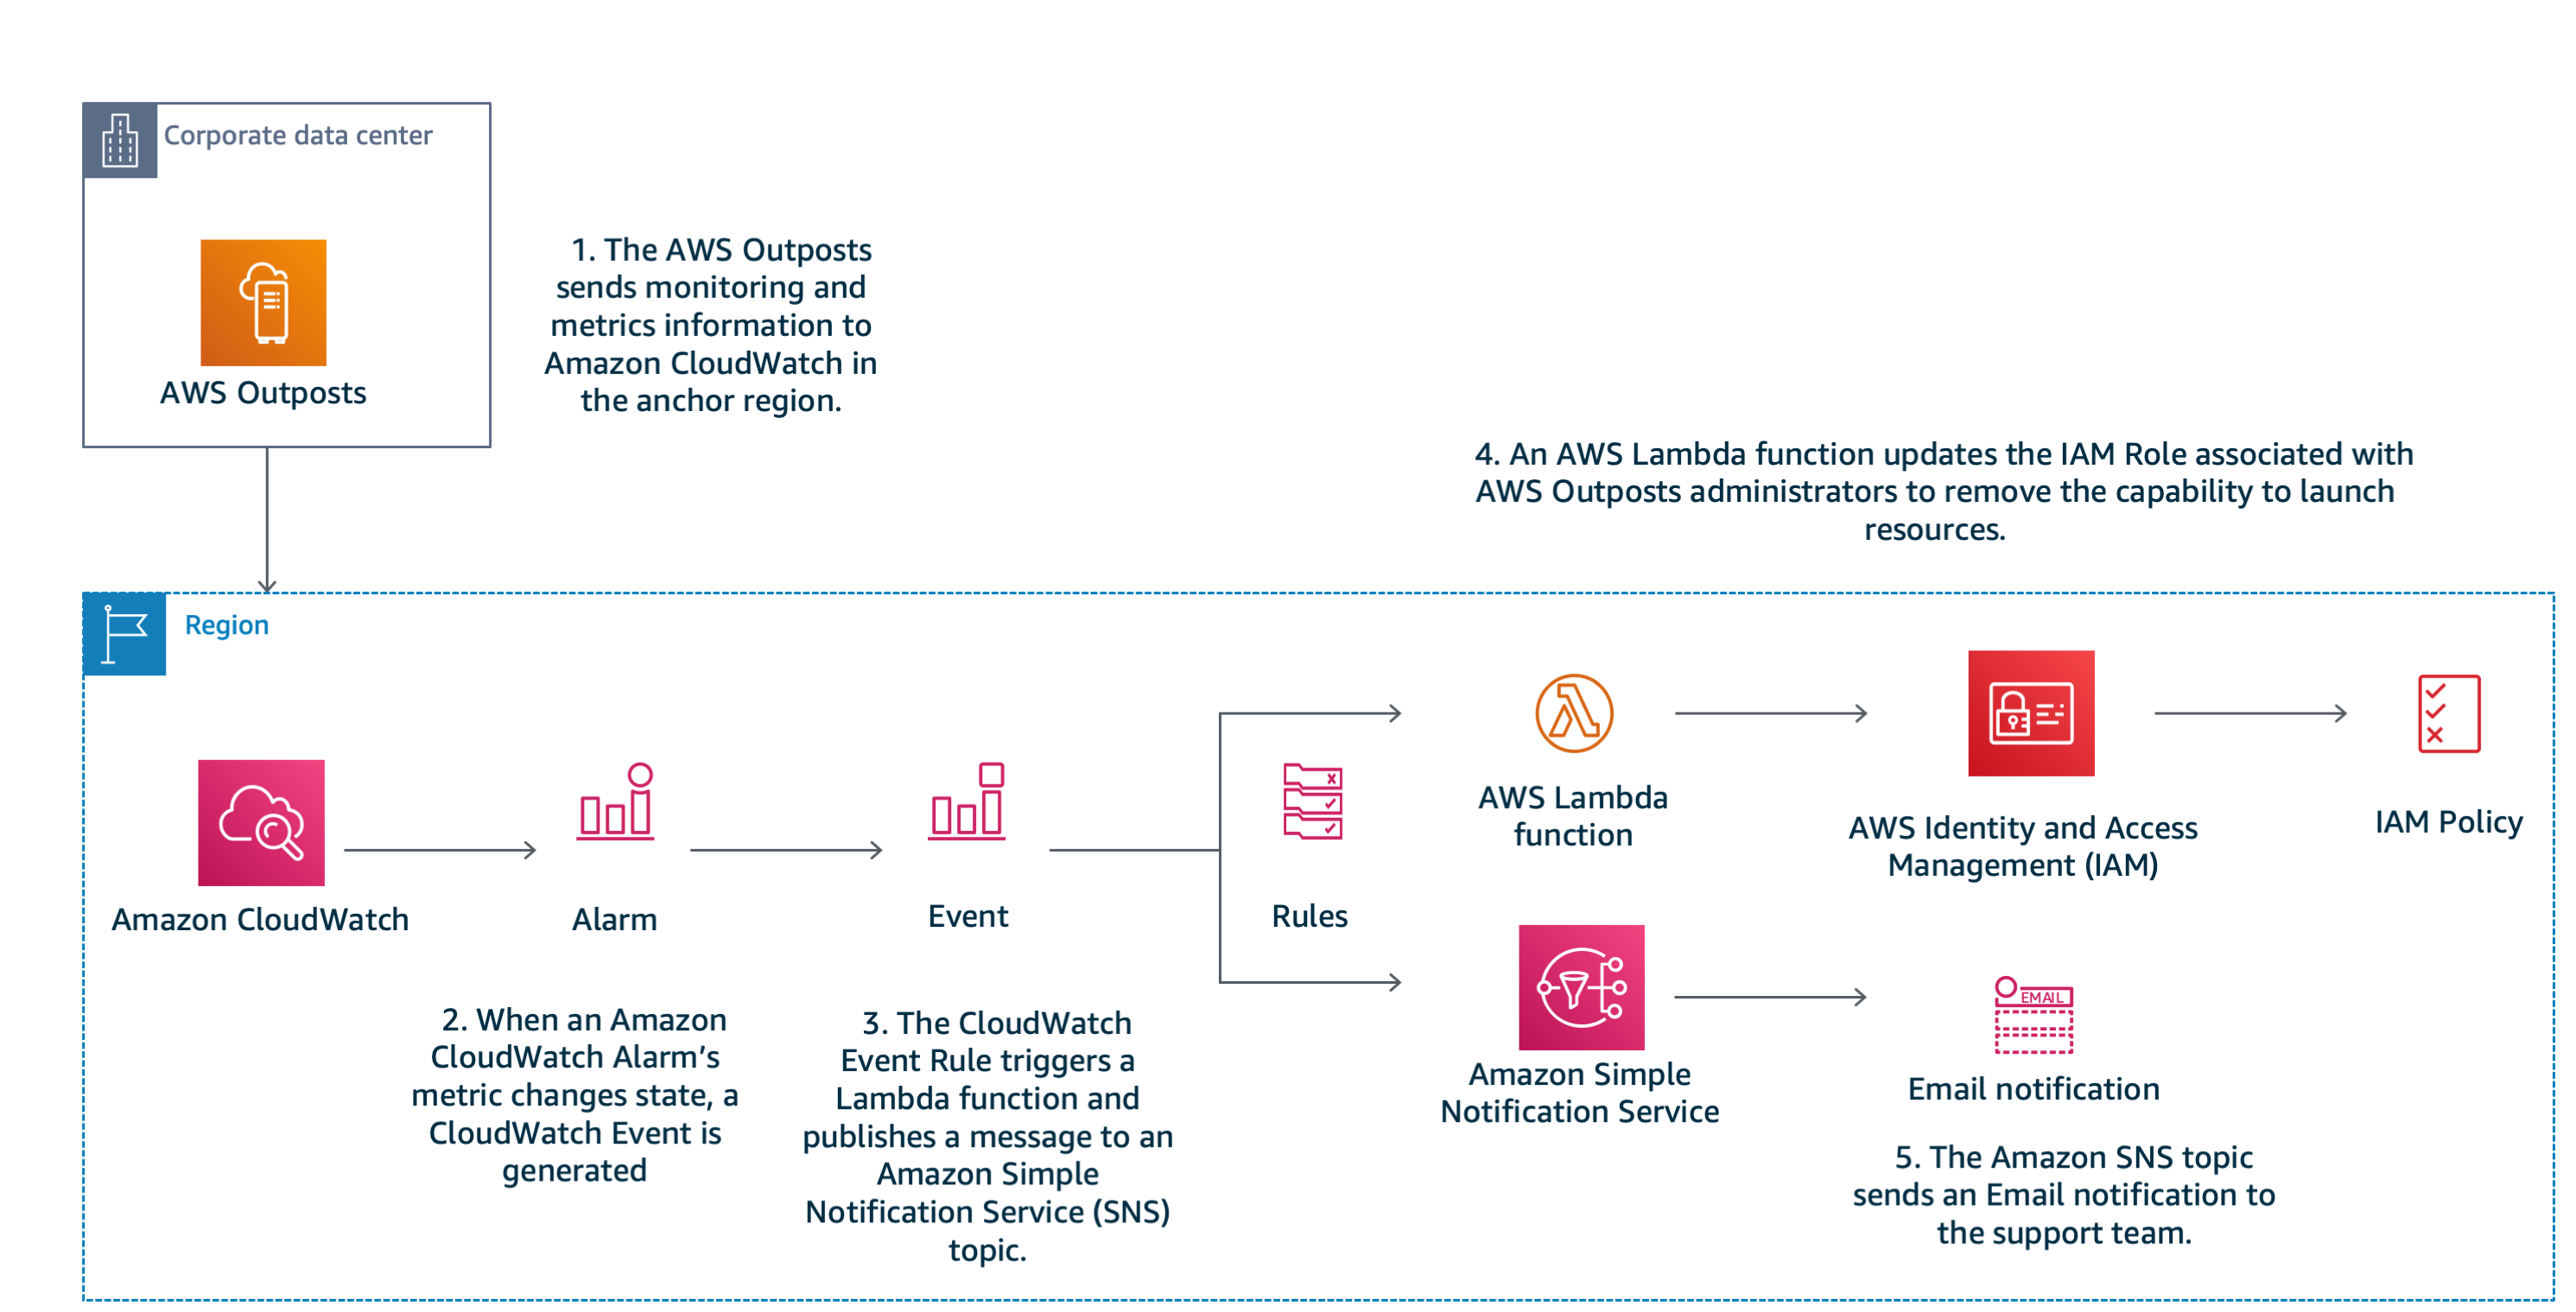
Solution Architecture Diagram and Workflow
Tutorial
Now, you are ready to set up this environment. First, create resources using the AWS Management Console and AWS CloudFormation. You can also use the AWS Command Line Interface (CLI) or your preferred infrastructure as code framework.
The suggested sequence of steps is as follows:
- Create AWS IAM policies
- Launch AWS CloudFormation stack
- Review created resources
- Validate your work
Prerequisites
For this walkthrough, you must have the following prerequisites:
- An AWS account
- A fully configured AWS Outposts
- An AWS IAM Role that you use to assign permissions to your AWS Outposts administrators
- An Amazon Virtual Private Cloud (VPC) subnet associated with your AWS Outposts
- An Amazon S3 bucket in the same AWS Region as your AWS Outpost. Please refer to the AWS Region Table for more information.
Before you deploy the solution’s resources, clone the solution’s GitHub repository. Once you’ve cloned the repository, you must upload a copy of the compressed AWS Lambda code artifacts (.zip files) to the top-level folder of an S3 bucket in your account.
Create AWS IAM policies
This approach updates AWS IAM policies to reflect the current capacity available in your AWS Outpost. This enables users to create resources (such as EC2 instances) when there is capacity available and denies them the ability to do so when the capacity threshold has been exceeded. Since this solution automates remediation via AWS Lambda, you must create a policy that allows the function to make changes in IAM. These permissions are restricted to creating and deleting policy versions. Please review the IAM service documentation for additional information or more in-depth examples.
To create an IAM policy
- Log in to AWS IAM console.
- Select Policies from the left side navigation tree and click the Create Policy button.
- Navigate to the JSON tab and replace the contents with the code below.
{ "Version": "2012-10-17", "Statement": [ { "Effect": "Deny", "Action": "ec2:RunInstances", "Resource": [ "arn:aws:ec2:*:*:subnet/", "arn:aws:ec2:*:*:network-interface/*", "arn:aws:ec2:*:*:instance/*", "arn:aws:ec2:*:*:volume/*", "arn:aws:ec2:*::image/ami-*", "arn:aws:ec2:*:*:key-pair/*", "arn:aws:ec2:*:*:security-group/*" ] } ] } - Select Review Policy.
- Provide a name for your policy, e.g., outposts-ec2-capacity and select Create Policy.
- Record the Amazon Resource Name (ARN) for the created policy in your text editor of choice.
- Repeat steps 2-6 to create a capacity policy for EBS, e.g., outposts-ebs-capacity using the JSON code below:
{ "Version": "2012-10-17", "Statement": [ { "Effect": "Deny", "Action": "ec2:CreateVolume", "Resource": [ "arn:aws:ec2:*:*:subnet/", "arn:aws:ec2:*:*:network-interface/*", "arn:aws:ec2:*:*:instance/*", "arn:aws:ec2:*:*:volume/*", "arn:aws:ec2:*::image/ami-*", "arn:aws:ec2:*:*:key-pair/*", "arn:aws:ec2:*:*:security-group/*" ] } ] } - Assign the created policies to a role mapped to your Outposts users.
Now, you have the correct IAM policies in place, and you can move on to launch an AWS CloudFormation stack.
Launch AWS CloudFormation stack
Create an AWS CloudFormation stack using the outposts-manage-capacity.yml template that is included in your local clone of the repository. For illustration purposes, the template creates resources to monitor a subset of the Amazon EC2 instance types supported on AWS Outposts. If you have a different configuration, adjust the template by modifying the CloudWatch alarm resources accordingly (Type: AWS::CloudWatch::Alarm).
Provide all necessary parameters using the following descriptions:

Review created resources
Now that you have launched your AWS CloudFormation stack, you are ready to review the resources you created. In order to automate the monitoring of our capacity, I use Amazon CloudWatch alarms to monitor the default metrics published by AWS Outposts and trigger an action when a particular condition has been met. Review the metric alarms created by navigating to the Amazon CloudWatch console. There are alarms for sample instance types in your Outposts. There is also an alarm for EBS capacity. The thresholds for these alarms are based on the parameters (ComputeThreshold, StorageThreshold) provided to your AWS CloudFormation stack.
I use an Amazon CloudWatch Event rule to fan-out notifications about capacity events in our AWS Outposts. Review the event rule created by navigating to the Amazon CloudWatch console. The rule triggers an action to send a message to an SNS topic to inform administrators via email. Review the created topics by navigating to the Amazon SNS console. After your email subscription is created, you must confirm it using the confirmation email message delivered to the account provided.
You then automate remediation by creating a second action in the event rule to trigger the AWS Lambda function. Remediation is based on the current capacity conditions and the state of our CloudWatch alarms. These functions use the boto3 python library to update the version of our previously created Amazon IAM policy and reflect the correct privilege for our administrators based on the system state. Review the created AWS Lambda functions using the console. Navigate to the function’s Configuration tab to see that Amazon CloudWatch Events are configured as triggers as shown in the figure below.

Lambda Function’s Configuration tab to check if CloudWatch events are configured as a trigger
Validate your work
To validate your work, assign the IAM policy created for Amazon EC2 and Amazon EBS to the IAM users or IAM roles assigned to your AWS Outposts administrators. Once assigned, use one of these IAM principals to create enough EC2 or EBS resources on your AWS Outpost to breach the thresholds you previously established. This depends on your AWS Outposts configuration and the capacity it is populated with. When capacity is exceeded, your administrators should receive an error similar to the following image when attempting to create resources in addition to an email notification of the condition. You can also circumvent this by using the ‘Set_Alarm_State’ function through the SDK/CLI to modify the state of your target alarms.

This error should be removed once the capacity returns to the normal state. Please note that AWS Outposts CloudWatch metrics have a default resolution period of five minutes so allow time for a period update to register before changes are made.
Cleaning up
To avoid incurring future charges, delete the resources created during this blog by deleting the AWS CloudFormation stack.
Conclusion
One of the benefits of AWS Outposts is a truly consistent hybrid experience. This post showed how you can use the same management and monitoring services in the AWS Cloud across on-premises and in-Region AWS environments. This simplifies the responsibility to manage capacity to meet your workload requirements. For additional information on the benefits of AWS Outposts, visit its product detail page.