AWS Database Blog
How to migrate from Oracle to Amazon Aurora PostgreSQL using AWS CloudFormation (Part 1)
Migrating an Oracle database to a different database engine is a multi-step effort. You must adapt schema structures, data types, and SQL code to the target engine before moving the data itself. AWS Database Migration Service (AWS DMS) helps you break this work into two manageable steps: schema and code transformation followed by data migration. With this approach, you can systematically modernize your database infrastructure while maintaining data integrity and application functionality.
In this post, you learn how to use AWS DMS Schema Conversion to migrate Oracle schemas to PostgreSQL. AWS DMS Schema Conversion converts database schemas and code objects to formats compatible with your target database. You also learn how to use AWS DMS to migrate data to Amazon Aurora PostgreSQL-Compatible Edition.
Solution overview
To help you follow along, we provide an AWS CloudFormation template to set up the required infrastructure.
This post has two main steps:
- Use AWS DMS Schema Conversion to convert from an Oracle to PostgreSQL database schema.
- Use AWS DMS to migrate data between databases.
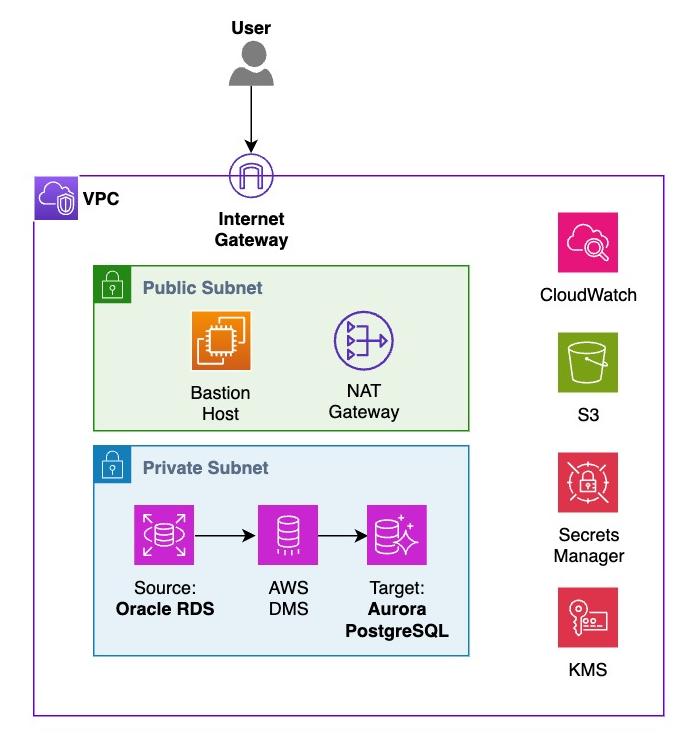
To demonstrate the migration process, we use an AWS CloudFormation script that deploys the following resources:
- An Oracle database on Amazon Relational Database Service (Amazon RDS), if you don’t already have a sample Oracle database.
- An Amazon Aurora PostgreSQL cluster.
- An AWS DMS replication instance.
We use other services, including Amazon Virtual Private Cloud (Amazon VPC) and its networking constructs, Amazon Simple Storage Service (Amazon S3) buckets, and AWS Identity and Access Management (IAM) roles and policies to aid in the migration process.
The AWS CloudFormation stack deployment takes about 20–30 minutes to finish. The overall walkthrough of the example takes less than an hour.
Walkthrough
Prerequisites
Launch the CloudFormation template in this GitHub repository to deploy the resources needed for this post.
When the stack launches successfully, the Status changes from CREATE_IN_PROGRESS to CREATE_COMPLETE. The Output section contains information about the resources deployed by AWS CloudFormation that you need later in this procedure. You can copy these values into a file for quick reference.
Step 1: Convert the database schema from source to target with AWS DMS Schema Conversion
The first step in a heterogeneous migration is to convert the source database schema definition, which we accomplish using AWS DMS Schema Conversion (SC). In this case, we use AWS DMS SC to convert the HR schema from our Oracle database to a PostgreSQL-compatible format. AWS DMS SC handles the conversion of schemas, functions, and stored procedures, and identifies any objects that require manual intervention.
To begin, create a migration project to help you manage your database migration.
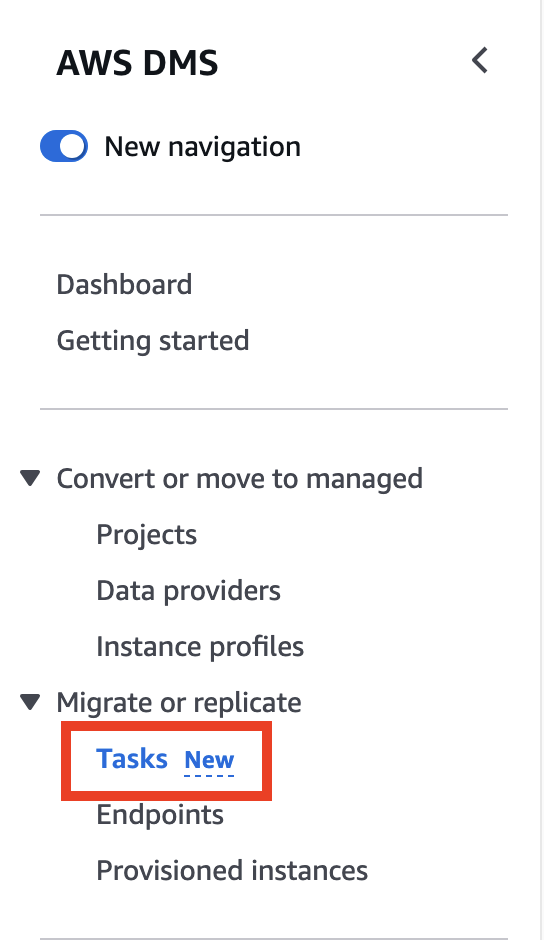
- Open AWS DMS from the AWS Management Console.
- In the left navigation pane, choose Convert or move to managed and Projects.
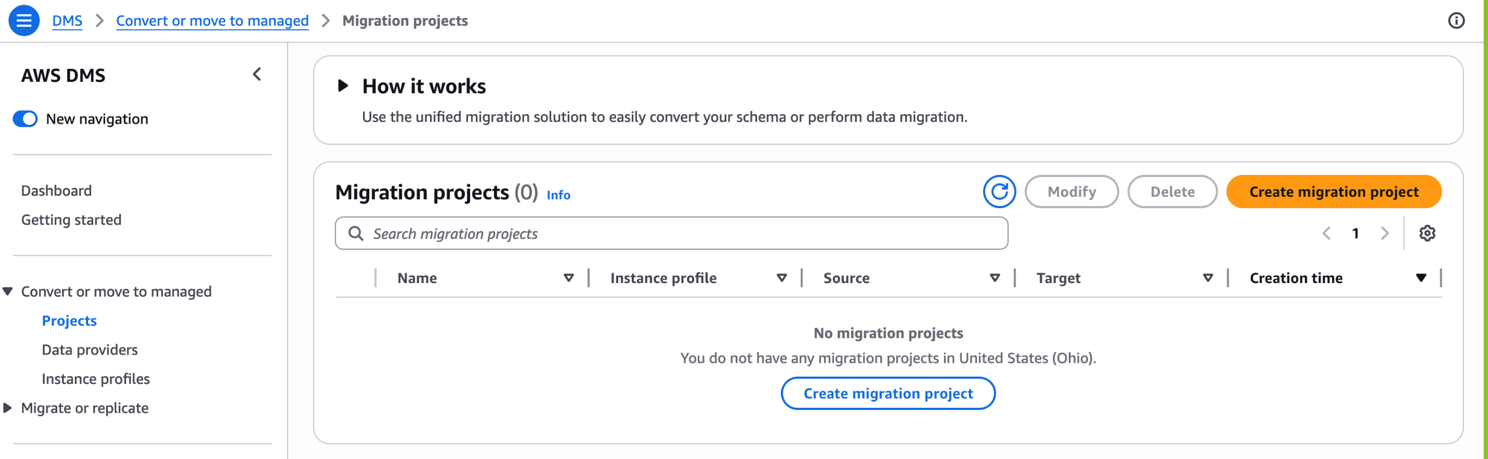
- Choose Create migration project.
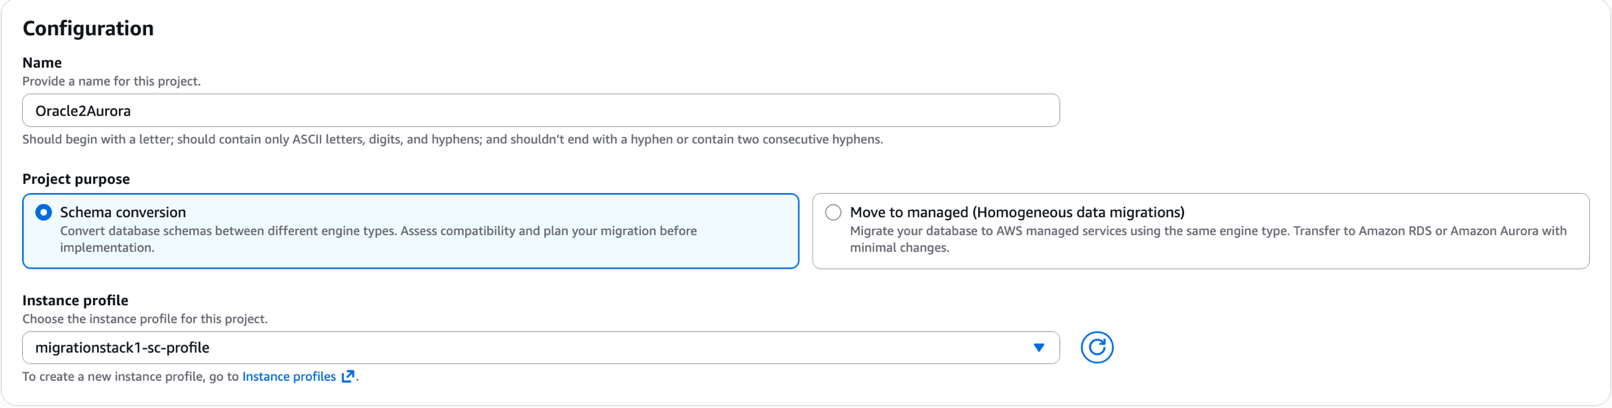
- Name the project Oracle2Aurora and for Project purpose, choose Schema conversion. Select migrationstack1-sc-profile as the Instance profile.
- Choose migrationstack1-oracle-provider as your Source.
- Select MigrationStack1-oracle-secret as the source Secret.
- For the IAM role for Secret, select Create and use a new IAM role.
- Select Customize encryption settings and choose the MigrationStack1-secrets-key.
- Name the project Oracle2Aurora and for Project purpose, choose Schema conversion. Select migrationstack1-sc-profile as the Instance profile.
- Under Target data provider, select migrationstack1-aurora-provider as the Target and MigrationStack1-aurora-secret as the target Secret. Leave the Use the same IAM role for target data provider option selected.

- Under S3 bucket access settings, choose Use an existing S3 bucket and Browse S3. Choose the S3 bucket with the prefix dms-sct-reports-.
- Leave all other settings as default.
- Choose Create migration project.
Schema conversion
- Navigate to your migration project, oracle2aurora.
- Switch to the Schema conversion tab.
- Choose Launch schema conversion.
- If you see a pop-up asking Launch schema conversion?, choose Launch.
After the project is created, you initiate the schema conversion process and see the impact of the object changes. Later you apply the changes.
Assess the migration environment
After the schema conversion tool has loaded (it might take a few minutes), you see two panes: the source Oracle database and the target Amazon Aurora PostgreSQL database.
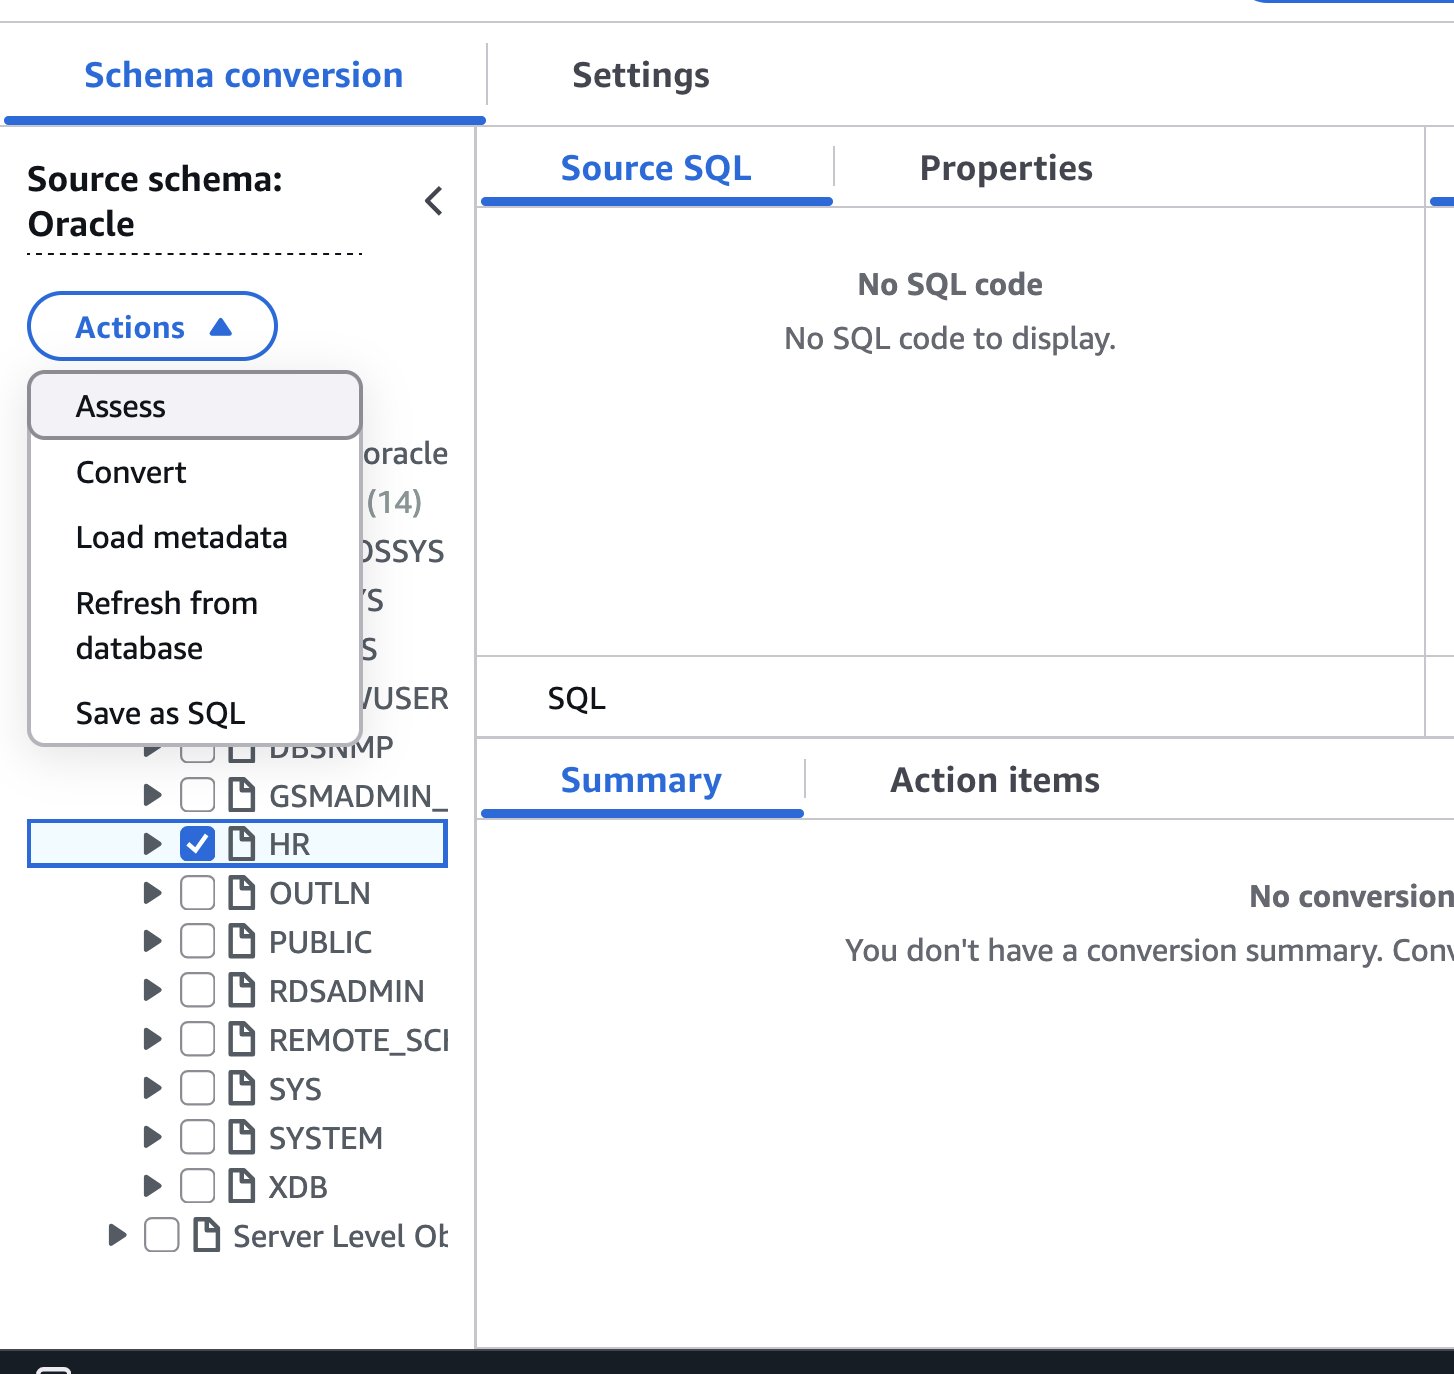
- In the Source schema: Oracle panel, expand the sections for migrationstack1-oraclerdsinsance > Schemas > HR.
- Clear all the other schemas.
- Select HR.
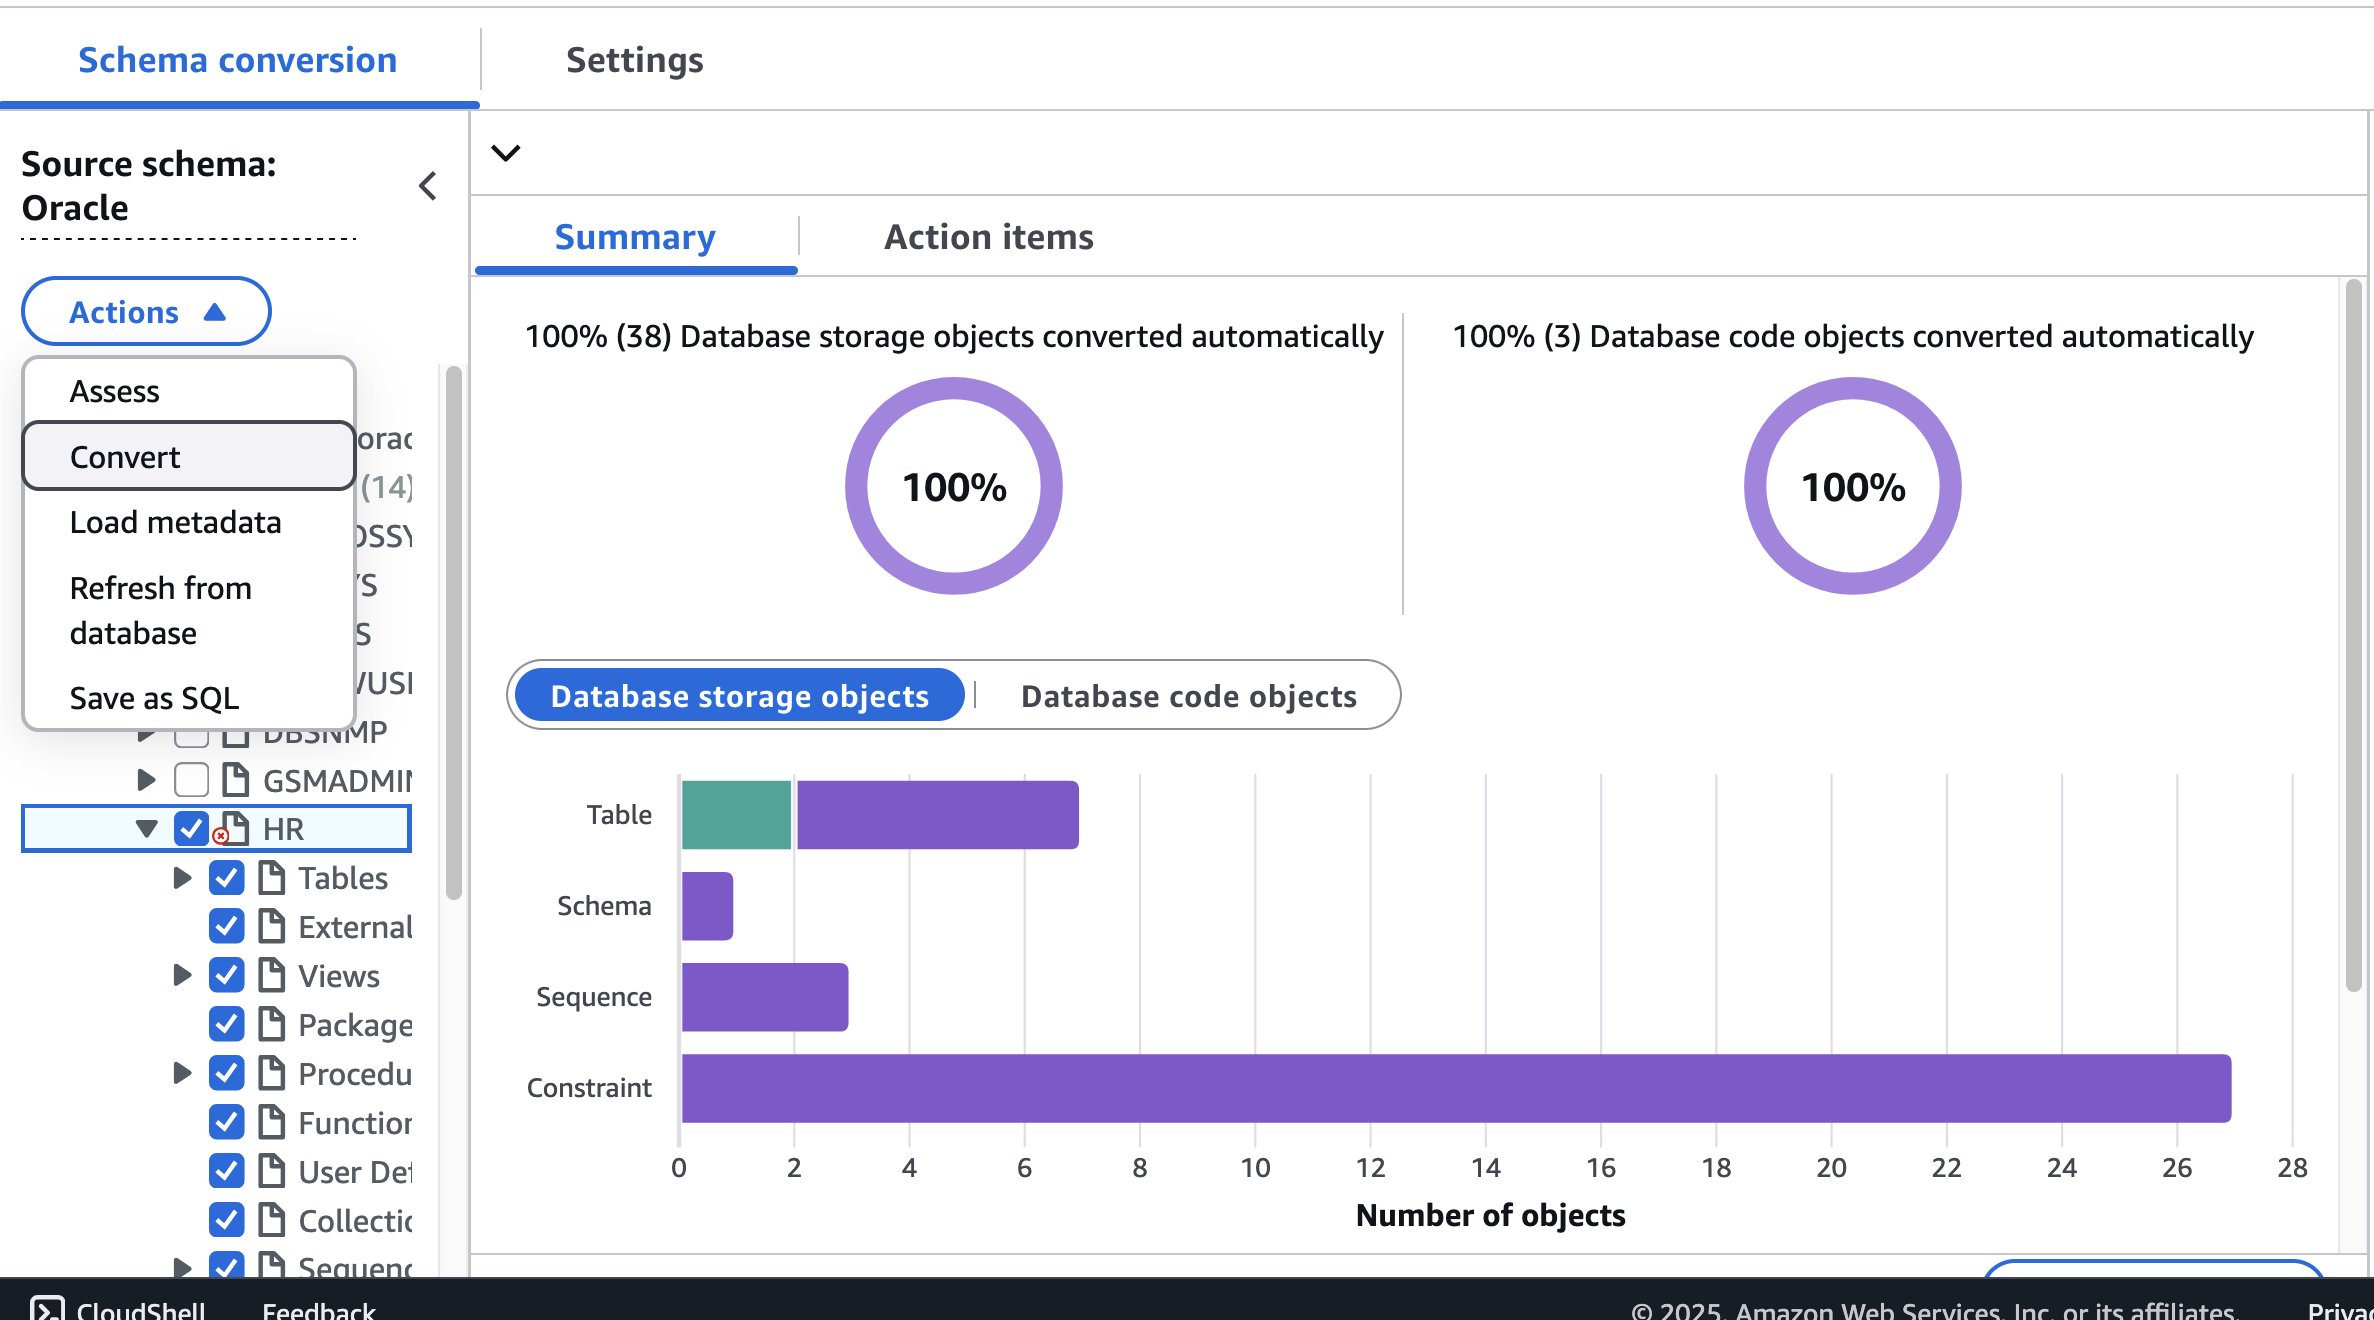
- Choose Actions and Assess.
- If asked Assess HR?, choose Assess.
After the assessment finishes, a summary graph shows how many objects were successfully converted. On the Action items tab, you see suggestions for ways to improve the conversion process. To store the summary and action items in S3, choose Export results.
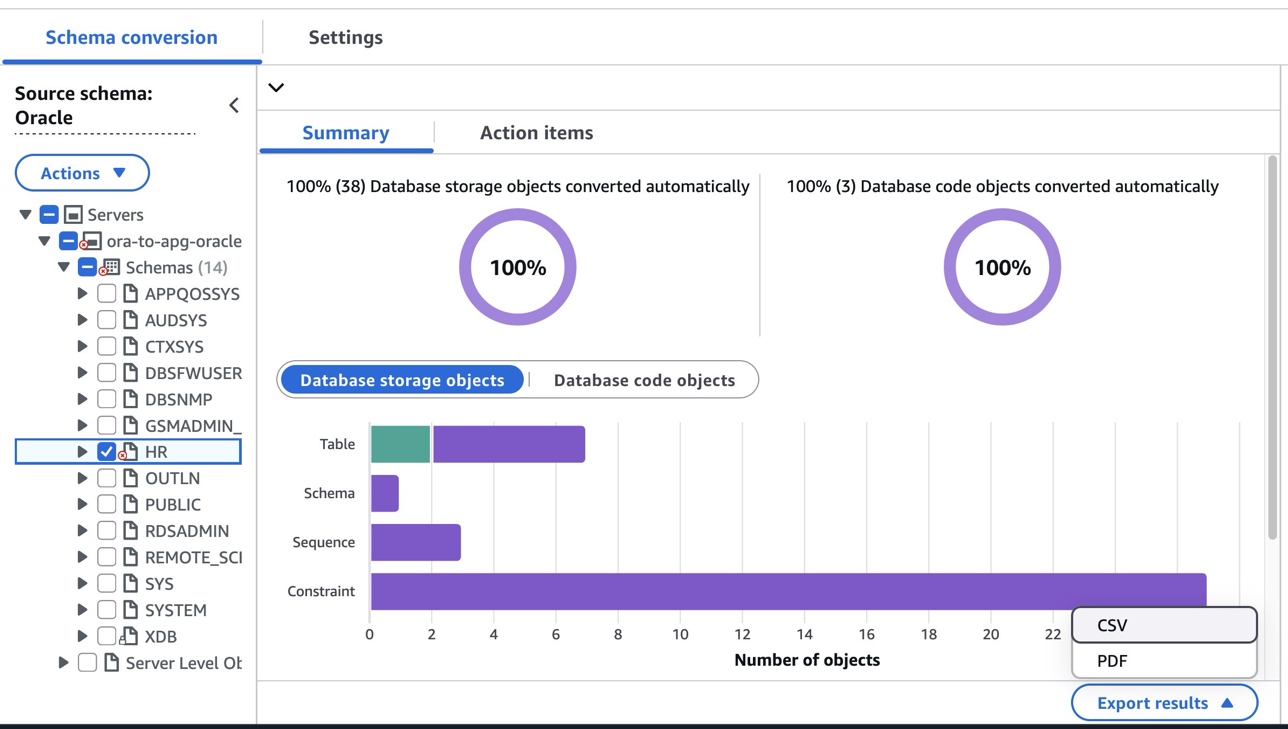
The database schema used in this post is straightforward, so no major action items are required. After the assessment finishes, you can see the assessment report created by the AWS DMS Schema Conversion service. Review the Summary section to see the details of the conversion that AWS DMS SC can do automatically, and the Action items section to understand the issues that require manual conversion. You can also export the assessment report to CSV or PDF format for reference.
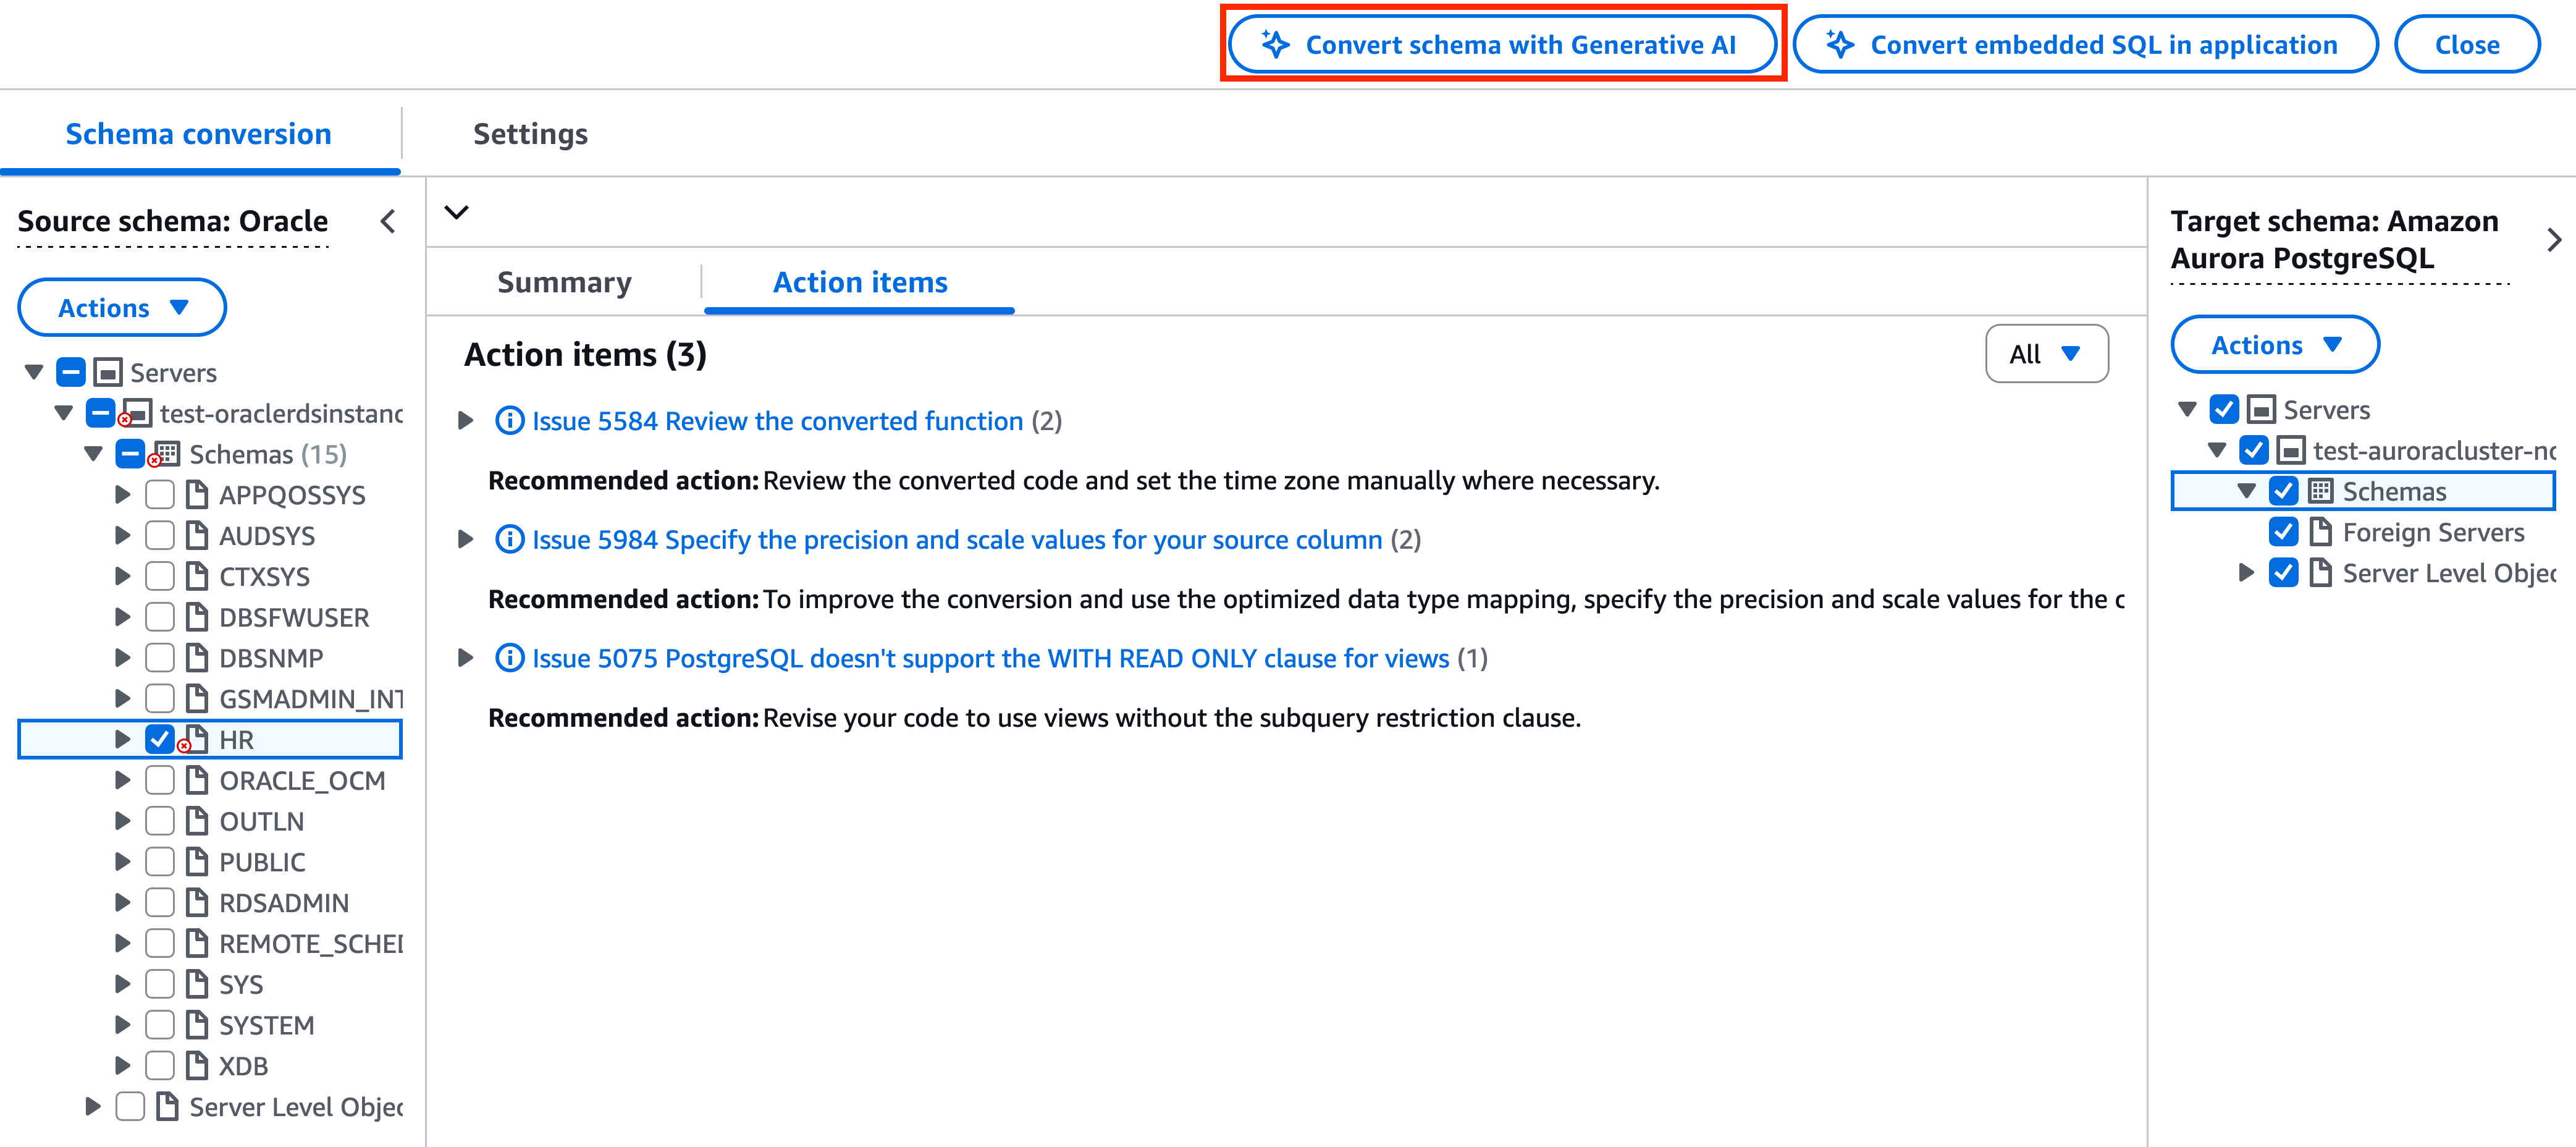
For complex database objects, AWS DMS SC with the generative AI feature streamlines the database migration process. The feature offers recommendations to help you convert previously unconverted code objects that typically require complex manual conversion.
Convert code and publish on target
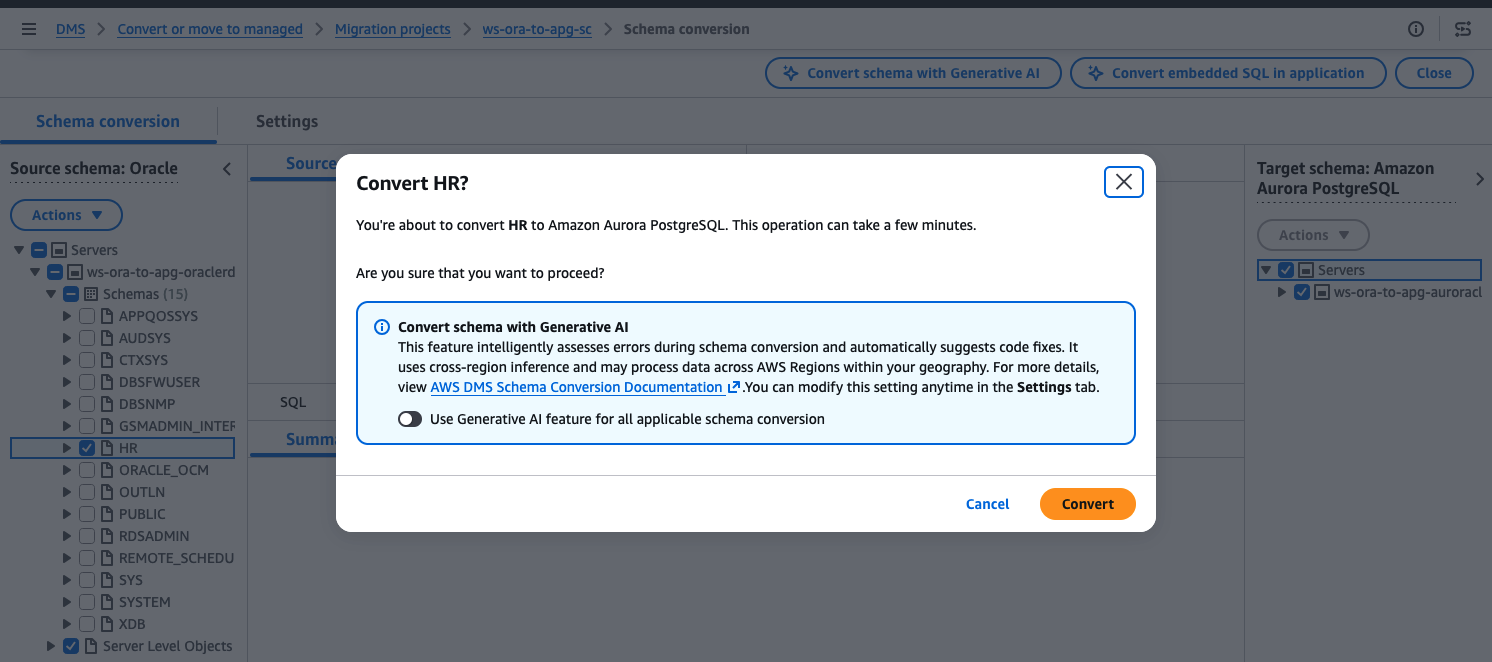
- With the HR schema selected (migrationstack1-oraclerdsinsance > Schemas > HR), choose Actions and Convert. If you get a pop-up asking Convert HR?, choose Convert.
- After the conversion process finishes, you can see that AWS DMS SC has created the hr schema under the target Amazon Aurora PostgreSQL section on the right. You can review the converted objects from Oracle to Aurora PostgreSQL.
- In the Target schema: Amazon Aurora PostgreSQL panel, select the hr schema.
- Choose Actions and Save as SQL.
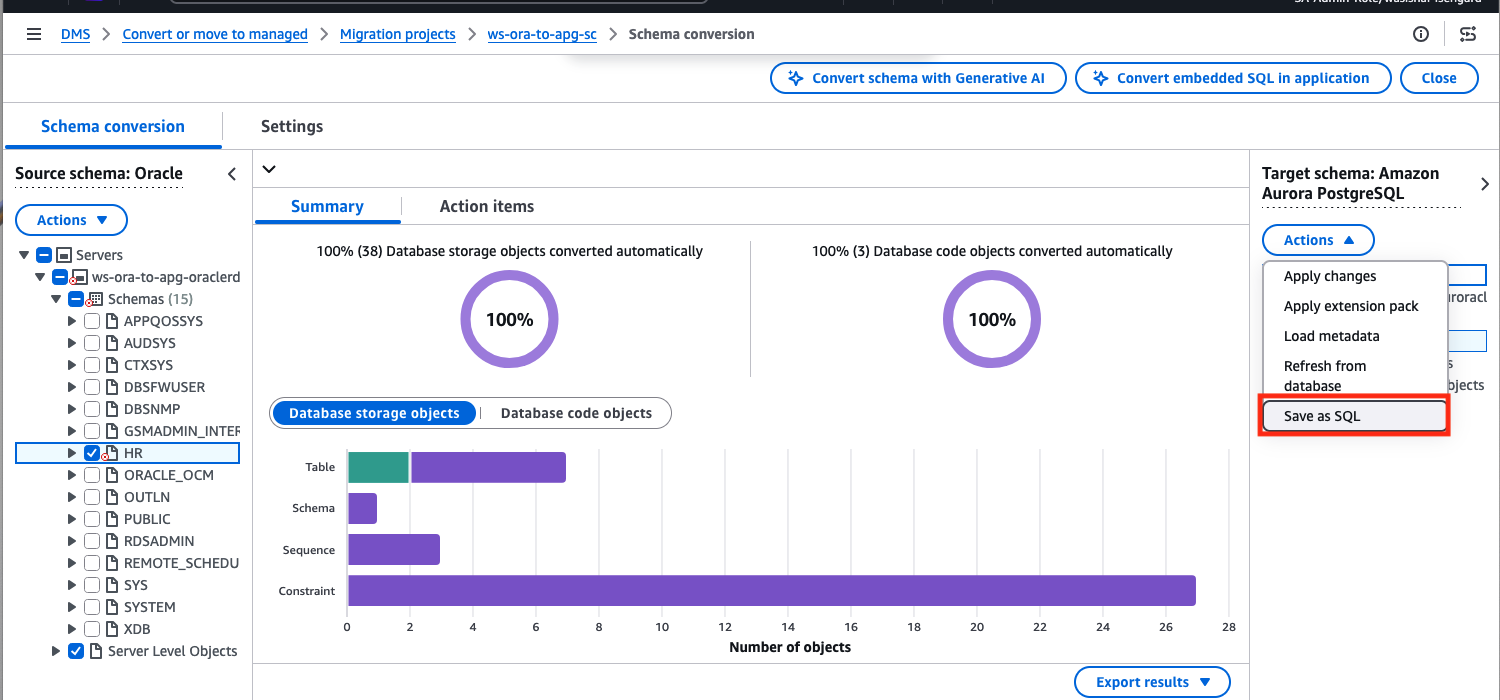
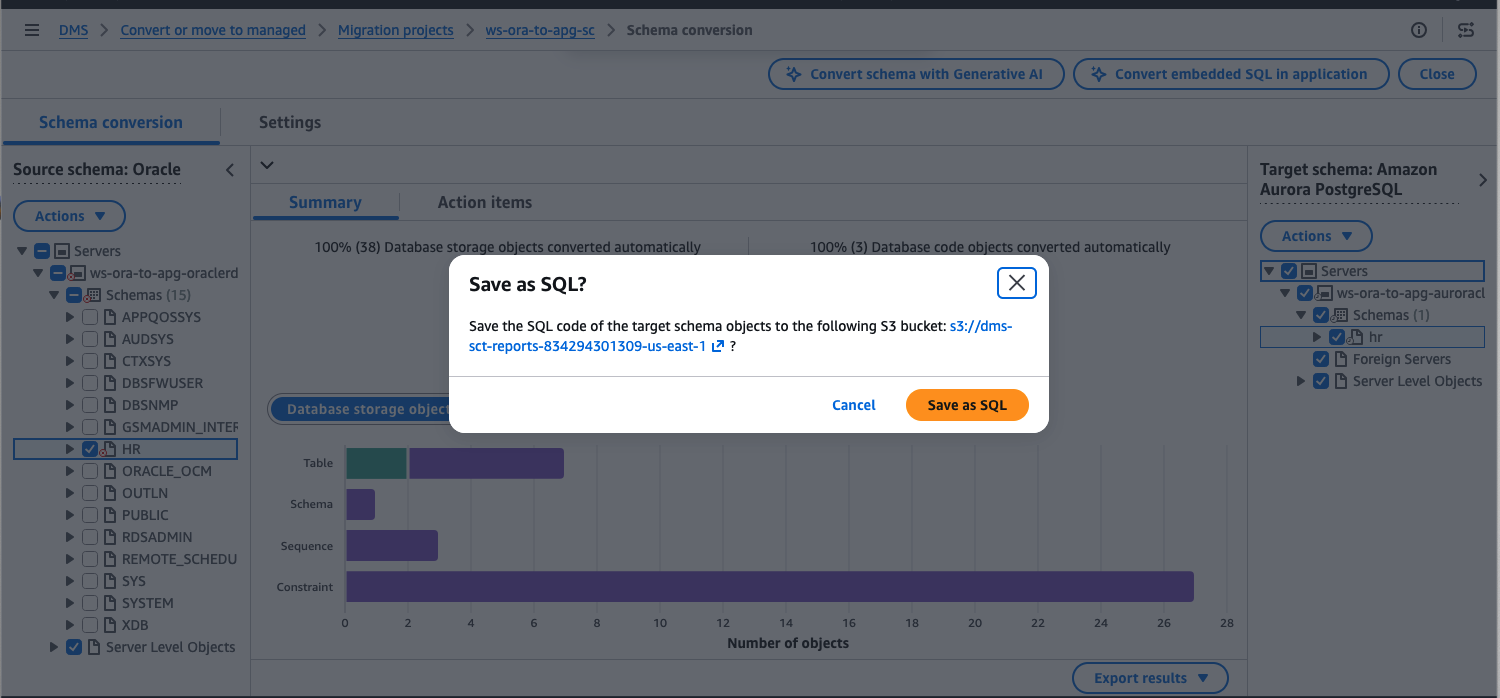
- When you choose Save as SQL, a ZIP file is sent to S3. The ZIP file contains the converted schema. You can also see the PDF file with your conversion report that was created when you assessed your workload in the previous step.
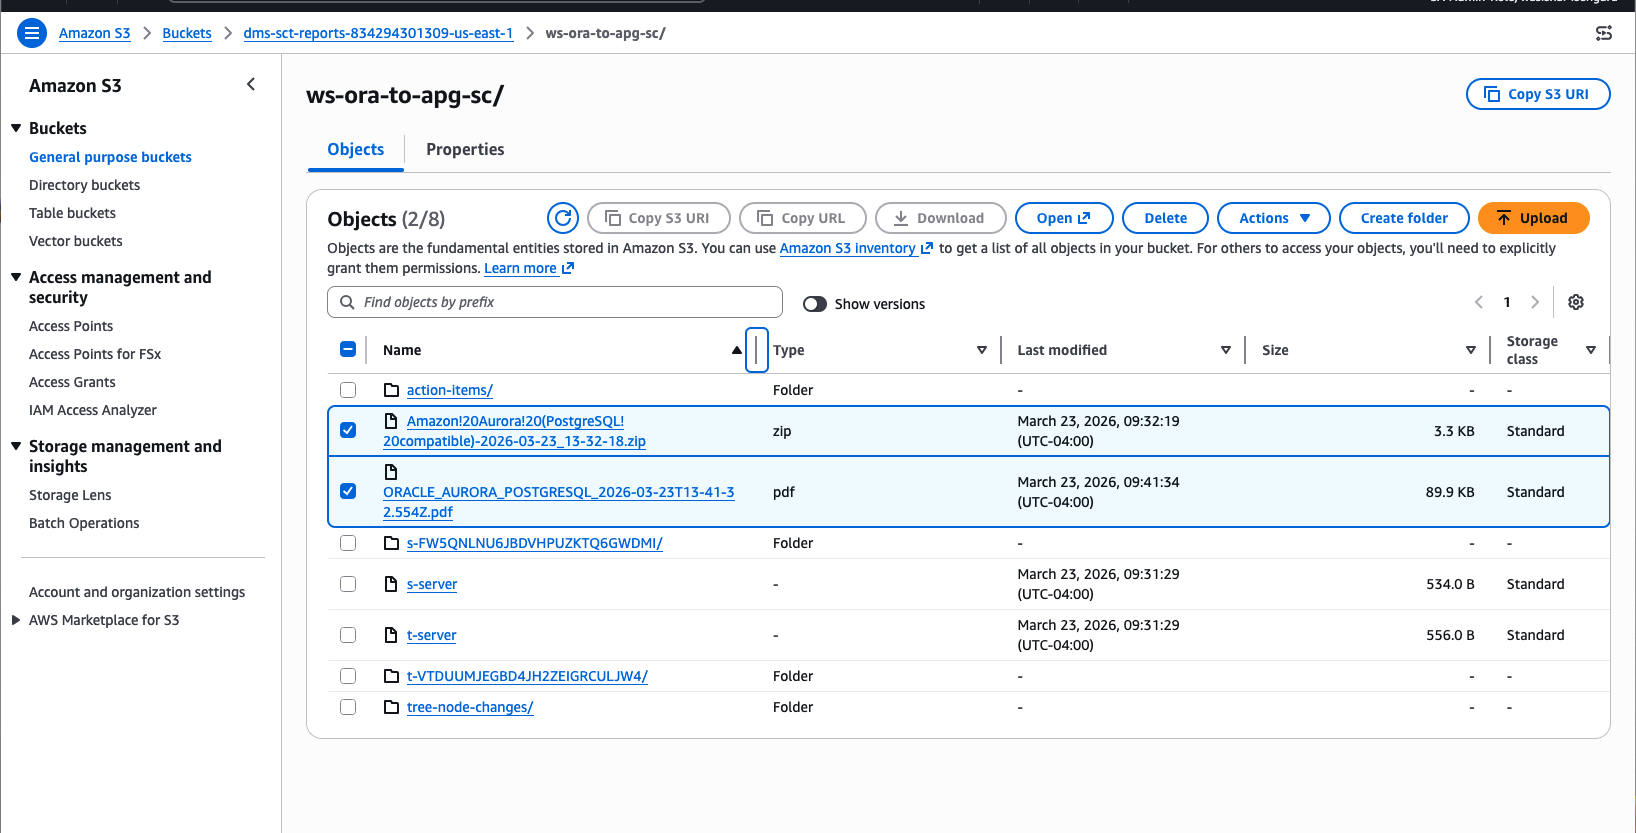
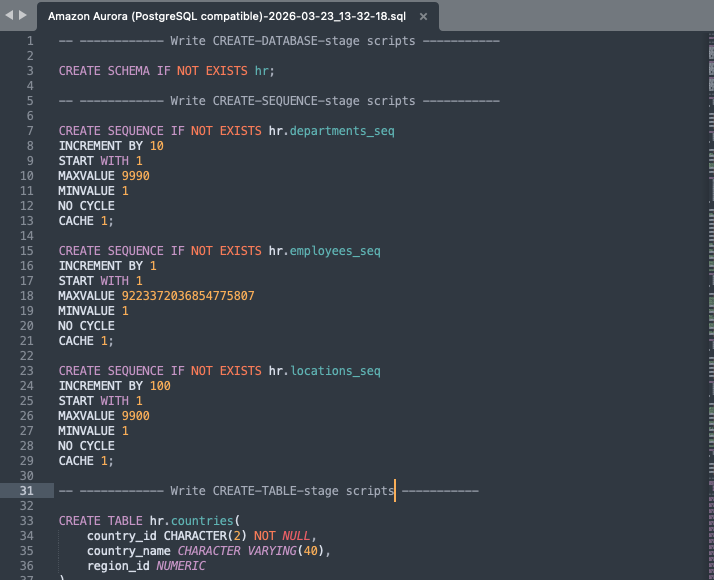
- Download the ZIP file from the previous step and review it. If you want to make manual changes, you can. After you finish reviewing the file, use a PostgreSQL client tool to apply the converted PostgreSQL schema to your target database.
At this point, you have successfully used the AWS DMS SC tool to write the HR schema to the target Amazon Aurora PostgreSQL database. For best results, save your converted schema to a file as a SQL script and review the converted schema with a target database expert.
Now you can proceed with the data migration.
Step 2: Migrate data from source to target with AWS DMS
In this step, we use AWS DMS to populate the data in the schema we migrated in the previous step in the Amazon Aurora PostgreSQL database. The CloudFormation stack already provisioned the AWS DMS replication instance along with the source and target endpoints required for this migration. Each endpoint is associated with the credentials needed to access both your source and target database, and these credentials are stored in AWS Secrets Manager.
Before you start your task, navigate to Endpoints on the AWS DMS navigation pane and test each of the pre-created endpoints for your source and target databases. For more information about how to create and test AWS DMS endpoints to help confirm connectivity, refer to the AWS DMS User Guide.
- Navigate to the AWS DMS console.
- In the left navigation pane, under Migrate or replicate, choose Tasks. Choose Create task and enter a task identifier.
- Enter a Task identifier of your choosing.
- Under task configuration, select the Source database endpoint and Target database endpoint that were created by the AWS CloudFormation stack. For Task Mode, select Provisioned and migrationstack as the provisioned instance.
- For Task type, choose Migrate only. This option lets you load data in bulk without change data capture (CDC) and helps confirm that the migration happens only once.
- On our AWS DMS target endpoint, we have an attribute (AfterConnectScript= SET session_replication_role = replica) set to bypass foreign keys and user triggers to prevent conflicts at the time of bulk load. As a result, you don’t need to disable foreign keys in this step.
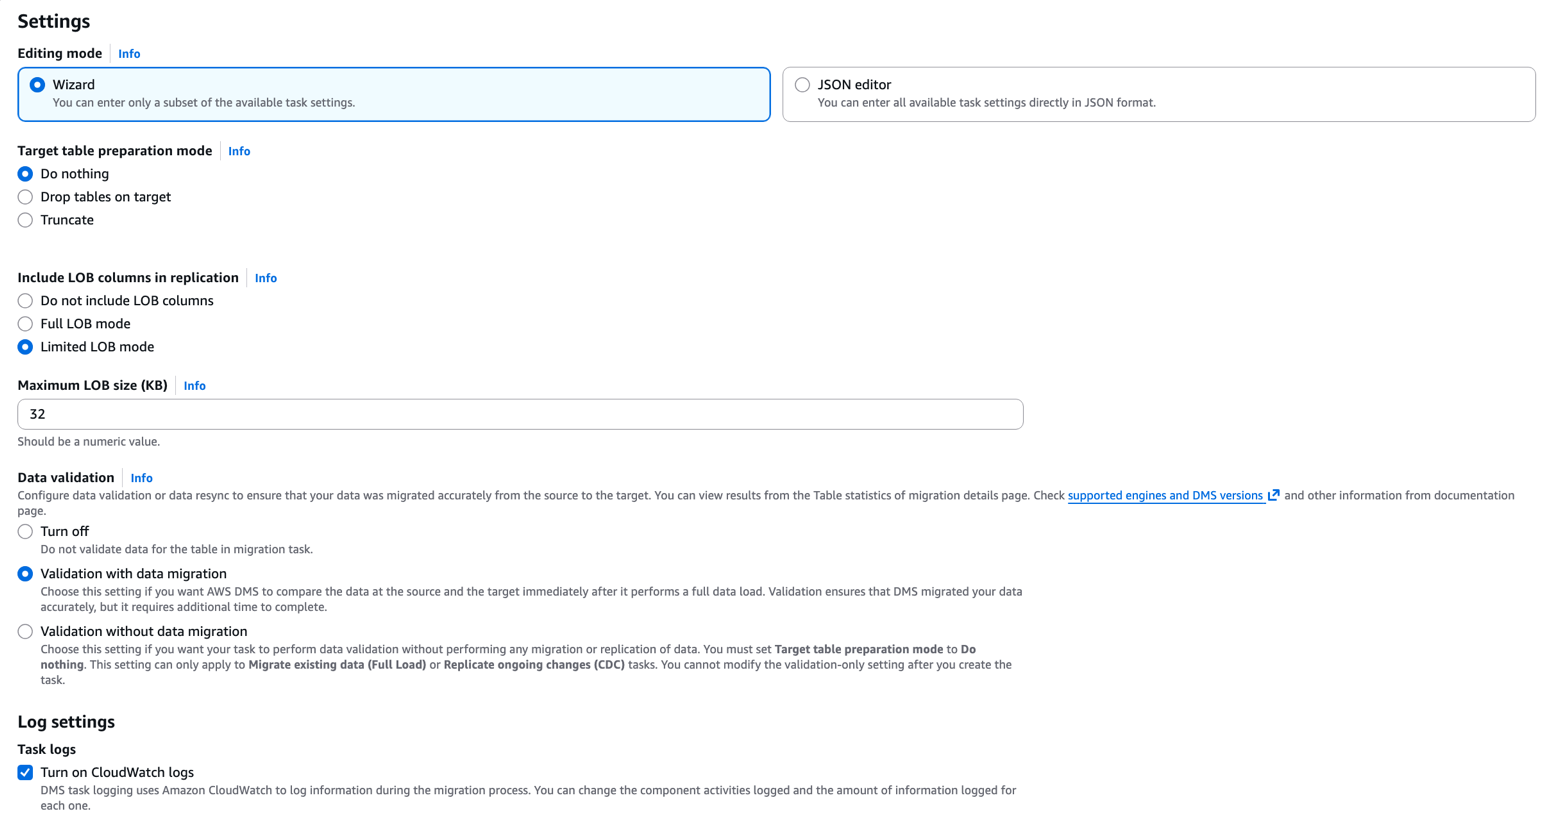
- Leave Editing mode as Wizard.
- For Target table preparation mode under Task settings, choose Do Nothing, because we used AWS DMS SC to convert the schemas already.
- For LOB column settings, choose Limited LOB mode and set the Maximum LOB size (KB) to 32. The limited LOB option lets AWS DMS pre-allocate memory and load the LOB data in bulk, which provides improved performance over Full LOB mode.
Note: For your own workloads, if you are not sure about the LOB size, continue with the Full LOB mode. For more information about which mode is right for your workload, refer to the AWS DMS documentation.
Validate migrated data
- Select Validation with data migration so AWS DMS validates that your data was migrated accurately.
- Select Turn on CloudWatch logs to log the task in Amazon CloudWatch for troubleshooting or log analysis if needed.
- Finally, in the Table Mappings section, select JSON editor for Editing mode. Enter the following into the editor to handle case sensitivity differences between Oracle and Aurora PostgreSQL, and to confirm proper object name conversion for successful migration. By default, any object created on Oracle is in uppercase, but by default, any object created in a Postgres database should be lowercase. This transformation action maps the source uppercase objects to the lowercase objects on the target.
- (Optional) Turn on Premigration assessment and leave the default S3 bucket name. If you select the premigration assessment, you must start the migration task manually after the assessment finishes.
- Choose Create task.
Load data into target
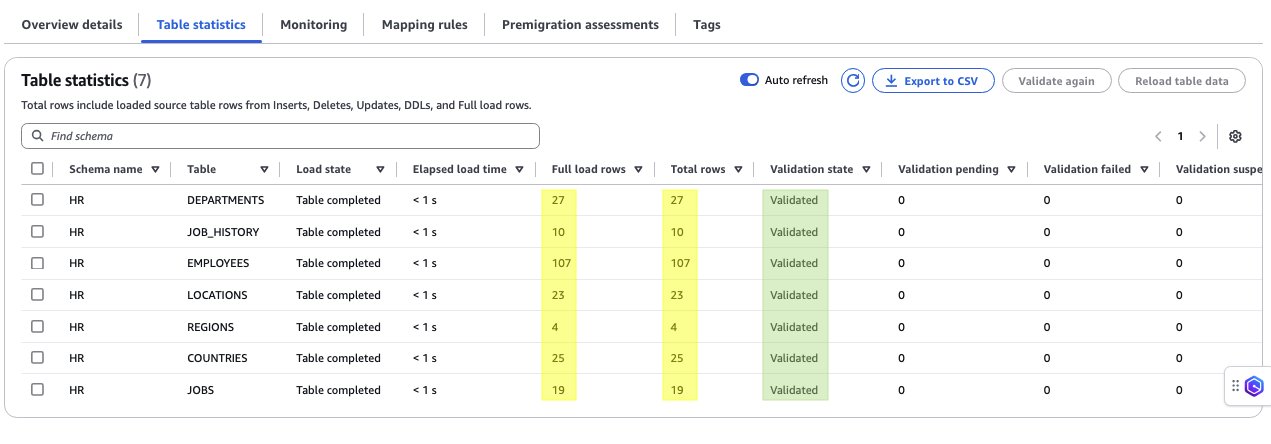
After the task is created, it automatically starts loading data from the source to the target database. After the task Status changes from Creating to Starting, choose the task and navigate to the Table statistics tab to see the migration progress. The validation state should change to Validated. Also confirm that the Total count matches the Full Load Rows values.
At this point, you have successfully migrated the data from the Oracle database to an Amazon Aurora PostgreSQL database. You can optionally use a PostgreSQL client to access Aurora and view the loaded data.
Clean up resources
You can continue to run the resources launched for this post, but note that they continue to accrue charges as long as they are running.
If you launched the CloudFormation from our GitHub repository, follow the cleanup instructions in the repository to delete the resources and stop incurring costs.
Conclusion
In this post, we showed you how to migrate an Oracle database to Amazon Aurora PostgreSQL using AWS DMS and AWS DMS SC. We walked through how to build a working environment to understand and test migrations from Oracle to Amazon Aurora PostgreSQL databases. To learn more, review Best practices for AWS Database Migration Service.
Special thanks to Sona Rajamani and Ballu Singh, the original authors of this post, and to Yousuf Athar for their support on this post.